
 Guns, Politics, Gunsmithing & Reloading Gunsmithing
 Go | New | Find | Notify | Tools | Reply |
| Please help me get started checkering | Login/Join |
| one of us |
I would like to checker a stock on a M98 sporter. I have never done this before and have no tools. This will be a basic pattern in about 22LPI. Was thinking of getting a starter set from Brownell's or Midway and Brownell's used to sell checkering templates but I don't see them listed now. Would you recommend getting one of the books or DVDs? Which tools are best? Are the templates still available? Thanks for any help. Have gun- Will travel The value of a trophy is computed directly in terms of personal investment in its acquisition. Robert Ruark | ||
|
one of us |
Blacktailer Les Brooks(who posts here) sold a nice checkering tutorial that was on a flashdrive. It was $25 and contained a lot of other great stuff. You might try sending him a pm. One of brownell's basic kits would be a good start. Brownells also sells a nice little booklet on checkering. I don't remember the name, but the guy on the cover is a dead ringer for Christopher Walken(the actor).Monty Kennedy's book The Checkering and Carving of Gunstocks is a classic. I believe brownells carries it. Jason "You're not hard-core, unless you live hard-core." _______________________ Hunting in Africa is an adventure. The number of variables involved preclude the possibility of a perfect hunt. Some problems will arise. How you decide to handle them will determine how much you enjoy your hunt. Just tell yourself, "it's all part of the adventure." Remember, if Robert Ruark had gotten upset every time problems with Harry Selby's flat bed truck delayed the safari, Horn of the Hunter would have read like an indictment of Selby. But Ruark rolled with the punches, poured some gin, and enjoyed the adventure. -Jason Brown | |||
|
| One of Us |
What ever kit you buy be sure to get a jointer you're going to need it. I bought the dem bart premier set and added the joiner and a few other tools. it's about all you'll need. And another thing Buy or build a Cradle. It will help you immensely. You need to understand how important it is to keep the motion of your arm in line with the line you are cutting. Doing checking on a bench hunched over a stock is no way to start. What ever angle your arm is to the line that the direction you will push the line off track. Don't ask me how I learned this one It's very inexpensive to get started in checkering so get the tool kit, get a joiner and a cradle you won't be disappointed doing a job with good tools The book brownells sells is fundamentals of gunstock checkering and it's written by bill McGuire. Good basic info in a cheep package. But the best and worst book is Monty Kennedy's book The Checkering and Carving of Gunstocks as Jason stated. It the best because it is fully encompassing and it the worst because there are no chapters or an index it just a compilation of notes but well worth the money. Get a used copy off Amazon www.KLStottlemyer.com Deport the Homeless and Give the Illegals citizenship. AT LEAST THE ILLEGALS WILL WORK | |||
|
| One of Us |
FWIW here's a pic of the tools I use. Not shown are skew chisels and a few other W.E.Brownell handles with spacers of different widths. 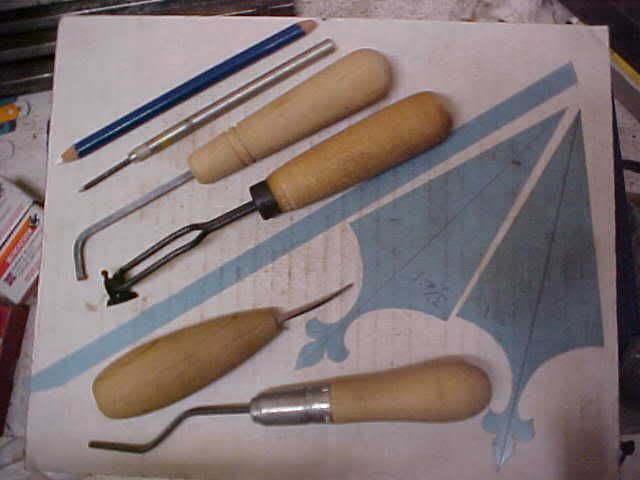 The templates are cut from X-ray film and have diamonds in both 3:1 and 3.5:1 ratios. Got the idea from the Dale Goens section of Kennedy's checkering book. I originally used 3.5:1 diamonds but am coming to prefer 3:1 on more stocks, depending upon the lines of the wrist and cheekpiece. Regards, Joe __________________________ You can lead a human to logic but you can't make him think. NRA Life since 1976. God bless America! | |||
|
| One of Us |
Do you have a DVD player? | |||
|
| one of us |
Yes Have gun- Will travel The value of a trophy is computed directly in terms of personal investment in its acquisition. Robert Ruark | |||
|
| One of Us |
Joe, could you expand on the diference between the 3:1 and the 3.5:1 diamonds. Are the wrist and cheek piece lines in themselves the reason or is it the grip radius that is the influencing factor. Does the old Rigby style of open grip differ to the more tightly curved grip in the choise of one over the other. Thanks in anticipation. Von Gruff. | |||
|
| One of Us |
Wanna borrow a good DVD on checkering? | |||
|
| One of Us |
It's kinda difficult to give you any hard-&-fast rules since it's all so VERY subjective. One of the considerations, as you mention, is the angle and slimness of the wrist area and the transition lines at its front and rear. Since I build a fair proportion of single shots, and some of these are straight-grip, the length and shape of the lower tang also has a bearing. However in the final analysis I believe the rear line of the PG/cap/belly area and the placement & shape of the stock's comb nose & cheekpiece are probably the most important factors in my decision. The choice of checkering pattern and the shape of the rear line of the grip checkering and the way it blends into the line of the comb and thumb cutout will often either make or break a particular treatment. I always temporarily lay out the estimated outlines of the pattern first and then I experiment with the master lines & angles until I begin to get some shapes that I like. IMO the forearm angle doesn't matter that much but the look of the grip/wrist area is CRITICAL! Try it both ways until you get something that looks good with that particular stock shape, and don't be reluctant to change the checkering pattern to suit. I've found that a fill-in pattern is far, far less critical in the diamond angle than a point pattern, especially a point pattern with mullered borders. The mullers emphasize the points and if their angles aren't attractively planned then the effect is often spoiled. I recommend a study of Dale Goens' work in Kennedy's book. The fashion of that day was borderless checkering and so you'll not see any mullers in Dale's work but his aesthetic mastery is quite evident. Regards, Joe __________________________ You can lead a human to logic but you can't make him think. NRA Life since 1976. God bless America! | |||
|
| One of Us |
Don't even think about checkering without a proper checkering cradle. If you do, you will be doomed to failure. I made mine from the instructions in 'Cherinf and Carving Gunstocks'. DR #2276, P-100 2021 | |||
|
| One of Us |
My Mannlicher Schoenauer stock has been waiting for a while. This is another example of why AR is such a great site. Thanks guys. "When the wind stops....start rowing. When the wind starts, get the sail up quick." | |||
|
| One of Us |
Any subject, any firearm, any problem, question, modification and or suggestion. There's more then a hand full of people here that have been there and done that even on the most obscure firearms subject. AR should be regarded as a National Asset www.KLStottlemyer.com Deport the Homeless and Give the Illegals citizenship. AT LEAST THE ILLEGALS WILL WORK | |||
|
| one of us |
AMEN. I ordered Kennedy's book from Amazon, have a DVD on the way (thanks to 22WRF) and didn't understand about 3/4 of what Joe said above but with your help, I will get it done. Thanks! Have gun- Will travel The value of a trophy is computed directly in terms of personal investment in its acquisition. Robert Ruark | |||
|
| One of Us |
Blacktailer, we kinda got sidetracked but here's some more info. The tools I showed are all that you need to do almost any type of checkering. Repeat, ALL the tools needed. You don't need nor will you use most of the tools sold in the commercial 'sets'. IMO they are barely adequate at best and will lead to mistakes in many cases. I, like almost everyone, initially bought a 'set' and actually did some halfway decent work on my first job, some dense Euro walnut, but the first cheap wood I cut looked like a rat chewed it. That brings me to my second point. Use good dense Euro walnut for practice, the good wood will ensure that any mistakes are yours rather than caused by poor wood. Also the good wood will allow you to become much more comfortable with learning the proper handling of each tool, without the distraction of having to compensate for wood imperfections. Chunks of old early military Mauser stocks make ideal practice pieces. Regards, Joe __________________________ You can lead a human to logic but you can't make him think. NRA Life since 1976. God bless America! | |||
|
| one of us |
Joe, Thanks for the info. Can you list those tools? I see you have a mark-anywhere pencil and the "see through" checkering tool but am not sure exactly what the others are. Russ Have gun- Will travel The value of a trophy is computed directly in terms of personal investment in its acquisition. Robert Ruark | |||
|
| One of Us |
As it happens I bought a copy of Kennedy's book for about NZ$20 (US$15) a year ago and had left a marker in for Goens Oakley rifle on p 261. It is of necessity a fill in pattern but the over wrist portion took my fancy although I was thinking of leaving out the ribons and doing it one piece wrap arround, but with points forward rather than the fluer-de-lis. It is the indecission that has prevented me from progressing with tool gathering. Von Gruff. | |||
|
| One of Us |
Russ, Lots of good advice here. A bit more. Practice on some walnut with finish on it. That replicates the real thing as your checkering should be done on a finished stock. I kind of disagree with JD in that I feel you will be better prepared for pitfalls inherent in working different species of walnut if you start and learn on the more difficult woods. Black or Claro, for example. You will make moves the wood dictated and learn to compensate and correct. Go slowly until the muscle memory kicks in and speed will follow. The tools you inquired about are from top: 1. Marking pencil (you already knew) 2. Scribe for marking the master lines in your layout 3. S-1 tool for tight areas (can reverse) 4. full view cutter 5. Veiner (for cutting tight radii) 6. Jointer (for straightening the errant line) There's more. Buy 3 or 4 additional handles for different cutters such as your layout cutter, a reversed cutter for cutting close to the border on the pull and one which you might want to bend for ease of working tight wraps on the grip area. A magnifying Optivisor will be much appreciated as well as good lighting and a calm environment. You will also need a flexible plastic ruler for layout and a small stiff brush (not too harsh)for getting the cutting dust out of the lines. The Kennedy book is great though some find the patterns dated. So What? Go slowly and remember you can reverse the cutters. Do not cut the border to final depth until all diamonds are brought to a peak. Do your final cutting of all diamonds lightly to more polish the sides of the pyramids than cut them. Make sense? You are embarking on a part of stock making that drives most into the woods screaming-no pun. However, once you finish your first panel to satisfaction you will be ever so doomed to cut another and the cycle of addiction/affliction is perpetuated. Oh yeah, one more thing. Do not try to cut the pattern to final depth in one pass. Do your lay out per chosen spacing and deepen progressively in each direction. Take the whole pattern down uniformly. I need a nap. Best of luck, Stephen | |||
|
| One of Us |
I forgot to add that I also use a 90-degree bent needle file, a pair of dividers and a toothbrush. Regards, Joe __________________________ You can lead a human to logic but you can't make him think. NRA Life since 1976. God bless America! | |||
|
| One of Us |
As already mentioned "Checkering and Carving of Gunstocks" by Monty Kennedy is a good book. I have also read "Checkering: A book of Checkering for the Beginner" by S.L. Mays. I would recommend either. I would definently recommend doing a ton of practice on "proofs" before you touch a gun stock. Its definently something that takes a lot of practice, and after seeing what I have seen, not everyone is capable of doing it. At CST(Colorado School of Trades) they first teach us to space on flat proofs, then learn to do point patterns on flat proofs, lastly they switch to checkering on rounded surfaces...which seperates the boys from the men. Please know that I am just an amatuer, but I did take lots of pics of the process. I have a little reluctancy to post them because of the level of talent here, but I would almost bet very few peoples first attempts are a stunning success. The books are going to tell you all the fine points, so no use in going over them here. Most important part is the beginning spacing that you do. If you mess up here, its hard to correct issues and your end result probably wont look good. Pics: Laying out: 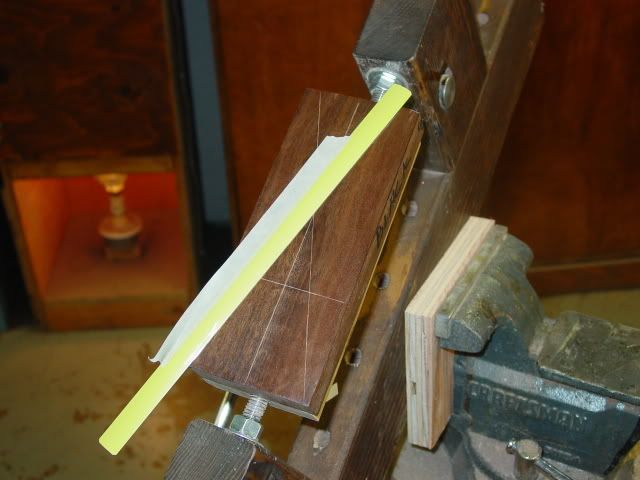 Spacing: all this involves is lightly scratching lines into the wood deep enough so that the tool will track without wanting to jump out. A lot of people have the tendancy to want to make the lines too deep to begin with, which in my experience can lead to lines running astray easier. Maybe someone who has been doing this longer can get away with more pressure, I cant. I have to apply light pressure and deepen it slowly after completely spacing with a lot of passes using sharp tools. Once you can space, move on to deepening to form the points. Here are pics of spacing, my first ever attempt at checkering...be easy on me: 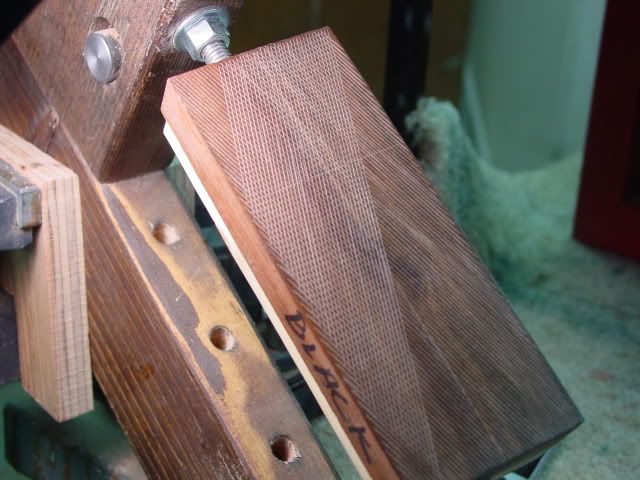 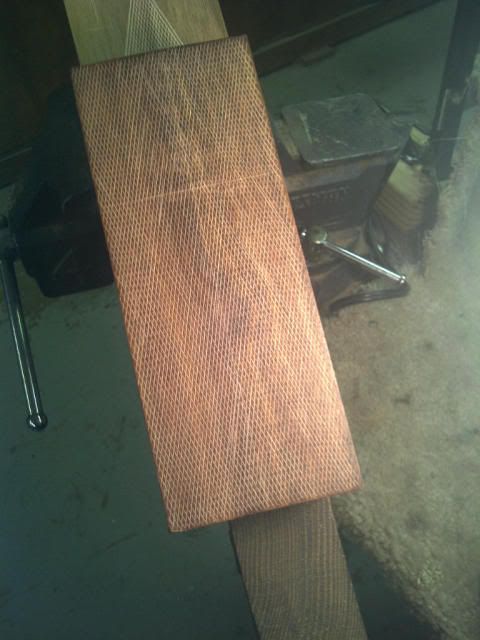 Here is my first point pattern; spacing: 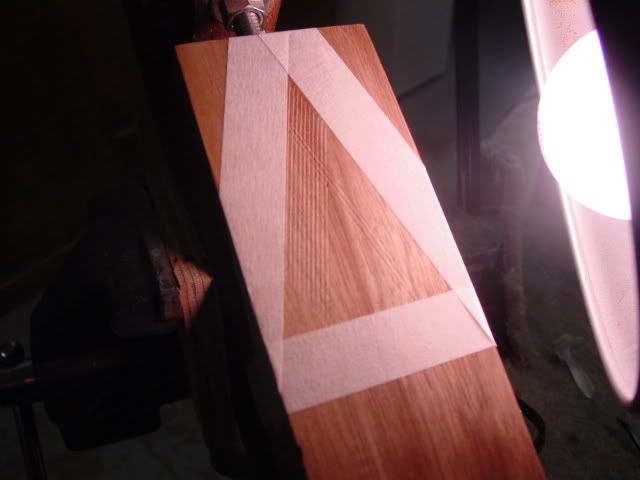 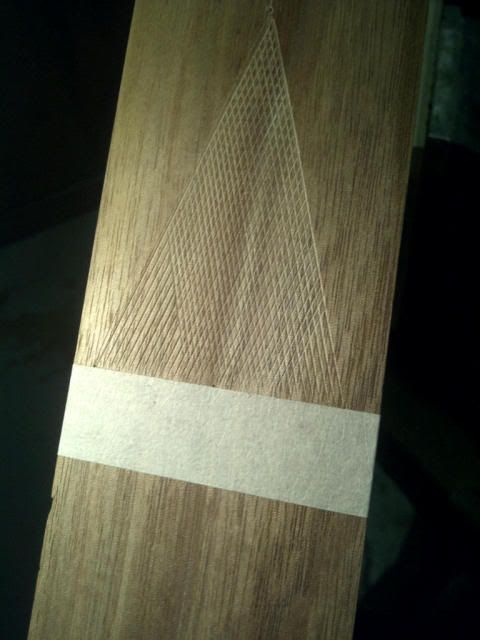 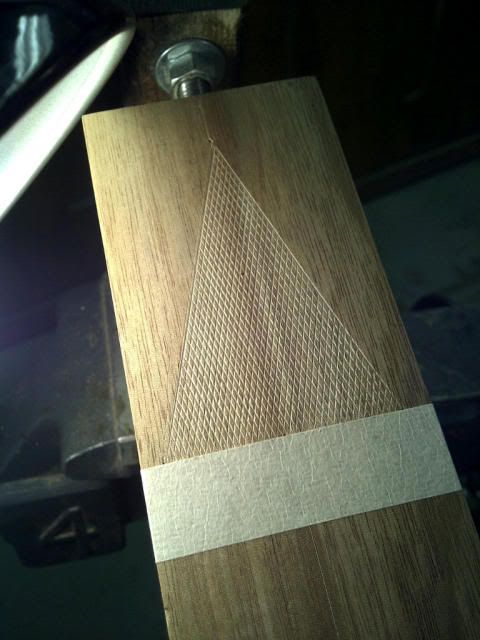 Deepened: 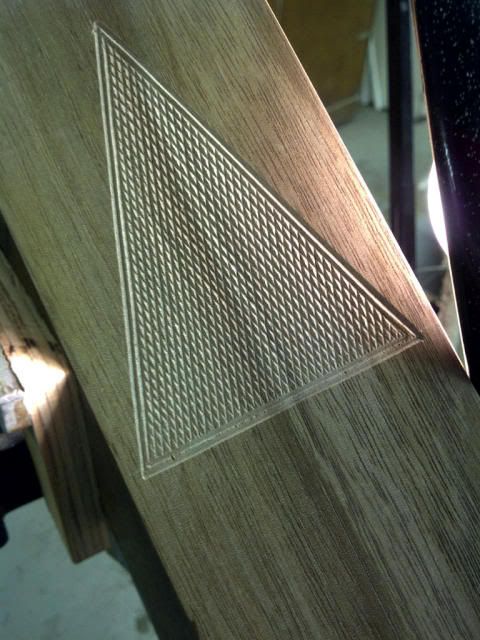 2nd attempt: 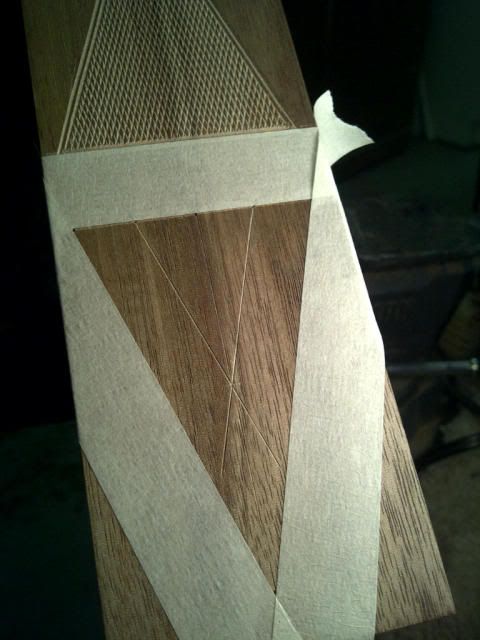 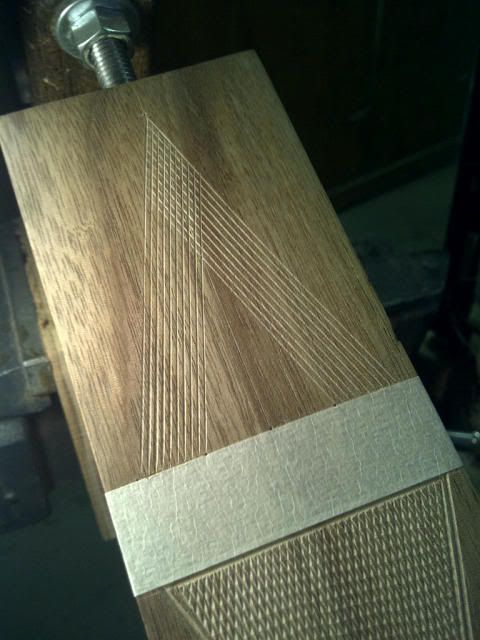 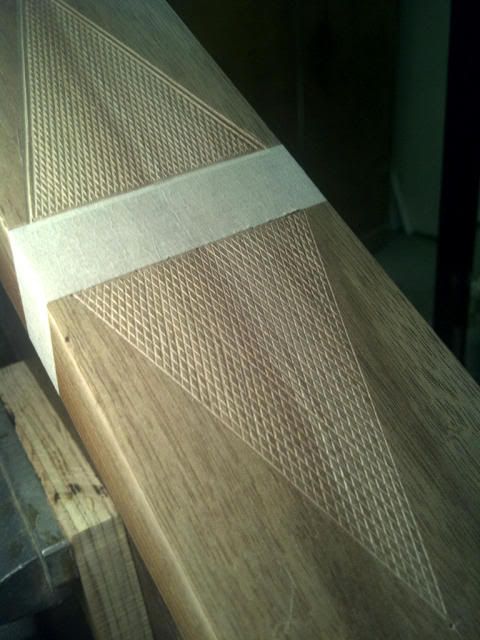 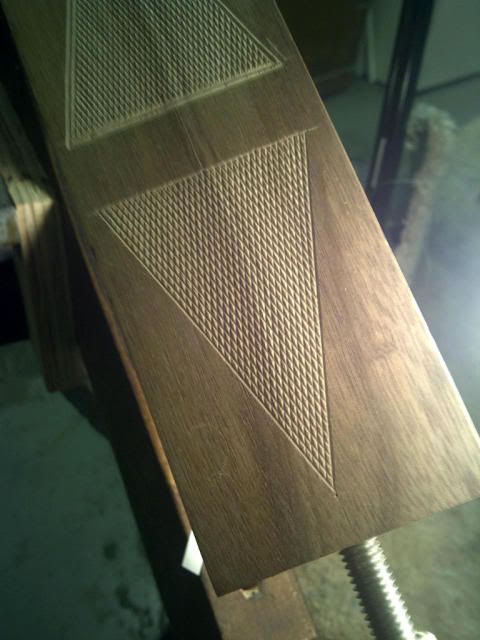 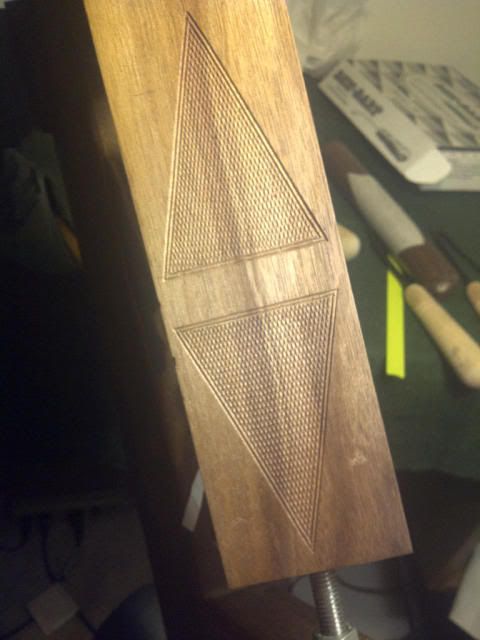 Moving to round "proofs". This fustrated me at times, and there is no way you are seeing my first attempt at round work...lol I experimented with a new way of laying thisngs out using pinstriping tape. Basically it enabled me to have a master line every 5th or 6th line(I forget), instead of just using one master line on each side to do the whole thing. Even this is a little risky. With a lot more practice I hope to be able to do round pieces like this only working off one master line. Here is a picture representing the forces you are woring against. The red lines kind of show how the curvatures try to pull you in, atleast in my experience: 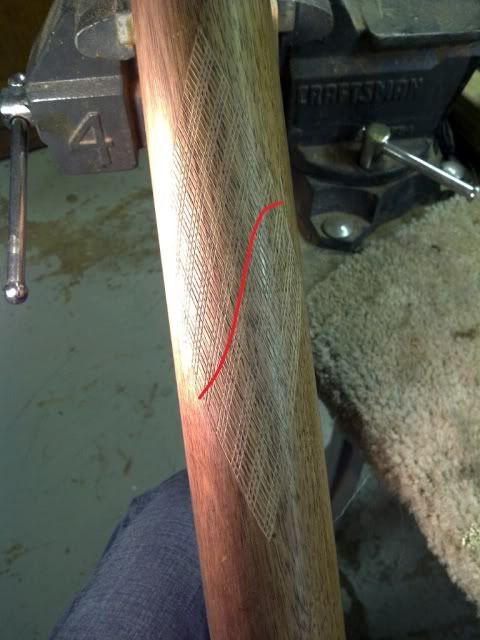 My "experiment": 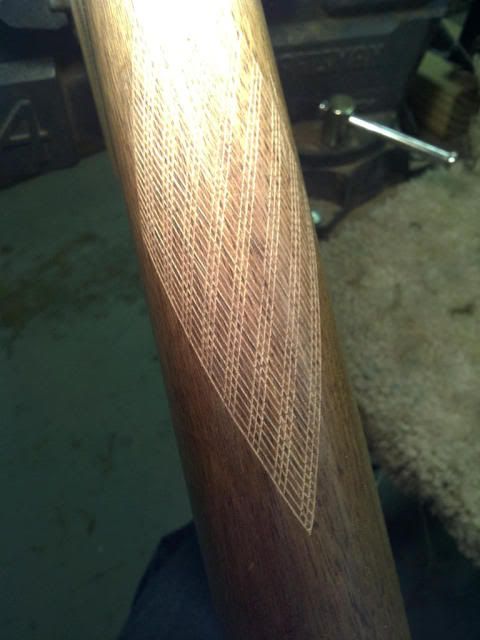 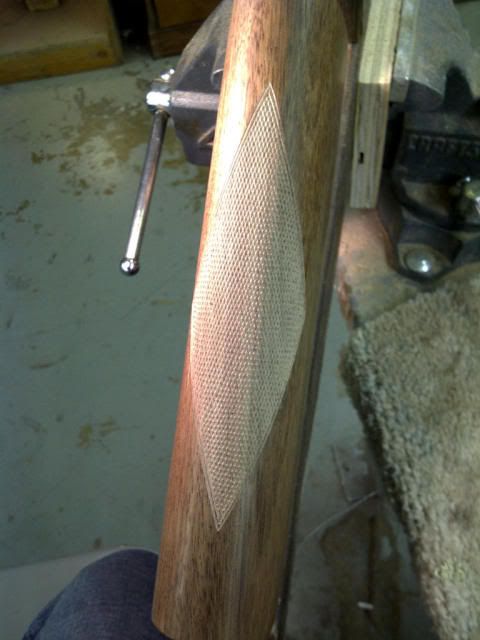 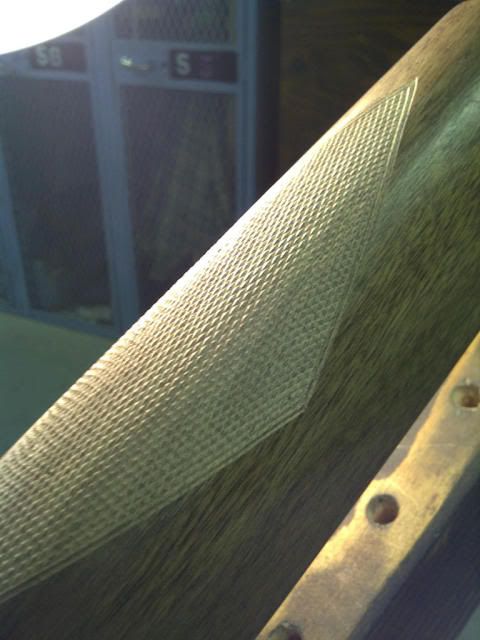 At this point I still have a lot of practice before I even think of touching a gun... http://www.facebook.com/profil...p?id=100001646464847 A.M. Little Bespoke Gunmakers LLC 682-554-0044 Michael08TDK@yahoo.com | |||
|
| One of Us |
You're already as good as many pros, just keep going. The pinstripe tape is a good idea, it's basically how I use the parallel straightedge strip I made. Regards, Joe __________________________ You can lead a human to logic but you can't make him think. NRA Life since 1976. God bless America! | |||
|
| one of us |
Aaron, that is good for your first try at checkering. Try using a grease pencil to mark the guide lines on the pattern before you start cutting. Use a clean plastic ruler that has the extra lines marked length wise and hold on the master line to mark the amount of guide line needed. You must have a light to the right side if you checker using the right hand. A dark room with a 60 watt bulb in a movable extension bench light is needed. Learn using SHADOWS TO SEE THE LINES. If you guys will make a set up like I have in the pic and get used to the air lines it will save much time by keep the dust out of the lines. You want have to stop to blow with your mouth and inhale the dust in the nose. Look for a post on the forum about 4 years ago on walnut dust if you can find the article. I started the post looking for advise about the problem. Lawndart and several other DR's wrote to me on the problems caused by the dust.   | |||
|
| one of us |
Thanks for all the help and advice especially Aaron, those pictures and explanation are a real big help for a novice like me. Have gun- Will travel The value of a trophy is computed directly in terms of personal investment in its acquisition. Robert Ruark | |||
|
| One of Us |
Kennedy's book that everyone here has recommended has the same kind of info in it as well. Very detailed explanations of the how and why things are done, written very "matter of factly" like talking to Monty over a cup of coffee. I use first name formalness as that is the way he comes off in the book, very easy going and modest about his skill level. Direct and to the point. With a bunch of patterns and examples even a section on how to make your own tools if you should care to undertake such a challenge. And if you're lucky you might get a used copy with margin notes like my copy and a few hand drawn examples tucked in the pages too. www.KLStottlemyer.com Deport the Homeless and Give the Illegals citizenship. AT LEAST THE ILLEGALS WILL WORK | |||
|
| One of Us |
More perspective on selecting the diamond ratio. Most folks prefer either 3:1 or 3.5:1 so that's what I used in my templates. Some older prewar sporters and pre-64 Wins are a little blunter, maybe even 2.5:1 but IMO that's too blunt. Here's a pic comparing stocks with defined rear PG lines but the lines make different angles with the belly/wrist line.  The roughed-out surface and poor photography make it hard to see, but the lines of the upper 2-pc stock would suggest, to me, use of the sleeker more acutely-angled 3.5:1 diamonds. The more-acute diamond line would more closely conform to the rear PG line and also serve to streamline the look of the front of the double-hook cheekpiece as well as decorate the otherwise-bare area. OTOH the lower 1-pc stock with its already-streamlined Rodgers treatment of the forward cheekpiece line doesn't really need any further streamlining and the line's (eventual) merger into the checkering pattern will decorate the area nicely. Also the more-vertical defined line at the PG rear will probably better match the less-acute 3:1 diamonds. Here's a view of the right sides, maybe the lines will show better.  IMO the CL of the PG diamonds should always be parallel to the basic wrist/belly line, that is, the observer's PERCEPTION of that line. Often the belly line is a little high or a little low on the wrist and so I judge things based upon my perception of the most aesthetically-pleasing combination. After these stocks are finished I'll lay out the proposed pattern angle lines & outlines on the wood with the grease pencil and change things around until they 'look right'. Then start cutting. Regards, Joe __________________________ You can lead a human to logic but you can't make him think. NRA Life since 1976. God bless America! | |||
|
| One of Us |
I would suggest you look into the NRA's summer gunsmithing programs to see if they have one on checkering. | |||
|
| one of us |
FYI Brownells has discontinued the full view checkering handles Have gun- Will travel The value of a trophy is computed directly in terms of personal investment in its acquisition. Robert Ruark | |||
|
| One of Us |
Over the years they have gradually discontinued almost all their really good small items. I'm just glad I had sense enough to buy a spare! Wish I had had sense enough to buy more Wisner-made items and more trap-door items though.... Regards, Joe __________________________ You can lead a human to logic but you can't make him think. NRA Life since 1976. God bless America! | |||
|
| One of Us |
If anyone knows a company that has some full-view handles please let me know. Been needing/wanting to pick up a bunch. http://www.facebook.com/profil...p?id=100001646464847 A.M. Little Bespoke Gunmakers LLC 682-554-0044 Michael08TDK@yahoo.com | |||
|
| One of Us |
Did you call the company in San Diego that makes them? Their name is also Brownells. | |||
|
| One of Us |
Thanks, that reminds me of a discussion with an instructor at school. He told me Brownells had them, but I just failed to remember it was a different Brownells... http://www.facebook.com/profil...p?id=100001646464847 A.M. Little Bespoke Gunmakers LLC 682-554-0044 Michael08TDK@yahoo.com | |||
|
| One of Us |
Both Brownells and Midway USA carry the full view handles. Brownells shows out of stock now. Jim | |||
|
| One of Us |
You mean the Guy's house?? He just sells the stuff to brownell's either way good stuff none the less. low over head too. W.E Brownell I believe. Found it W.E Brownell 9390 Twin Mountain Circle San Diego, CA 92126-4827 - (858) 695-2479 If the need should arise I work within a mile or two of this place. I could pick some up and ship USPS flat rate www.KLStottlemyer.com Deport the Homeless and Give the Illegals citizenship. AT LEAST THE ILLEGALS WILL WORK | |||
|
| One of Us |
Found this interesting thread. Blacktailer - how did your checkering work go? I would like to see the results. I am about to start my adventure on the Mannlicher Schoenauer I restocked a few years ago. Les Brookes helped me with a lot of good advise on that project. I will have to get the book, tools etc. and start practicing first. Here is the rifle.   "When the wind stops....start rowing. When the wind starts, get the sail up quick." | |||
|
| One of Us |
When I started I bought the full view handles but I didn't like them at all, I ended up making my own out of 3/16" key steel similar to the Dembart handles. The longer straight shaft just tracks better IMO, I find I don't need to watch the back of the cutter at all. I never cut back to a border really so no need for "full view". Here is a list. 1 handle for each cutter. I use Dembart inserts. 1 jointer. for master lines & straightening. 1 RH spacer. 1 LH spacer. 1 single line push. 1 single line pull. For changes in grain. 1 pull back border tool, short insert. 1 60 degree veiner. I do 3-1 layout. Use a piece of flat steel tape measure or Dymo lable tape to get your master lines DEAD STRAIGHT. Then using the Dymo tape I lightly scribe guide lines completely over the whole pattern. Gives you lines about 3/8" apart to eyeball as you go. When spacing out only make very a shallow cut, just deep enough for the guide to run in for the next line, until it is fully laid out. When you start deepening the lines with your single cutter (or dual if you are game), don't try to go too deep straight away, just light cuts, alternating in direction, slowly sneaking up to full depth. Depending on the LPI you might work the pattern over 4 to 6 times before it points up. Good luck. | |||
|
| One of Us |
Thanks mate. I need to read up first and practice. Just wondering about the basics of layout. I feel that layout & master line are critical - if that is wrong, the patern & lines will be wrong. I wish there was a good video. Youtube is not that great for actual detail - particularly layout / master lines. "When the wind stops....start rowing. When the wind starts, get the sail up quick." | |||
|
| One of Us |
A couple of years ago I tried to lend you a copy of this video. I don't remember if you took me up on it or not. Unfortunately I have since sold it. I highly recommend it for anyone who would like a visual aid to learn checkering and does not have someone in the flesh to watch. Yes, it is somewhat expensive. But I found that my copy was easily saleable after I was done with it, so you too may be able to recoup some of your money if you purchase a copy. http://www.brownells.com/gunsm...=ARTISAN+PRODUCTIONS | |||
|
| One of Us |
In my usual way of dragging a thread completely off tangent and into left field. With MMC now defunct, has anyone had any hard use experience with the Hosford & Co or the Ullman Precision power heads? I had an MMC but sold it to a friend after I began to suspect that it was mileing out. (you don't want me as a friend) I was going to get a new one but the company folded before I got around to it. When I was a kid. I had the stick. I had the rock. And I had the mud puddle. I am as adept with them today, as I was back then. Lets see today's kids say that about their IPods, IPads and XBoxes in 45 years! Rod Henrickson | |||
|
| One of Us |
I tried to give away my checkering cradle. It is made on aluminum channel,bothe ends aluminum also. The swivel parts on both ends have heat treated drill bushings on them. The ends that they pivot in are oil lite bushings. It has been powder coated. It needs the grub screws to tighten and keep the stock from rotating after locking it down. One of our young forum members said he would pick it up and use it some day.    Sorry for the less than clear photos. | |||
|
| One of Us |
This might help- http://forums.accuratereloadin...043/m/347103474/p/14 This was one of the best threads ever on AR. Get hold of an old walnut stock and just go for it! | |||
|
| One of Us |
Hey butch, if that cradle gets abandoned I'd be open to an adoption! Wes | |||
|
| Powered by Social Strata | Page 1 2 |
| Please Wait. Your request is being processed... |
Guns, Politics, Gunsmithing & Reloading Gunsmithing

Visit our on-line store for AR Memorabilia