 Rifles Double Rifles
 Go | New | Find | Notify | Tools | Reply |
| Decided to dress up my Baikal | Login/Join |
| One of Us |
I decided to change the stock on my new 30-06 Baikal, now I am not a stock maker by trade (first attempt at it) Now I had a stock design in mind which I like the way it feels and handle a lot and it fits me to the tee, it is the stock on my 9.3x74R Sabatti. I found out that, It was one of the better stocks that I have felt comfortable holding and handling and was a good fit for me. better than the few doubles that I tried out, even better than my 470 but not by much (gave me more control in the wrist area). I wanted to have a cast off, so I toyed around with my rifles a bit and felt how they mounted and aimed etc, and settled for a 3/8”right cast off. I had a piece of walnut laying around in my office, which I decided to use for the new project. Not a fancy piece but quite adequate for a first time trial. As for tools; well your basic carpentry tools, a table saw, a 5" plane, a jig saw,a chop saw, and a hand saw. I started working on my new project Saturday the 9th a week ago,6 hours of work brought me this far into it. 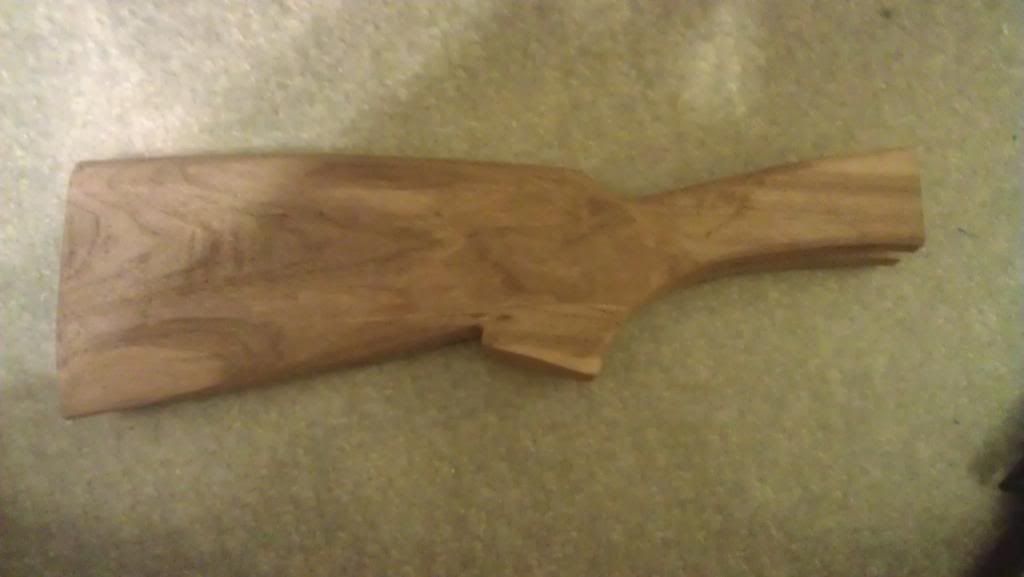 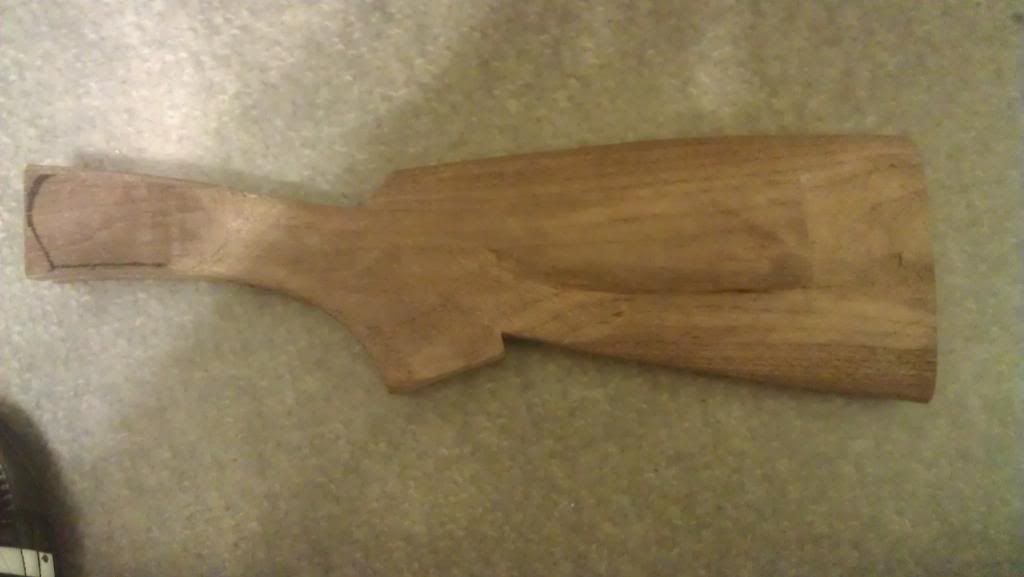 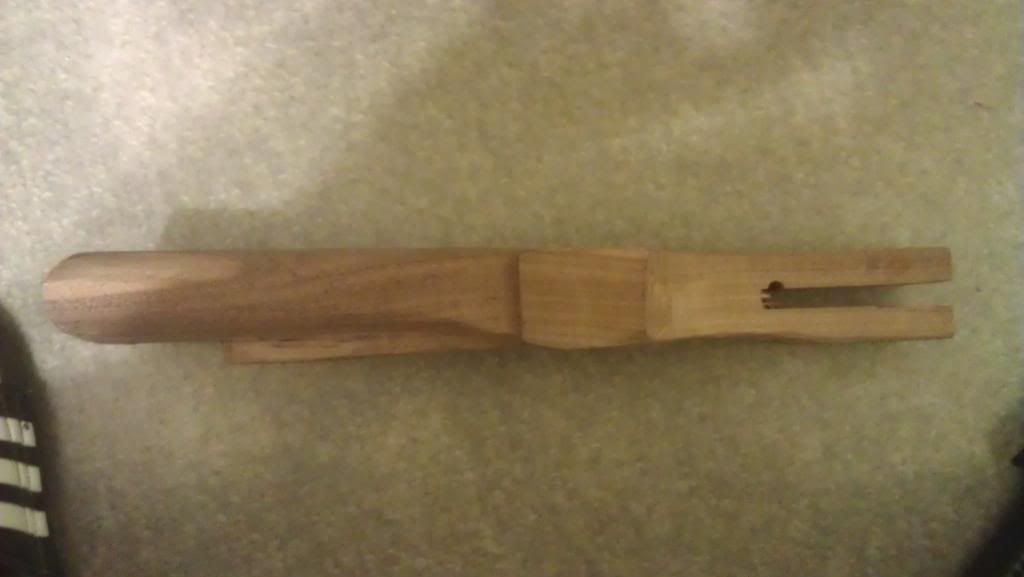 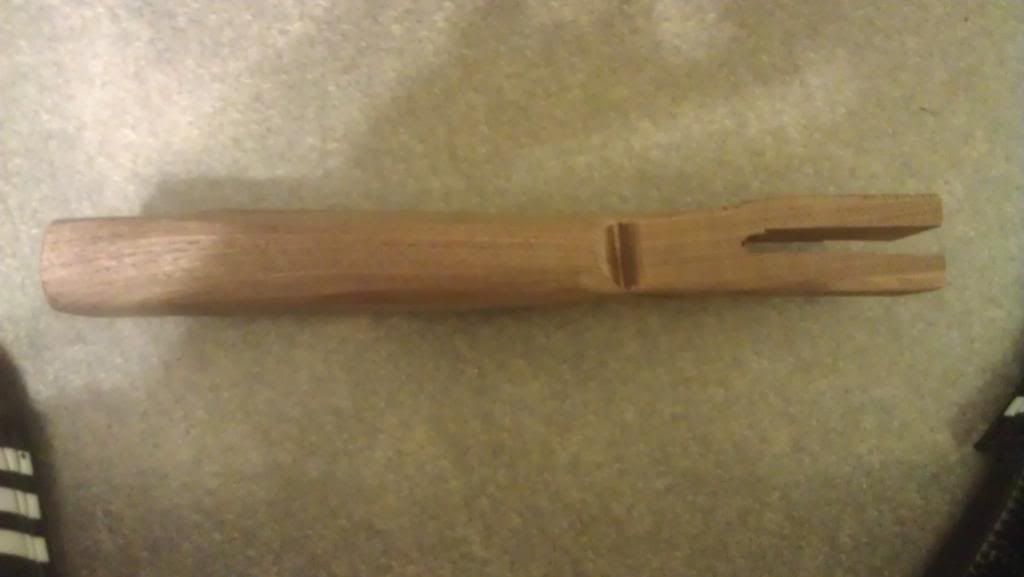 Best regards Malek Good shooting/hunting and God's best Best regards Malek Good Hunting/Shooting and God's best. | ||
|
| One of Us |
I am looking forward to following your progress, Malek. ___________________________________________________________________________________ Give me the simple life; an AK-47, a good guard dog and a nymphomaniac who owns a liquor store. | |||
|
| One of Us |
Hello JJ: Thank you for your interest in the little project that turned out into a good size one. I have added few tools to this part of the project, a chop saw, a hand saw those I used also on the previous part and forgot to mention I will correct that, for this part I added a chisel, a rasp and couple of files a round one and a another file with semicircle on one side and flat on the other. I have done quite a bit more work on the project this week and it started to shape up pretty good. In matter of fact I almost finished with the inletting of the receiver and done some more shaping and fine tuning. I am glad that I have had some time on my hand which is all consumed by this project. For there is still quite a bit of work ahead of me. I do have to find a way to drill out the whole into the back of the stock to install the Bolt that holds the receiver into the stock, also quite a bit of inletting reshaping and refinement to it. This work is very therapeutic, it is like I enter into this state of ZEN, I lose track of time and what is happening around me. I have to be pulled away almost by force either by the wife or the kids, tons of fun. After one full 12 hours day and another couple 3 hour days, that brought me this far into the project. As you can tell I am a little behind on the reporting. 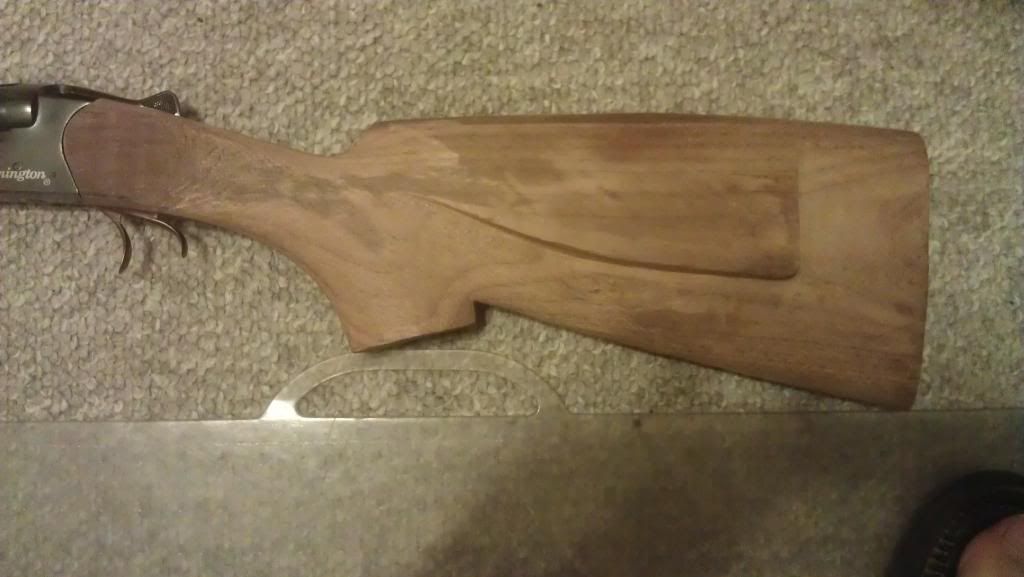 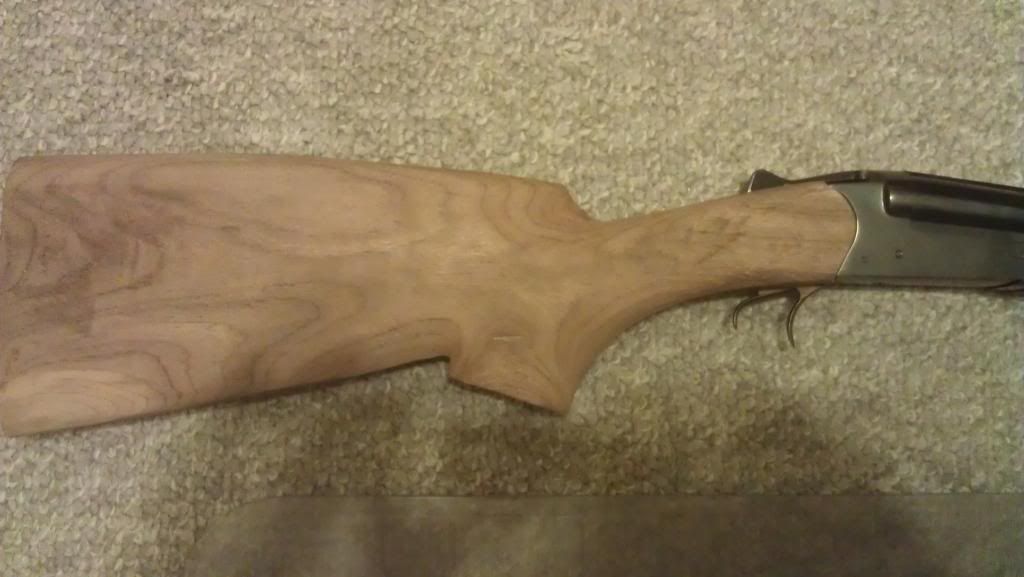 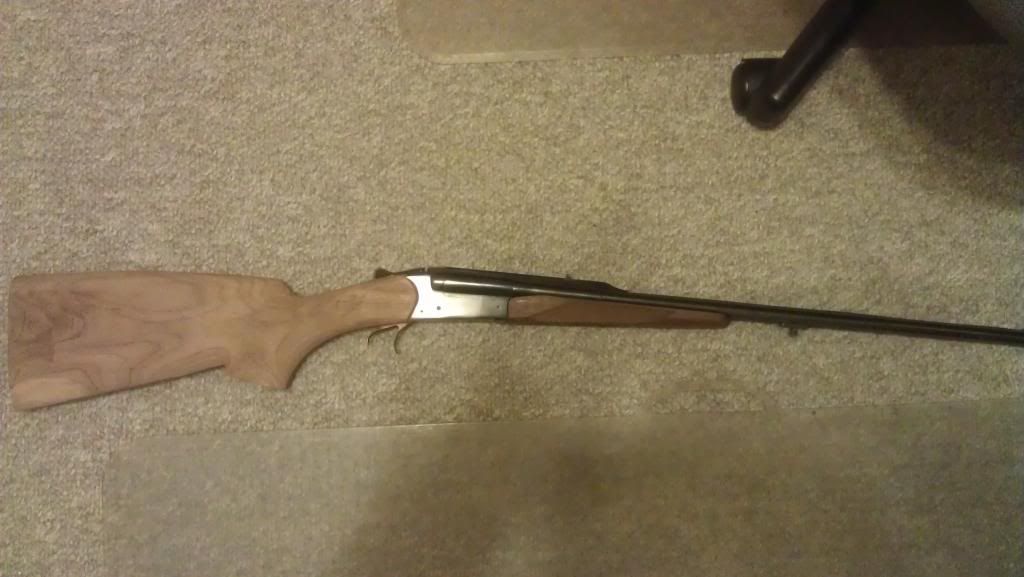 Best regards Malek Good shooting/hunting and God's best Best regards Malek Good Hunting/Shooting and God's best. | |||
|
One of Us |
Looking good! Paul Smith SCI Life Member NRA Life Member DSC Member Life Member of the "I Can't Wait to Get Back to Africa" Club DRSS I had the privilege to fire E. Hemingway's WR .577NE, E. Keith's WR .470NE, & F. Jamieson's WJJ .500 Jeffery I strongly recommend avoidance of "The Zambezi Safari & Travel Co., Ltd." and "Pisces Sportfishing-Cabo San Lucas" "A failed policy of national defense is its own punishment" Otto von Bismarck | |||
|
| one of us |
Nice Euro hogback. Eager to see it finished. There is hope, even when your brain tells you there isn’t. – John Green, author | |||
|
| One of Us |
Thanks Paul and Bill, I am working at it as time permitted. Yes I decided to change a bit from the original design, figured it will give it more character. After all it is a European (Russian) made and will be using it for hogs, so figured why not match the rifle to the game. Best regards Malek Good shooting/hunting and God's best Best regards Malek Good Hunting/Shooting and God's best. | |||
|
| One of Us |
Let us know how you drilled the throughbolt hole. It is generally best to drill that hole first, into over sized blank, followed by inletting, while keeping blank width oversized in thickness and height, to later reduce it for cast off and for sizing to action thickness. After inletting is finalized, stock dimensioning and contouring are done next, but firstly having two pencil lines drawn all around blank, showing both cast off line and center line. | |||
|
| One of Us |
I must agree with you jack that the drilling of the hole usually is done before the shaping of the stock. I wanted first to figure out the angle of the receiver in relation to the stock so I can drill the hole at the proper angle in order to maintain a proper drop of the heel and the right way the rifle mounted to my shoulder. In doing so, I figured I would not need to readjust the inletting to compensate for the change of the receiver’s angle in relation to the stock. Which worked very well for me and it did come out just fine. I found out that that matting of the arch of the receiver to the stock is definitely a pain, it has to be perfectly angled. The slightest change in the arch’s angle will raise or lower your barrel's front sight and thus the whole mounting feel of the rifle will change Best regards Malek Good shooting/hunting and God's best Best regards Malek Good Hunting/Shooting and God's best. | |||
|
| One of Us |
Added some more tools at this point, a sanding block and 100 grit sand paper. Done some more work on the stock mainly shaping and trimming down the stock. Also I did install a recoil pad and shaped the stock to it, done quite a bit of filing, shaped the palm swell and done some more work on the inletting where the trigger guard sits in the stock, done some sanding too. A total of 12 hours woth of work I am very excited at this point, things started to shape up very nicely and it started to look very pretty. I will be taking some pictures later on and will post them soon. Best regards Malek Good shooting/hunting and God's best Best regards Malek Good Hunting/Shooting and God's best. | |||
|
| One of Us |
Best regards Malek Good Hunting/Shooting and God's best. | |||
|
| One of Us |
Nice work Malek. Congrat on a good looking new stock. JP Sauer Drilling 12x12x9.3x72 David Murray Scottish Hammer 12 Bore Alex Henry 500/450 Double Rifle Steyr Classic Mannlicher Fullstock 6.5x55 Steyr Classic Mannlicher Fullstock .30-06 Walther PPQ H2 9mm Walther PPS M2 Cogswell & Harrison Hammer 12 Bore Damascus And Too Many More | |||
|
| One of Us |
Thanks a bunch mdstewart and everybody else that showed interest and expressed encouraging thoughts. I really have been enjoying this project and it has been coming along pretty good, thank God no major problems, but challenges yes. I have done some more work on the stock, about 4 hours, mainly drilling the bolt hole through the stock for the anchoring bolt which proved to be not as bad as I did imagine it was going to be. Now since doubleriflejack has requested to know how I went about it and as much as my descriptive vocabulary would allow me, here it is in details. Without the proper tools it is very difficult to drill straight and at the right angle and keep from veering off the main course, ending up drilling through the sides of the stock or at the wrong angle. with the limited tools at my disposal, I had to scratch my head quite a bit in order to come up with an idea how to do it right, especially without a lathe or a drill press that is capable of drilling through this long distance. After letting it brew in my head for few days and weighing my thoughts, trying to justify in my mind the need to buying a wood lathe or a drill press for the sake of doing a onetime project or probably two. Also not having the space to keep it in my already crowded work shop I kind discarded that idea. I did remembered a small gadget that a friend of mine gave to me around 20 some odd years ago which I rarely used and was stashed somewhere in my work shop. It is a stand with a moving leaver/drill mounting device traveling along a vertical axle that you mount a regular drill to and can be converted into a make shift drill press. trying to use that gadget proved to be quite a bit challenging because it does not even have enough clearance between the drill and it’s base to accommodate the stock , even without having a 16" long bit attached to it. Luckily the leaver/drill mount does not only move up and down along the axle but it can be rotated to the sides too. So I came up with this idea, I got my portable Black & Decker work bench/clamp stand. I did clamp the new press base to it, rotated the drill mount/lever to the side, and tightened the clamping bolt. That allowed the drill to move up and down along the side of its stand and all the way down to its base allowing the bit to go way down beyond the base, almost to its full length. Starting with the lever at the top of the axle I installed my 16" long 3/8" bit into the drill, set up my stock vertically on the step of the bench stand directly under the bit. Low and behold I ended up with about 1/2" clearance between the tip of the bit and the wood where the hole needs to be drilled. I had to secure the stock vertically straight and pitching it a little forward in order to have the proper angle for the bit, so when the hole is drilled it will have the proper angle for the bolt connecter at the end of the receiver to enter the stock at the right angle without having to readjust the setting of the receiver into the stock in order to accommodate for the change in the angle. Still faced with another hurdle this time the leaver can travel so far down the axle and I had to readjust every 4" or so. I had to stop drilling few times, lower the leaver on the axle, while the bit and drill still into the stock retighten the clamping bolt around the axle and continue on drilling. I had to repeat that process few times till I ran out of axle. At this point I had only about 4" more to go so I ended up drilling the rest free handed using the bit as a guide. The end result is a hole that has been drilled in the new stock that matches exactly the one drilled in the old one. Now that I am coming to a place in the project where I have to start thinking about finishing the stock. I have been tossing the idea of what kind of finish I would want to use. I should mention that I do like a dark reddish kind of a tint rather than the traditional walnut brownish tint. Anybody out there with experience in this field is welcomed to chime in with their thoughts and knowledge especially on how to end up with that red tint, it will be much appreciated. Best regards Malek Good shooting/hunting and God's best. Best regards Malek Good Hunting/Shooting and God's best. | |||
|
| One of Us |
Malek Cool project. Thanks for posting the process. Would you or could you post a picture of your makeshift drilling apparatus. I've got a little project I've been working on that needs a long hole like that, but my practice pieces on 2x8's have drilled off to the side. Thanks Bfly Work hard and be nice, you never have enough time or friends. | |||
|
One of Us |
Malek, The stock is taking shape quite nicely. This may be your first rifle stock but it's obvious you have worked with wood previously and are quite accomplished IMO. I'm very interested in seeing the completed product. On the red tint, my new VC came out with that coloring. You might give Ken at Kebco a call and see if he would inquire with Jerome about what they used to finish my rifle. I'm with you on that one as I like the red tint as well. Keep us posted on progress. What about checkering. Are you proficient with that? | |||
|
| One of Us |
Brownells has the old Winchester stain with the red tint. Look for the Classic Pilkington spirit stains, pre 64. They also have a stain called Herters French Red (Remember Herter's?) that is supposed to replicate Win Pre 64 reddish tint. Alto check out Laurel Mountain stains; I have used them all and their Walnut has a reddish tint; go to Track of the Wolf site and you can see the colors. You need a lathe if you are going to drill many long holes. | |||
|
| One of Us |
Looking good! | |||
|
| One of Us |
I was kinda wondering how you'd accomplish that stock bolt hole. The ones I've done, that was the first task. That way if it didn't come out right, I'd only be out that piece of wood. On the first one I made a jig to guide the drill at the proper angle and just took it nice and slow from both ends and met in the middle. I don't like those long drills, seem too flimsy for my tastes. Glad that worked for you. It looks pretty good so far. Krieghoff Classic 30R Blaser Stevens 044-1/2 218 Bee Tikka t3x lite 6.5 creedmo Tikka TAC A1 6.5 creedmo Win 1885 300H&H. 223Rem Merkel K1 7 Rem mag CCFR | |||
|
| One of Us |
Thanks guys for the encouraging words and tips. Bfly and 209: Yeh; finding the gadget setting it up and drilling the hole took the better part of 4 hours, certainly it is a pain in the neck not having the right tools. I will try to post some pictures for that make shift drill press set up. Todd: I don't know about accomplished, but yes I worked with wood quite a bit, say owned my construction business for a bit over 24 years. As for the red tint, I always liked the contrast between the read back ground and the black grain in the wood especially when lot of it is there and very pronounced. I liked it that much I even owned one of my trucks in the two color tones the red and black, and yes seeing your rifle perked all that up in me again. As for the checkering I never done it before and I am not sure if I will have the patience to do it. But again I never thought I will be making a gun stock for my rifle. Dpcd: Thanks for the tips I already checked out Laurel Mountain stains, I also read about it somewhere else as being a very good stain. I looked at their web site and liked what I saw in particular their maple stain where they described it to have a red and Amber under tone. Looked very nice on the net but again that is in the pix, I am not sure if it will look the same in reality, what did you experience, do they look close to the pix? Best regards Malek Good shooting/hunting and God's best. Best regards Malek Good Hunting/Shooting and God's best. | |||
|
| new member |
Impressive. Looking forward to seeing the finished project. Jim | |||
|
| One of Us |
I will send you some pics of their maple stain on walnut. It won't be red; more yellow. | |||
|
| One of Us |
Hello Gentlemen: For those of you who asked, these are some pixs of the make shift drill press, also for the hole that I was able to drill in the stock using this gadget, of course with the help of the level and few clamps and pieces of 2x4s. 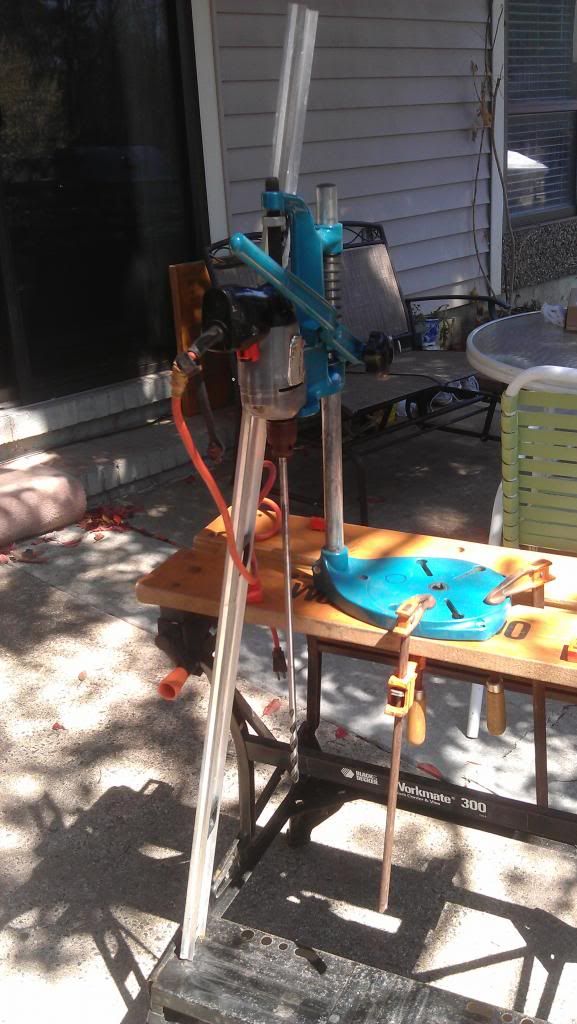 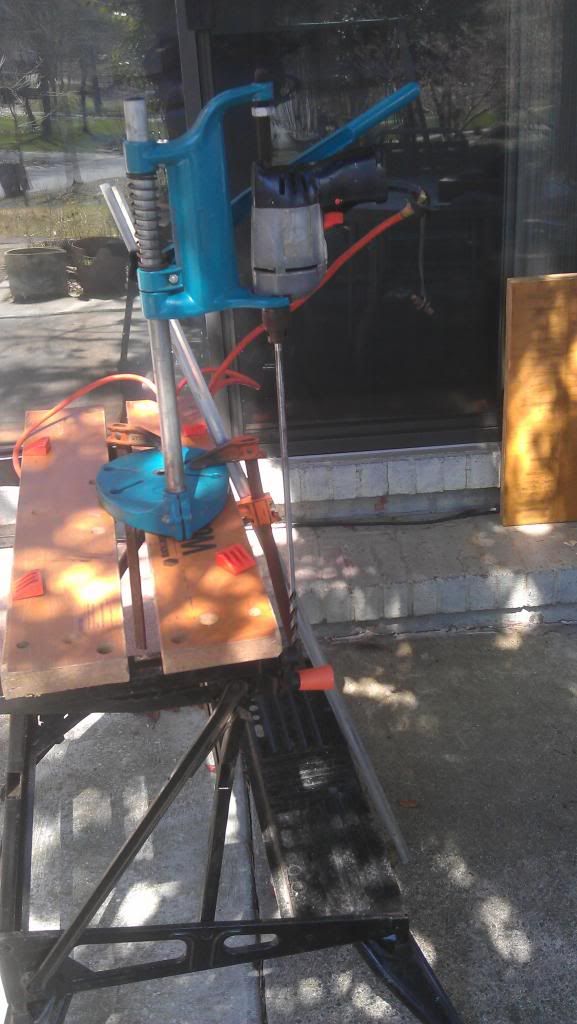 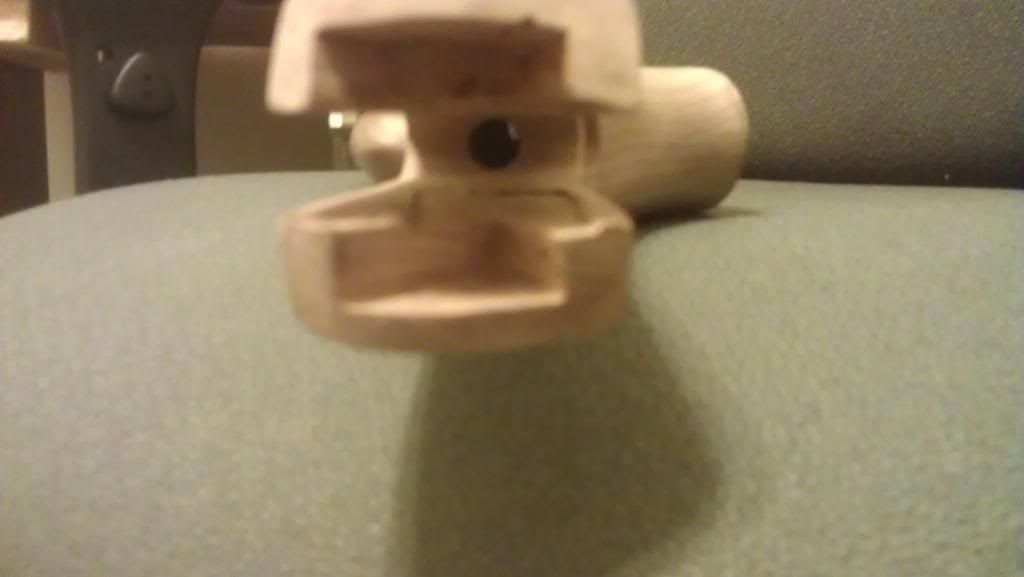 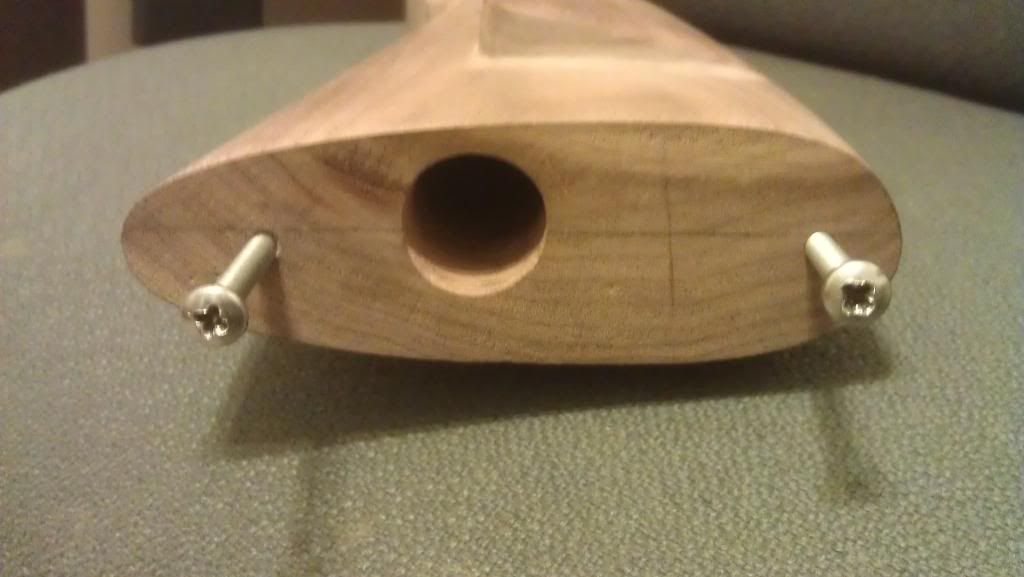 Best regards Malek Good shooting/hunting and God's best. Best regards Malek Good Hunting/Shooting and God's best. | |||
|
| One of Us |
Rube Goldberg would be proud!! | |||
|
| One of Us |
Thanks Todd; I don't know about Rube Goldberg, but I think I can get some small projects accomplished if I put my mind to it and my patience will allow me. As of now, I am working on the finish, trying on a piece of wood, one side I used the Birchwood gun stock filler walnut tone under Tru-oil finish and on the other side I used the Tru-oil finish alone without any wood filler or stain. So far I like the Tru-oil alone, it is beautiful but don't like the plain brown color. I should get me some red tint or something, I haven't made up my mind yet to what I should use. Best regards Malek Good shooting/hunting and God's best. Best regards Malek Good Hunting/Shooting and God's best. | |||
|
| One of Us |
Here are 3 Laurel Mountain stains on walnut. I recommend you get the red stain you like; either the pre 64 or French Red from Brownells. I am not sure I would trust the Maple I show because I often mix stains and I forgot if I mixed something into this or not.  | |||
|
| One of Us |
Thanks dpcd for going through the pain to make up the samples, none of them though seems to have any red tint in it. Reading the description on Laurel mountain site they state "MAPLE – Amber color with red undertones. Popular 18th – 20th century American Stock color. When used on walnut stocks, stain has stronger red undertones than Walnut Stain. Produces an exceptionally fine color on English walnut". It does show reddish amber color on maple in the pix and I do really like it. Now if your batch had been tampered with (pre mixed), do you think that the real patch might have looked different? Now on the other hand their Cherry stain looks beautiful too but I am affraid it might end up to have too much read to it. What do you think of it? CHERRY – Deep, rich red-brown color. Brings out red undertones when used on cherry or any other wood. Duplicates the color of 18th and 19th century firearms from Lehigh and Northampton county PA., when staining maple. Matches the classic red-brown used on high quality European firearms, when used on walnut. Color similar to that obtained with the natural stain alkanet root, but with the exceptional light fastness characteristic of all Laurel Mountain Forge Stains Best regards Malek Good shooting/hunting and God's best. Best regards Malek Good Hunting/Shooting and God's best. | |||
|
| One of Us |
Any updates from the Queen City, Malek? ___________________________________________________________________________________ Give me the simple life; an AK-47, a good guard dog and a nymphomaniac who owns a liquor store. | |||
|
| One of Us |
You cannot go by their descriptions of "color"; you have to actually put the stain on YOUR piece of wood; they all react differently. I have used most all of the Laural Mt stains. You should just go to Brownells and get the French Red or pre-64 stain; they will be reddish. I personally do not like the red color and don't use it. | |||
|
| One of Us |
JJ; funny you should ask, today I put the final touches to the shape of the stock and finished the sanding of it, using 320grit sand paper for the final sanding. The finished shape and feel of the stock took some time, I did not rush into it, I went by the way it handled, felt in the hand and certainly the way it did mount. The first thing I did work on is to achieve the proper fit of the stock which causes the rifle to mount to the shoulder in such a way that it is on target with very little effort. I believe a properly stocked double should be right on target most if the time if not all the time when you mount that rifle to your shoulder. I test that using the following method. I pick out a target few yards away, I close my eyes, I mount the rifle to my shoulder as I normally would do with my opened eyes while I am in my normal shooting stance, then I open my eyes. Now if the rifle is pretty much on target I believe I did accomplish some thing. But the most important thing is the alignment of my sights. If the back sight is in perfect alignment with the front sight and I don't need to move my head sideways or up and down to achieve that, I believe I have reached my objective and my hard work have paid off big time and was rewarded with a perfect sight alignment. So the 3/8" cast off, the 1 1/4" drop at the comp and the 2" drop at the heel with the Hogback shape of the stock, gave me the desired results the perfect sight alignment. I did work on it and reported it in my previous report. The second thing I like to do is to hold the rifle at the wrist with my right hand and try to control it, moving it up and down and sideways, I try to mount it to my shoulder with one hand. If the rifle felt light, lively and I have good control on it and I am able to maneuver it without much effort. Then I believe I do have very good control on the rifle and the grip at the wrist area fits my hand properly and that is to me what makes carrying the rifle a very pleasant experience. I must point out that I did incorporate a palm swell in the wrist area of this stock, I did work quite a bit on shaping and then reshaping some more of the wrist area and the palm swell and the rest of the stock till I achieved my objectives and again the desired results, a good grip at the wrist which gave me a good control of the rifle. This part I have done and worked on since my last report and it did take about 16 hours of work between the shaping, the final touches and the sanding of the stock. Now I am waiting on the stain to arrive, I should have it any day now. Best regards Malek Good shooting/hunting and God's best. Best regards Malek Good Hunting/Shooting and God's best. | |||
|
| One of Us |
dpcd; I ended up ordering the Laurel mountain stain in both the Maple and the Cherry. I will give them a try on the left over walnut piece of the stock which I did sand down and is ready to be stained; I will apply them individually and also will mix them up a bit till I achieve the desired color. I don't like it to be too red just a little tint, I believe mixing up the Cherry with the Maple will give me the color I am looking for. Best regards Malek Good shooting/hunting and God's best. Best regards Malek Good Hunting/Shooting and God's best. | |||
|
| One of Us |
Thanks malek! Looking forward to seeing the finished product. I am sure she will look (and perform) great. ___________________________________________________________________________________ Give me the simple life; an AK-47, a good guard dog and a nymphomaniac who owns a liquor store. | |||
|
| One of Us |
You are quite welcomed, I tried to post some Pix yesterday and today for the final shape of the stock but to no avail. It seems like photobucket is having some problems with loading the photos, I don't know, hopefully by tomorrow they would have fixed up the problem, so I will be able to post some. Best regards Malek Good shooting/hunting and God's best. Best regards Malek Good Hunting/Shooting and God's best. | |||
|
| One of Us |
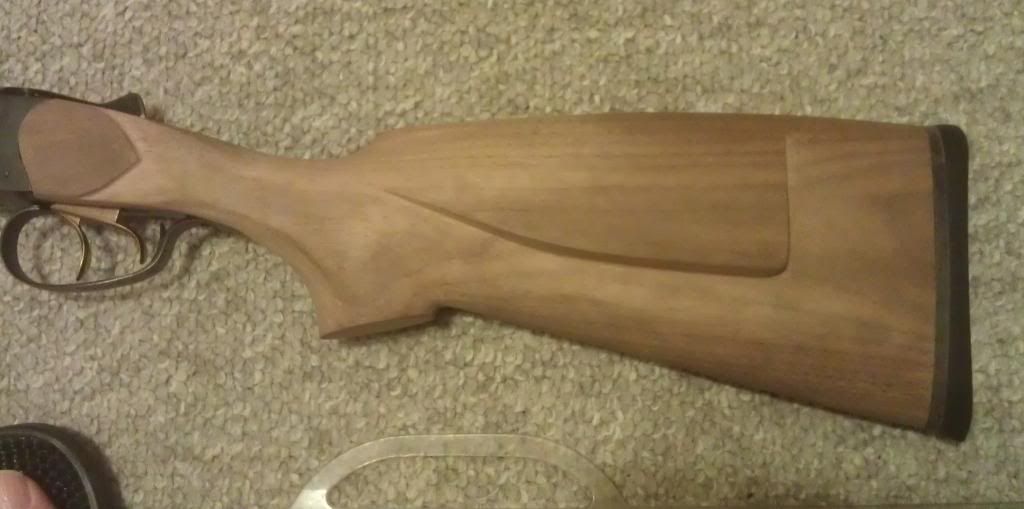
Here they are, the screws in the back are to hang the stock from to dry while finishing it. Still waiting for the stain. 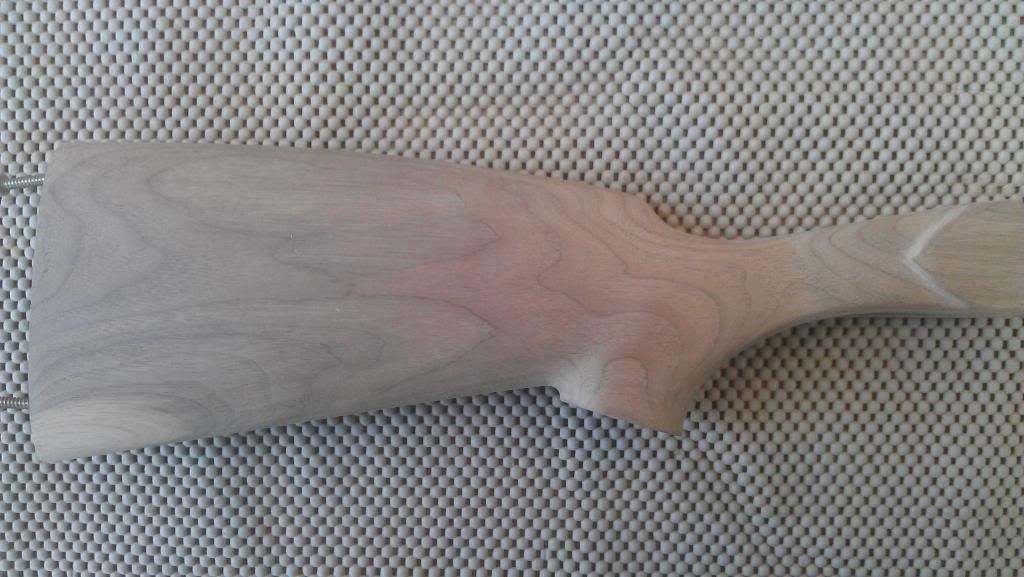 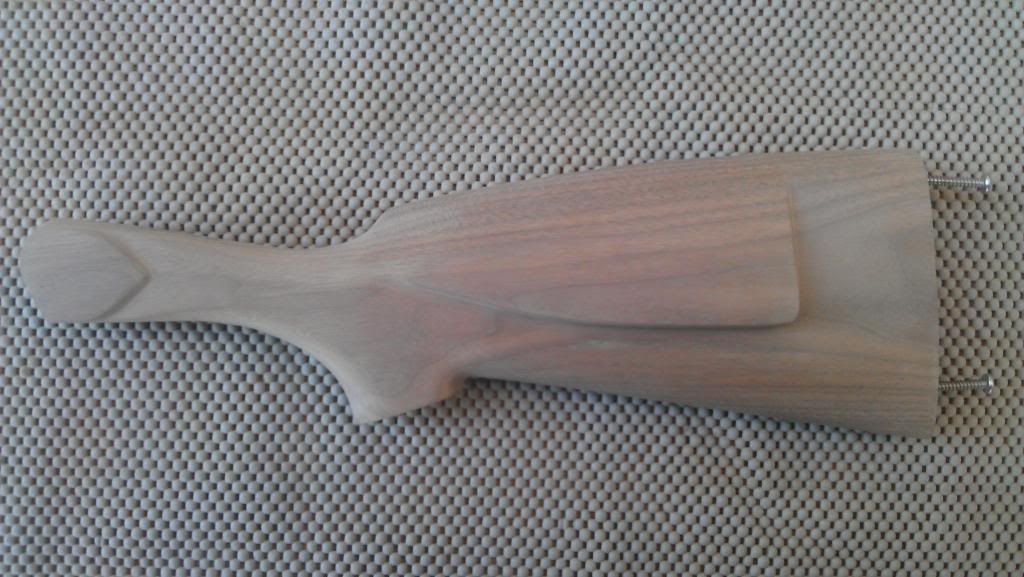 Best regards Malek Good shooting/hunting and God's best. Best regards Malek Good Hunting/Shooting and God's best. | |||
|
| one of us |
I was thinking of buying one but after I heard it cant shoot for beans,I changed my mind. | |||
|
| One of Us |
shootaway: You are entitled to your opinion but your comment adds nothing to the discussion of restocking this rifle. The entire discussion is about making a stock. | |||
|
| One of Us |
Very nice work, keep us posted. | |||
|
| One of Us |
That's coming along nicely. Should look just the business when it all comes together. Are you going to go with a traditional splinter on the front or a beavertail? As far as shooting these things goes, I tried mine for the first time just a few days ago. I only fired 4 shots and for reasons I won't go into, it had to be done at about 30m from a standing position. From the results it is apparent that one barrel shoots a little higher than the other, however, all 4 shots went into about 2.5 inches. Now, given that the front trigger, in particular, is absolutely horrendous and the foresight is nothing short of dreadful (my next little project I think) I believe that isn't too bad. When I finally have this little rifle sorted I imagine it will be perfectly adequate for almost any medium/large game animal this side of 100m. Where I typically hunt, (steep bush and scrub country) that would be considered a long shot. | |||
|
| One of Us |
Shootaway: I don't know if you have read my post which describes my positive experience with the Baikal rifle http://forums.accuratereloadin...0101804/m/2241017581 My two Baikal rifles shoot quite well, also dcpd's Baikal shoots well too. That is what got me enthused about building a new stock for it and that is what this post is pretty much about. But as Grenadier mentioned you are entitled to your opinion. Best regards Malek Good shooting/hunting and God's best. Best regards Malek Good Hunting/Shooting and God's best. | |||
|
| One of Us |
Thank you nilgi and Lonewulf; It has been quite a while since my last progress report. Since my last report I did up getting the stain from Laurel mountain stains, I experimented with them quite a bit on left over pieces from the original wood that I used to build the stock from, I ended up using their maple stain mixing it up with Tru-Oil walnut stain to get the desired color. It looks very beautiful also gave me the desired reddish tone that I was looking for. After a thick coat of stain and several coats of Tru-Oil using some fine sanding (400 grit) and OOOO steel wool in between coats. I applied a coat of stock sheen conditioner to the stock that gave it a very beautiful lustrous finish. The stock was ready for installation on the gun at this point. This process took around a week, for I had to let it dry for 24 H between coats. Just before I was about to install the stock back on the rifle, accidentally I dropped on it one of the pieces of wood that I used for stain testing which was on the shelf above the working bench where the stock was laying on. It did put quite a dent in the stock, talk about being sick, well I was and nothing I could do about it except to calm down walk away from it and leave it alone. After few days I started the work on it again, I steamed out the dent, let it completely dry and steamed it out again till the dent disappeared. I sanded out the area and re matched the stain mixing few stains till I got the exact matching color. I reapplied few coats of Tru-Oil to the damaged area feathering it in to match the thickness of the finish on the rest of the stock and then applied an additional couple of coats to the Whole the stock. As I write this report, the stock is hanging to dry out after the final coat of Tru-Oil, tomorrow God willing it will receive the Stock sheen and conditioner rub and will be left to dry before I do install it on the gun. Best regards Malek Good shooting/hunting and God's best. Best regards Malek Good Hunting/Shooting and God's best. | |||
|
| one of us |
Thanks Malek.Good to know they shot well for some.I am now thinking of getting one. | |||
|
| One of Us |
shootaway....neither can you........ | |||
|
| Powered by Social Strata | Page 1 2 |
| Please Wait. Your request is being processed... |
Rifles Double Rifles

Visit our on-line store for AR Memorabilia