
 Guns, Politics, Gunsmithing & Reloading Gunsmithing
 Go | New | Find | Notify | Tools | Reply |
| Mechanical drawings for barrel shanks and parts | Login/Join |
| One of Us |
A hobby train and airplane builder friend of mine called this morning and asked where to buy those old timey oil cans with the spout so he could fill the oilier on his knee mill without running the table all the way out and to the top. I told him I didn't have a fawking clue. He asked how I filed mine and I told him I just poured it in. So he came over to see where and how I had relocated my oil reservoir. He almost crapped himself when he learned the awful truth. Yup. Plain old liquid laundry soap jugs. They have that nifty spout to get into hard places on washing machines. Been using them for years. 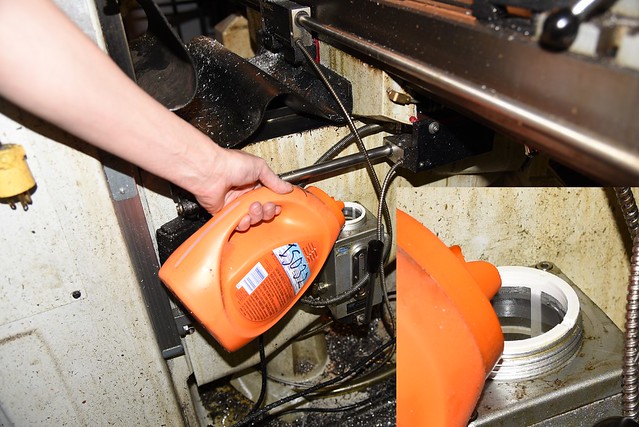 AS 32 Oil by Rod Henrickson, on Flickr AS 32 Oil by Rod Henrickson, on FlickrWhen I was a kid. I had the stick. I had the rock. And I had the mud puddle. I am as adept with them today, as I was back then. Lets see today's kids say that about their IPods, IPads and XBoxes in 45 years! Rod Henrickson | |||
|
| One of Us |
For those who always wondered how to quickly grab, hold, machine, release, 1000 1/2 X 28 bolts while you cut a screwdriver slot in the heads with the mill, or held something with a polished surface without damage while you cut them with the band saw and heard the rumours but never saw one. Yes, it's a 1-1/8th pin vise. Quick twist dat way, tight. Quick twist dis way, loose. There is a removable material stop inside so each cookie is within +-.005 inch in length. It uses 5C collets and the handle is hollow so any length of material can be used with an end stop for material length. 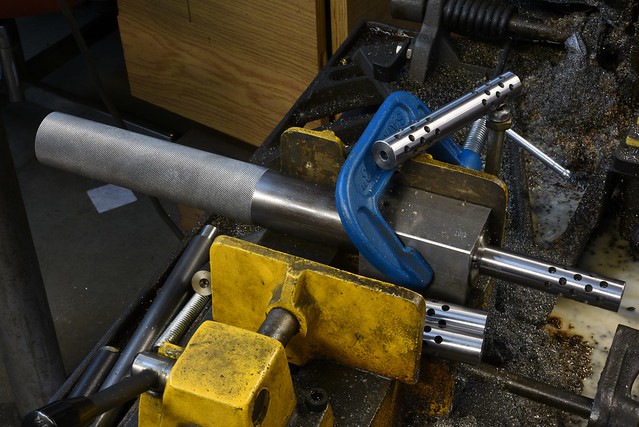 1 18 pin vise by Rod Henrickson, on Flickr 1 18 pin vise by Rod Henrickson, on FlickrWhen I was a kid. I had the stick. I had the rock. And I had the mud puddle. I am as adept with them today, as I was back then. Lets see today's kids say that about their IPods, IPads and XBoxes in 45 years! Rod Henrickson | |||
|
| One of Us |
Four months worth of muzzle brakes. 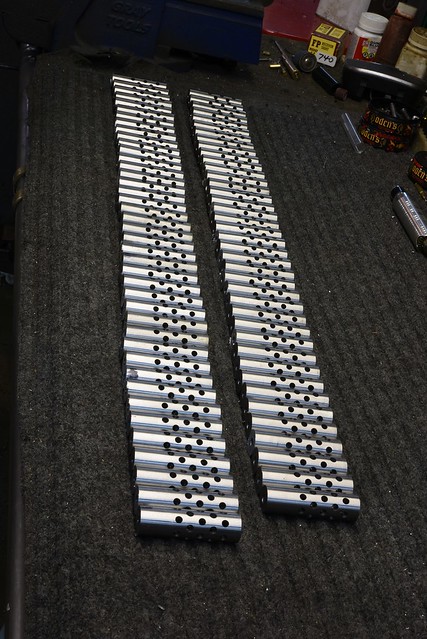 Gunsmith Rod Henrickson Brakes by Rod Henrickson, on Flickr Gunsmith Rod Henrickson Brakes by Rod Henrickson, on FlickrWhen I was a kid. I had the stick. I had the rock. And I had the mud puddle. I am as adept with them today, as I was back then. Lets see today's kids say that about their IPods, IPads and XBoxes in 45 years! Rod Henrickson | |||
|
| One of Us |
Driving out loaded rounds with a grease gun, video. https://youtu.be/HGbigz35QAg When I was a kid. I had the stick. I had the rock. And I had the mud puddle. I am as adept with them today, as I was back then. Lets see today's kids say that about their IPods, IPads and XBoxes in 45 years! Rod Henrickson | |||
|
| One of Us |
Modification to use the Warne and other BRNO - CZ 19mm rings on the older BSA rifles. The cut is .251 inches deep and .400 inches wide. The length of the cut is a try and fit type affair but easy to do. It doesn't really matter if the length of the cut is too far. It just has to be far enough to give clearance for the recoil lug when the ring is tightened. It's actually one of the neatest and cleanest bastardizations for this rifle that I have used. HSS will cut these receivers with a full flood of water but the material is tough and really hard on cutters. Carbide should be used to make it cost effective. 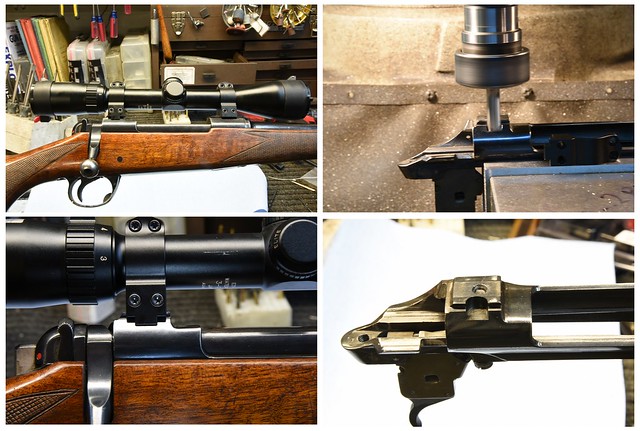 BSA by Rod Henrickson, on Flickr BSA by Rod Henrickson, on Flickr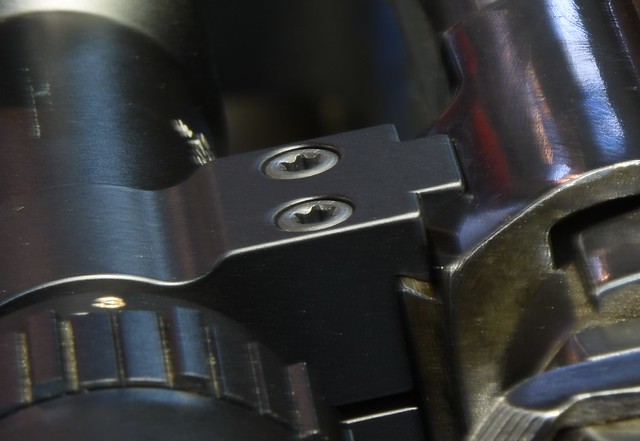 BSA1 by Rod Henrickson, on Flickr BSA1 by Rod Henrickson, on FlickrWhen I was a kid. I had the stick. I had the rock. And I had the mud puddle. I am as adept with them today, as I was back then. Lets see today's kids say that about their IPods, IPads and XBoxes in 45 years! Rod Henrickson | |||
|
| One of Us |
Here is a video of removing a stuck 50 BMG case. This is the coolest one yet. Scared the crap out of me when it let go. I would have to think that it built up a rather EXCESSIVE amount of pressure before it let go. https://youtu.be/fimvzxZTpbU When I was a kid. I had the stick. I had the rock. And I had the mud puddle. I am as adept with them today, as I was back then. Lets see today's kids say that about their IPods, IPads and XBoxes in 45 years! Rod Henrickson | |||
|
| One of Us |
Up until a couple of years ago I was still threading with HSS. I had tried carbide for threading 10 years back but it was just to chalky and brittle to thread at low speeds on the little can opener machines that we use in our industry. I had sort of resigned myself to the fact that it was CNC only. About a year and a half ago, one of the tooling salesmen had convinced me that carbide had changed enough to be useful to me and I ordered a tool holder and a bunch of 6 TPI inserts so that I could cut any pitch to give them a try. While expensive at about $20 per insert or $6.66 per tip CAD, I found that the damned things were lasting virtually forever at 200 RPM in 416 and 4140. The thread finish was also pretty much as good as I was cutting with sharp HSS so I started using the carbide full time. Some time ago I changed all the threads for my brakes to 28 TPI, ½, 9/16, 5/8 and ¾ so two weeks ago I dropped $400 on a new tool holder and some full form 28 TPI inserts. I have cut about 15 threads with the insert in the picture and it shows no sign of wear whatsoever. I am cutting my shanks .003 to .004 inch over sized and I cut until it knocks the crest off and then try the device. If necessary I make one more cleanup cut. I'm never going back to HSS. Hi Rod, Thanks for all the info and vids you take the time to post. When you were an HSS man, did you ever use a single point, thread profile cutting tool which was round. We clamped it on to the side of the holder. When it needed sharpened,you just grind the top rake, move the cutter round to reset the height.They came in numerous tpi. I do a lot of external screw cutting close up to the shoulder so I keep the speed down even lower than you. I used these cutters years ago, but have lost touch with the source and can't find them on the net.jc | |||
|
| One of Us |
I do not do production but for my purpose the Arthur Warner HSS toolholder and their HSS inserts. Beautiful threads and they are great for longevity. | |||
|
| One of Us |
. Yup. I know the tool that you're talking about John. I used them many many years ago on a on a Hardinge Screw machine. They were a little Pacman shaped job when new, with a spline on the one side with about 60 or so cuts. You loosened the allen set on the left and advanced the spline up one notch and held the top of the cutting surface to about 4 degrees or so on the grinding wheel to resharpen it with a bit of rake. As it dulled you kept rotating the Pacman up, advancing it one notch on the spline to give you new material to grind. You never had to recenter the tool and if you were careful with your grind you never had to readjust your height. I could be wrong but if memory serves Putnam may have made them. I haven't seen them for sale in years. I still use HSS quite often but I use cobalt, concave, T top parting blades for tools. It has positive rake built right into it with the hollow grind and I sharpen them with diamond wheels on one of my can opener lathes so I get perfect angles and grinds. They cut nicer threads than any HSS tool I have ever used. I'm getting old and I don't look so good anymore, even with glasses to cover my face so the cutter grinders are a blessing. 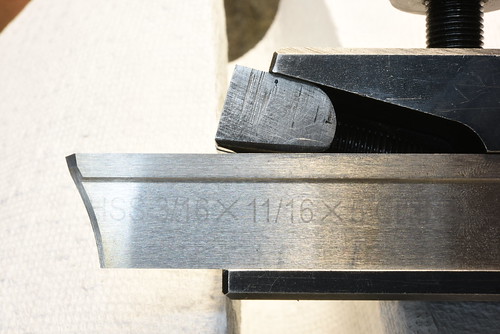 HSS Thread Side by Rod Henrickson, on Flickr HSS Thread Side by Rod Henrickson, on Flickr HSS Thread Top by Rod Henrickson, on Flickr HSS Thread Top by Rod Henrickson, on Flickr HSS Threading End by Rod Henrickson, on Flickr HSS Threading End by Rod Henrickson, on FlickrAs far as the carbide goes, I've had some problems. My tool box is too small and I've stored them too close together and the fool things have been breeding up. I turn them at about 300 RPM now which is the fastest I can manage and still hit the notches on the clock. Faster is better for finish. Too fast is chaotic. 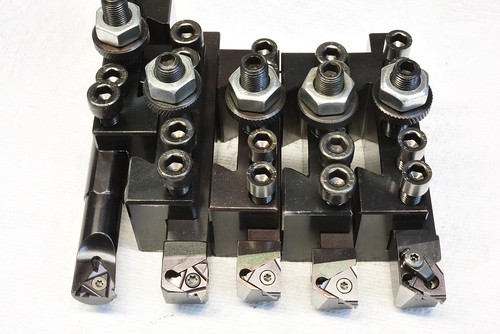 Carbide Threading by Rod Henrickson, on Flickr Carbide Threading by Rod Henrickson, on FlickrMost people don't understand full form tools and a lot of them don't even use them right. There are several parts to a thread and all of them are important to getting a good thread fit. What the full form tooling does is gives you a near perfect mirror image of the thread that you want to cut. As a rule I believe they are formed to about +-.0001 inch accuracy on the angle, flank length, root dimension and crest dimension. With hand ground or standard V tooling it is quite literally impossible to get the root correct. Most people just ignore the crest altogether and allow it to crush into the root of the female side. Others will wipe the crest undersized with a file. Unless you are using a tool and cutter grinder of some type, most people are probably lucky to get the flank angles within 2 degrees and quite often on hand ground tools the flanks are far from square. What most people do is cut the thread undersized and then crush it on to get a reasonable fit. What they often notice is that once they screw it off and screw it on a couple of times, their tight thread fit has been lost because the high spots have all been worn off the thread. If both the male and female threads have been cut with class 4 fit taps and dies, or if they have been cut with full form tooling, the thread fit will be much more accurate and the fit will remain tighter over a longer period of time as there is more surface area bearing. Some people will actually buy one full form threading holder and then buy full form tooling for the largest thread they will be cutting and simply cut smaller thread sizes to fit with the larger size tooling. This sort of works and is an improvement over hand ground tools but they lose the advantage of the full form with differing roots and an unknown crest. The biggest novelty of the full form tooling is the ability to simply measure the OD to determine when you have completed your thread. When cutting a 1/2x28 thread for example, you simply measure the OD as you cut and as soon as your micrometer reads .500 inch, your thread is to size and all dimensions are correct to Unified specifications. In our industry of course we can't simply assume that the devices we are threading to match are to correct to Unified standards. Most of the time, because of CNC machines and operators not checking on the fly, or simple tool wear and carelessness the entire thread we are cutting to is slightly under or over size. In which case we simply cut to size using the try and cut method. Using this method is more than acceptable and providing the maker of the part that we are fitting to was using taps, dies or full form tools and we are using taps, dies or full form tools, all of the thread dimensions will still be correct in every detail. Just slightly smaller or slightly larger than standard Unified. But a totally correct fit, none the less. When I first tried full form carbide 15 years ago they were a MASSIVE FAILURE for me. Most of the times gunsmiths are threading on hollow tubes, with small centers, light machines and most importantly, machines which were incapable of threading at the speeds the tooling required. My early experiments at using them were a dismal failure and the tips just broke up like chalk. This new crop of tooling is totally different. You can thread at 60 RPM with tremendous tool pressure (yer still not suppose to) but they hold up fine. You can have it chatter like a Californian in Alaska and they hold up fine. You can even cut interrupted threads and they hold up fine. On average I seem to get about 50 or 60 threads per tip or 150 or 200 threads per cutter out of them. The cost seems to be about a dime per thread USD. I buy boxes of cutters for different pitches as I need them. But so far, I just have holders for the common pitches that I cut. I simply, temporarily cannibalize holders as I need them for oddball pitches. This is a picture I just took of the nose of a 28 TPI full form cutter. Full form tooling is just slightly less complicated than what it took to take this picture. But if you have full form tooling and use it correctly, a monkey can cut perfect threads. Notice the little flat on the nose that cuts the root dimension. 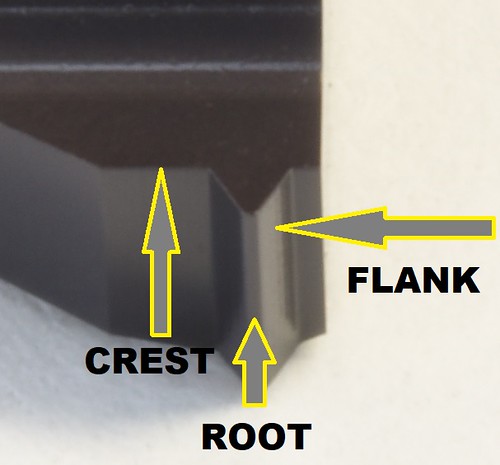 28 TPI full form by Rod Henrickson, on Flickr 28 TPI full form by Rod Henrickson, on FlickrWhen I was a kid. I had the stick. I had the rock. And I had the mud puddle. I am as adept with them today, as I was back then. Lets see today's kids say that about their IPods, IPads and XBoxes in 45 years! Rod Henrickson | |||
|
| One of Us |
Thanks for your reply Rod and butch. I'll try em both.Everything goes so dam fast these days,especially with tungsten carbide. I wish I was as old as you Rod (again | |||
|
| One of Us |
I just hope I get to be as old as Ole Lambert some day. Without the rocks & pokey sticks flashbacks of course. When I was a kid. I had the stick. I had the rock. And I had the mud puddle. I am as adept with them today, as I was back then. Lets see today's kids say that about their IPods, IPads and XBoxes in 45 years! Rod Henrickson | |||
|
| One of Us |
A simple experiment to show what happens to steel as it is heated. Old style structural steel buildings vs reinforced concrete buildings. Or for the conspiracy theorists: WHAT YOUR GOVERNMENT DOESN'T WANT YOU TO KNOW ABOUT STRUCTURAL STEEL BUILDINGS ! https://youtu.be/aqSrmeZexyg When I was a kid. I had the stick. I had the rock. And I had the mud puddle. I am as adept with them today, as I was back then. Lets see today's kids say that about their IPods, IPads and XBoxes in 45 years! Rod Henrickson | |||
|
| One of Us |
Here's one that walked in off the street and walked out as is. Never buy guns at auctions. And if you happen to be a hand loader, this is enough pressure for just about any Hillbilly, Cowboy or Redneck ! 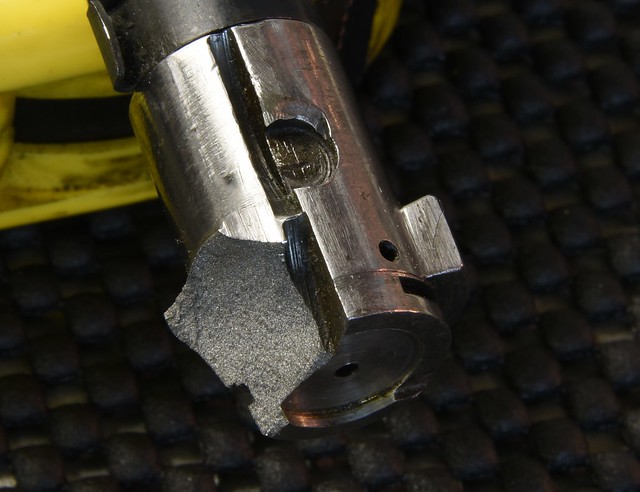 Gunsmith Rod Henrickson Pressure1 by Rod Henrickson, on Flickr Gunsmith Rod Henrickson Pressure1 by Rod Henrickson, on Flickr Gunsmith Rod Henrickson Pressure2 by Rod Henrickson, on Flickr Gunsmith Rod Henrickson Pressure2 by Rod Henrickson, on FlickrWhen I was a kid. I had the stick. I had the rock. And I had the mud puddle. I am as adept with them today, as I was back then. Lets see today's kids say that about their IPods, IPads and XBoxes in 45 years! Rod Henrickson | |||
|
| One of Us |
Tikka T3 Drawing  Rod Henrickson Tikka T3 by Rod Henrickson, on Flickr Rod Henrickson Tikka T3 by Rod Henrickson, on FlickrWhen I was a kid. I had the stick. I had the rock. And I had the mud puddle. I am as adept with them today, as I was back then. Lets see today's kids say that about their IPods, IPads and XBoxes in 45 years! Rod Henrickson | |||
|
| One of Us |
Ruger M77 MKll Drawing 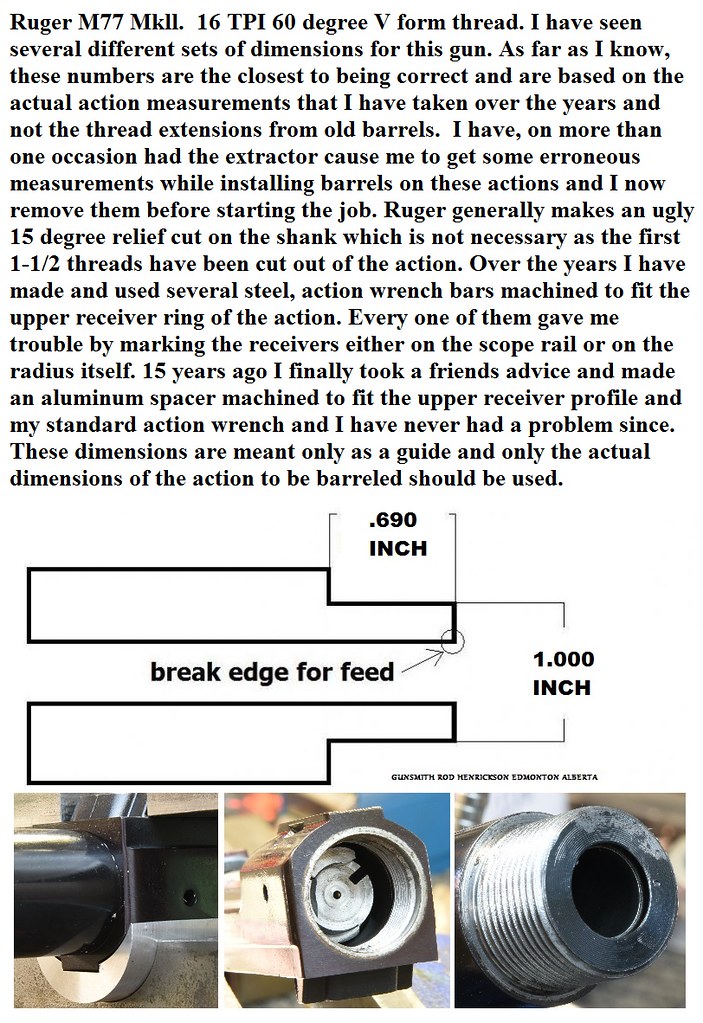 Rod Henrickson Ruger M77 Mark ll by Rod Henrickson, on Flickr Rod Henrickson Ruger M77 Mark ll by Rod Henrickson, on FlickrWhen I was a kid. I had the stick. I had the rock. And I had the mud puddle. I am as adept with them today, as I was back then. Lets see today's kids say that about their IPods, IPads and XBoxes in 45 years! Rod Henrickson | |||
|
| One of Us |
A few months back I had to drill & tap some holes inside of a crank case to hold some fluid lines and to do it I ordered some ER11 and 16 collet extensions to do the job. I thought they would be single usage but it's gotten to the point that if you tried to take them, I'd smash your thieving fawking fingers ! 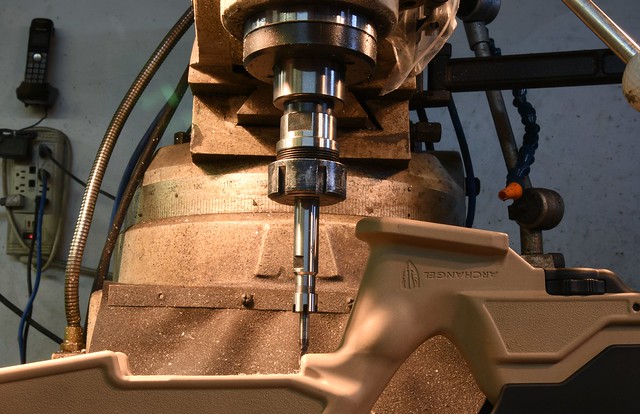 ER11 extension by Rod Henrickson, on Flickr ER11 extension by Rod Henrickson, on FlickrWhen I was a kid. I had the stick. I had the rock. And I had the mud puddle. I am as adept with them today, as I was back then. Lets see today's kids say that about their IPods, IPads and XBoxes in 45 years! Rod Henrickson | |||
|
| One of Us |
A while back someone was complaining about an off center bore. This came in for cut and crown and is one of the worst that I have come across in a long time. It is .040 inch off. Thank goodness for piloted crowning reamers. 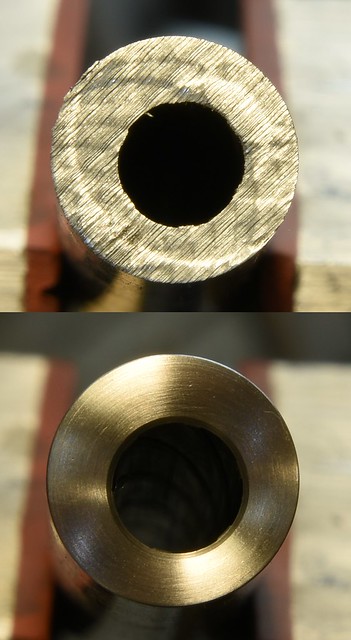 hole not in the middle by Rod Henrickson, on Flickr hole not in the middle by Rod Henrickson, on FlickrWhen I was a kid. I had the stick. I had the rock. And I had the mud puddle. I am as adept with them today, as I was back then. Lets see today's kids say that about their IPods, IPads and XBoxes in 45 years! Rod Henrickson | |||
|
| One of Us |
As most people know I dislike putting Sako or M16 style extractors in the 700 Remington. I know all of the pros and cons of the after market verses the factory extractors. I just happen to think you're spending a bunch of money to make the gun do, what it already did, but really no better. But I'm a whore and I'll do anything for money as long as it's legal. I have started to use the Sako 75 extractors because the other versions are getting pretty hard to get. Plus, the 75 extractor uses a common plunger to drive it without a half notch cut into it. I have found that it is far less finicky to install and get functioning than previous versions. I have done about 15 so far to these dimensions with no hiccups. I will do a drawing for the magnum at a later date when I have one in front of me.  REMINGTON BOLT FACE SAKO EXTRACTOR by Rod Henrickson, on Flickr REMINGTON BOLT FACE SAKO EXTRACTOR by Rod Henrickson, on FlickrThe lugs are tilted to a 45 degree angle for the cut. There are a number of ways to do it, but using V blocks and a common level will get you to +/-1 degree or less. I believe that most of the other guys installing them lean toward 45 degrees as well to ensure that the cartridges do not hit the scope on the way out and fall back into the action. After finding 45 degrees the center is located using an edge finder. 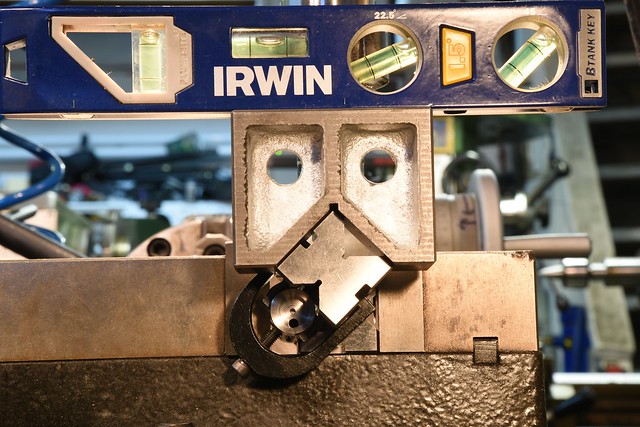 finding 45 by Rod Henrickson, on Flickr finding 45 by Rod Henrickson, on FlickrThe slot is then cut with a 7/32nds carbide slot or end mill. 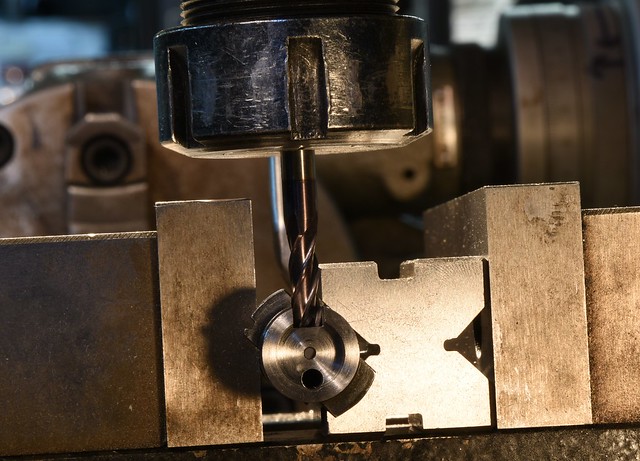 mill cut by Rod Henrickson, on Flickr mill cut by Rod Henrickson, on FlickrThe edges are found in the slot with an edge finder and the hole for the spring and plunger is drilled. 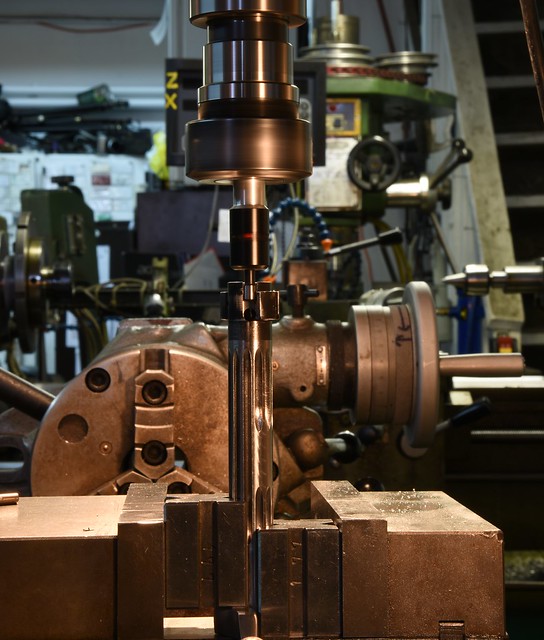 finding center by Rod Henrickson, on Flickr finding center by Rod Henrickson, on FlickrFinished job. 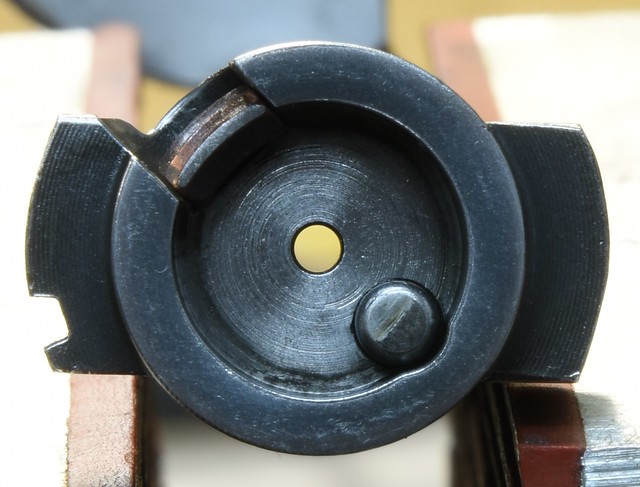 bolt face by Rod Henrickson, on Flickr bolt face by Rod Henrickson, on FlickrI guess I should add that I like to use an electronic edge finder in the extractor cut to find the sides and back of the cut. I can tell you from experience that every so often if a wiggler / clicker type edge finder is used it will start bouncing catty-corner off two edges at once and double over - - - - - - - IT'S ONE HELL OF A MESS ! You will need a new edge finder after pulling that stunt ! 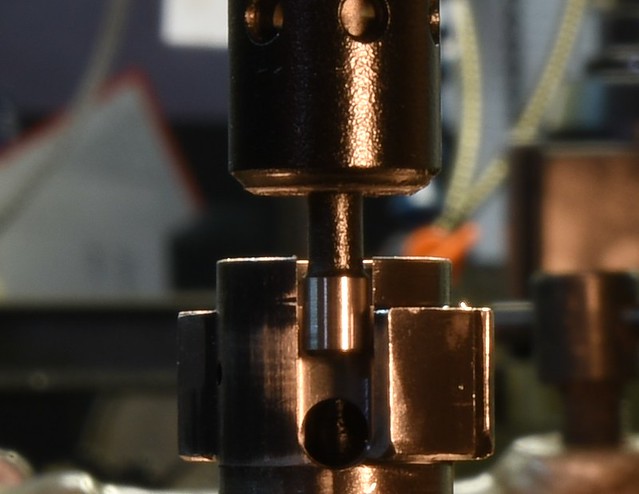 electronic edge finder by Rod Henrickson, on Flickr electronic edge finder by Rod Henrickson, on FlickrSo why, besides the money you ask, would one take a perfectly good Remington 700 S bolt and screw it up with a Herring Muncher extractor ? Why, to match the rest of the cluster fawk butchering you did to the action. Of course ! 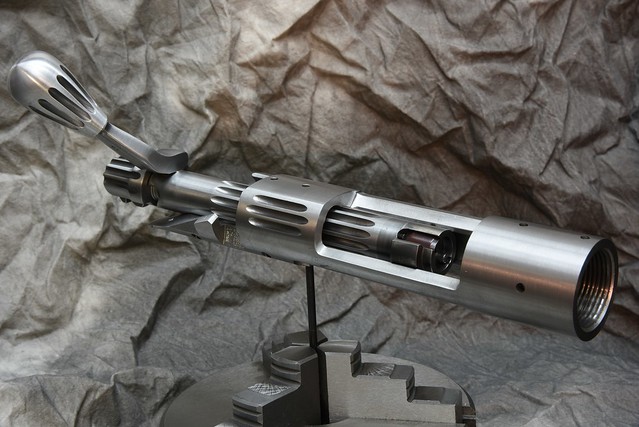 Rem 700 R by Rod Henrickson, on Flickr Rem 700 R by Rod Henrickson, on Flickr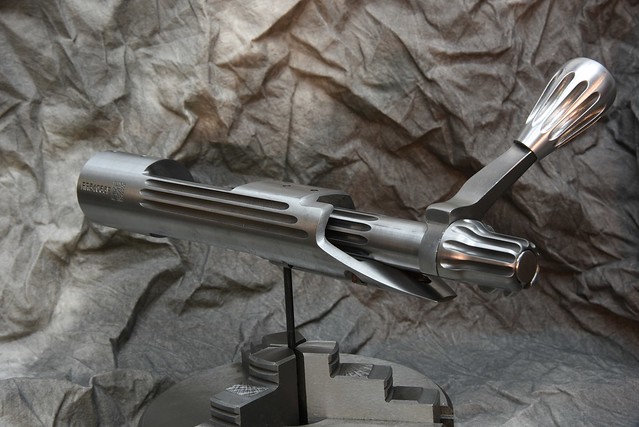 Rem 700 L by Rod Henrickson, on Flickr Rem 700 L by Rod Henrickson, on FlickrPeople often ask me about the chatter on bolt lift caused by the flutes and say that they dislike it. Simple mathematics. Don't flute that area. Then it won't chatter. 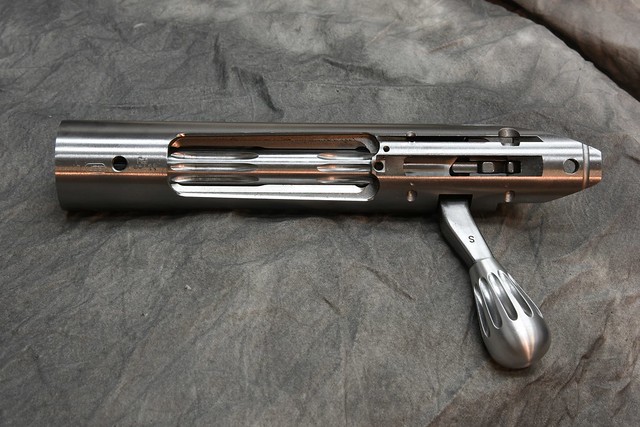 non chatter by Rod Henrickson, on Flickr non chatter by Rod Henrickson, on Flickr Rem 700 BC by Rod Henrickson, on Flickr Rem 700 BC by Rod Henrickson, on FlickrWhen I was a kid. I had the stick. I had the rock. And I had the mud puddle. I am as adept with them today, as I was back then. Lets see today's kids say that about their IPods, IPads and XBoxes in 45 years! Rod Henrickson | |||
|
| One of Us |
You just never quite run out of stuff to chop off. 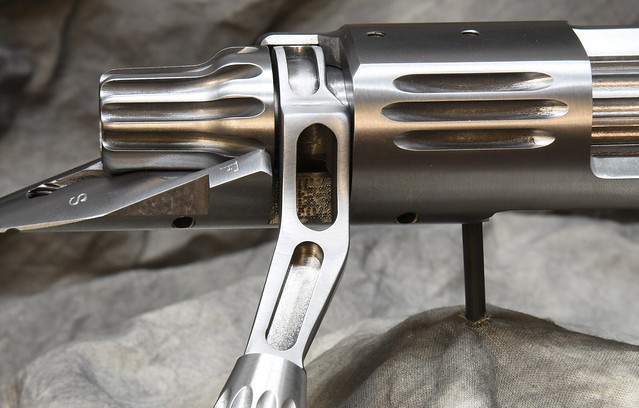 Rem 700 SA Bolt Handle by Rod Henrickson, on Flickr Rem 700 SA Bolt Handle by Rod Henrickson, on FlickrWhen I was a kid. I had the stick. I had the rock. And I had the mud puddle. I am as adept with them today, as I was back then. Lets see today's kids say that about their IPods, IPads and XBoxes in 45 years! Rod Henrickson | |||
|
| One of Us |
At some point you're just being silly. 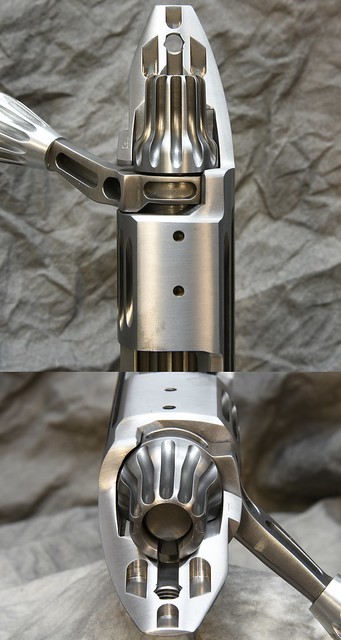 Rem 700 SA 7 by Rod Henrickson, on Flickr Rem 700 SA 7 by Rod Henrickson, on FlickrWhen I was a kid. I had the stick. I had the rock. And I had the mud puddle. I am as adept with them today, as I was back then. Lets see today's kids say that about their IPods, IPads and XBoxes in 45 years! Rod Henrickson | |||
|
| One of Us |
Now that I'm thinking about it, Remington actually cheated in their final fitting and made 3 different bolt lengths to shortcut final headspacing. They run the reamers in and shoot for dead on. If things don't quite work, (which happens to everyone off and on) they simply reach in the bin and grab an oversize or an undersized bolt. 98% of the time that fixes the hiccup without pulling the barrel and making manual corrections. 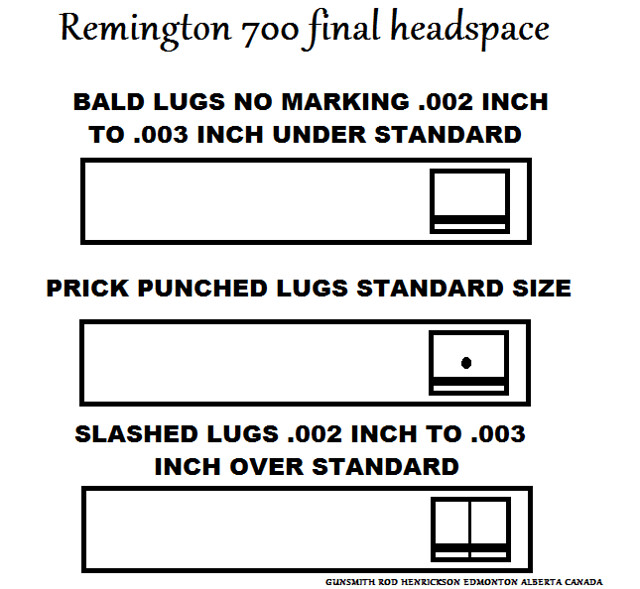 REMINGTON HEADSPACE by Rod Henrickson, on Flickr REMINGTON HEADSPACE by Rod Henrickson, on FlickrWhen I was a kid. I had the stick. I had the rock. And I had the mud puddle. I am as adept with them today, as I was back then. Lets see today's kids say that about their IPods, IPads and XBoxes in 45 years! Rod Henrickson | |||
|
| One of Us |
Browning X Bolt / A Bolt disassembly tool Screw the bolt shroud all the way into the bolt. Usually 1/2 to 3/4 of a turn past normal. Then you grab the A Bolt / X Bolt fire array disassembly tool out of the top drawer in the brown tool box and jam it in the shroud with the flat toward the pin in the cocking piece and the wedge part forward. Then you unscrew the shroud and the handy dandy tool holds the cocking piece back. I don't have an A Bolt or X Bolt in the shop to demonstrate with right now. To get the measurements for the tool you just screw the shroud all the way into the body and measure with a caliper. Then what with the filing. And the hack sawing. And the filing. Swearing helps. 10 minutes shot all to hell making that thingy. The wedge for the A Bolt is shorter or longer than the X Bolt but essentially the same damned thing. You make one on one end. And tother on tother end. Clear as mud in mothers milk I expect? I'll try to add a photo in use next time an A Bolt or X Bolt come in for repair. 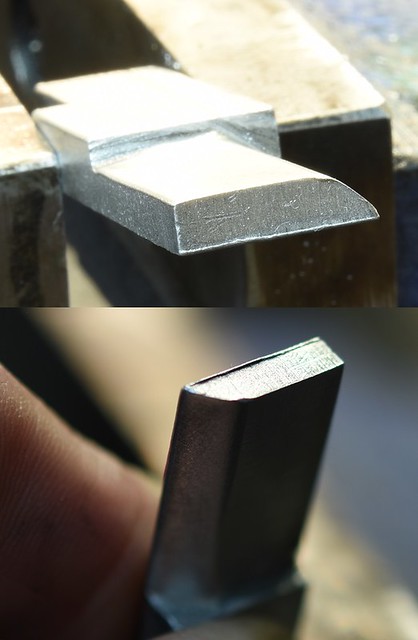 A Bolt X Bolt by Rod Henrickson, on Flickr A Bolt X Bolt by Rod Henrickson, on FlickrThis is how the tool is used. Yes the same tool works on Weartherby Vanguards. 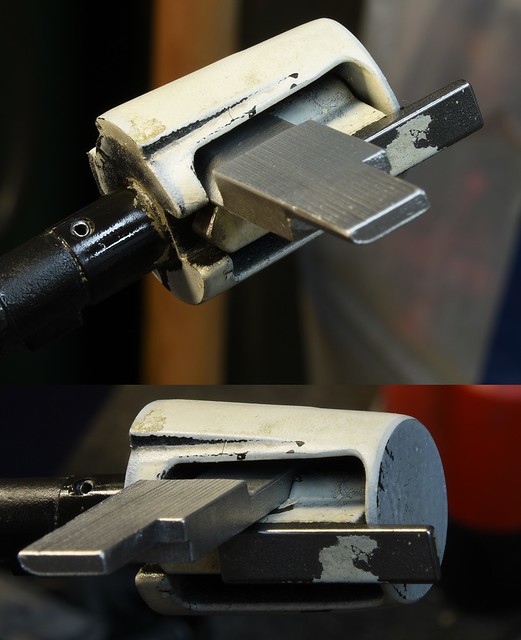 Bolt dissasembly tool by Rod Henrickson, on Flickr Bolt dissasembly tool by Rod Henrickson, on FlickrWhen I was a kid. I had the stick. I had the rock. And I had the mud puddle. I am as adept with them today, as I was back then. Lets see today's kids say that about their IPods, IPads and XBoxes in 45 years! Rod Henrickson | |||
|
| One of Us |
I've never been in a fight over love or money and only twice over whiskey. But I have had to shoot a couple of clowns that tried to flinch that clamp.  Gunsmith Rod Henrickson Pad Clamp by Rod Henrickson, on Flickr Gunsmith Rod Henrickson Pad Clamp by Rod Henrickson, on FlickrWhen I was a kid. I had the stick. I had the rock. And I had the mud puddle. I am as adept with them today, as I was back then. Lets see today's kids say that about their IPods, IPads and XBoxes in 45 years! Rod Henrickson | |||
|
| one of us |
Rod,....I just stumbled upon this thread. I don't spend much time on this site. I didn't realize you were so darn prolific with pics, videos and drawings. You have a production crew on staff?....:-) Interesting stuff. I see a few ideas I plan to steal. I have to get out and see you someday. | |||
|
| One of Us |
. I don't really hunt or shoot anymore Rick. No time to because that's my busy time and I sort of burned out of it about 10 years back so I sort of got into photography a bit. Besides, Cam likes camera stuff too. Every time he spends $300 on a piece of photographic equipment, I rush out and drop another $3,000 just to piss him off. Besides, I have been holding off buying a small CNC mill because of lack of space and 3 phase power and the money will burn a hole in my pocket if I don't spend the stuff off the bottom. And don't feel bad. I've been meaning to slip out and see your new place (not so new anymore I guess). But you know how it goes and you had to move half way to Calgary so I'd have to pack a lunch and a tent and make a safari of it. LOL When I was a kid. I had the stick. I had the rock. And I had the mud puddle. I am as adept with them today, as I was back then. Lets see today's kids say that about their IPods, IPads and XBoxes in 45 years! Rod Henrickson | |||
|
| One of Us |
I had a guy come in yesterday for a brake on a rifle, nothing special there, and an odd ball looking bolt knob that he had thought up for a Weatherby Vanguard. About the time I got the brake installed on the other rifle I got to thinking "The Vanguard has a round knob, so wouldn't it be cool to cut a flange out of it to butt the handle up to" After a bit of colorful calculating and putzing around with a coax, it didn't turn out half bad. A word of caution though. Those Vanguard bolt handles are rock hard. I turned the annular cutter at about 90 RPM with a full flood of Ridged sulfur base cutting fluid and I still took about 5 Remington 700 bolt knobs of life off the cutter. 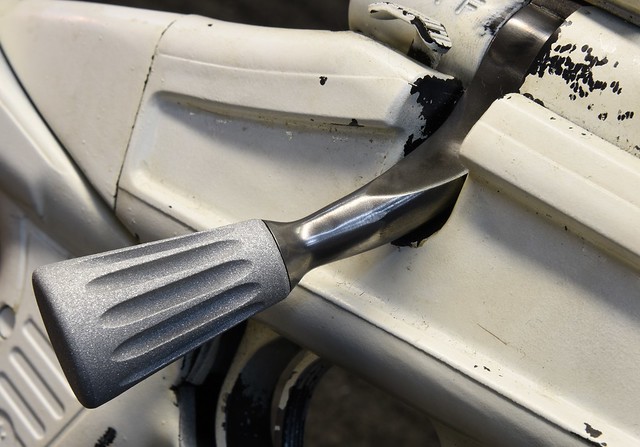 Bolt Knob by Rod Henrickson, on Flickr Bolt Knob by Rod Henrickson, on FlickrWhen I was a kid. I had the stick. I had the rock. And I had the mud puddle. I am as adept with them today, as I was back then. Lets see today's kids say that about their IPods, IPads and XBoxes in 45 years! Rod Henrickson | |||
|
| One of Us |
The action that the rats got at and chewed apart, after completion. Some days I start thinking that I should re-name the business to: "Rods Kooky Kreations."  DSC_0469 by Rod Henrickson, on Flickr DSC_0469 by Rod Henrickson, on Flickr DSC_0472 by Rod Henrickson, on Flickr DSC_0472 by Rod Henrickson, on Flickr DSC_0470 by Rod Henrickson, on Flickr DSC_0470 by Rod Henrickson, on Flickr DSC_0471 by Rod Henrickson, on Flickr DSC_0471 by Rod Henrickson, on FlickrWhen I was a kid. I had the stick. I had the rock. And I had the mud puddle. I am as adept with them today, as I was back then. Lets see today's kids say that about their IPods, IPads and XBoxes in 45 years! Rod Henrickson | |||
|
| One of Us |
A long time ago I realized that getting kicked around test firing shotguns and rifles just to see if they would go bang was not in my karma. It's also very expensive at a buck or four a shot. So I started using test caps. Take brass rifle cases and open the primer pocket enough to take a primer pressed in with your finger and shoot that. For shotguns I simply use the brass Pachmeyer snap caps and open them up to take 209s that I push in with my finger. Getting booted around isn't for this little-black-duck ! I still charge a buck or four per shot. I'm a whimp, I'm not silly ! 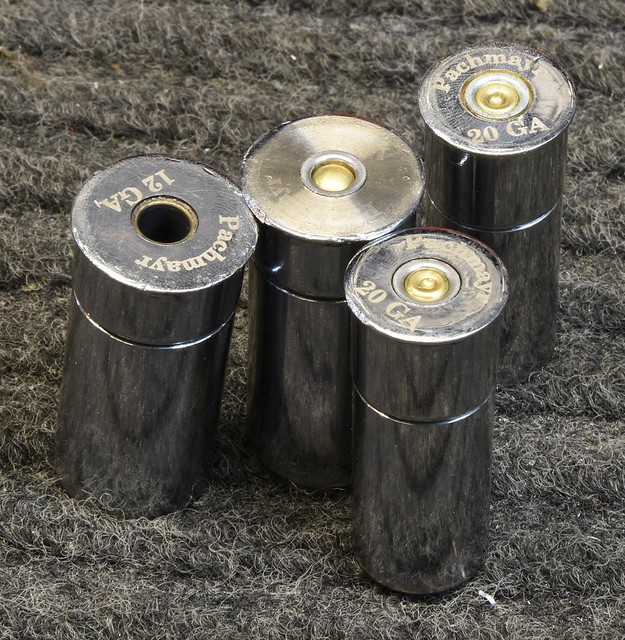 Test Blanks by Rod Henrickson, on Flickr Test Blanks by Rod Henrickson, on FlickrWhen I was a kid. I had the stick. I had the rock. And I had the mud puddle. I am as adept with them today, as I was back then. Lets see today's kids say that about their IPods, IPads and XBoxes in 45 years! Rod Henrickson | |||
|
| One of Us |
OK, so talking about it struck me with a thimble full of ambition, so I chopped off a piece of O1 and carved out the 243, 260, 308, 7mm-08, 358 test fire cap. That's the most common one. Length against a factory GO gauge is nuts on and I don't see any need to heat treat it. I think I'll start on the 25-06 - 30-06 in 2020. Maybe sooner if I get a bug in my ass. 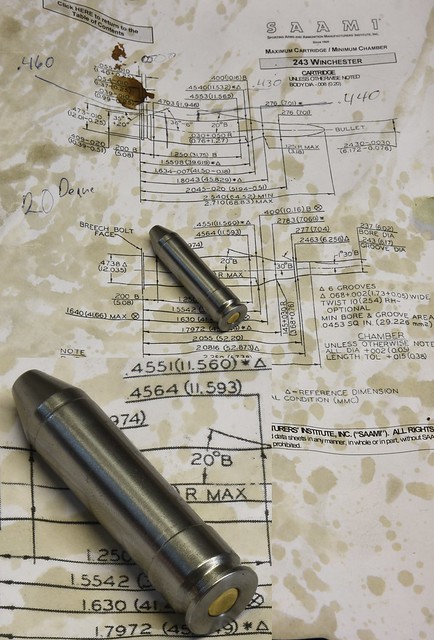 test cap 243 by Rod Henrickson, on Flickr test cap 243 by Rod Henrickson, on Flickr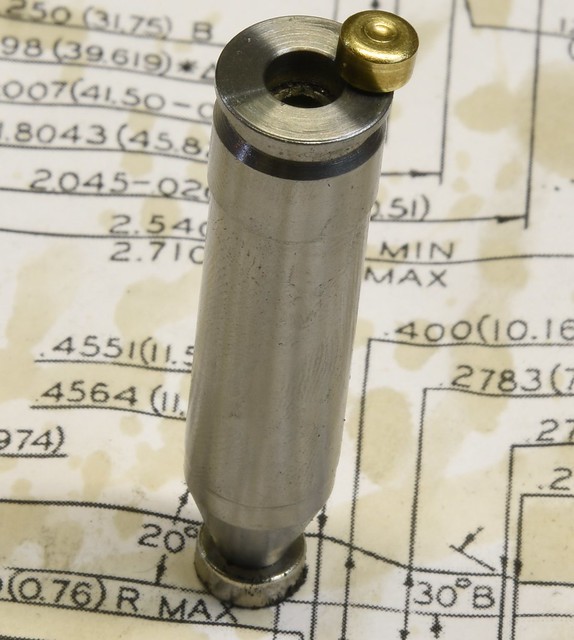 test cap2 243 by Rod Henrickson, on Flickr test cap2 243 by Rod Henrickson, on FlickrWhen I was a kid. I had the stick. I had the rock. And I had the mud puddle. I am as adept with them today, as I was back then. Lets see today's kids say that about their IPods, IPads and XBoxes in 45 years! Rod Henrickson | |||
|
| One of Us |
For those who have never welded up and refit, or installed a new locking bolt in a Browning, Perazzi or other double shotgun or rifle for that matter. The setup to mill the block looks pretty much like this. Yes you can just do it on the belt sander or with a file with spotting compound on the barrel seats. But if you don't get the seats 100% flat, you will often find that the bolt will jam in the forward position against the barrel seat and undo force will be required to break it free until the block wears in. Doing it in the mill with a carbide end mill ensures that they will be flat with a very fine finish. Also, using a sine bar will allow you to make a cut and then put it back into the mill at the exact same height every time. Make sure to set up the stop on your sine bar so the block sits in the same spot every time. It does not matter where the sine bar sits in the vise of course. Some of you math heroes may like to sit down with a lunch and work out the block height, I prefer to just use one of the hundreds of sine bar apps that you can download to your cell phone. Always measure the angle using ground parallels or blocks fitted into the lug seats of the barrels and then use your protractor to measure the angle. Round it off to the nearest degree. Then add 1 degree more. The reason for this is that the block will always have play in it and it will stand up when it locks. I cut about .001 inch at a time (cut and try – cut and try) until the top leaver sits to the right side edge of the tang, or to where ever the manufacturer happens to recommend it be. It's always best to weld up the old locking block with a TIG and any buzzard grade of non hardening rod and then re-cut it. The logic behind it is that there is simply a lot less fitting required in working with the old block. All of the Browning Superposed and Citories are safe to weld. Some of the old old old MX8s and all of the old MT6s are not safe to weld and the blocks will go glass hard and crack during welding. All of the MX8s from the 80s to current are safe. The BT99 is also safe to weld. 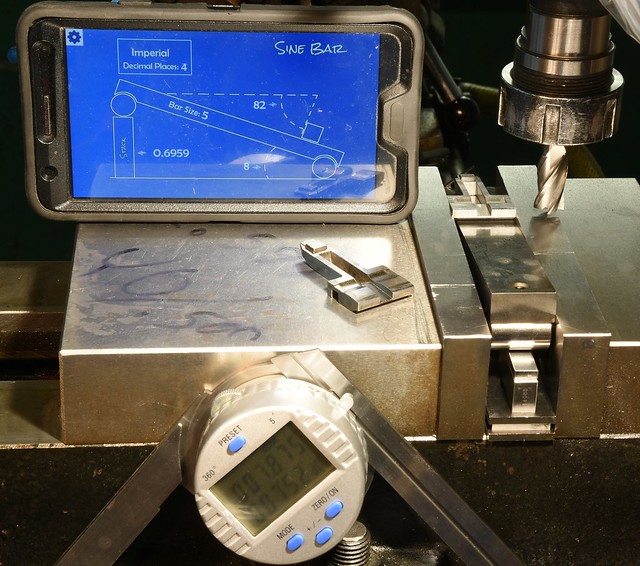 Browning Locking Bolt by Rod Henrickson, on Flickr Browning Locking Bolt by Rod Henrickson, on FlickrFitted locking block installed in the receiver and the old one above for reference. In the lower right is a blowup of the bolt. You can see the 1/64th 45 degree angle stoned on to the very front. If you fail to do this the lug can dig into the locking seat in the barrels. 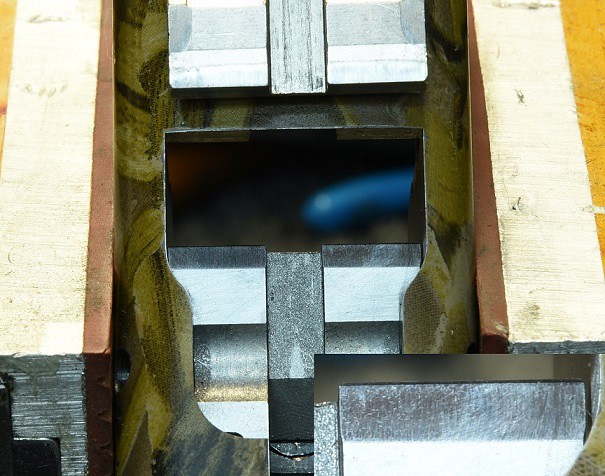 fitted locking bolt by Rod Henrickson, on Flickr fitted locking bolt by Rod Henrickson, on FlickrWhen I was a kid. I had the stick. I had the rock. And I had the mud puddle. I am as adept with them today, as I was back then. Lets see today's kids say that about their IPods, IPads and XBoxes in 45 years! Rod Henrickson | |||
|
| One of Us |
Rod, I found this thread interesting,and the pics you put up. I thread and recrown probably about a hundred barrels a year, to fit various moderators. I have got into the habit of setting the barrel up in the lathe before shortening it, that can be anything from 1/2" to ??" to check how true it is. The barrels are generally quite concentric, as they should be, not all old barrels either, some brand new. However when reduced in length some can be just as eccentric as the one you show. Which means of course,the rifling is not dead straight and only running true where and when supported in the lathe, when originally profiled. As gunsmiths do you or any of the guys have a check to see just how true/straight the rifling is? It's little wonder we need scopes in order for our bullets find their mark. I note that some are remarkably better than others. PS would you have checked this one before shortening,or just put it in the saw? | |||
|
| One of Us |
| |||
|
| One of Us |
Well, the off center bore was not exactly evident at the crown end. This is the off cut from that barrel and as you can see it's the same off center SOB from the first picture. But something else is stinking in Denmark and it's not the cheese or the lutefisk. A little tinkering with the focus and lighting and the big-ass bulge in the end of the barrel becomes very apparent. When I install brakes and flash hiders I always cut the threads on centers so if a barrel is wonky it always becomes immediately apparent when I turn on the machine. If it's only out .005 inch or so, I re-contour the brake to match the off center bore after threading. In a case like this the taper on the brake leading into the barrel would start to look really bad (trigonometry is not our friend here). So I choose not to do them when they get like this. As to be expected, the barrel itself is dead true inside. As in straight. It's the contour on the outside that's all screwed up. In the case of this one, which is a Remington barrel, it's because the barrel was centerless ground. The blanks are drilled or hammer forged and often, the end result happens to end up with a blank whose hole is not in the middle of the blank. During the centerless grinding used to turn the barrel to it's final profile the grinding wheels follow the pre-established outside dimensions of the barrel as a guide. Not the inside or bore. And you end up with a barrel like the one in the picture. The same goes for some custom, gunsmith turned barrels. They simply chuck one end in the three jaw (turning half at a time to avoid chatter) and turn half of it using a taper turning attachment and then flip it around and do the other half. Not working on centers leaves them with a hole that is far from in the middle. Or true to the outside. 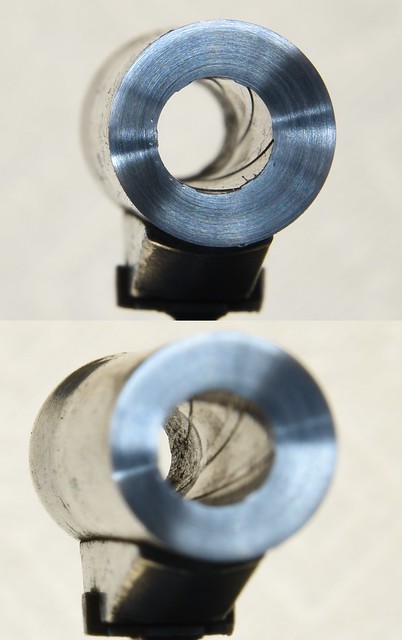 Off Center Bulge by Rod Henrickson, on Flickr Off Center Bulge by Rod Henrickson, on FlickrADD NOTE: The bulge on this one is actually quite apparent from the outside in this picture. Not so much with the naked eye. The camera lets us see things that our eyes don't often pick up. This bulge is a typical mud-plug. You can tell from the impacted finish on the inside. Snow and ice plugs always look very smooth inside. Bug-plugs and cleaning patch-plugs often show up as being bulged on one side only and are quite smooth. Bore sighter plugs are usually displayed as the typical (Bugs Bunny) Splay, split or classic banana peel down the barrel. Customers who experience bore sighter plugs are often crying when they come in too. When I was a kid. I had the stick. I had the rock. And I had the mud puddle. I am as adept with them today, as I was back then. Lets see today's kids say that about their IPods, IPads and XBoxes in 45 years! Rod Henrickson | |||
|
| One of Us |
99% of the time when I do a repair I put all of the customers bits and pieces into a bag and give them back, no questions asked. In the case of bulged barrels, I always make an exception and leave the stub on the saw. If the customer does not ask for it back between saw cleanings (that can take a couple three months) I section them in the mill and give them to regular customers as key fobs. I have always thought about having the shop name laser engraved on the backs but I am extremely low on ambition and VERY high on cheap. Besides, they know where they got it from and some of the craftier ones have managed to get two or three out of me. Old age and memory are not on my side. 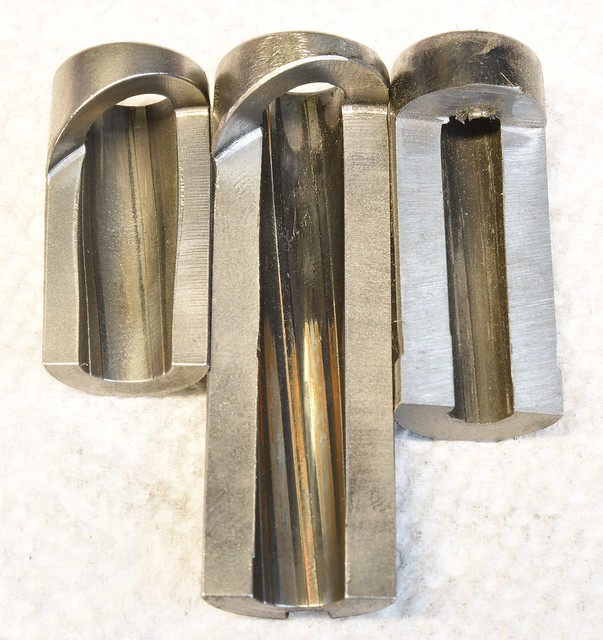 Bulge Fobs by Rod Henrickson, on Flickr Bulge Fobs by Rod Henrickson, on FlickrThe two outside ones are mud plugs. The one in the middle is a snow or ice plug. When I was a kid. I had the stick. I had the rock. And I had the mud puddle. I am as adept with them today, as I was back then. Lets see today's kids say that about their IPods, IPads and XBoxes in 45 years! Rod Henrickson | |||
|
| One of Us |
My curiosity got the best of me so I sectioned the barrel with the wonky contour and sure enough it is one of the most beautiful, classic, mud-plugs you could ever ask for. The blow up in the bottom right clearly shows how the sand has impacted into the steel and been dragged along. I also left the one end alone so the different thickness in the barrel wall can be seen. I will probably give this one to the Alberta Hunter Education Instructors Association for their displays. They get most of my really good blowups and interesting stuff. Everyone has a charity. 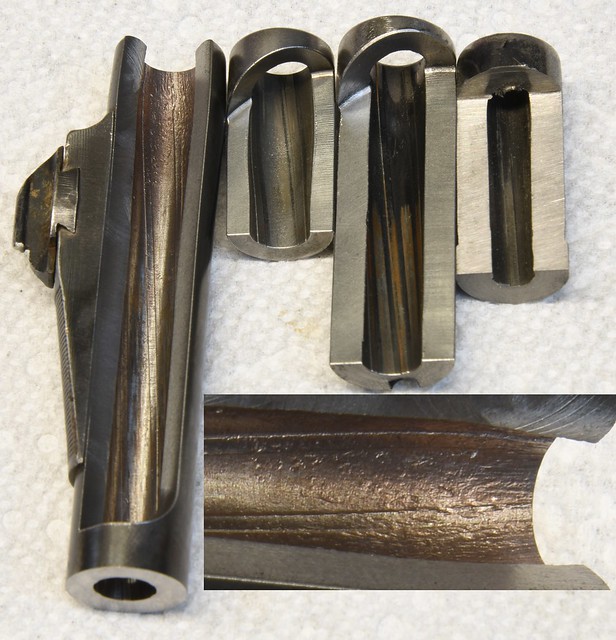 Mud Plug 1 by Rod Henrickson, on Flickr Mud Plug 1 by Rod Henrickson, on FlickrWhen I was a kid. I had the stick. I had the rock. And I had the mud puddle. I am as adept with them today, as I was back then. Lets see today's kids say that about their IPods, IPads and XBoxes in 45 years! Rod Henrickson | |||
|
| One of Us |
Thank you Butch and Rod for your replys and explanation. So it's not just computers that gets bugs in them. I will also give the customer his damaged thread or crown to remind him why his groups were goosed.jc | |||
|
| One of Us |
Bugs are big in gun barrels here. Every farmer in southern Alberta has a 303 British Lee Enfield with a 14 inch barrel. They tend to leave their guns in shops and garages a lot and the leaf cutter bees which are used to pollinate alfalfa crawl in the barrels about 3 inches down and build nests and lay eggs. The bees hatch but leave a bug/leaf cocoon inside and when Joe farmer shoots it, about 2 inches of the barrel blows off. They then square it off with the chop saw or hack saw and repeat this procedure every year until the barrel gets down to about 14 to 16 inches. After that they begin sticking a pencil or dropping a large headed screw into the bore to dissuade the bees. The theory being that you keep blowing off bits of the barrel until the optimum sweet spot is found and the gun starts shooting it's best. That's how it was explained to me by one old stogey sucking, whiskey guzzling row cropper. When I was a kid. I had the stick. I had the rock. And I had the mud puddle. I am as adept with them today, as I was back then. Lets see today's kids say that about their IPods, IPads and XBoxes in 45 years! Rod Henrickson | |||
|
| One of Us |
I bought one of those $20 endoscopes for my Android phone, just to play with and I can definitely say that it will never replace a good digital or optical bore scope. But for what it is, it is pretty damned good and will show you quite a bit if you happen to know what you are looking for to begin with. This barrel has a lot of rust in it so it was a good one just to play with to get the feel of the thing. It works a lot better if you shine a flashlight in the end of the bore as I did in this video. For gunshop use, looking for rusty chambers, bores, bulges or examining feed radius's and the like I can see a definite use for it. It also wouldn't bother me to turn loose one of my customers with it to play with. The thing is supposed to be waterproof and more or less indestructible. (within reason I suppose) And, the Chinese can make these fool things quicker than my customers could destroy them and at $20, I'm not to worried if it does get wreaked. It's also very quick and there is no setup. Just plug it into the phone, the app self starts and you poke it into whatever hole happens to be staring you in the face. The light on the endoscope is also adjustable with a hand wheel. The only thing that might bug some people about this one is that the companies info is watermarked on the photos and videos. Not a big deal as there are after market camera apps out there that will work with these devices if the advertising bothers you. https://www.youtube.com/watch?v=ZcXlcNGHJyQ  rusty bore by Rod Henrickson, on Flickr rusty bore by Rod Henrickson, on FlickrWhen I was a kid. I had the stick. I had the rock. And I had the mud puddle. I am as adept with them today, as I was back then. Lets see today's kids say that about their IPods, IPads and XBoxes in 45 years! Rod Henrickson | |||
|
| One of Us |
The same cheap endoscope used after the same bore has been scrubbed with a copper brush. The clarity of the pitting and damage is actually quite amazing and is more than good enough for the average amateur gunsmith. For it's simplicity and price it's probably a must for every gunsmith with a cell phone. I'll be carrying one in my pocket for gunshows and the like from now on too. https://youtu.be/Z_SaQt2Hsi8  enoscope2 by Rod Henrickson, on Flickr enoscope2 by Rod Henrickson, on FlickrWhen I was a kid. I had the stick. I had the rock. And I had the mud puddle. I am as adept with them today, as I was back then. Lets see today's kids say that about their IPods, IPads and XBoxes in 45 years! Rod Henrickson | |||
|
| One of Us |
Oh I'm having fun with this new toy. These little $20 endoscopes are quite handy. Putting a slight bend in the cable and running it through the barrel from the muzzle end gives a good view of the lug seats in the action and allows you to see if the bolt has been set back and the condition of the lug seats. https://youtu.be/vqwVfhQbhME 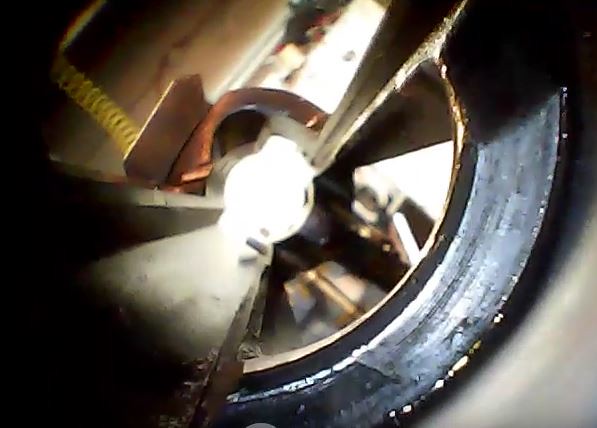 lug seats by Rod Henrickson, on Flickr lug seats by Rod Henrickson, on FlickrWhen I was a kid. I had the stick. I had the rock. And I had the mud puddle. I am as adept with them today, as I was back then. Lets see today's kids say that about their IPods, IPads and XBoxes in 45 years! Rod Henrickson | |||
|
| Powered by Social Strata | Page 1 2 3 4 5 6 |
| Please Wait. Your request is being processed... |
Guns, Politics, Gunsmithing & Reloading Gunsmithing

Visit our on-line store for AR Memorabilia