
 Guns, Politics, Gunsmithing & Reloading Gunsmithing
 Go | New | Find | Notify | Tools | Reply |
| Mechanical drawings for barrel shanks and parts | Login/Join |
| One of Us |
These are the dimensions for the Mosin Nagant Bolt Disassembly tool. The video shows it's use. When I first made the tool, the nose tube at the front was machined from the same piece as the body. Until I dropped it and bent it. The forward part was then altered by drilling out the body of the tool to accept replaceable noses. I should have done that in the first place. But I have never been accused of being the sharpest tack in the box. https://www.youtube.com/watch?v=ModW2H-rSf8  Mosin Nagant Bolt Disassembly Tool by Rod Henrickson, on Flickr Mosin Nagant Bolt Disassembly Tool by Rod Henrickson, on FlickrWhen I was a kid. I had the stick. I had the rock. And I had the mud puddle. I am as adept with them today, as I was back then. Lets see today's kids say that about their IPods, IPads and XBoxes in 45 years! Rod Henrickson | |||
|
| One of Us |
I finally broke down and made an effort at trying to make a usable bolt handle for the Mosin Nagant that wouldn't fall into the popular category of looking like hell, bending or simply breaking off at the first sign of over use. I wanted to get away from the clean up required with TIG welding and somehow use an improved brazing or silver solder method to fix the handle to the body so that clean up could be done quickly with chisels, harsh wire wheels and sand blasting. I settled on milling a short 1/4 inch wide, 1/4 inch deep key way into the top of the bolt bodies safety/guide lug with a carbide end mill and then milled a .500x.250X.250 key with an overhanging shelf on the root of the bolt handle that could silver soldered into the key slot on the bolt body. Not only would the key slot give more strength than would ever be required but the huge welded surface area would make it impossible to ever rip off. At first I toyed with the idea of using a geometric butter knife handle and while it did prove concept of the key way, the thing looked so hideous and was so hard to find and use that I dropped the butter knife idea all together and went with a conventional threaded stub. I finally settled on this model which can be cut from 3/4 inch cold rolled 1018 round stock in the mill. This will leave the style of the knob completely up to the customer as it uses the standard 5/16thX24 thread. While being much stronger than the joint on the Remington 700 bolt handle and geometrically able to work with the ATI cantilever scope mount with room to spare, it is none the less, still hideous. I don't think it's possible to make a Mosin Nagant church ready !  mosin nagant TK by Rod Henrickson, on Flickr mosin nagant TK by Rod Henrickson, on Flickr mosin nagant TD1 by Rod Henrickson, on Flickr mosin nagant TD1 by Rod Henrickson, on Flickr mosin nagant TD2 by Rod Henrickson, on Flickr mosin nagant TD2 by Rod Henrickson, on Flickr mosin nagant TD3 by Rod Henrickson, on Flickr mosin nagant TD3 by Rod Henrickson, on FlickrWhen I was a kid. I had the stick. I had the rock. And I had the mud puddle. I am as adept with them today, as I was back then. Lets see today's kids say that about their IPods, IPads and XBoxes in 45 years! Rod Henrickson | |||
|
| One of Us |
This is sort of a re-post from another thread. One of the newer offerings in Remington 700 triggers is the TriggerTech unit and at the start I was very suspicious of the design. There is no true sear in it as there are in other triggers. The two sears actually role on a steel pin which sits between them which eliminates almost all of the friction. Much like how the Egyptians rolled large stones on logs while making the pyramids. (Aliens taught them to do that. I saw it on TV or on the interweb)I have since had a chance to take apart and play with a half dozen of the their 700 triggers and those will be my next go-to for hunting triggers. To date, they seem to be one of the most thought out and from one trigger to the next the pull is very uniform and predictable. The roller sear takes away all of the trigger to trigger and most of the shot to shot variation. The safety is both an trigger and sear block system and it is a non-wearing system. I should have also added that the adjustment screw is actually a click system and there is no need to glue and un-glue everything when you make adjustments. The photos show the safe in the fire position and in the safe position. 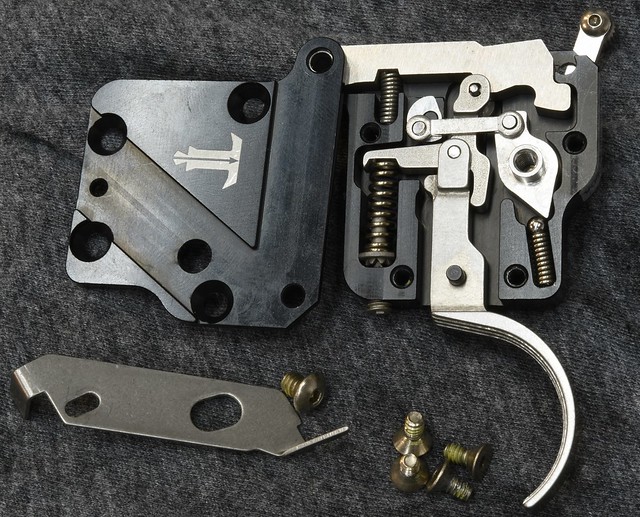 TriggerTech by Rod Henrickson, on Flickr TriggerTech by Rod Henrickson, on Flickr TriggerTech Safe On by Rod Henrickson, on Flickr TriggerTech Safe On by Rod Henrickson, on FlickrWhen I was a kid. I had the stick. I had the rock. And I had the mud puddle. I am as adept with them today, as I was back then. Lets see today's kids say that about their IPods, IPads and XBoxes in 45 years! Rod Henrickson | |||
|
| One of Us |
I did a drawing for the blank on the Mosin Nagant bolt handle and ran off a proof to the numbers just to make sure I hadn't mixed something up. The threads are added after and the handle can be held in the lathe by the thread extension and the handle rounded in the lathe if you want the shank round as I did in the earlier photo instead of square. I put the bend in last by heating and bending to 27 degrees. 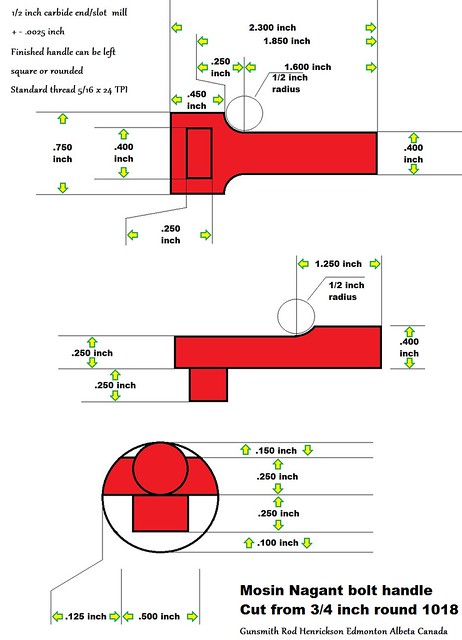 Mosin Nagant Bolt Handle by Rod Henrickson, on Flickr Mosin Nagant Bolt Handle by Rod Henrickson, on Flickr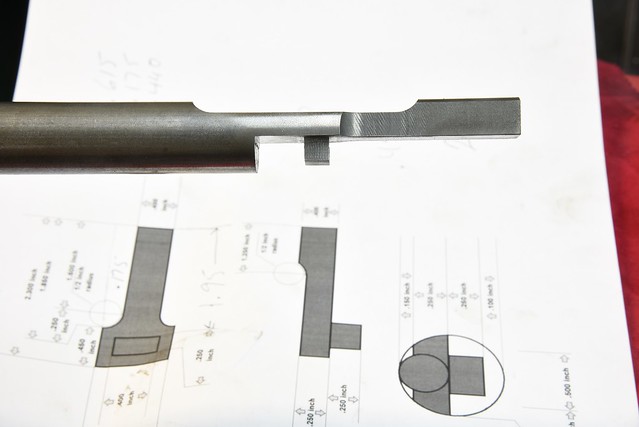 Mosin Nagant Bolt Handle1 by Rod Henrickson, on Flickr Mosin Nagant Bolt Handle1 by Rod Henrickson, on FlickrWhen I was a kid. I had the stick. I had the rock. And I had the mud puddle. I am as adept with them today, as I was back then. Lets see today's kids say that about their IPods, IPads and XBoxes in 45 years! Rod Henrickson | |||
|
| One of Us |
I just ran into a rather interesting anomaly. A guy came in with a stuck case from an over pressured factory round, I have no reason to doubt him on it being factory. And besides, I don't really care. The case came out with the usual assortment of colorful metaphors and violence that the last 100 came out with. Headspace is fine and outside of a few hairline cracks in the stock caused by the usual vented gases in the mag well or, traumatic overload pregnancy thingy there is no real damage. What did strike me odd is that after getting the case out, the primer pocket had taken a bit of a six sided shape. After a couple of cups of coffee and dissecting a live primer (not recommended for anyone but fools) and taking some measurements. It is evident that the cup on the primer backed or flowed out and the feet on the anvil of the primer spayed out and impressed themselves into the walls of the primer pocket. You can actually see in the photo where the anvil feet were pressed into the bottom of the pocket and then bent straight up to impress themselves into the pocket walls. You can also see how the anvil feet protected the rim of the primer pocket from gas cutting. This created the six sided look of the primer pocket. After which, the pressure launched all of the remnants of the primer to that strange place where those sorts of things go. I'm not at all confused by what I've found. I'm just perplexed that I have never encountered this or possible just have never noticed this effect before. It's not like I haven't seen several hundred blown out primers before. At any rate I thought I'd get out the big lenses and the ring lights and put up a photo to see if others had noted this phenomenon before ? 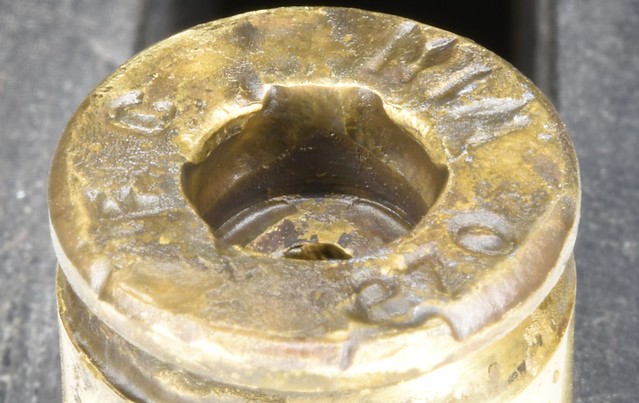 odd primer pocket overload by Rod Henrickson, on Flickr odd primer pocket overload by Rod Henrickson, on FlickrWhen I was a kid. I had the stick. I had the rock. And I had the mud puddle. I am as adept with them today, as I was back then. Lets see today's kids say that about their IPods, IPads and XBoxes in 45 years! Rod Henrickson | |||
|
| One of Us |
A very common problem seen here are broken bolt stop screws on the Howa 1500 series. The little screw is pitiful and even if you can even get a replacement, they never last very long. The screw has to take the full force of the bolt crashing into the bolt stop and it is woefully too tiny for the job. The end all fix is to convert the screw to the common, partial thread 6x46 screw. The first thing you have to do is locate center on the X and Y axis. Because the new hole is going to be a lot larger you have to move the Y axis up to raise the location of the screw .017 inch. Doing this will keep the new screw in the main thickness area of the tang and will in no way impede it's function. After threading, a slight shadow of the old thread can be observed on the lower portion of the hole. This is actually what you want to see. 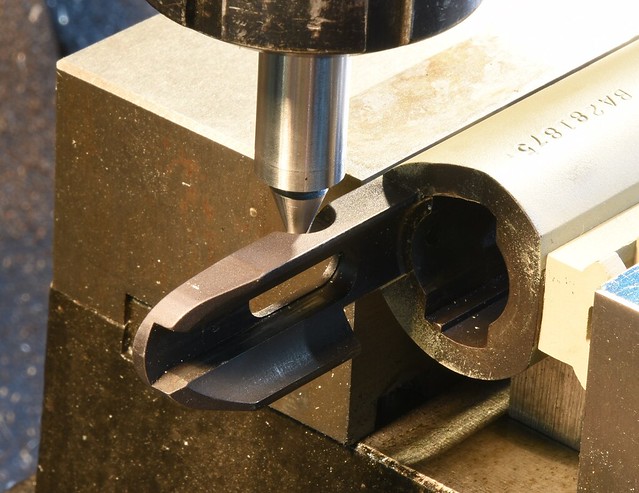 Howa1 by Rod Henrickson, on Flickr Howa1 by Rod Henrickson, on FlickrAfter center +.017 inch is found, the center finder is replaced with a 3mm carbide slot mill. 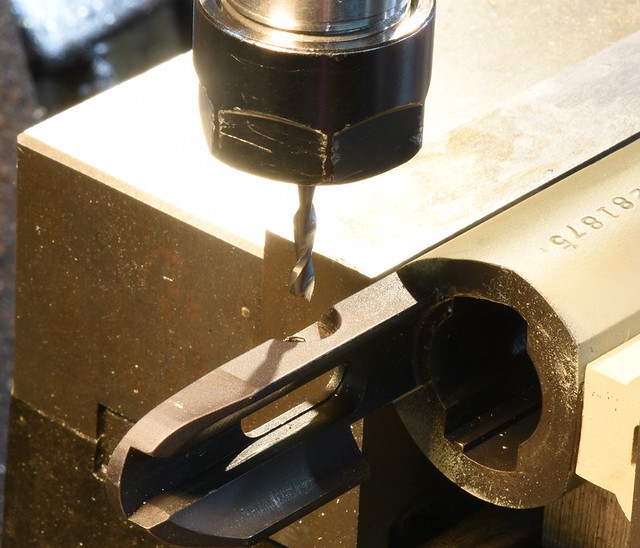 Howa2 by Rod Henrickson, on Flickr Howa2 by Rod Henrickson, on FlickrI can't say off hand what the correct speed is to drive those small slot mills, but I run them at 3000 RPM which is as fast as my machine will run. I suspect it is slightly over ludicrous speed. The slot mill is plunged completely through. You will notice a slight shadow on the bottom side of the hole where the old thread has not been cut away. The hole may appear slightly egg shaped by .002 inch but that should go away after tapping. 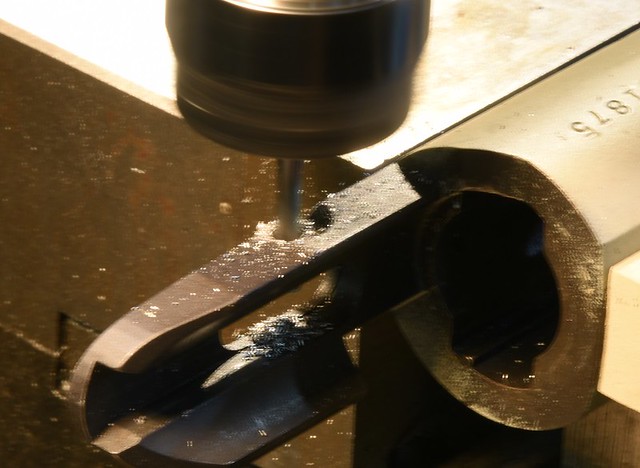 Howa3 by Rod Henrickson, on Flickr Howa3 by Rod Henrickson, on FlickrThe slot mill is replaced with a 6x48 tap and then hole hand tapped. I don't recommend tapping them under power as the receivers are quite tough. Use lots of sulfur oil and peck tap. 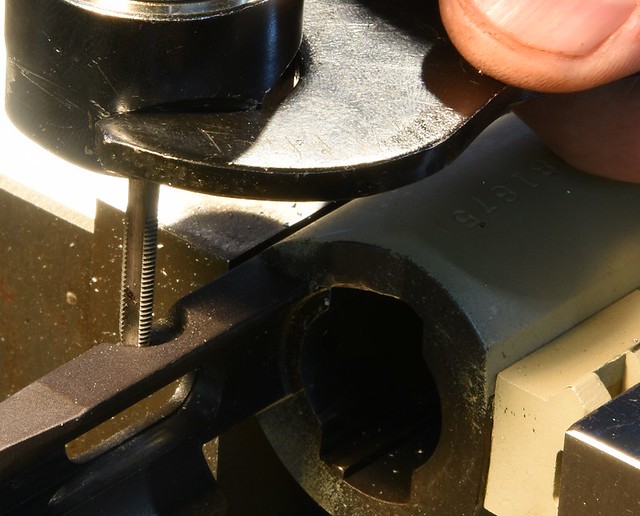 Howa4 by Rod Henrickson, on Flickr Howa4 by Rod Henrickson, on FlickrThe bolt stop is then installed using the partial thread 6x48 screw. The partial thread screw will jam out just nicely before the head crimps down on the bolt stop. Always select a long screw and trim it just short of peeking out on the opposing side. I always Locktite the screws in as there is no real need to ever take them out again. This should be considered to be a PERMANENT FIX. I have never had on break after installing the 6x48 and I have done close to 40 of them. 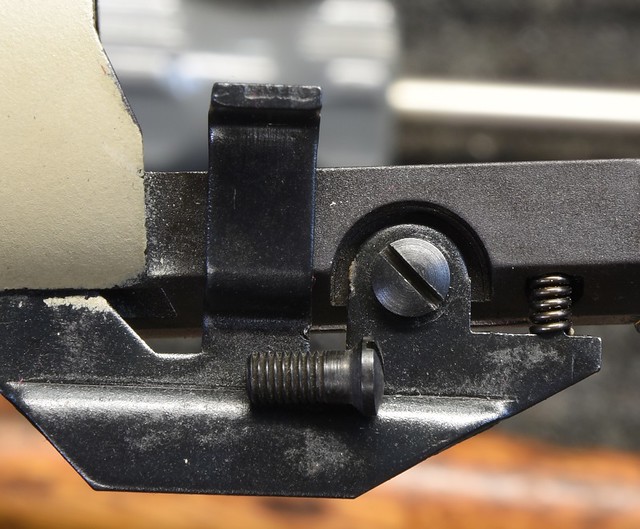 Howa5 by Rod Henrickson, on Flickr Howa5 by Rod Henrickson, on FlickrWhen I was a kid. I had the stick. I had the rock. And I had the mud puddle. I am as adept with them today, as I was back then. Lets see today's kids say that about their IPods, IPads and XBoxes in 45 years! Rod Henrickson | |||
|
| One of Us |
HAhah, ahh hah. Yes. That is at the home despot right beside the 3-start 6mm by 17 acme thread, torx head, beryllium screws. The left hand ones you have to send away for though. Seriously though, that looks like a proper fix. Thanks for sharing your method! | |||
|
| One of Us |
Yeah, you can actually get factory replacements from Midway. The problem is that you charge the customer $70 USD (my minimum) to book in the gun, drill out the old screw and install a new one. When he comes back a week later with the EXACT, same problem, things can get a bit heated. I don't warranty someone elses bad design. So they can pay $135 USD for the permanent fix or I will install the factory screws for the rest of their lives for $70 a pop. Their choice. Before I dreamed up this fix I had replaced 4 in one gun before the customer finally said ENOUGH and had me explore this option. If memory serves I did his for free just because it was a learning experience. (and by then I was feeling sort of sorry for him) When I was a kid. I had the stick. I had the rock. And I had the mud puddle. I am as adept with them today, as I was back then. Lets see today's kids say that about their IPods, IPads and XBoxes in 45 years! Rod Henrickson | |||
|
| One of Us |
Every once in a while you will run into a barrel that simply doesn't want to come off, or as in this case, was stubbed off for reasons I won't augment on. The most common reason is 100 years of rust. But at any rate. To get them out the barrel is stubbed off at the receiver and set up in the mill and a 1/4 inch carbide end mill is used to cut slots to the minimum diameter of the receiver threads. After cutting both sides, a simple whack on each side with a brass drift and a hammer will collapse the extension and allow you to screw it out by hand. No muss no fuss no damage to the receiver. Sorry for the shitty photos. I left my camera at home and this job wouldn't wait so I had to use my cell phone. Hemorrhoid verses Polaroid. But it shows the setup well enough that a monkey could follow it.  barrel stub1 by Rod Henrickson, on Flickr barrel stub1 by Rod Henrickson, on Flickr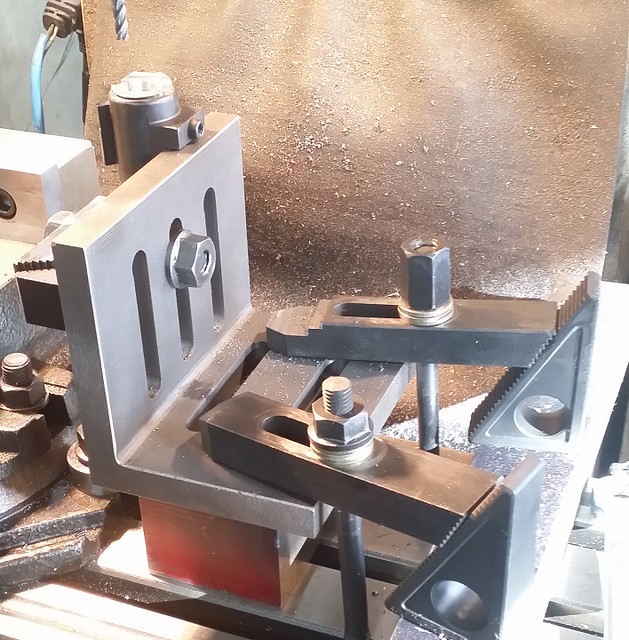 barrel stub2 by Rod Henrickson, on Flickr barrel stub2 by Rod Henrickson, on Flickr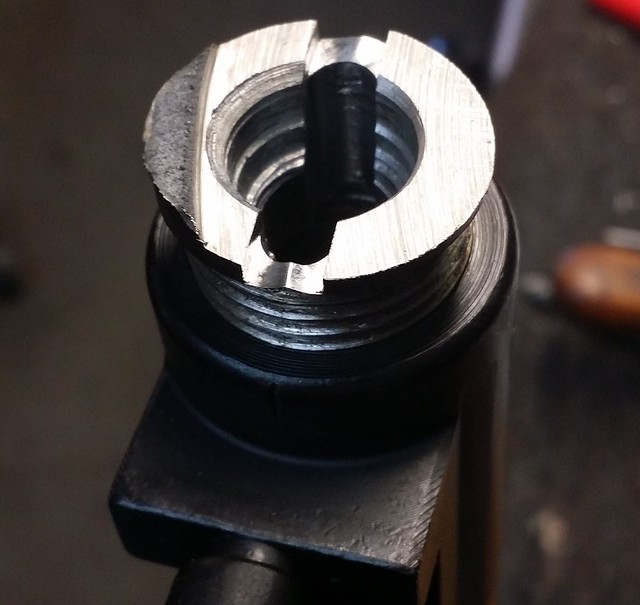 barrel stub3 by Rod Henrickson, on Flickr barrel stub3 by Rod Henrickson, on FlickrWhen I was a kid. I had the stick. I had the rock. And I had the mud puddle. I am as adept with them today, as I was back then. Lets see today's kids say that about their IPods, IPads and XBoxes in 45 years! Rod Henrickson | |||
|
| One of Us |
In response to the PM. The cut across the face was made with the 1/4 inch end mill. The little chevron shaped thingy is actually the last remnants of the shoulder on the barrel which bugged up after the tension was released from the barrel tenon. Yes, they are in that tight. No, I didn't invent some new type of end mill. LOL 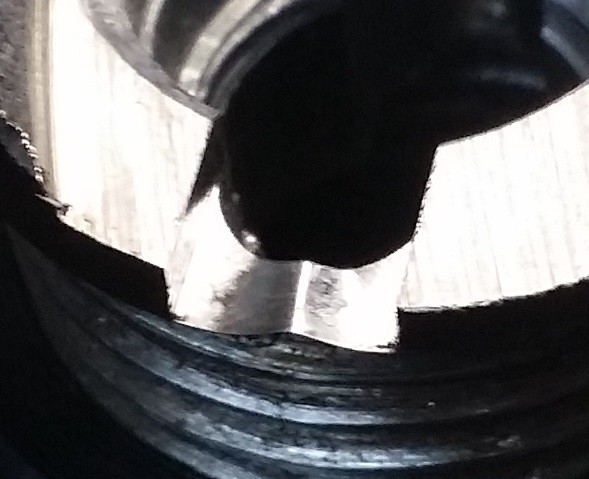 barrel stub5 by Rod Henrickson, on Flickr barrel stub5 by Rod Henrickson, on FlickrWhen I was a kid. I had the stick. I had the rock. And I had the mud puddle. I am as adept with them today, as I was back then. Lets see today's kids say that about their IPods, IPads and XBoxes in 45 years! Rod Henrickson | |||
|
| One of Us |
Hole spacing to redrill the old 760 Remington to 8x40 TPI or other. 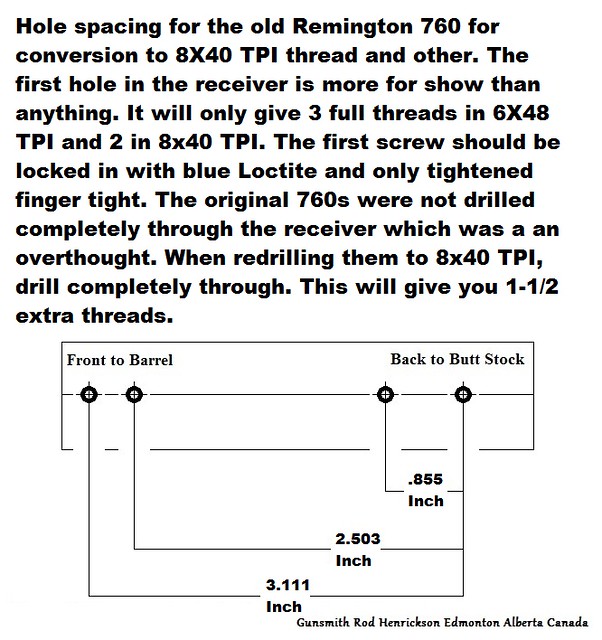 Remington 760 by Rod Henrickson, on Flickr Remington 760 by Rod Henrickson, on FlickrWhen I was a kid. I had the stick. I had the rock. And I had the mud puddle. I am as adept with them today, as I was back then. Lets see today's kids say that about their IPods, IPads and XBoxes in 45 years! Rod Henrickson | |||
|
| One of Us |
I have a chamber to cut that requires a separate neck and throat. After digging up my old extension, it was quite apparent that the thing was on it's last legs and had to be replaced. Rather than order a new one from the reamer makers and get only half of what I wanted I decided to bite the bullet and just make one. I used 1/2 inch O2 and 28 TPI on the body to give me .036 inch advance per revolution, or .003 inch advance per hour. I also made the main ring lockable with a cushioned grub screw so it can't accidentally come loose and a second ring to allow measuring between the two prior to setting the locking ring. I left enough of a ring on the back to hold it in an ER collet if need be as well as a heavy center drill in the back. Lastly I added a 3/8ths hex so that it can be used with a common socket extension through the action if need be. I've been cursing the old one for 20 years for various reasons. I guess I'll have to find something new to whine about now. But that won't be to hard. 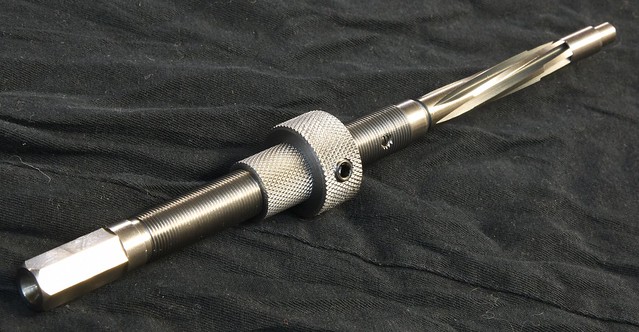 Reamer extension by Rod Henrickson, on Flickr Reamer extension by Rod Henrickson, on FlickrWhen I was a kid. I had the stick. I had the rock. And I had the mud puddle. I am as adept with them today, as I was back then. Lets see today's kids say that about their IPods, IPads and XBoxes in 45 years! Rod Henrickson | |||
|
| One of Us |
. In that last two months before spring things always slow down a bit and in spare moments I generally take on some project that I have always wanted to do but just never got around to. This years hare brained project is the: "Billy Leeper Executive Toy". Sorry Bill, I thought it would fit. That special something for that CEO who has outlived having a secretary sitting on his desk. I always wanted to do a cutaway Mauser and I have seen some crude attempts, but over the years I slowly worked out the cuts in my head that would allow me to make a fully functional 98 Mauser, less the boom, that would feed the way it is supposed to and show the operation of all of the parts. It's in the white here and will go out for bluing. After I get it back I will mount it on a finished piece of drift wood or fancy stump wood as a desk stand while it's not being played with. Like a lot of other things it will either get sold or end up as a curio at home. 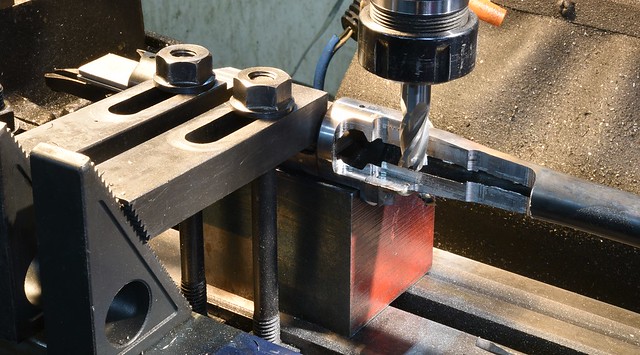 Bill Leeper Executive Toy1 by Rod Henrickson, on Flickr Bill Leeper Executive Toy1 by Rod Henrickson, on Flickr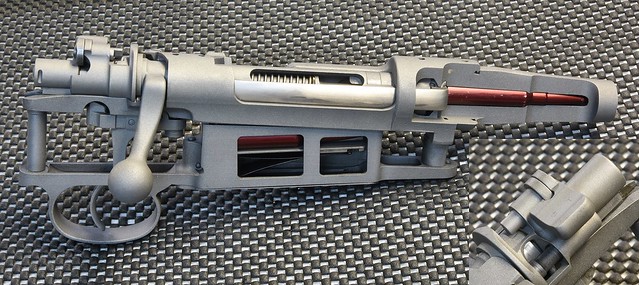 Bill Leeper Executive Toy by Rod Henrickson, on Flickr Bill Leeper Executive Toy by Rod Henrickson, on FlickrWhen I was a kid. I had the stick. I had the rock. And I had the mud puddle. I am as adept with them today, as I was back then. Lets see today's kids say that about their IPods, IPads and XBoxes in 45 years! Rod Henrickson | |||
|
| One of Us |
Why did you paint it primer gray? Why don't you polish and blue it? | |||
|
| One of Us |
It's bead blasted to better show off the parts without glare Butch. Hopefully my falcon will pick it up today or tomorrow for caustic bluing. I can already tell that I'm going to have a bitch of a time selling it. I don't want to admit to how much time I've got into it and I keep petting it and running dummies through it and playing with it every time I walk by. Maybe I'll just charge people $1.00 a look and $5.00 to pet it. I've had guns that have become kittens and puppies like this in the past and it's a bad way to do business! When I was a kid. I had the stick. I had the rock. And I had the mud puddle. I am as adept with them today, as I was back then. Lets see today's kids say that about their IPods, IPads and XBoxes in 45 years! Rod Henrickson | |||
|
| One of Us |
Come on Rod, polish and rust blue it. Yeah, good job. | |||
|
| One of Us |
. Look at this video Butch. Isn't that the cutest little-ole-Mauser you ever did see? I can't give that up! Not to some bad-man that won't pet it and tell it bedtime stories. https://youtu.be/FrTAOeNjdhc When I was a kid. I had the stick. I had the rock. And I had the mud puddle. I am as adept with them today, as I was back then. Lets see today's kids say that about their IPods, IPads and XBoxes in 45 years! Rod Henrickson | |||
|
| One of Us |
Bedding a Ruger M77 and thought I would take some photos of the dimensions and setup. You can buy the blocks from Brownells or you can simply make a lifetime supply in about 30 minutes on the lathe and mill. The simple way is to cut 5/8ths diameter cookies into a manageable length to be handled in the mill and through drill them to ¼ inch for the tang screw. They can be held in a dividing head set to 30 degrees from vertical or in the vise in a V block angled to 30 degrees from Z. Its a simple 90 degree cut into the material at that point. I cut the .250 Z measurement too deep. Usually to about .300 in depth and take a cleanup cut to establish the .460 inch X axis cut. Then I take a measurement to determine what remains and slab it off in one cut. I then zero the Z axis and move to .250 and make the last cut. There are many ways to approach it. That is just the way I do it. Mainly because it's fast. I then lock a setup block into the mill vise at 30 degrees and clamp the stock to it. I use aluminum backed rubber vise jaws as padding under the clamps which also builds load into the clamping so the stock won't slip. I use a center finder to locate the center of the front tang screw hole and lock in a deep reach 5/8ths carbide end mill, double check the Y axis with the inlettted area of the floor plate recess and plunge the mill completely through. After that I mock the front pillar up in the stock and scribe it and cut it to length in the lathe. You can cut it flush with the wood if you choose, but I always leave it about .005 inch proud. The pictures probably explain it better than I do. 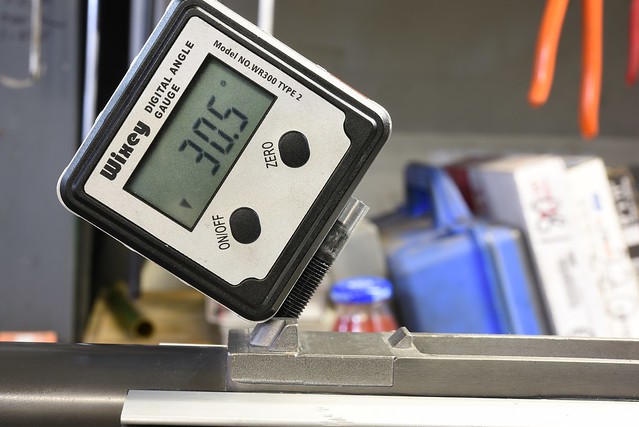 m773 by Rod Henrickson, on Flickr m773 by Rod Henrickson, on Flickr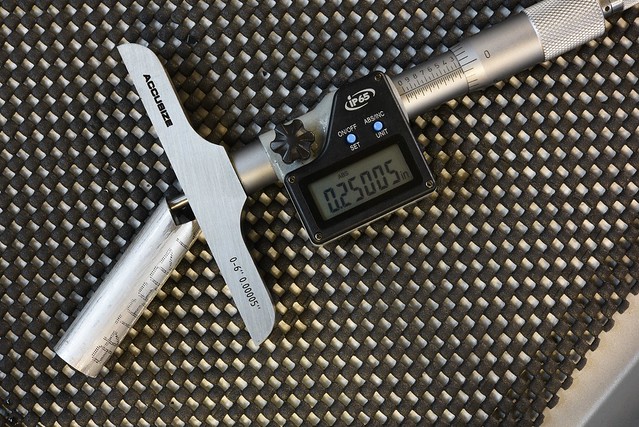 m772 by Rod Henrickson, on Flickr m772 by Rod Henrickson, on Flickr m771 by Rod Henrickson, on Flickr m771 by Rod Henrickson, on Flickr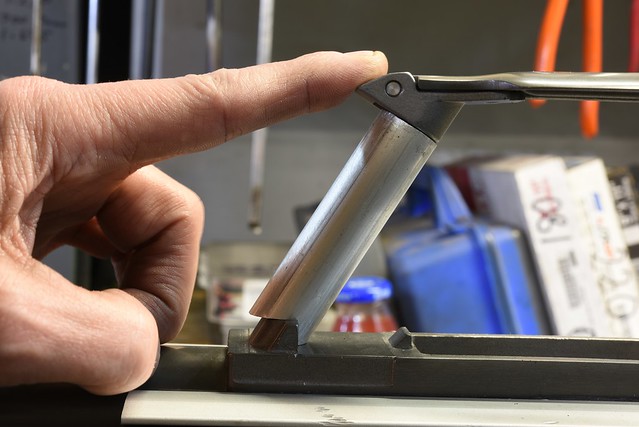 m774 by Rod Henrickson, on Flickr m774 by Rod Henrickson, on Flickr m775 by Rod Henrickson, on Flickr m775 by Rod Henrickson, on FlickrJust for giggles I stuck the endoscope in the magwell so that I could watch the cutter break through and not crash into my setup block and snapped a picture. 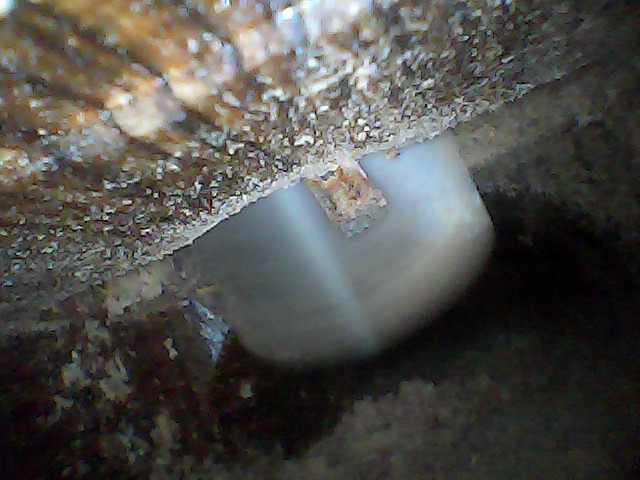 m777 by Rod Henrickson, on Flickr m777 by Rod Henrickson, on Flickr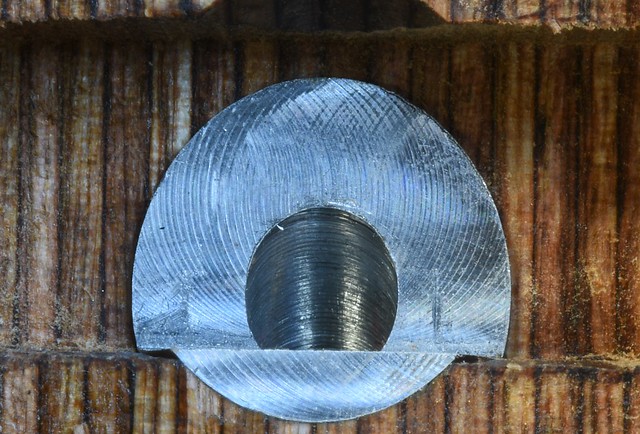 m778 by Rod Henrickson, on Flickr m778 by Rod Henrickson, on Flickr m779 by Rod Henrickson, on Flickr m779 by Rod Henrickson, on FlickrWhen I was a kid. I had the stick. I had the rock. And I had the mud puddle. I am as adept with them today, as I was back then. Lets see today's kids say that about their IPods, IPads and XBoxes in 45 years! Rod Henrickson | |||
|
| One of Us |
Just to let you know that your work is worth what you're charging for it. It would seem a customer dropped off a CZ858 to one of the local heroes for a flash hider installation. The firearm then found it's way into my hands when the customer noted that he was experiencing a bit of flash-hider-deflectum. As you can see our hero was having a bad day and his die decided to go careening off to left field a bit. When I went through CST 35 years ago, old Gus Crites, the machine shop instructor was famous for saying: "Anything you do to a barrel has to be done between centers." It still seems to hold true today too. 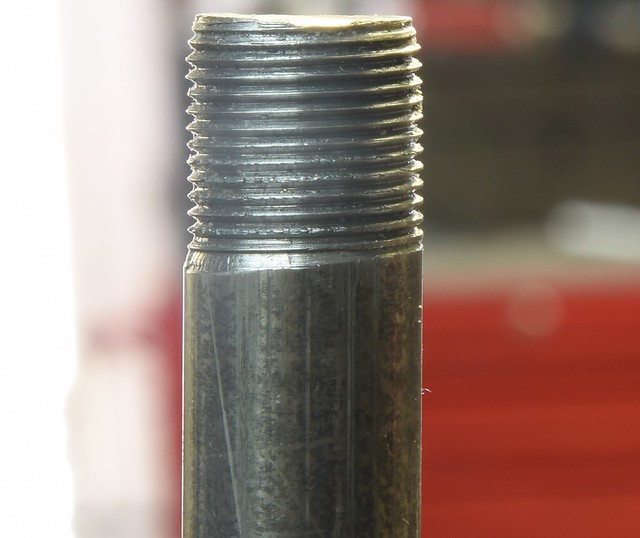 CZ858 by Rod Henrickson, on Flickr CZ858 by Rod Henrickson, on FlickrWhen I was a kid. I had the stick. I had the rock. And I had the mud puddle. I am as adept with them today, as I was back then. Lets see today's kids say that about their IPods, IPads and XBoxes in 45 years! Rod Henrickson | |||
|
| One of Us |
If you do any amount of work on the SKS and it's variants you are going to see a lot of them for flash hider or brake install and a good number for recrowning after the guys pull the front sight off with the commercially available, bubba pullers. A lot of guys use crowning reamers driven by cordless drills but despite all the claims they seldom give a crown that is ever close to square and a lot of them chatter like a Californian in an igloo while cutting. The best way is to hold the crowning reamers in the lathe and either drive the barrel or drive the tooling. For that you need a means to grab the gun in a four jaw without marking it or some sort of center jig. Most guys make a little jig almost exactly the same as the one pictured. It is made from 1/2 inch material and two 7/32nd slots are milled on either side, .075 inch deep to fit into the receiver. Some guys mill them from a solid block. But, me being lazy, I simply silver soldered another piece on to allow room to drill the center hole. The center drill hole is located exactly .400 inch from the top edge and of course centered on the sides. The barrel and receiver can then be run on centers and the crowning tool held in a chuck and the jig run on a center in the tailstock. Running on that center is usually well under .100 inch over the length of the unit and trigonometry is on your side so it is still closer than trying to hold a cordless drill square. Doing it that way also breaks the tendency to chatter. If you want to get more exact for threading, the jig can be held in a 4 jaw with the muzzle in live center. A long range rod is then inserted into the chamber and the Z axis center can be found using a dial test indicator inserted through the ejection port and magazine well. The zero Y axis of the receiver can be found by using a zeroed plunger indicator and DRO in the same manor. I have found that simply dialing in on the outside of the barrel as close as you can get to the receiver with the muzzle on center is more than accurate enough for flash hiders and brakes. This is NOT ACCURATE enough for suppressors ! The barrel must be dialed in with a range rod for that.  cz8582 by Rod Henrickson, on Flickr cz8582 by Rod Henrickson, on Flickr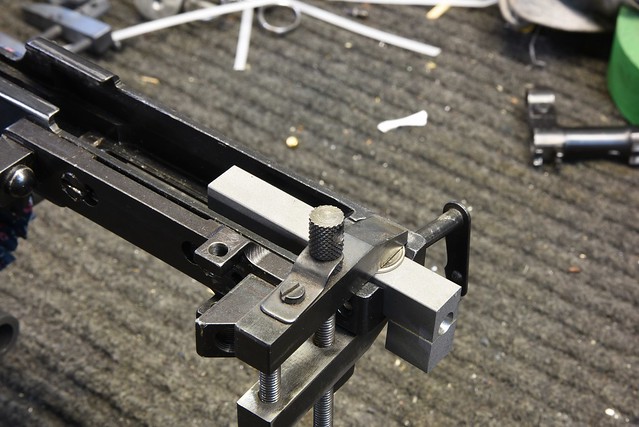 cz8583 by Rod Henrickson, on Flickr cz8583 by Rod Henrickson, on FlickrWhen I was a kid. I had the stick. I had the rock. And I had the mud puddle. I am as adept with them today, as I was back then. Lets see today's kids say that about their IPods, IPads and XBoxes in 45 years! Rod Henrickson | |||
|
| new member |
You have some classy tools, thinks for the look. Glenn | |||
|
| One of Us |
You can't have enough toys Glenn. I mean tools. Did I say toys? Strange! When I was a kid. I had the stick. I had the rock. And I had the mud puddle. I am as adept with them today, as I was back then. Lets see today's kids say that about their IPods, IPads and XBoxes in 45 years! Rod Henrickson | |||
|
| One of Us |
I install about 200 to 300 muzzle brakes per year and every once in a while a guy requests a thread protector so that he can take the noisy abomination off while hunting. I used to do a pretty brisk repeat business on the caps after guys had been forced to get stuck ones off with pliers at the range or in the field. I finally started adding a small flange to the front of them and cutting screw driver or coin slots in them. Needless to say it has hurt my thread protector sales quite a bit! 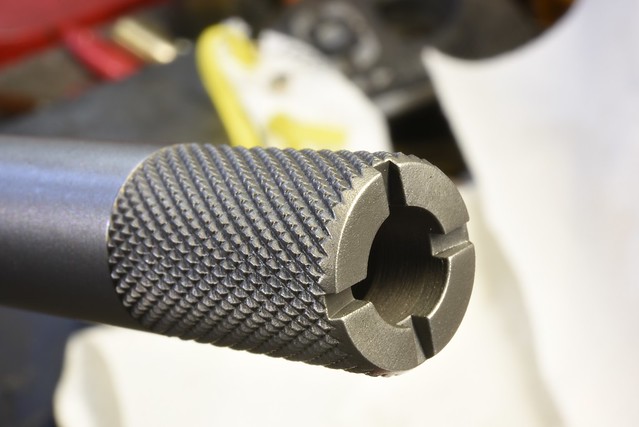 brake cap by Rod Henrickson, on Flickr brake cap by Rod Henrickson, on FlickrWhen I was a kid. I had the stick. I had the rock. And I had the mud puddle. I am as adept with them today, as I was back then. Lets see today's kids say that about their IPods, IPads and XBoxes in 45 years! Rod Henrickson | |||
|
| One of Us |
I put a lot of brakes on the M305s here. Rather than bastardize the gun and re-thread it, the brake is cut to Norincos standard M15x.75 thread. There is no shoulder for the brake to butt up against so a tube is cut that slips over the barrel and acts as the shoulder to keep the device tight. The brake is simply pressed on to the tube in ER40 collets in the lathe. It also makes the gun look like a heavy barrel which some find sort of cool. If the customer gets tired of the brake, it's a simple matter of screwing it off and putting the old sight and flash hider assembly back on. 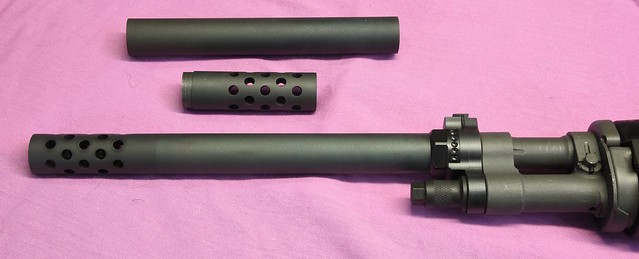 M305 Brake by Rod Henrickson, on Flickr M305 Brake by Rod Henrickson, on FlickrWhen I was a kid. I had the stick. I had the rock. And I had the mud puddle. I am as adept with them today, as I was back then. Lets see today's kids say that about their IPods, IPads and XBoxes in 45 years! Rod Henrickson | |||
|
| One of Us |
I had to do a bedding job on a CZ-455. Which drives me nuts because, well bedding a fawking BB gun (22 rimfire) is CRAZY ! But the customer is always right. At any rate I took some photos to show other crazy people how its done and a video showing checking the fit and showing how the pillars are attached to the action while gluing in to give a stress free fit after the bedding has set up. The action and pillars are held into the stock only with common rubber bands while the glue sets up. The stock is held in the mill vise and the pillars are trimmed to length after the Marine Tex has fully cured. This gun has interchangeable barrels so the barrel was left entirely free floated for different diameter barrels. Video checking the fit of the action with the pillars installed into the stock. https://youtu.be/6n6MzWWSHiM The pillars are not hard to make. Just basic machining. 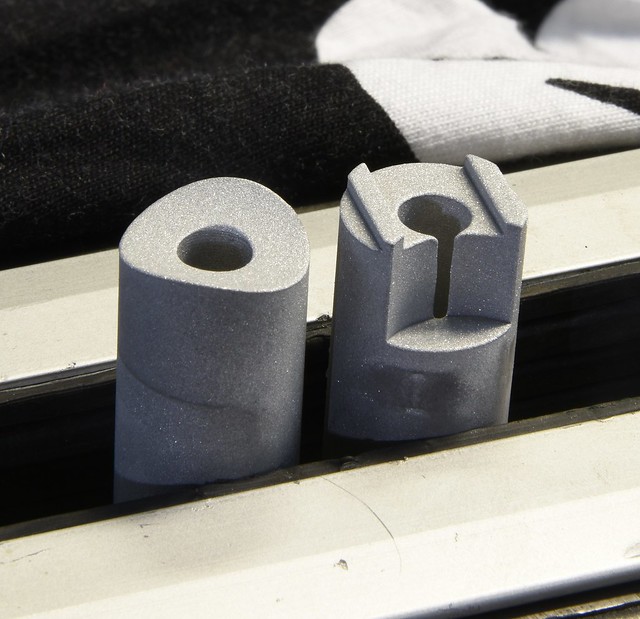 455 pillars by Rod Henrickson, on Flickr 455 pillars by Rod Henrickson, on FlickrThe action has been coated with Honey Wax Mold Release Compound, polished and the pillars bolted on prior to bedding. 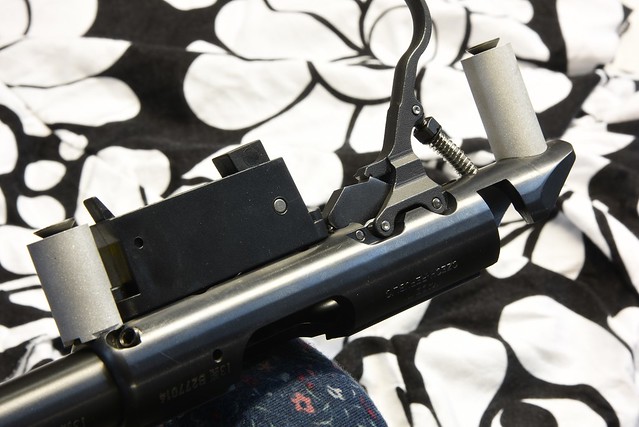 455 pillars installed by Rod Henrickson, on Flickr 455 pillars installed by Rod Henrickson, on FlickrAfter bedding and cleanup. 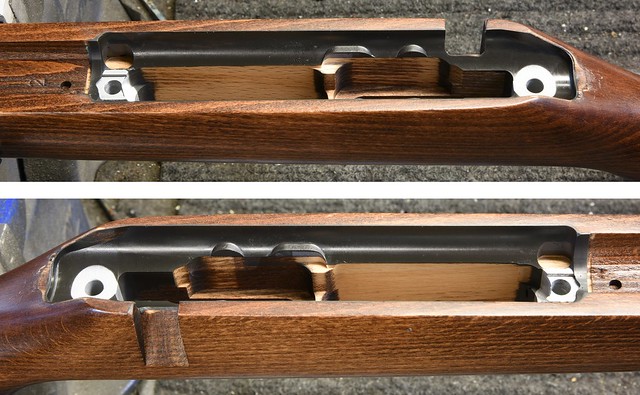 455 after bedding by Rod Henrickson, on Flickr 455 after bedding by Rod Henrickson, on FlickrWhen I was a kid. I had the stick. I had the rock. And I had the mud puddle. I am as adept with them today, as I was back then. Lets see today's kids say that about their IPods, IPads and XBoxes in 45 years! Rod Henrickson | |||
|
One of Us |
Amazing work chief, how I wish you were on this side of the pond... | |||
|
| One of Us |
Notwithstanding the fact that some of the worlds finest guns come out of the London area. But owing to the difficulties with firearms ownership and use I wouldn't imagine that there are a lot of general service gunsmiths in your neck of the woods. I should think that someone like myself would probably have a fairly difficult time trying to make a living at it there. When I was a kid. I had the stick. I had the rock. And I had the mud puddle. I am as adept with them today, as I was back then. Lets see today's kids say that about their IPods, IPads and XBoxes in 45 years! Rod Henrickson | |||
|
| One of Us |
Ghubert is far too busy educating and baiting on ARPF to find the numerous excellent gunsmiths all over the uk. What we certainly don't have is someone like yourself who displays his skills and techniques so that the layman can only wonder,why did I not follow that wonderful trade. Thanks for all that you do and explain Rod,very generous and educational. Far too many skills go without being passed on.. | |||
|
| One of Us |
Despite all of the trouble it causes, the internet has become an almost indispensable tool in our lives. I for one would be lost without it. There are actually quite a few very knowledgeable people like Tom, Butch, Duane and many others who often take time out of their days to pass on a lot of interesting stuff too John. I have to admit I probably wouldn't spend much time on forums like this if I wasn't actually getting something out of them too. I hoard away all sorts of neat stuff and ideas that I steal here and from other forums that people post. Most of the tools, ideas and procedures that I use, I have simply stolen from other people. When I was a kid. I had the stick. I had the rock. And I had the mud puddle. I am as adept with them today, as I was back then. Lets see today's kids say that about their IPods, IPads and XBoxes in 45 years! Rod Henrickson | |||
|
| One of Us |
Drawing for the Cooper Model 22 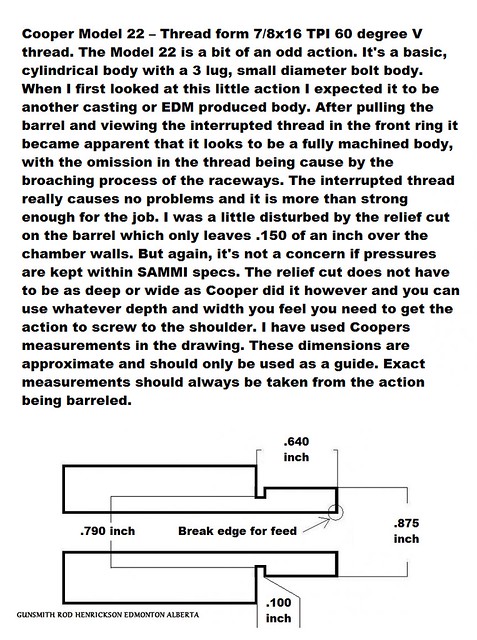 Cooper Model 22 Drawing by Rod Henrickson, on Flickr Cooper Model 22 Drawing by Rod Henrickson, on Flickr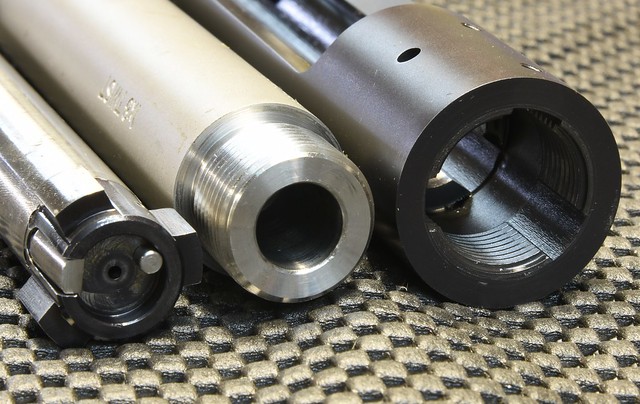 Cooper Model 22 by Rod Henrickson, on Flickr Cooper Model 22 by Rod Henrickson, on FlickrWhen I was a kid. I had the stick. I had the rock. And I had the mud puddle. I am as adept with them today, as I was back then. Lets see today's kids say that about their IPods, IPads and XBoxes in 45 years! Rod Henrickson | |||
|
| One of Us |
I don't know if any of you guys do this, but when you do a barrel job, if the guy is a hand loader you can offer to make a headspace and seating depth comparator from the stub cut from the muzzle or chamber of his barrel. I always make them included into the price of the install, but some guys do charge for it which is understandable. They are simple to make as you will pre-turn the shank between centers prior to cutting and threading. As soon as you're done with the chamber job, you simply chuck the stub up in the collet, face it off and run the reamer in until the shoulder is 90% cut. Then flip it around, face it and cut just the start of a throat. To compare different bullet weights and ogives to the same seating depth you simply insert a loaded cartridge of the seating depth you prefer into the throat end of the gauge and measure the combined length of the cartridge and gauge. Then insert the target cartridge and measure that. From that you can easily figure how much deeper or shallower the new bullet has to be seated to come to your preferred seating depth. You can also check your distance to the lands and grooves by inserting a sized case into the shoulder cut side of the die and measuring the overall length of case and gauge. Then short seat a bullet and drop it back in and remeasure it. This will tell you exactly how many turns of your seating stem are required to push the bullet down to the lands and grooves. To check your cartridge headspace the headspace gauge is inserted into the shoulder cut end of the gauge and the overall length of gauge and comparator is recorded. Then a resized cartridge is inserted and measured and the two numbers compared to tell you if you are resizing to much or if your cases have become too hard and are springing back in the die and require annealing. This toy only works well if you use a piece of the original barrel and the reamer used to cut the chamber. 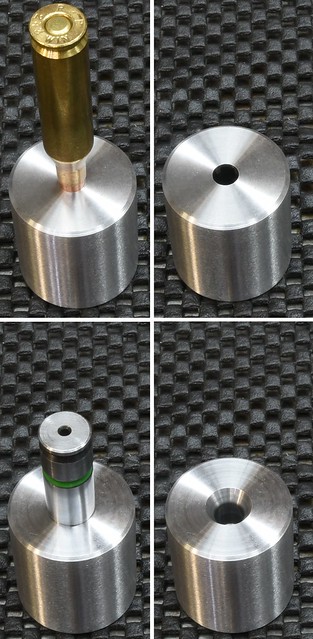 comparator by Rod Henrickson, on Flickr comparator by Rod Henrickson, on FlickrThis is a handy quick reference for the common seater plug thread sizes and the advance per turn of those plugs for setting bullet seating depth. For those without pitch gauges and who never learned how to divide 1 by TPI. lol 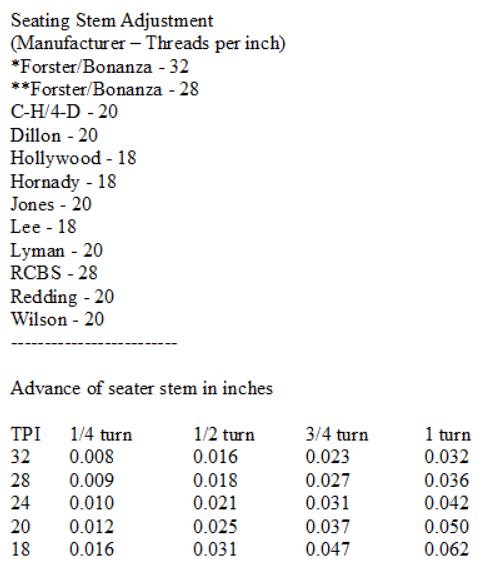 Seater Stem Advance by Rod Henrickson, on Flickr Seater Stem Advance by Rod Henrickson, on FlickrWhen I was a kid. I had the stick. I had the rock. And I had the mud puddle. I am as adept with them today, as I was back then. Lets see today's kids say that about their IPods, IPads and XBoxes in 45 years! Rod Henrickson | |||
|
| One of Us |
Today seems to be the day for all of my low life, gunsmith and hobbyist friends to show up. The last one was a grenouille friend in town for a wedding who works for another firm as a gunplumber. I was getting ready to bed a gun while he was sucking back all of my coffee and was a bit baffled by one of my tools. Grenouille: Whats that for? Me: That's your basic hoopty bedding bar. Grenouille: What's it do? Me: Well you use it in place of the floor plate array when you bed a gun. Grenouille: Why don't you just use the floorplate/trigger guard like everyone else does? Me: Well because NO ONE, but stupid Frenchmen use the floor plate array because it ends up getting glued in, it takes a half hour to clean it up after and you invariably scratch it. Grenouille: It would take you an hour to make that thing. I've never seen one before. It looks like a waste of time. Me: You just keep thinking that. I've used them for 20 years and so do most all of the other gunsmiths I know. I also remember what it was like before I had them. 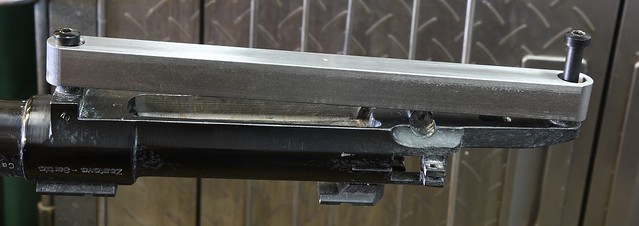 Hoopty bedding bar1 by Rod Henrickson, on Flickr Hoopty bedding bar1 by Rod Henrickson, on Flickr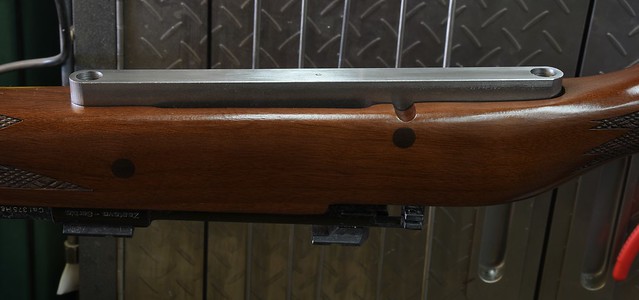 Hoopty bedding bar2 by Rod Henrickson, on Flickr Hoopty bedding bar2 by Rod Henrickson, on FlickrWhen I was a kid. I had the stick. I had the rock. And I had the mud puddle. I am as adept with them today, as I was back then. Lets see today's kids say that about their IPods, IPads and XBoxes in 45 years! Rod Henrickson | |||
|
| One of Us |
When I made that last post I had a slight psychic event and I detected a bit of disbelief and skepticism from Tom. So after pulling the action this morning I snapped a quick photo. You can see that after pulling there is not a single trace of release agent or bedding compound on the floor plate, trigger guard array. No sticking and ZERO cleanup. There was however a bit of compound stuck to the bedding bar. I banged it on my vise after the photo and it fell off and I put it back in the cabinet. 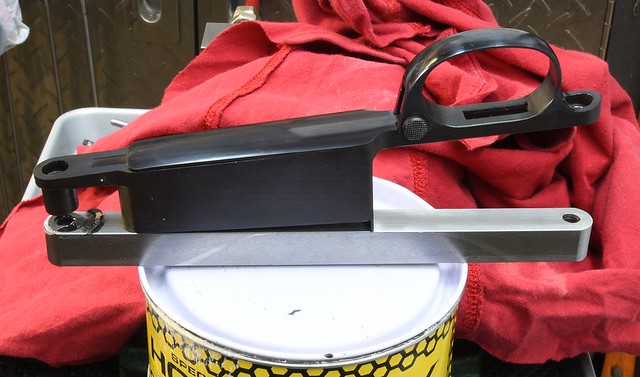 Bedding bar3 by Rod Henrickson, on Flickr Bedding bar3 by Rod Henrickson, on FlickrWhen I was a kid. I had the stick. I had the rock. And I had the mud puddle. I am as adept with them today, as I was back then. Lets see today's kids say that about their IPods, IPads and XBoxes in 45 years! Rod Henrickson | |||
|
| One of Us |
Dunno, based on your posts, you seem well above the average smith here. Hell, I had a go 'round with a vaunted ACGG smith who apparently scales his quality based on how "big" the job is and his personal impression of the rifle he is working on. Frustrating to say the least. | |||
|
| One of Us |
Well, I think you will find that most of the gunsmiths today are actually VERY HIGHLY, specialized in what they do. While I did my time and got my ring from the Colorado School of Trades Gunsmithing and my 4 years apprenticeship, I branched off into warranty work, general repairs and metal work. My location more or less demanded it, if I wanted to make a living at it. I know quite a bit in those specialized fields and because a lot of the questions here are repair oriented I have a lot of answers. But I also don't say to much and I start taking notes when Jim Wisner starts commenting about parts manufacture or Duane Wiebe starts talking about stock making and classic, custom bolt guns. I've seen their work and those guys have more background on those subjects than I could ever amass in my remaining years. So it's all very relative to the work that's being done. When I was a kid. I had the stick. I had the rock. And I had the mud puddle. I am as adept with them today, as I was back then. Lets see today's kids say that about their IPods, IPads and XBoxes in 45 years! Rod Henrickson | |||
|
| One of Us |
You can be the biggest peckerhead you want, just don't let your work reflect that fact. ;-). I look at it this way: If you accept a job, there is one level of effort, your best. If not, don't accept the job. | |||
|
| One of Us |
I made a quick video to show how I check them. Knowing my luck, this barrel won't shoot anyway! https://youtu.be/HEeZYNplv4g 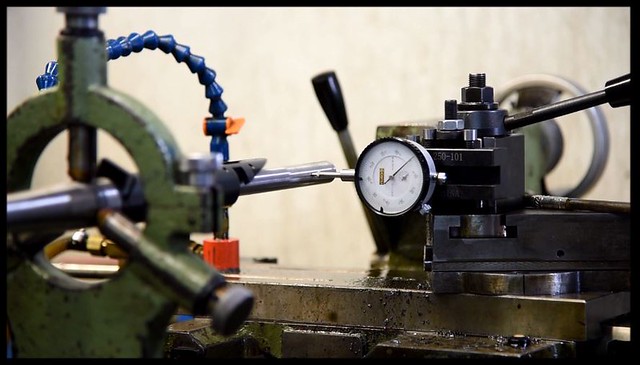 Action Run Out by Rod Henrickson, on Flickr Action Run Out by Rod Henrickson, on FlickrWhen I was a kid. I had the stick. I had the rock. And I had the mud puddle. I am as adept with them today, as I was back then. Lets see today's kids say that about their IPods, IPads and XBoxes in 45 years! Rod Henrickson | |||
|
| One of Us |
Back in the day, Parker Hale made the old Safari model and many of them found their way to Canada and the USA through Simpson Sears, Eatons and a lot of other jobbing outlets. (Back when you could still buy guns out of the Christmas Wish Book) For all intents and purpose they were excellent old rifles built on commercial 98 Mausers. The one drawback today is that the British, in their infinite wisdom chose to furnace braze 19mm bases directly to the front receiver ring and rear bridge. Even in the day the rings were a chicken shit, aluminum affair with a tapered post in the center of each ring that locked into corresponding tapered holes in the bases to keep the ring from sliding. Because the holes in the bases and the posts in the rings were tapered, the rings used to slide forward and UP under the recoil of the magnums (and standard calibers if allowed to come loose) and they would rip the claws off of the cheap, aluminum rings. To make matters worse, no American company currently makes rings that will fit Parker Hales old proprietary system. The classic fix is to grind the bases off of the action, reblue and then drill and tap for the standard weaver #45 and #46 bases. This tends to be a bit more than most people want to spend. The simple fix is to drill and tap the front base and receiver for the #46 Weaver base. Then purchase a set of Warne CZ 550, 19mm dovetail rings. The recoil lug is then milled off the one ring and the heads of two 6x48 screws are turned down so that when installed, they will allow the front ring to sit tightly in between them and act as recoil abutments. It may look a bit tacky, but it is a cheap and effective solution to the problem. If in the future, if some cowboy decides to grind off the bases, the front receiver ring will already be drilled and tapped to the correct hole spacing.  Parker Hale Safari Rings by Rod Henrickson, on Flickr Parker Hale Safari Rings by Rod Henrickson, on FlickrWhen I was a kid. I had the stick. I had the rock. And I had the mud puddle. I am as adept with them today, as I was back then. Lets see today's kids say that about their IPods, IPads and XBoxes in 45 years! Rod Henrickson | |||
|
| One of Us |
Some people don't know that you generally get one freebie with the old ejector rivet when replacing the ejector in the 870 which allows you to get away without rebluing the receiver. It does however require you to make a small annular cutter with which to reclaim the old rivet. Basically all you are doing is cutting the sides off of the old, mushroomed rivet to leave a new, though slightly shorter post. While it is shorter, the reclaimed post is more than tall enough to allow riveting in a new ejector. The cutter is simple to make with annealed drill rod and any small end mill. The flutes do not have to be any magic angle but the cutter needs a small, 60 degree lead in to help centre it on the old rivet head. The blank is cut out on the lathe to a diameter of about .140 inch and a #47 drill is used to cut the centre hole. A 60 degree centre drill is used to cut the lead in taper. The flutes should extend all the way to the bottom of the inner taper. I did the math and plunged the 1/4 inch carbide cutter in .015 inch deep and formed 8 flutes. As you can see in the photos I was shy by about .003 inch. It matters little because the cutter is driven very slowly in a cordless drill and it will do it's job even if the teeth are a bit shallow. After that you simply heat it to bright orange and plunge it in oil. It will either break and you will have to start over or it will cut like the dickens. The cutter should easily last for 20 or 30 jobs, at which point you can soak it in muriatic acid for 20 minutes or so and it should eat a fresh edge just like when you sharpen a file. The soak may take longer, depending on edge wear and the strength of your acid. From a distance the cutter looks cute as a bug. 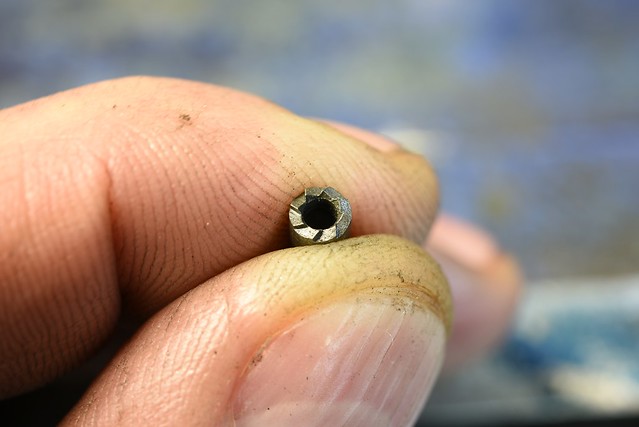 Rivet 1 by Rod Henrickson, on Flickr Rivet 1 by Rod Henrickson, on FlickrClose up though, not so much and looks like a crude midevil torture device. But that's OK it's gunsmithing not rocket science. 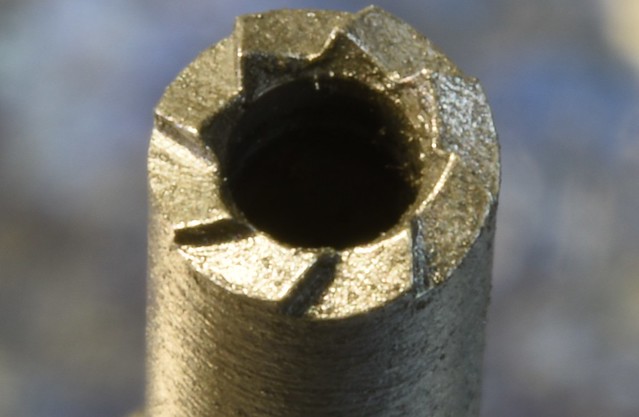 Rivet 2 by Rod Henrickson, on Flickr Rivet 2 by Rod Henrickson, on FlickrThe new post after recutting.  Rivet 3 by Rod Henrickson, on Flickr Rivet 3 by Rod Henrickson, on FlickrThe new ejector installed and riveted.  Rivet 4 by Rod Henrickson, on Flickr Rivet 4 by Rod Henrickson, on FlickrWhen I was a kid. I had the stick. I had the rock. And I had the mud puddle. I am as adept with them today, as I was back then. Lets see today's kids say that about their IPods, IPads and XBoxes in 45 years! Rod Henrickson | |||
|
| One of Us |
A couple of years back I built a high pressure grease press to push stuck bullets out of gun barrels. By and large the fool thing was a complete success and it has long paid for itself and begun to show a profit. Of course with every hare-brained-idea there are stumbling blocks and this was no exception. The first was the second piston to keep the brass piston from being torn up or turning while the compression screw is turned. I made it from drill rod and hardened it and under the force of use it split in half. I replaced it with another made from un-heat treated 1144 which has worked out well. In the original version the fill port was located on the back of the main barrel so that it could be charged and then there would be no pressure on it after the piston slipped by. I some how suspected that the zerk fitting, which is only rated for about 25,000 PSI might blow out and kill me, or someone else. The only problem was that each time the seals went past the hole, it would bite a chunk out of the seal or cut one in half and they had to be changed every 6 or 7 presses. I decided to build a new barrel for the device with the zerk fitting located on the square body of the device and not on the cylinder portion. Then I would drill a vent hole in the collar at the very back just ahead of the driving nut and cut an oversized chamber in the back for the piston to rest in when the driving screw it totally withdrawn to let air escape as the cylinder of the unit is being filled with grease. I cut a 4 degree throat going from the oversized chamber into the main compression area of the cylinder so that the seals would not be damaged in the transition between the two. I located the zerk fitting on the square body of the unit facing away from me (just in case.) This turned out to be a good thing. After driving a 308 bullet into an old barrel and setting everything up, the zerk fitting blew out on the second turn of the handle. I replaced it and promptly did the same thing with the second grease fitting. Examination showed it had completely stripped the threads off grease fitting. I replaced the zerk with a 1/4x28 tang screw and proceeded to press the bullet out with no problems. Examination after pressing showed no damage or wear to the O rings and no leak by. Just as a matter of note. The zerk fittings should be rated much higher than the highest pressure industrial grease guns and some of the good ones have a burst pressure of 25,000 PSI. So god only knows what the operating pressure of the unit is as it blew the grease fittings out like a pistol shot with almost no effort or resistance at all. According to the Machinerys Handbook a 3/4x16 TPI grade 8 bolt should generate a compression force of somewhere around 40,000. I somehow suspect that the Machinerys Handbook never took gunsmiths with 32 inch cheater bars into the equation either. A photo of the brass lap used to hone the cylinder after reaming and the piston that will run in the cylinder to pressure up the grease.  brass lap by Rod Henrickson, on Flickr brass lap by Rod Henrickson, on FlickrA photo of the cylinder and the chamber after reaming and honing. The chamber was lightly polished but not honed to remove reaming marks as the seals are not compressed in this area and can't be damaged.  chamber and throat by Rod Henrickson, on Flickr chamber and throat by Rod Henrickson, on FlickrThe brass delivery nipples are made .015 over bore and driven in into the rifle barrel with the tail stock of the lathe to seal the bore. The nipples, being made from brass are no harder than the bullets that are shot through it so there is no damage to the bore or crown. 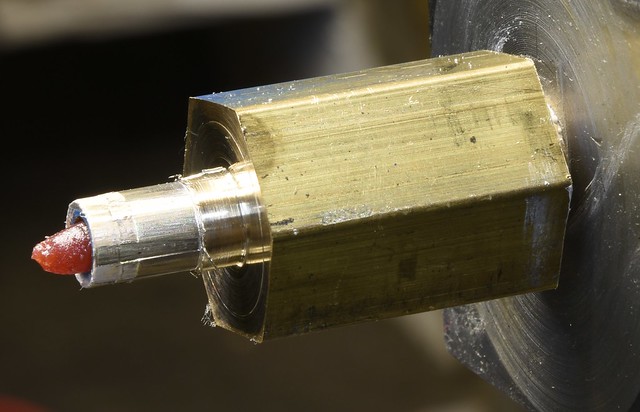 brass delivery by Rod Henrickson, on Flickr brass delivery by Rod Henrickson, on FlickrA test run with a 308 bullet pushed through a discarded barrel with the new cylinder. Nothing in the system can leak or you can not get the peak pressures needed to get the bullet moving. Even with a class 4 fit on the threads you can see the thread sealant which oozed out after 1 press. The sealant will harden overnight so future oozing will stop. 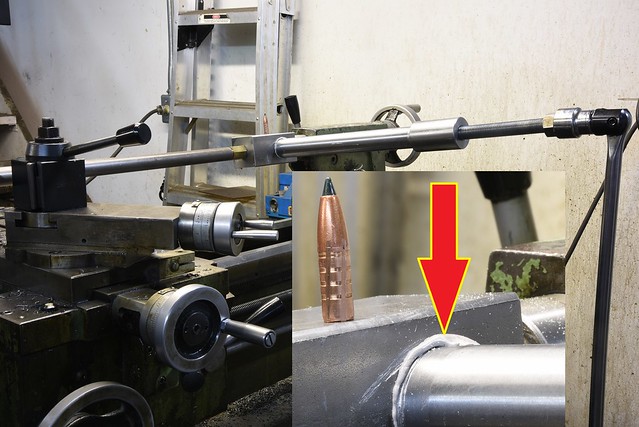 grease press by Rod Henrickson, on Flickr grease press by Rod Henrickson, on FlickrWhen I was a kid. I had the stick. I had the rock. And I had the mud puddle. I am as adept with them today, as I was back then. Lets see today's kids say that about their IPods, IPads and XBoxes in 45 years! Rod Henrickson | |||
|
| Powered by Social Strata | Page 1 2 3 4 5 6 |
| Please Wait. Your request is being processed... |
Guns, Politics, Gunsmithing & Reloading Gunsmithing

Visit our on-line store for AR Memorabilia