
 Guns, Politics, Gunsmithing & Reloading Gunsmithing
 Go | New | Find | Notify | Tools | Reply |
| Mechanical drawings for barrel shanks and parts | Login/Join |
| One of Us |
I work from an open shop. Customers can walk in to the service counter and see all of the equipment and what is being done. I find this much better than a closed shop where I have to leave the shop and come up front to deal with people. And, as the customers can't actually walk into the work area, they can't get in my way and if they want to talk I can keep working and discus what they want or just ignore them and wait until they get bored and leave. It's not like I'm just walking away from them and they can see that I'm busy. A lot of the time customers want to know or see how things are done and this is where these videos are handy. They get the basic idea and I don't have to sit there and explain it to them. This is a short on how muzzle brakes are made on single stage machines. A lot of the stupid steps have been eliminated to keep people from getting board and I left out all of the rambling commentary and elevator music that I hate in “How-It's-Done” videos. I generally make 40 to 100 at a time. Tooling up to make one is obviously pointless. http://youtu.be/w5NCUrRAihw When I was a kid. I had the stick. I had the rock. And I had the mud puddle. I am as adept with them today, as I was back then. Lets see today's kids say that about their IPods, IPads and XBoxes in 45 years! Rod Henrickson | |||
|
| One of Us |
The Japanese, with the help of W. Edwards Deming, invented the philosophies that would later become Motorola's Six Sigma Quality Improvement Program. The fact that barrels could interchange and time and headspace, is awesome. | |||
|
| One of Us |
I posted this in another thread, but I'll dump it here too as it provides the dimensions of a 12 spline fluted barrel on a Shilen #7 conture barrel. The cutter is a standard 1/8th convex or sprocket cutter. Involute gear cutters do not work well at this depth because they exceed the radius of the cutter and the flutes get uneven or wavy as they run down the taper of the barrel. I only go to .550 up to 30 caliber. In my opinion they get to thin if you go that deep on larger calibers. 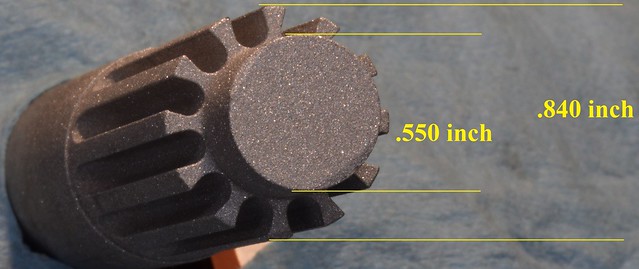 Gunsmith Rod Henrickson 12 Spline by Rod Henrickson, on Flickr Gunsmith Rod Henrickson 12 Spline by Rod Henrickson, on FlickrWhen I was a kid. I had the stick. I had the rock. And I had the mud puddle. I am as adept with them today, as I was back then. Lets see today's kids say that about their IPods, IPads and XBoxes in 45 years! Rod Henrickson | |||
|
| One of Us |
Here is a simple bolt thrust calculator that you can put into Open Office, Microsoft Excel or any spreadsheet. It is obviously not exact enough for engineers, but it is close enough for estimation for gunsmith bolt thrust calculations. If you want, you can protect all cells but A2, A4 and B4 and that will keep you from accidentally wiping out non user friendly cells. For those who don't use CTRL/Z for all their fat fingered corrections that is. 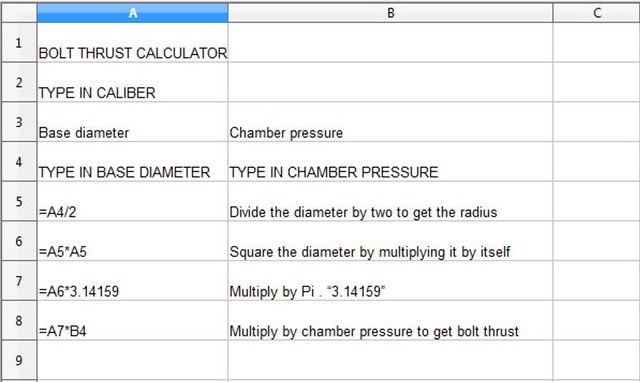 Gunsmith Rod Henrickson Bolt Thrust Calculator by Rod Henrickson, on Flickr Gunsmith Rod Henrickson Bolt Thrust Calculator by Rod Henrickson, on FlickrWhen I was a kid. I had the stick. I had the rock. And I had the mud puddle. I am as adept with them today, as I was back then. Lets see today's kids say that about their IPods, IPads and XBoxes in 45 years! Rod Henrickson | |||
|
| One of Us |
Converting the Ruger 10-22 to 8x40 screws after the 6x48 holes have been stripped out. 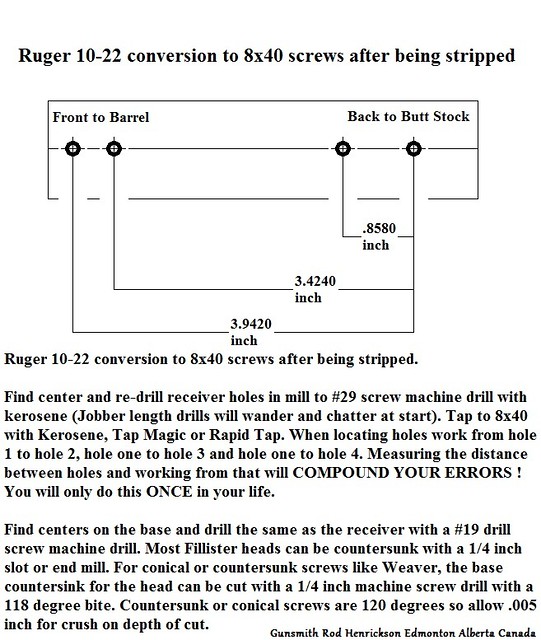 Gunsmith Rod Henrickson Ruger 10-22 by Rod Henrickson, on Flickr Gunsmith Rod Henrickson Ruger 10-22 by Rod Henrickson, on FlickrWhen I was a kid. I had the stick. I had the rock. And I had the mud puddle. I am as adept with them today, as I was back then. Lets see today's kids say that about their IPods, IPads and XBoxes in 45 years! Rod Henrickson | |||
|
| One of Us |
Video of how to hold a Stock Plate in place using a Fish while installing a BAR Butt Stock. https://youtu.be/mWRP8MNlmzc When I was a kid. I had the stick. I had the rock. And I had the mud puddle. I am as adept with them today, as I was back then. Lets see today's kids say that about their IPods, IPads and XBoxes in 45 years! Rod Henrickson | |||
|
| One of Us |
I started using piloted crowning reamers about 25 years ago because they cut the crown perfectly square to the bore and they do such a nice job. Some people may poopoo them for whatever stupid reason. But as far as I'm concerned, .003 of an inch never looked so good! 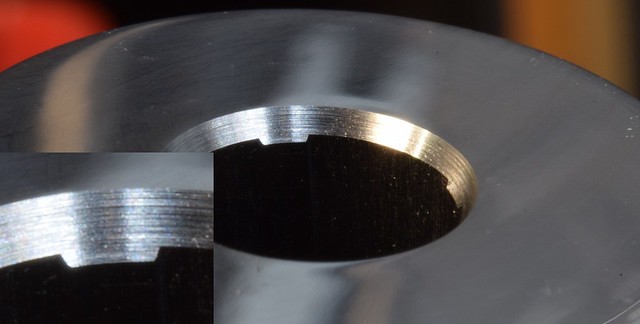 Gunsmith Rod Henrickson Reamer Crown by Rod Henrickson, on Flickr Gunsmith Rod Henrickson Reamer Crown by Rod Henrickson, on FlickrWhen I was a kid. I had the stick. I had the rock. And I had the mud puddle. I am as adept with them today, as I was back then. Lets see today's kids say that about their IPods, IPads and XBoxes in 45 years! Rod Henrickson | |||
|
| One of Us |
Checking the run out in the threads after they have been re-cut in a Remington 700 is a pretty hit and miss thing to try to do. Considering all of the variables that you have to contend with. The actual measured run out in properly re-cut action threads is only about .002 of an inch at 7 inches. In truth, if you consider the variables, the threads are probably much closer than that. The equipment at hand makes it impossible to measure them any closer. No one has actually ever proved that having the threads in perfect alignment to the bolt and barrel actually makes the gun shoot any better. But it is a good theory and despite the fact that we can't prove it, one can rest assured that its certainly not hurting anything, so we do it. https://www.youtube.com/watch?...ees&feature=youtu.be When I was a kid. I had the stick. I had the rock. And I had the mud puddle. I am as adept with them today, as I was back then. Lets see today's kids say that about their IPods, IPads and XBoxes in 45 years! Rod Henrickson | |||
|
| One of Us |
I had to flute a bolt and receiver today so I did a quick video of the setup in the knee mill. I don't try to blow any snow up anyone's ass. You don't really loose much weight to the fluting. It just looks cool and people pay for cool ! I still have to flute the bolt shroud to match and install a different bolt handle. https://youtu.be/CcNXOdCYbx4 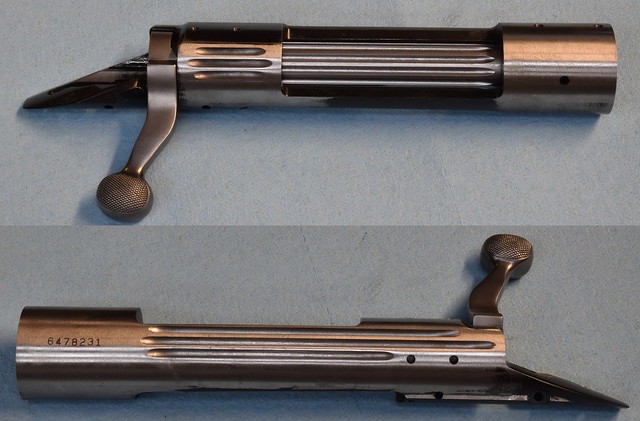 Gunsmith Rod Henrickson Action Fluting by Rod Henrickson, on Flickr Gunsmith Rod Henrickson Action Fluting by Rod Henrickson, on FlickrWhen I was a kid. I had the stick. I had the rock. And I had the mud puddle. I am as adept with them today, as I was back then. Lets see today's kids say that about their IPods, IPads and XBoxes in 45 years! Rod Henrickson | |||
|
| One of Us |
Nothing left but the handle, if I do it. That being done, then the hard part. Finding someone in Canada that's stupid enough to pay for a fully trued and tricked chromoly 700.  Gunsmith Rod Henrickson Fluted Action Cr by Rod Henrickson, on Flickr Gunsmith Rod Henrickson Fluted Action Cr by Rod Henrickson, on FlickrWhen I was a kid. I had the stick. I had the rock. And I had the mud puddle. I am as adept with them today, as I was back then. Lets see today's kids say that about their IPods, IPads and XBoxes in 45 years! Rod Henrickson | |||
|
| One of Us |
I decided to replace the factory Remington knob with a custom one. In for a penny, in for a pound they say. https://www.youtube.com/watch?...TVI&feature=youtu.be When I was a kid. I had the stick. I had the rock. And I had the mud puddle. I am as adept with them today, as I was back then. Lets see today's kids say that about their IPods, IPads and XBoxes in 45 years! Rod Henrickson | |||
|
| One of Us |
This is cute. We see a lot of it here. It's SKS chamber cancer. Great money maker if you like pulling cases and polishing chambers.  Gunsmith%20Rod%20Henrickson%20SKS%20Chamber%20Cancer(1) by Rod Henrickson, on Flickr Gunsmith%20Rod%20Henrickson%20SKS%20Chamber%20Cancer(1) by Rod Henrickson, on FlickrWhen I was a kid. I had the stick. I had the rock. And I had the mud puddle. I am as adept with them today, as I was back then. Lets see today's kids say that about their IPods, IPads and XBoxes in 45 years! Rod Henrickson | |||
|
| One of Us |
The Winchester model 70 mainspring compression tool is simple to make and even simpler to use. The video makes both pretty self explanatory. I made this one 20 years ago from a 4140 off-cut from the waste bin. I have changed 100s of main springs and firing pins with it. https://www.youtube.com/watch?v=FZh_GNf_uGM When I was a kid. I had the stick. I had the rock. And I had the mud puddle. I am as adept with them today, as I was back then. Lets see today's kids say that about their IPods, IPads and XBoxes in 45 years! Rod Henrickson | |||
|
| One of Us |
. For the curious. The flute spacing on Remington receivers is 15 degrees between each flute with a 1/8th convex cutter or sprocket cutter. You can't cut these flutes with an involute cutter because of the depth of cut. The depth of cut is .120 inch. The distance between the flutes on the tops works out to about .049 inch and the distance between them at the narrowest point is about .038 inch. I do them with a spacer but if you are doing it with a dividing head 15 degrees works out to 24 divisions and you can do it directly off the face plate. I have done them at 14 degrees between flutes but they get a bit thin and easy to damage. They measure .039 inch on the tops and .028 at the narrowest point. You don't lose much weight doing this. Like bolt fluting, it just looks cool.  Gunsmith Rod Henrickson Remington Action Flutes by Rod Henrickson, on Flickr Gunsmith Rod Henrickson Remington Action Flutes by Rod Henrickson, on FlickrWhen I was a kid. I had the stick. I had the rock. And I had the mud puddle. I am as adept with them today, as I was back then. Lets see today's kids say that about their IPods, IPads and XBoxes in 45 years! Rod Henrickson | |||
|
| One of Us |
A hobby gunsmith friend of mine took a look at my flush system and set up a through barrel oil system for his own machine and asked me about sulfur based oils that would go through his impeller pump and I recommended the old Sulflo Light. I have used it in gear pumps for years on my machines. I have also ran it through impeller pumps on other machines with no problems. My friend, being sort of short on both hearing and brain, picked up the Sulflo Dark cutting oil by mistake. He found that it ran through his cheap-as-china impeller pump just fine. On a lark I picked up a couple jugs about a month ago and switched it out in my own tanks. I have cut a half dozen chambers with it so far and it could be all in my head but I think it cuts smoother than the regular light Sulflo and easily as good as Dark, Ridgid Cutting Fluid. I tried it in the impeller system in my band saw and it goes through it like Jack-De-Bear, but it's a bit to sticky and messy for that application. I will however, keep using it in my chamber flush system. Stuff sure is messy. And sticky. And stinky. But it seems to work good so that's OK !  Gunsmith Rod Henrickson Sulflo Dark by Rod Henrickson, on Flickr Gunsmith Rod Henrickson Sulflo Dark by Rod Henrickson, on FlickrWhen I was a kid. I had the stick. I had the rock. And I had the mud puddle. I am as adept with them today, as I was back then. Lets see today's kids say that about their IPods, IPads and XBoxes in 45 years! Rod Henrickson | |||
|
| One of Us |
The Browning Superposed/Citori mainspring compression tool is a very cheap and simple tool to make and use. It is also almost indispensable for anyone who works on double shotguns. It consists of nothing more than a cheap set of channel lock pliers with a notch ground on one jaw to lock into the mainspring strut and a claw on the other to grip any area of the receiver tang. One can make them as clean and fancy as you wish using a mill with carbide tooling to make the cuts. Or they can be as rough and simple as the one in this video that I made in a hurry, on a grinder 15 years ago after breaking my first or possibly sixth one. I'm sure that the only reason that Brownells has never manufactured a tool like this is that everyone would take a look at the picture and grind their own from a $7.00 pair of Walmart channel locks. https://www.youtube.com/watch?...mgs&feature=youtu.be When I was a kid. I had the stick. I had the rock. And I had the mud puddle. I am as adept with them today, as I was back then. Lets see today's kids say that about their IPods, IPads and XBoxes in 45 years! Rod Henrickson | |||
|
| One of Us |
I bought a half dozen Krieger barrels for stock. I'm not fond of cut rifled barrels and I try to avoid them like the plague because they foul so bad. But the price was right. Took some high magnification JPGs for giggles. Some nasty deep grooves in the lands and I know what that will lead too. Still don't like cut rifling.  krieger1 by Rod Henrickson, on Flickr krieger1 by Rod Henrickson, on Flickr krieger2 by Rod Henrickson, on Flickr krieger2 by Rod Henrickson, on Flickr krieger3 by Rod Henrickson, on Flickr krieger3 by Rod Henrickson, on Flickr krieger4 by Rod Henrickson, on Flickr krieger4 by Rod Henrickson, on FlickrWhen I was a kid. I had the stick. I had the rock. And I had the mud puddle. I am as adept with them today, as I was back then. Lets see today's kids say that about their IPods, IPads and XBoxes in 45 years! Rod Henrickson | |||
|
| One of Us |
Building a 243 for sale and opted for one of the fluted brakes to match the flutes on the barrel. The things are a horrible pain in the ass to make with 12 splines and 60, .120 inch holes and no CNC. But they look so cool I just had to do it. The thread protector that can be screwed on for hunting is standing below.  Gunsmith Rod Henrickson Fluted Brake by Rod Henrickson, on Flickr Gunsmith Rod Henrickson Fluted Brake by Rod Henrickson, on FlickrWhen I was a kid. I had the stick. I had the rock. And I had the mud puddle. I am as adept with them today, as I was back then. Lets see today's kids say that about their IPods, IPads and XBoxes in 45 years! Rod Henrickson | |||
|
| One of Us |
I finally put a short video together on barrel fluting to try to show my customers why I feel justified in charging them so much. http://youtu.be/Hm8bpaSpWCA When I was a kid. I had the stick. I had the rock. And I had the mud puddle. I am as adept with them today, as I was back then. Lets see today's kids say that about their IPods, IPads and XBoxes in 45 years! Rod Henrickson | |||
|
| One of Us |
Yet another hare brained brake design. I angled the slots 5 degrees forward to cut down on blast. Probably won't. 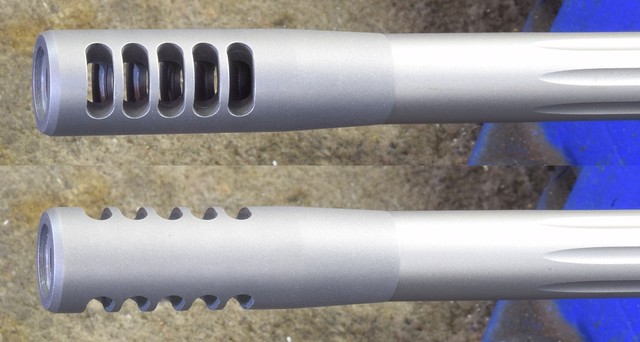 Gunsmith Rod Henrickson Ted Brake by Rod Henrickson, on Flickr Gunsmith Rod Henrickson Ted Brake by Rod Henrickson, on FlickrWhen I was a kid. I had the stick. I had the rock. And I had the mud puddle. I am as adept with them today, as I was back then. Lets see today's kids say that about their IPods, IPads and XBoxes in 45 years! Rod Henrickson | |||
|
| One of Us |
Micro balloons works very much the same as using sand to hold the heat except the micro balloons transfer the heat away much more slowly than sand does which gives a better, more uniform anneal for those who lack a heat treating furnace to do it properly. Micro balloons are actually mostly air and as anyone in the window industry knows, trapped air is actually one of the poorest thermal conductors around. Be careful pulling the parts out of the balloons. Even after a half an hour, larger parts will still be hot enough to burn you and smaller parts will be uncomfortable to the touch. 20 minutes to 1/2 hour is usually long enough to allow the part to become thoroughly softened. Here's a video of it but lets face it, annealing is not really a show me sort of thing required. Heat, plunge, wait then rework part as required. It is sort of fun watching the micro balloons boil for a half hour. Wink ADD NOTE: Plunge the part deep enough into the bucket of powder so that the micro balloons don't boil to the surface. That way an insulating cocoon of dry micro balloons will form around the part. You can NEVER get all of the moisture out of micro balloons. Even if you cook them in the oven there will still be moisture in them and as they cool they will suck moisture back in until they hold the same amount of water as the air around them. https://www.youtube.com/watch?v=pOntsvBKvKk When I was a kid. I had the stick. I had the rock. And I had the mud puddle. I am as adept with them today, as I was back then. Lets see today's kids say that about their IPods, IPads and XBoxes in 45 years! Rod Henrickson | |||
|
| One of Us |
A lot of customers have been asking about how I pull the sights off the Norinco M305s without the aid of hammers, violence, broken flash hiders and bent barrels. So I put together a video. Plus, I just happened to get in another one to do! https://youtu.be/8LUH0kfXSws When I was a kid. I had the stick. I had the rock. And I had the mud puddle. I am as adept with them today, as I was back then. Lets see today's kids say that about their IPods, IPads and XBoxes in 45 years! Rod Henrickson | |||
|
| One of Us |
This is for the Weaver # 429M base. When drilling and tapping the Remington 870 for scope mounts you should always sandwich the receiver between two, clean parallels. The first reason for this is that the sides of the receivers are often wavy and when you use an edge finder to find center you can easily be off by .002 to .004 inch depending on where you take your reading from. The second is that the edge finder will almost always leave a mark on the bluing or paint. Sandwich the receiver between two parallels, take readings from the outside of both and divide by two for center. If you don't have a DRO you can use a 2 inch dial indicator to eliminate slap. 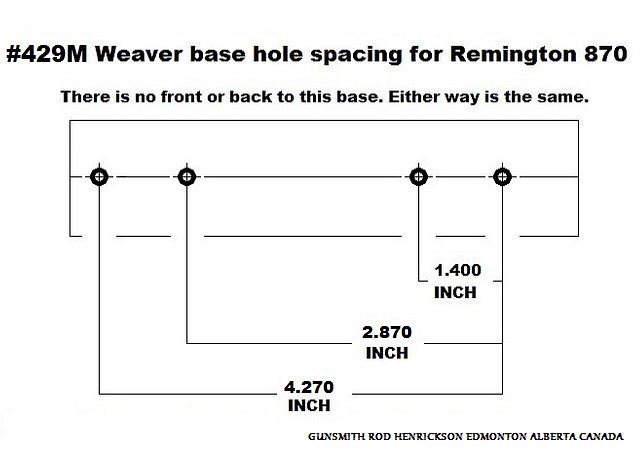 870 REMINGTON BASE by Rod Henrickson, on Flickr 870 REMINGTON BASE by Rod Henrickson, on Flickr Gunsmith Rod Henrickson Shotgun Receiver by Rod Henrickson, on Flickr Gunsmith Rod Henrickson Shotgun Receiver by Rod Henrickson, on FlickrWhen I was a kid. I had the stick. I had the rock. And I had the mud puddle. I am as adept with them today, as I was back then. Lets see today's kids say that about their IPods, IPads and XBoxes in 45 years! Rod Henrickson | |||
|
| One of Us |
. Just bedding a stock so I shot a picture. Anchor foot holes have been cut with the mill so the bedding does not pull free and the stock is masked off. The toilet paper keeps the Marine Tex from dripping on my bench while I'm cleaning up the top end. 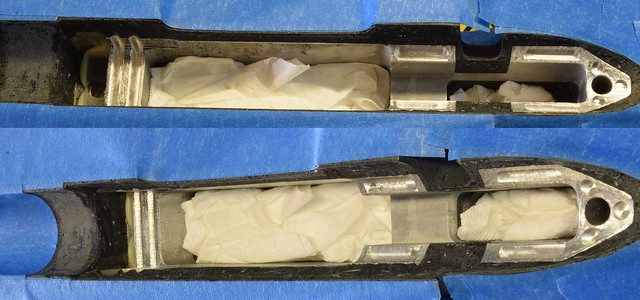 Gunsmith Rod Henrickson Bedding12 by Rod Henrickson, on Flickr Gunsmith Rod Henrickson Bedding12 by Rod Henrickson, on FlickrWhen I was a kid. I had the stick. I had the rock. And I had the mud puddle. I am as adept with them today, as I was back then. Lets see today's kids say that about their IPods, IPads and XBoxes in 45 years! Rod Henrickson | |||
|
| One of Us |
Modifying the Timney Featherweight trigger to work in the Husky and HVA rifles. For this you need the high replacement sear that Timney makes for the thick tanged Mausers. You also have to use the Featherweight Mauser, Timney trigger which will work with the military, notched cocking piece. 1 The first step is to grind off the safety spring pin on the original HVA safety. 2 Second step is to cut off the safety arm and button from the safety plate on the Timney and then re-install the plate on the trigger. 3 The trigger and the original safety are then installed and the #31 hole is located and center punched. Move the plate and safety to the on and off position to find this location. Remember that the safety slides straight back and forth and the plate moves in an arch so a certain amount of vertical movement has to be allowed for. 4 Remove the plate and using a #31 carbide drill make the hole for the new safety pin. After the hole has been drilled you can re-assemble everything and install a #31 drill to check that the function is close. 5 Remove the plate and silver solder the drill bit into place and clean away the excess silver and shorten the pin to about 1/10th of an inch. 6 Re-assemble the trigger and check the function. You may need to replace the safety trigger block spring with something a bit lighter. You may also need to lengthen the slots in the original HVA safety to allow enough travel to fully engage the safe on the Timney trigger. I normally do this with a 3mm carbide slot mill.  Gunsmith Rod Henrickson Timney HVA by Rod Henrickson, on Flickr Gunsmith Rod Henrickson Timney HVA by Rod Henrickson, on FlickrWhen I was a kid. I had the stick. I had the rock. And I had the mud puddle. I am as adept with them today, as I was back then. Lets see today's kids say that about their IPods, IPads and XBoxes in 45 years! Rod Henrickson | |||
|
| One of Us |
Drawing for the Winchester Featherweight conture barrel. This drawing is marked as taken from a stainless steel barrel which would make it modern production. It may or may not be exactly the same as the pre-64 conture. But, like the Douglass Featherweight conture, it's probably close enough to fool anyone but one of those foolish Winchester collectors with a jewelers loup and a rectal probe. It was a double taper with the taper break locations being based loosely on the node points of the 30-06 and 270 Winchester at about 11 inches, if memory serves. I just did some quick trig and the top end of the taper is .3960 taper per foot so the included angle would be 1.5469 degrees ÷ 2 = .7734 degree angle per side. The bottom end of the taper is .1320 taper per foot which would work out to .6302 degrees included angle or .3151 degrees angle per side. You might want to double check my calculations but they seem about right. Me and math don't play so well together some days and this is one of those (some days). Drawing courtesy of Chuck Nelson 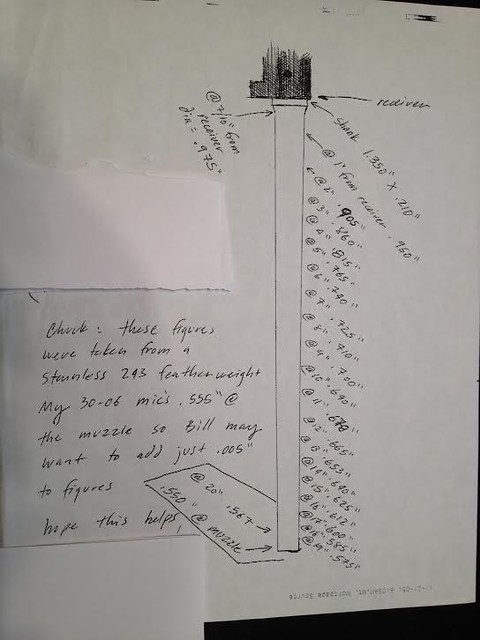 Gunsmith Rod Henrickson Chuck Nelson Featherweight 70 by Rod Henrickson, on Flickr Gunsmith Rod Henrickson Chuck Nelson Featherweight 70 by Rod Henrickson, on FlickrWhen I was a kid. I had the stick. I had the rock. And I had the mud puddle. I am as adept with them today, as I was back then. Lets see today's kids say that about their IPods, IPads and XBoxes in 45 years! Rod Henrickson | |||
|
| One of Us |
The 243 with the Kreiger barrel finally, somehow got finished. These things take time when they are spec rifles and not projects commissioned by customers. They are usually a lot racier than the ones I build for customers too because I do everything I can think of to them. They are essentially make work projects but they do help pay the bills. The bare rifle came out at 8-1/2 pound even with the barrel measuring .870 at the muzzle. That's the same weight as a Remington 700 BDL in 7mm mag. The 12 spline fluting tends to rip off quite a bit of weight while still giving the illusion of the barrel being very heavy. The fluting is actually more for looks than anything. If I had wanted a lightweight gun I would have stuck on a #1 conture barrel. If I was looking for accuracy I would have used a #6. It's all merchandising. Fluting the receiver and the bolt just adds a bit more Buck Rogers to the look.  Gunsmith Rod Henrickson 243 by Rod Henrickson, on Flickr Gunsmith Rod Henrickson 243 by Rod Henrickson, on FlickrWhen I was a kid. I had the stick. I had the rock. And I had the mud puddle. I am as adept with them today, as I was back then. Lets see today's kids say that about their IPods, IPads and XBoxes in 45 years! Rod Henrickson | |||
|
| One of Us |
Had to make a small drudgery of muzzle brake. More fun than watching paint dry. Well, no, not really.  Gunsmith Rod Henrickson Muzzle Brakes by Rod Henrickson, on Flickr Gunsmith Rod Henrickson Muzzle Brakes by Rod Henrickson, on FlickrWhen I was a kid. I had the stick. I had the rock. And I had the mud puddle. I am as adept with them today, as I was back then. Lets see today's kids say that about their IPods, IPads and XBoxes in 45 years! Rod Henrickson | |||
|
| one of us |
Rod Keep up the good information sharing. I really enjoy seeing how someone else approaches the same work. I too have an open shop with a service counter. There are a few parts lockers and tool boxes here and there obstructing the view. Customers can watch some things but not everything. How about posting some wide angle photos of your shop and equipment. I am pretty cramped from tooling and machines and would like to see how you deal with similar problems. How much pressure are you running with the flush system when chambering barrels ? Do you plan on shooting a video of threading and chambering a barrel ? Finally, whats up with the camo shirt and black shorts in every video? Its driving us Texans crazy ! Craftsman | |||
|
| One of Us |
The dress is simple. I have about 20 pairs of camo T shirts and black shorts. I'm usually bathed in coolant and sulfur base cutting fluid by 1:00 every day and they don't show it. Plus, long sleeves and floppy attire are sort of taboo in a machine shop. At 54 I still have all my fingers, eyes, ears and toes. I used to run the oil at about 15 pounds but it was too messy so I dropped it to about 4 pounds and it keeps the reamer well lubed. I use Sulflo Dark Cutting fluid. I suspect they buy Ridged Dark cutting fluid by the tanker truck load and wrap their own label on it. The service counter is at the back by the red tool box. I use movable carts in the shop. The first one in the picture is all carbide. The second is mostly collets. R8, 5C, ER40, ER32, ER16 and ER11. All of my lathe tooling is quick change carbide and quick change ER32xMT3. The red tool box is mostly taps ranging in size from 3 inch down to 3x56 and some proprietary R8 tooling. Some where in there are two can opener lathes, a 40 inch lathe, 44 inch lathe, 9x50 inch mill with a regular and shaper head, metal saw, 9x32 inch column mill, belt sander, couple of grinders, sand blast cabinet, solvent tank and my Cuttermaster grinder doubles as the monitor stand for the putor. The safes and woodworking tools are behind the photo. It's a fawking nightmare and I need a shoehorn and GPS to sweep the floor. 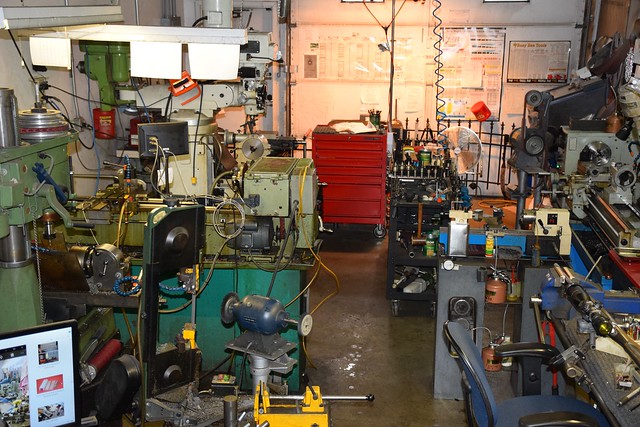 Gunsmith Rod Henrickson Shop by Rod Henrickson, on Flickr Gunsmith Rod Henrickson Shop by Rod Henrickson, on Flickr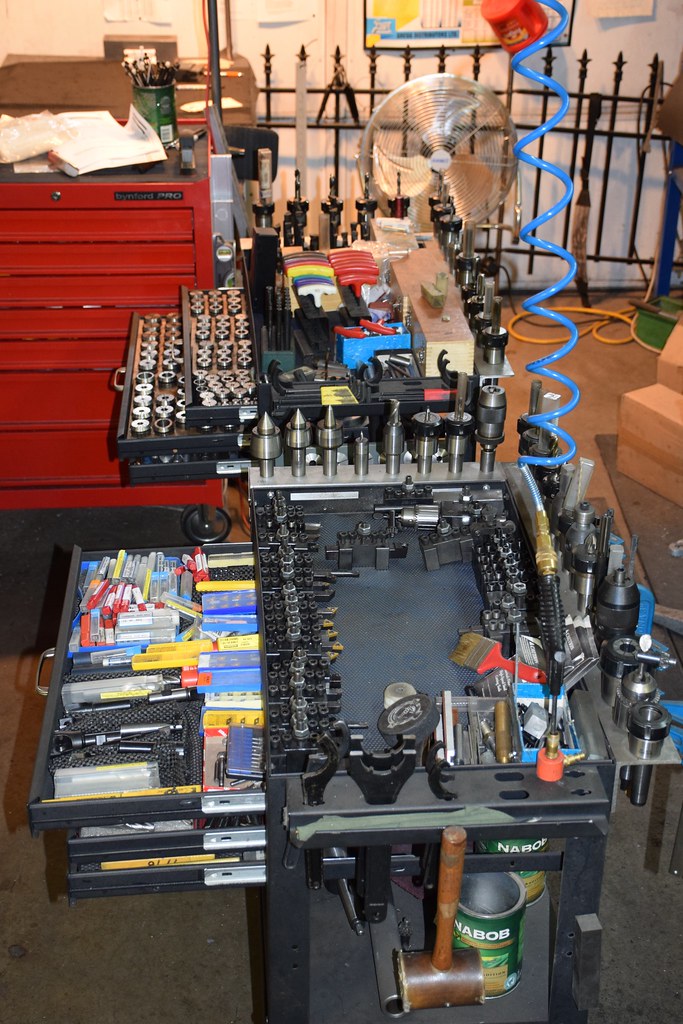 Gunsmith Rod Henrickson Shop1 by Rod Henrickson, on Flickr Gunsmith Rod Henrickson Shop1 by Rod Henrickson, on FlickrWhen I was a kid. I had the stick. I had the rock. And I had the mud puddle. I am as adept with them today, as I was back then. Lets see today's kids say that about their IPods, IPads and XBoxes in 45 years! Rod Henrickson | |||
|
| one of us |
Rod That's a lot of equipment, very well organized. I like the carts and ER tooling. I have just started adding ER tooling to my shop. I've got the Bridgeport out fitted now I'm setting up my lathe. I've got the face plate adaptor for the ER40, just got to find time to machine it. Craftsman | |||
|
| One of Us |
I know what you mean. I bought an ER32 collet plate to bolt on to that cream colored 6 x 12 inch C1 can opener lathe in the middle right of the first photo about 6 months ago and I still haven't gotten around to doing it. The 3 inch chuck that's on it is about as accurate as Mr Magoo trying to run a piece of spaghetti up a tigers ass, but I still keep fighting with it even though it would only take an hour to throw the collet plate on it. When I was a kid. I had the stick. I had the rock. And I had the mud puddle. I am as adept with them today, as I was back then. Lets see today's kids say that about their IPods, IPads and XBoxes in 45 years! Rod Henrickson | |||
|
| One of Us |
. Up until a couple of years ago I was still threading with HSS. I had tried carbide for threading 10 years back but it was just to chalky and brittle to thread at low speeds on the little can opener machines that we use in our industry. I had sort of resigned myself to the fact that it was CNC only. About a year and a half ago, one of the tooling salesmen had convinced me that carbide had changed enough to be useful to me and I ordered a tool holder and a bunch of 6 TPI inserts so that I could cut any pitch to give them a try. While expensive at about $20 per insert or $6.66 per tip CAD, I found that the damned things were lasting virtually forever at 200 RPM in 416 and 4140. The thread finish was also pretty much as good as I was cutting with sharp HSS so I started using the carbide full time. Some time ago I changed all the threads for my brakes to 28 TPI, ½, 9/16, 5/8 and ¾ so two weeks ago I dropped $400 on a new tool holder and some full form 28 TPI inserts. I have cut about 15 threads with the insert in the picture and it shows no sign of wear whatsoever. I am cutting my shanks .003 to .004 inch over sized and I cut until it knocks the crest off and then try the device. If necessary I make one more cleanup cut. I'm never going back to HSS.  Gunsmith Rod Henrickson Full Form 28 UNF by Rod Henrickson, on Flickr Gunsmith Rod Henrickson Full Form 28 UNF by Rod Henrickson, on FlickrWhen I was a kid. I had the stick. I had the rock. And I had the mud puddle. I am as adept with them today, as I was back then. Lets see today's kids say that about their IPods, IPads and XBoxes in 45 years! Rod Henrickson | |||
|
| One of Us |
A friend of mine wanted to see how I cut Mauser receiver bridges in the mill so I put this mock up video together to show how the cuts are made. With an actual receiver a mandrel is run through the action and dogged off solid. One end of the mandrel is held in the dividing head or spacer and the other is locked into the tailstock center. Keep the mandrel as short as possible to hep break chatter. In a real life situation the cuts have to be kept light at .010 to 020 inch per cut as carbide should be used and the light bar through the action will flex and set up chatter which will chip the leading edges off the cutter. The current angle of the receiver bridge is found across the flats with a protractor. Rotating the head 24 degrees on either side of center will give an included angle of 48 degrees across the flats. From that it's basic math to measure the included angle of the original two flats and figure out how many degrees of rotation it will take to match the original bridge geometry. Basically center is found between the cutter and receiver and the first cut is made deeper and deeper down through the stripper clip hump to create a small flat straight down the center of the rear bridge. The head is then rotated 4 degrees and the same process is repeated until you reach the same depth you stopped at on your first cut. This is continued until you have cut one side of the radius and you are now at the correct angle for the first flat. This flat is then cut by simply using the X and Y axis on the table. The whole thing is then brought back to center and the other side is done. Simple polishing with 600 wet & dry and a sanding block will blend in the flats on the top. To cut the front receiver ring I drive a slot mill down .005 inch into the ring and then use the spacer to make a complete rotation over the ring. Then I move forward another cutter width and rotate it around again. This speeds things up and avoids 50 small cuts and 50 small flats to polish out later. https://www.youtube.com/watch?v=nnxqblNmuq0 When I was a kid. I had the stick. I had the rock. And I had the mud puddle. I am as adept with them today, as I was back then. Lets see today's kids say that about their IPods, IPads and XBoxes in 45 years! Rod Henrickson | |||
|
| One of Us |
Not so long ago I bought a 6 inch and a 10 inch ER11 collet chuck specifically to drill some holes in an engine crank case that couldn't be reached by any conventional methods. Like a lot of these special job purchases I billed the customer for the labor and of course the cost of the tooling and tossed it into the tool box expecting to never use it again. Oddly enough, now that I have them, I find that I'm digging into the box for them every couple of weeks for odd jobs. Their slimness allows you to get into some really tight places at odd angles that would otherwise be impossible. The big positive thing I have found is that for milling on tiny parts like the front sight in the picture, it allows you to actually see what you are doing from all angles rather than just navigating by the numbers as one would operate a submarine. Of course they do have their limitations and you can only take light cuts without building chatter but when used within their capabilities they are worth buying and having.  ER11 by Rod Henrickson, on Flickr ER11 by Rod Henrickson, on FlickrWhen I was a kid. I had the stick. I had the rock. And I had the mud puddle. I am as adept with them today, as I was back then. Lets see today's kids say that about their IPods, IPads and XBoxes in 45 years! Rod Henrickson | |||
|
| new member |
Hi , Need to ask can one sleeve a barrel shank area and re cut threads for different action . I have a licenced .300 H&H barrel threaded for a Ruger action and want to fit it to a P 14 Enfield action.......I could buy a new barrel but relicencing here is a real pain in the butt. thank you | |||
|
| One of Us |
I have seen stuff like that done but it generally weakens the system quite a bit. As you can imagine a double set of threads in the wall of a pressure vessel is no substitute for solid steel. People get away with it because action and barrel dimensions are basically designed to be about twice as strong as they need to be. This thinking provides a safety net in the event that the gun is fired with an overload or plugged bore. I'm not an engineer but a double set of threads would probably nicely sacrifice that safety net and for that reason I have never attempted it myself and never would. If anything bad can happen with a machine, it probably will, sooner or later. When I was a kid. I had the stick. I had the rock. And I had the mud puddle. I am as adept with them today, as I was back then. Lets see today's kids say that about their IPods, IPads and XBoxes in 45 years! Rod Henrickson | |||
|
| new member |
Thank you for your reply, so its seems a bad idea and sadly looks like I have to purchase a new barrel. Just a point though what I was thinking more along the lines of machining threads on the barrel shank, then a matching internal thread on the (new) sleeve. The (old) barrel threads would be machined off, new sleeve threaded and locktighted or sweated soldered on whilst threaded on to barrel. The new threads for action then thread onto that new shank area. | |||
|
| One of Us |
Like I say, it's been done. But it's generally not recommended and I wouldn't do it myself. When I was a kid. I had the stick. I had the rock. And I had the mud puddle. I am as adept with them today, as I was back then. Lets see today's kids say that about their IPods, IPads and XBoxes in 45 years! Rod Henrickson | |||
|
| new member |
Thanks for your valued replies. | |||
|
| Powered by Social Strata | Page 1 2 3 4 5 6 |
| Please Wait. Your request is being processed... |
Guns, Politics, Gunsmithing & Reloading Gunsmithing

Visit our on-line store for AR Memorabilia