
 Guns, Politics, Gunsmithing & Reloading Gunsmithing
 Go | New | Find | Notify | Tools | Reply |
| Mechanical drawings for barrel shanks and parts | Login/Join |
| One of Us |
Ya know it would be just as easy to go to the local pharmacy and pick up a box of condoms and put one over the muzzle. I see they even have camo designs now, in case a person wanted to fit in with the hunting crowd. Never rode a bull, but have shot some. NRA life member NRA LEO firearms instructor (retired) NRA Golden Eagles member | |||
|
| One of Us |
I've told a lot of my customers to do just that. Or wrap electrical tape around the barrel and rip off a bit and put it over the muzzle after every shot. But I still charge them $150 to cut off the barrel and recrown it to get rid of the bulge they already have. Condoms also stop unwanted pregnancy but a lot of teens suffer from that affliction too. No one ever said people were bright ! When I was a kid. I had the stick. I had the rock. And I had the mud puddle. I am as adept with them today, as I was back then. Lets see today's kids say that about their IPods, IPads and XBoxes in 45 years! Rod Henrickson | |||
|
| One of Us |
. I'm not sure if you Mercans can get them, but the Jews are having another sale on carbide spot drills. The geometry is actually meant for micarda and fiberglass but I ordered 20 last time and I have been using the hell out of them with no problems. I even drilled a hole through a Nicolson file just to test one. I ordered anther 30 which should keep me going for a while. As always, buyer beware on EBay sometimes. But at $3.12 USD a pop plus shipping they are pretty damned cheap. http://www.ebay.com/itm/222148...07&mc_eid=864ab6297e  3mm spot drills by Rod Henrickson, on Flickr 3mm spot drills by Rod Henrickson, on Flickr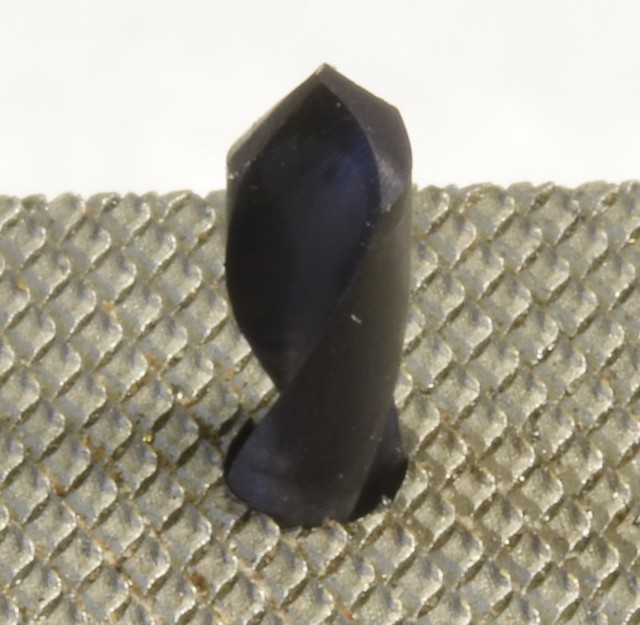 3mm carbide by Rod Henrickson, on Flickr 3mm carbide by Rod Henrickson, on FlickrWhen I was a kid. I had the stick. I had the rock. And I had the mud puddle. I am as adept with them today, as I was back then. Lets see today's kids say that about their IPods, IPads and XBoxes in 45 years! Rod Henrickson | |||
|
| One of Us |
. To skeletonize the main handle on the 700 bolts a 3.5 degree block and a piece of one inch diameter brass is used to lock the handle into the vise. Center is found with an edge finder between the angle block and the brass bar. The 3.5 degree angle will let the cutter run right up the center of the handle and allow for the taper in the handle and keep it running right down the middle. If I had a CNC I would probably cut a pie slice in the lower part of the handle instead of the slot. But it's to much money to set up the rotary table and do it on a single stage machine. I changed things up a bit this time and did a 1/4 inch plunge cut straight down and into the bolt body itself to leave a perfectly round hole and a square edge on the body. It looks 100% better than the unfinished look of old. Now I want to get the other 100 or more that I've done back and redo them. Well, no. I can't do that now even if I wanted too. LOL 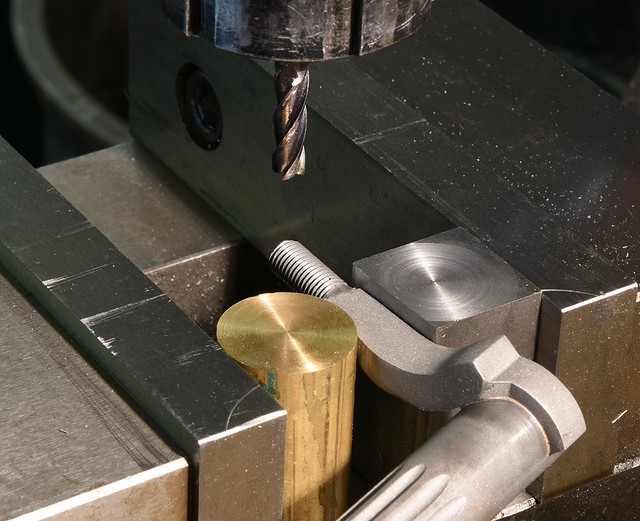 angle block by Rod Henrickson, on Flickr angle block by Rod Henrickson, on Flickr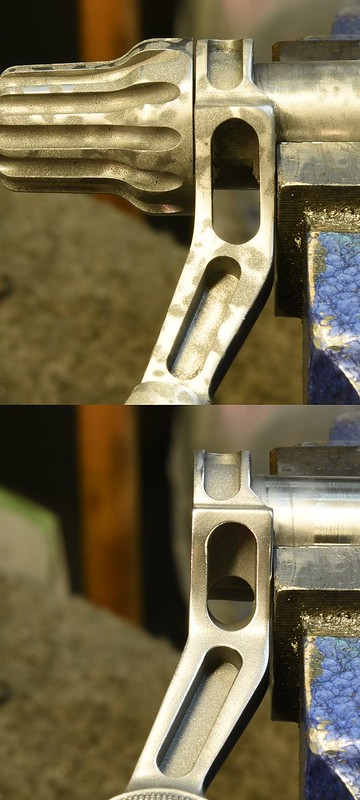 skeleton1 by Rod Henrickson, on Flickr skeleton1 by Rod Henrickson, on FlickrWhen I was a kid. I had the stick. I had the rock. And I had the mud puddle. I am as adept with them today, as I was back then. Lets see today's kids say that about their IPods, IPads and XBoxes in 45 years! Rod Henrickson | |||
|
| One of Us |
Howa 1500, Mossberg, Smith & Wesson and Weatherby Vanguard.  Howa 1500 by Rod Henrickson, on Flickr Howa 1500 by Rod Henrickson, on FlickrWhen I was a kid. I had the stick. I had the rock. And I had the mud puddle. I am as adept with them today, as I was back then. Lets see today's kids say that about their IPods, IPads and XBoxes in 45 years! Rod Henrickson | |||
|
| One of Us |
Screw cutting gear ratio...Thanks for that Rod.I had to do exactly that on a 'modern' chinese metric lathe in order to cut an imperial thread.(no norton box) The instruction manuals leave a lot to be desired,but we got there eventually | |||
|
| One of Us |
. Thankfully, I have only had to work on one metric machine in my entire life. Even the dials were metric only. I used to curse that foolish thing. When I was a kid. I had the stick. I had the rock. And I had the mud puddle. I am as adept with them today, as I was back then. Lets see today's kids say that about their IPods, IPads and XBoxes in 45 years! Rod Henrickson | |||
|
| One of Us |
For those of you who enjoy launching BLR22 extractors, springs and plungers all over the shop ! https://youtu.be/pNKMY8u5a8o  BLR22 extractor Tool by Rod Henrickson, on Flickr BLR22 extractor Tool by Rod Henrickson, on FlickrWhen I was a kid. I had the stick. I had the rock. And I had the mud puddle. I am as adept with them today, as I was back then. Lets see today's kids say that about their IPods, IPads and XBoxes in 45 years! Rod Henrickson | |||
|
| One of Us |
. I had to make a barrel ring bushing for a Savage 116 so I drew up the dimensions so I would never have to figure it out again. The radius, which somehow never got marked on the drawing is 1/2 inch approximate but is not critical. You could simply cut a 45 degree taper if you don't have a whole raft of radius tools pre-ground. 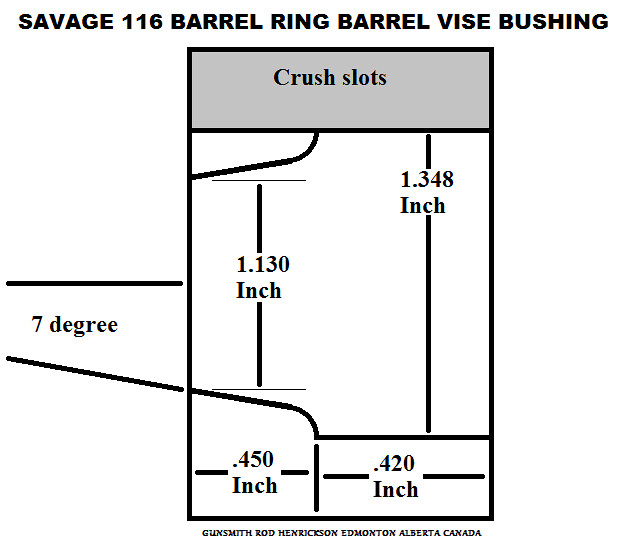 Savage 116 Barrel Ring Bushing by Rod Henrickson, on Flickr Savage 116 Barrel Ring Bushing by Rod Henrickson, on Flickr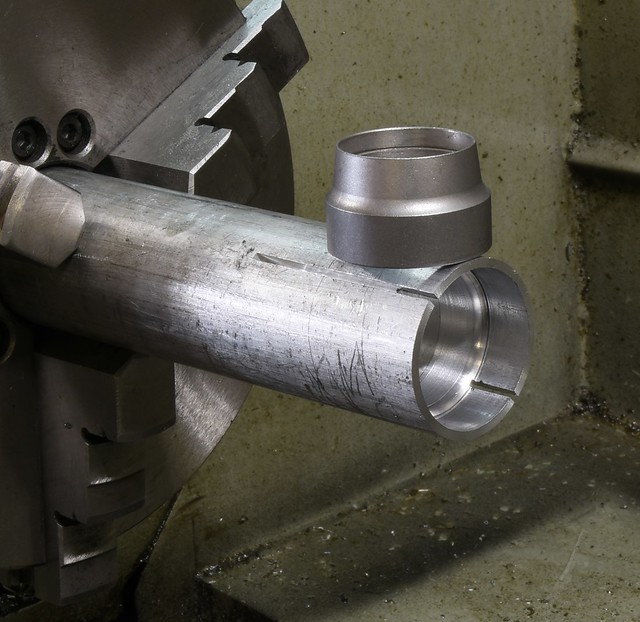 Savage Bushing Before Parting by Rod Henrickson, on Flickr Savage Bushing Before Parting by Rod Henrickson, on Flickr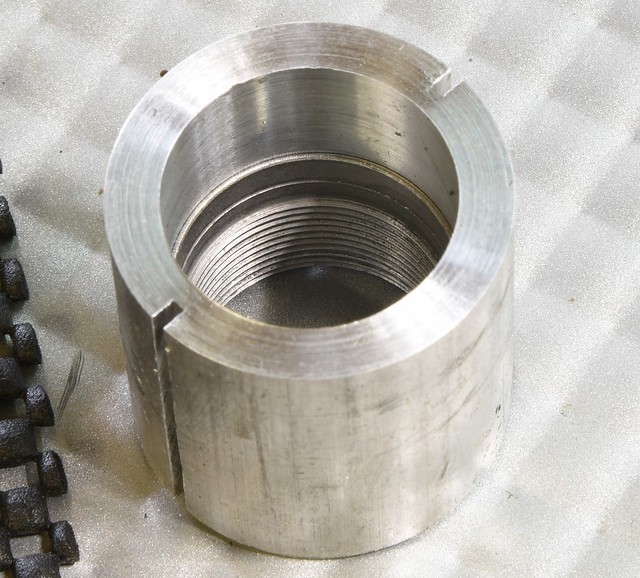 Bushing With Barrel Ring by Rod Henrickson, on Flickr Bushing With Barrel Ring by Rod Henrickson, on Flickr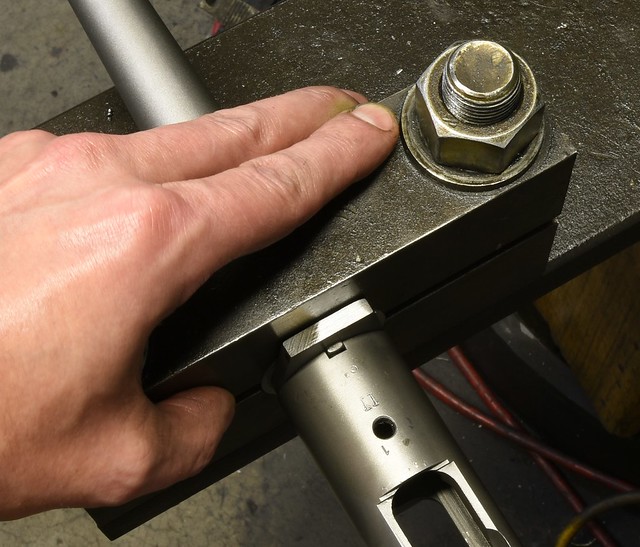 Savage in Barrel Vise by Rod Henrickson, on Flickr Savage in Barrel Vise by Rod Henrickson, on FlickrWhen I was a kid. I had the stick. I had the rock. And I had the mud puddle. I am as adept with them today, as I was back then. Lets see today's kids say that about their IPods, IPads and XBoxes in 45 years! Rod Henrickson | |||
|
| new member |
Would just like to thank you for all your posts that contain a ton of infomation pleas continue. | |||
|
| One of Us |
Drawing for the KIDD 10-22 tang installation.  KIDD1 by Rod Henrickson, on Flickr KIDD1 by Rod Henrickson, on Flickr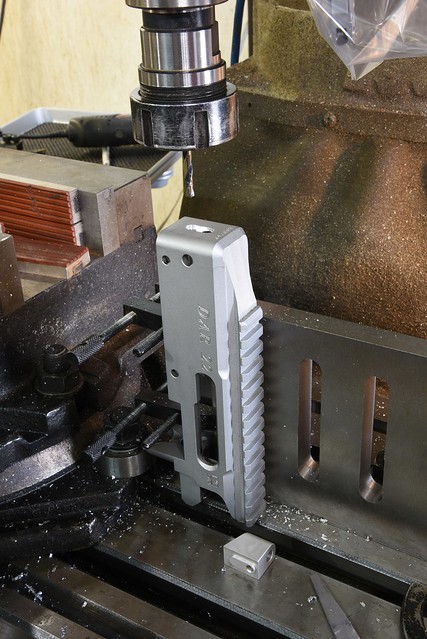 KIDD2 by Rod Henrickson, on Flickr KIDD2 by Rod Henrickson, on Flickr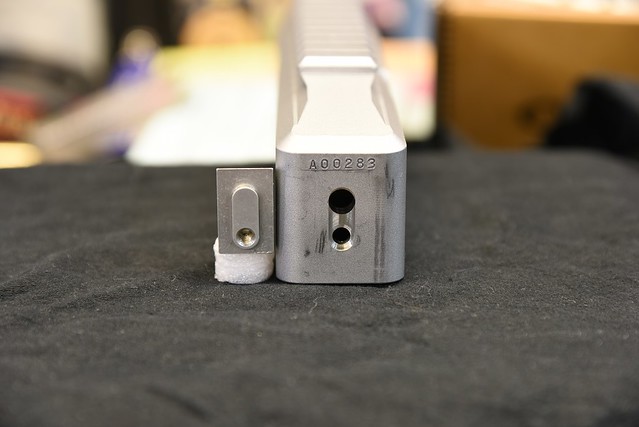 KIDD3 by Rod Henrickson, on Flickr KIDD3 by Rod Henrickson, on Flickr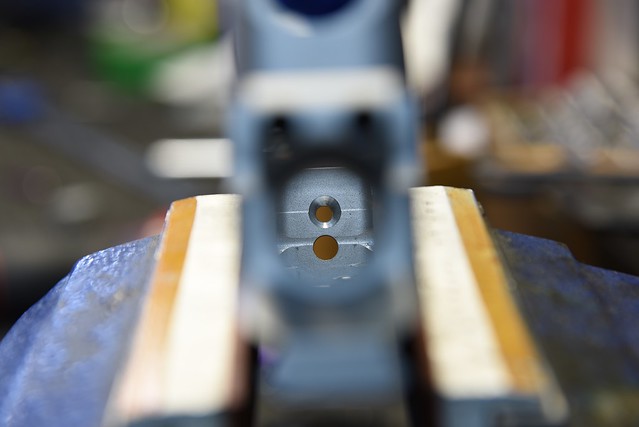 KIDD4 by Rod Henrickson, on Flickr KIDD4 by Rod Henrickson, on Flickr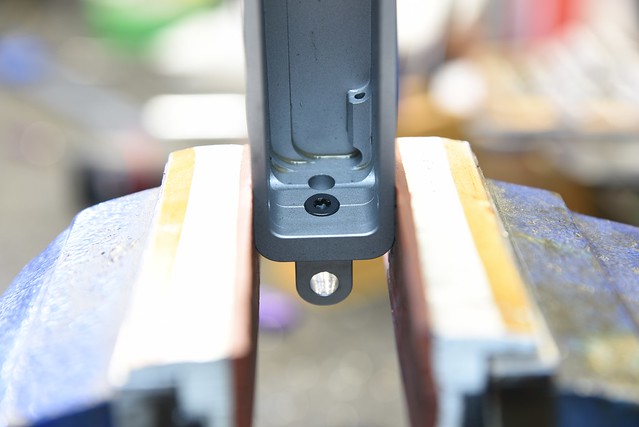 KIDD5 by Rod Henrickson, on Flickr KIDD5 by Rod Henrickson, on Flickr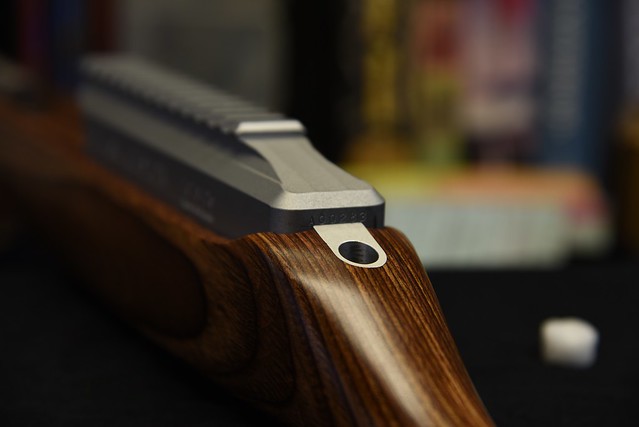 KIDD6 by Rod Henrickson, on Flickr KIDD6 by Rod Henrickson, on FlickrWhen I was a kid. I had the stick. I had the rock. And I had the mud puddle. I am as adept with them today, as I was back then. Lets see today's kids say that about their IPods, IPads and XBoxes in 45 years! Rod Henrickson | |||
|
| One of Us |
Like a lot of people I cut and thread bolt stubs for those ugly, kidney jabbers in the milling machine. Many people have asked me if I have ever torn a Remington 700 handle off doing it that way, to which the answer is no. But it has always been in the back of my mind that one day it could happen. I have always meant to build a Zimbabwe death clamp from hell that would take all of the twisting force off of the weld while cutting and threading them and I finally got around to doing it. I made it from 3/4 inch 1018 material. The thread size on the tightening bolts is 5/16X24. I soft soldered a brass pad to the jaw that clamps against the handle to prevent marring. The clamping force should be somewhere between lebbinty lebbing million and a gazzilion pounds per square inch. It's nothing more than a simple, parallel machinists clamp with the lower jaw threaded to the standard 1/2X13 TPI thread of the Remington bolt.I'm sure it would also work for holding the handle on while re-soldering or welding a new or broken off handle on. Tools look so purdy when they are new. But that won't last long. 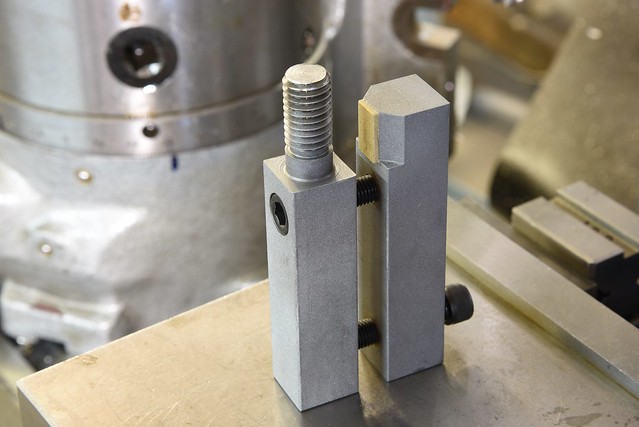 700 Bolt Handle Clamp1 by Rod Henrickson, on Flickr 700 Bolt Handle Clamp1 by Rod Henrickson, on Flickr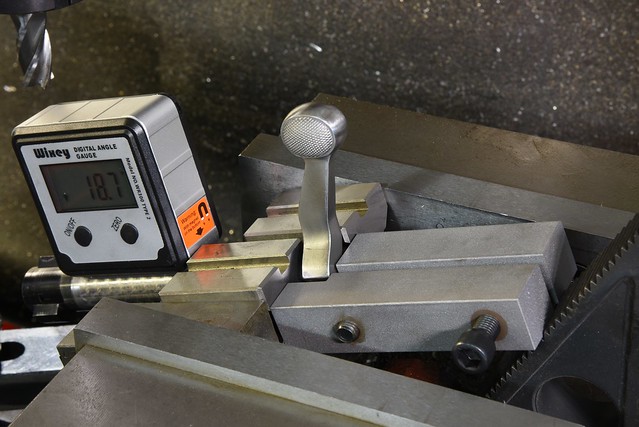 700 Bolt Handle Clamp2 by Rod Henrickson, on Flickr 700 Bolt Handle Clamp2 by Rod Henrickson, on FlickrThreading Bolt Handles For Custom Knobs On The Mill. https://www.youtube.com/watch?v=Ruv66jA4TVI When I was a kid. I had the stick. I had the rock. And I had the mud puddle. I am as adept with them today, as I was back then. Lets see today's kids say that about their IPods, IPads and XBoxes in 45 years! Rod Henrickson | |||
|
| One of Us |
Thanks for posting all this info! I just thought I'd mention that if you've got a 10/22 in a machine to work on it like this, it's nice to punch a thru hole at the top of the slot. The drawing doesn't show it, but your pictures do. I guess that tang covers it up, but usually people put the hole there so you can get a cleaning rod through the back of the action without removing the barrel. | |||
|
| One of Us |
Thanks for posting all this info! I just thought I'd mention that if you've got a 10/22 in a machine to work on it like this, it's nice to punch a thru hole at the top of the slot. The drawing doesn't show it, but your pictures do. I guess that tang covers it up, but usually people put the hole there so you can get a cleaning rod through the back of the action without removing the barrel.[/QUOTE] A lot of guys do that with all their 10-22s regardless of whether there is a tang there or not. Some guys also drill and tap the hole to take a grub screw to make it look pretty when not in use. This practice allows them to clean from the chamber end without pulling the barrel. In this case the hole was there before I got there. The DAR 22 comes hole included. As long as you are using a slot mill or a center cutting end mill the hole is not necessary to make the cut. When I was a kid. I had the stick. I had the rock. And I had the mud puddle. I am as adept with them today, as I was back then. Lets see today's kids say that about their IPods, IPads and XBoxes in 45 years! Rod Henrickson | |||
|
| One of Us |
Yeah, you can do that but you still need to drop the bolt and trigger assembly. I'd much rather remove the barrel and don't have to worry about the solvent all over the inside of my receiver. | |||
|
| One of Us |
. I think most of the time you have to re-sight the gun a bit after pulling the barrel Butch. Or so I've been told. I'm not a self loader fanatic. Mind you, the Ruger 10-22 is the only true self loading 22 rimfire ever made. The rest are semiautomatic. The "SEMI" part refers to the fact that they don't work ALL the time ! When I was a kid. I had the stick. I had the rock. And I had the mud puddle. I am as adept with them today, as I was back then. Lets see today's kids say that about their IPods, IPads and XBoxes in 45 years! Rod Henrickson | |||
|
| One of Us |
A lot of guys simply drill right through the rib and barrel when installing new beads on shotguns with choke tubes in them. Back in the days before ribs this was common practice and there is absolutely nothing wrong with it. Even the manufacturers do it. I generally will lay my head on the mill table with a little flashlight shining in the bore and stop drilling just as the exit dimple begins to appear. (Just because) For a giggle I plugged the camera into my tablet, pointed it into the muzzle with an octopus and commenced to drill. When the little 1/64th dimple appeared I stopped as normal. I don't have any swarf in my ear this time. 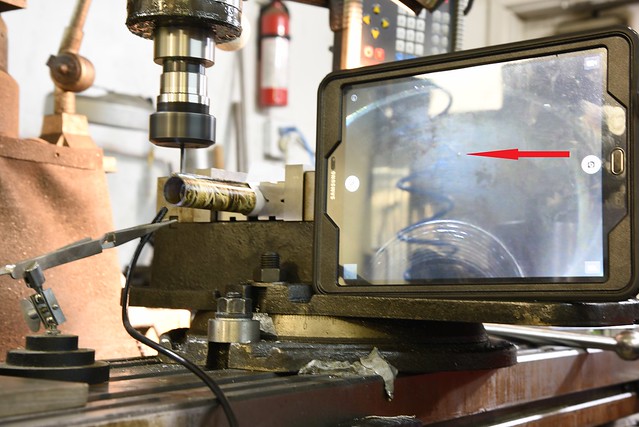 Camera Bead by Rod Henrickson, on Flickr Camera Bead by Rod Henrickson, on FlickrWhen I was a kid. I had the stick. I had the rock. And I had the mud puddle. I am as adept with them today, as I was back then. Lets see today's kids say that about their IPods, IPads and XBoxes in 45 years! Rod Henrickson | |||
|
| One of Us |
I had to tighten up a Perazzi 2000 with a new locking bolt. Fitting them is not much of a chore but does take some special tooling and procedures to do correctly. The first is a milling block. The block is necessary because the locking bolts are sort of uneven and it's just too wide to sit comfortably on a common sine bar. (You guys with universal grinders and magnetic sine bars can bite me where I stink) To make it is just a simple 45 degree cut with an end or slot mill, angled to 8.5 degrees. When I made mine I just set the block on my sine bar and put the corresponding blocks under it and went at it. Very simple to make. 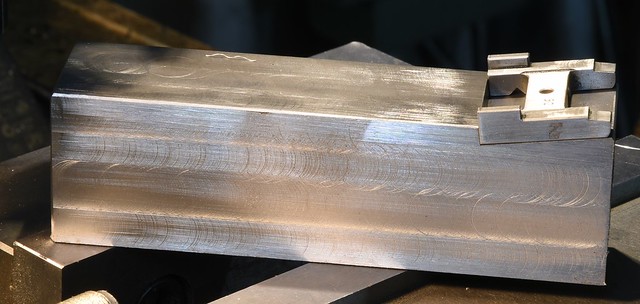 PZ 8.5 degree milling block by Rod Henrickson, on Flickr PZ 8.5 degree milling block by Rod Henrickson, on FlickrYou always want to check the angle of the old block before you do anything to make sure that some cowboy hasn't altered the barrel seats from the standard 8.5 degree angle. 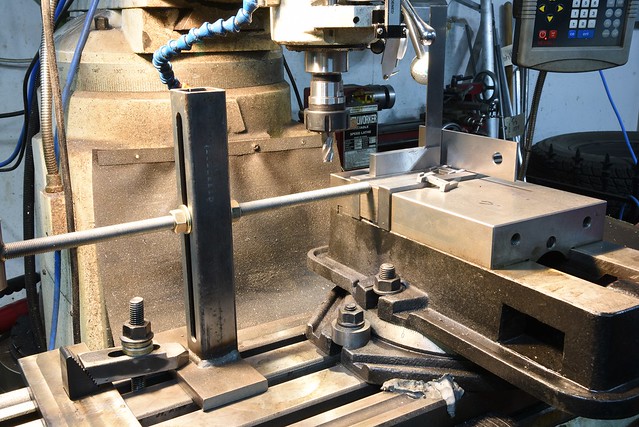 Old PZ block by Rod Henrickson, on Flickr Old PZ block by Rod Henrickson, on FlickrAlways buy a #12 or #11 new block. Unless you happen to be made of money, don't try to guess as often the block you get will end up being one size to low and you will end up buying a second, thicker one. The seat angles have to fit EXACTLY or the locking bolt will jam in solid and be almost impossible to unlock. Also the seat fit has to be balanced on both sides or the block will jam. If it is imbalanced and jamming it is ALMOST ALWAYS the right hand toe that is engaging to much. (New blocks will always be a bit sticky. Jamming means you have to reef on the top leaver to open it) If they both look to be engaging the same amount when you put felt pen on the block and close and open them, it is generally the right hand toe that must be cut a bit more. Always set your milling block up with a dead stop so that you can take the block out, try it and then put it back in to the exact same spot. (You may need to make 6 or more cut and tries) This way you can simply advance the table up .003 inch at a time for each cut. Once the block begins to engage the lug seats on the barrel, a .003 inch cut will advance the top leaver 1/32nd to 1/16th of an inch. Don't get carried away and try to take a larger cut. Some times it will fool you and move the top leaver more. Locking bolts for PZs are expensive. You don't want to buy a free one for the customer. 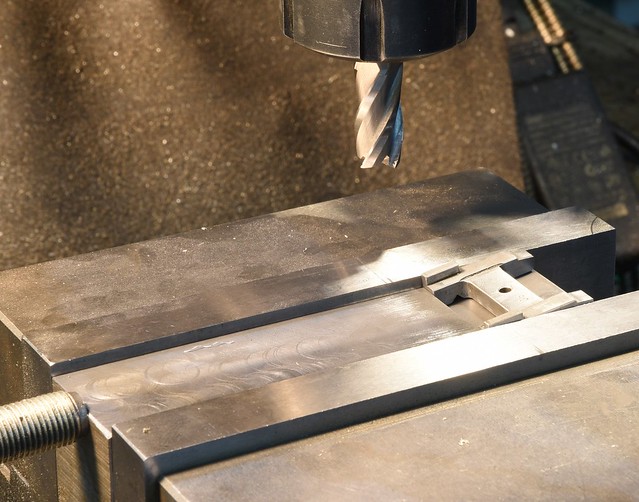 PZ block ready to mill by Rod Henrickson, on Flickr PZ block ready to mill by Rod Henrickson, on FlickrCheck your block seats as you go by blacking them with a felt pen after each cut to ensure you are maintaining square. 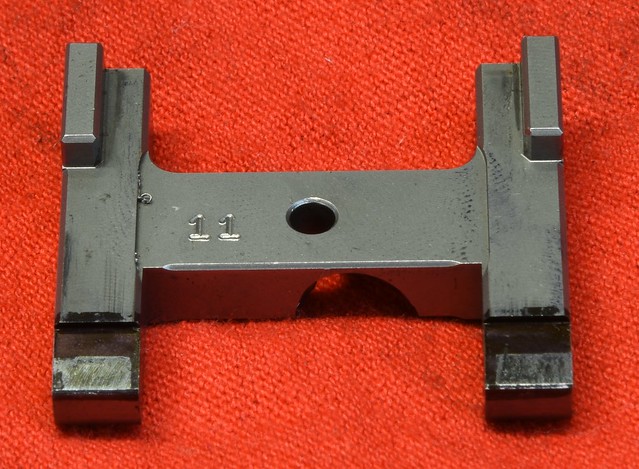 PZ Block with felt pen black by Rod Henrickson, on Flickr PZ Block with felt pen black by Rod Henrickson, on FlickrThe top leaver should fit just on the edge and slightly inside the tang when complete. You always want to replace the top leaver spring when installing a new block. (Don't fit them with an old worn spring!) 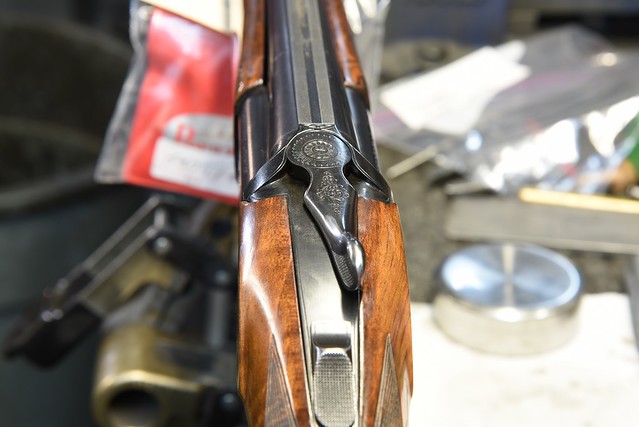 Proper possition of PZ top leaver after new block by Rod Henrickson, on Flickr Proper possition of PZ top leaver after new block by Rod Henrickson, on FlickrWhen I was a kid. I had the stick. I had the rock. And I had the mud puddle. I am as adept with them today, as I was back then. Lets see today's kids say that about their IPods, IPads and XBoxes in 45 years! Rod Henrickson | |||
|
| One of Us |
Lots of guys seem to feel they can get their shotgun barrels altered, shoot the new stuff with the thicker wads and they won't have problems with steel shot. The steel in the barrels is still far to soft in the old guns. But if they like straight rifled barrels, why not? 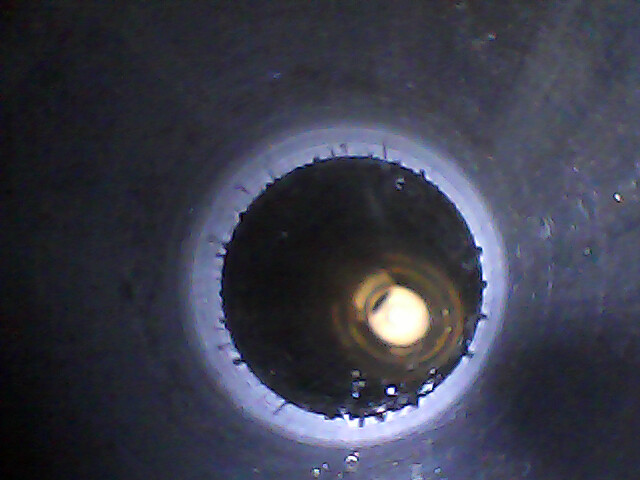 2016-10-05-11-52-11 by Rod Henrickson, on Flickr 2016-10-05-11-52-11 by Rod Henrickson, on Flickr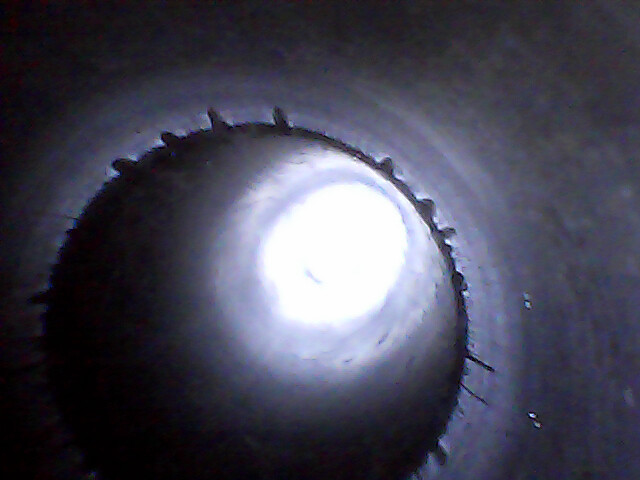 2016-10-05-11-55-36 by Rod Henrickson, on Flickr 2016-10-05-11-55-36 by Rod Henrickson, on FlickrWhen I was a kid. I had the stick. I had the rock. And I had the mud puddle. I am as adept with them today, as I was back then. Lets see today's kids say that about their IPods, IPads and XBoxes in 45 years! Rod Henrickson | |||
|
| One of Us |
Sort of an interesting job, if you find having problems interesting. A guy came in with 92 rifle in 38/357 with an unknown number of bullets lodged in his barrel with one bullet showing at the end of the muzzle. The one at the end made it impossible to get the delivery for the grease press in so I had to make a derivation of a stuck case remover to pull it. As luck would have it, it only pulled the core and the jacket had to be collapsed with a small, brass sliver to avoid damaging the bore and allow me to get the delivery in. After hooking up the grease press and pushing out the remaining four bullets I discovered that the 2nd bullet from the end had been damaged by running into the first one and the press only removed the core and left the jacket stuck tight in the bore. I then cut a brass slug on the lathe to groove diameter (far left in the photo) and drove it into the muzzle with a brass punch and hammer and pressed it through with the grease press. It picked up the jacket beautifully and ran it out. There are a couple of small (micro) bulges from the bullets crashing into one another on firing which are just barely visible, but other than that no damage whatsoever. Pistol cartridges don't behave like rifle cartridges and most still shoot fine with those tiny bulges. In the future I'll charge $300 CAD, $230 USD for jobs like this one. Too much pissing around. 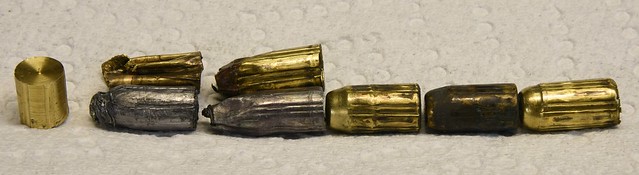 stuck bullets by Rod Henrickson, on Flickr stuck bullets by Rod Henrickson, on FlickrWhen I was a kid. I had the stick. I had the rock. And I had the mud puddle. I am as adept with them today, as I was back then. Lets see today's kids say that about their IPods, IPads and XBoxes in 45 years! Rod Henrickson | |||
|
| One of Us |
Shotgun beads Benelli 2.6 mm Belknap B63, B63E 3x56 Beretta 3x56 or 2.6mm Browning BPS 5x44 Browning Citori Hunter M3x.6 Browning Gold M3.0x.5 Browning Target Citori 3x56 C.I.L. (most) 3X56 CAESAR GUERINI M3x.5 Charles Daly 3mm Citori Field M3.0x.5 Coast to Coast 3x56 Cotter & Co 3x56 Eastern Arms (most) 3x56 Fabarm M3.0x.5 Franchi 3mm Franchi M3.0x.5 Gamble Skogkmo 3x56 H&K M3.0x.5 H&R 3x56 Hastings 3x56 Hercules (most) 3x56 Ithaca 6x48 JC Higgins (most) 3x56 Kreigoff 3x56 Marlin 3x56 Mossberg 5x40 New England Firearms 3x48 Perazzi 2.6mm Remington 6x48 Remington 870, 11-87 (newer crimp in) drill & tap 6x48 Ruger 3x56 S&W M2.5x.45 Sears (most) 3x56 SKB 6x48 Springfield (most) 3x56 Stevens 311 3x56 Stoeger pumps & autoloaders 2.6mm Stoeger side x side 5x40 Verona Press in Bead Weatherby / SKB Orion 6x48 Weatherby 3x56 Winchester 1200, 1300, 1400, Super X2 S 3x56 Winchester SX3 3mm Yildiz 5-40 When I was a kid. I had the stick. I had the rock. And I had the mud puddle. I am as adept with them today, as I was back then. Lets see today's kids say that about their IPods, IPads and XBoxes in 45 years! Rod Henrickson | |||
|
| One of Us |
About 20 years back I was operating as a proof house here in Canada for Remington Arms and for a time it was almost impossible to get the new style 700 bolts with the anti bind cut in them. The parts distributor for international sales in Ilion fed us all a line that any bolts that were being made were going into production and nothing was left over for parts distribution. He was probably telling the truth but deep down I suspected that they were trying to get rid of the cases and cases of old style bolts that they had stacked up at the plant. Every time I ordered a new batch of bolts I would make some half hearted accusations and threats which of course were greeted with loud laughter followed with a: "you're just lucky I have old style bolts on hand that I can give you right now!" At any rate, with the help of the guys in the Remington repair shop, we quickly learned how to convert them. To this day I still run into the occasional instance where I have to cut the anti bind lug in an old style bolt to make it fit a new style receiver. It's actually very simple to do. The cut is made with a 1/16th woodruff cutter. The bolt is held in the mill vise with a V block and the bolt lugs are cocked to exactly 25 degrees using a V block on the lugs and a protractor or electronic protractor. The slot is 1/16th of an inch in width and .047 inch in depth. The lip under the slot measures 1/16th of an inch. My own personal way of locating the slot is to set the lugs at 25 degrees and then set the woodruff on top of the high lug and zero one of the Z axis. The quill is then lowered or table raised .354 inch. The cutter is then touched up to the side of the lug and then driven in.047 inch and the cut is climb milled across the length of the lug. Once in a while the top edge of the slot has to be broken a bit with a needle file to compensate for the rounded corner made by the broach while cutting the raceway. Also a slight lead may have to be made at the front or the back of the slot so that it can engage the guide without a lot of jiggling, fiddling and aligning. Most of the time it's just cut, wire wheel and toss it in the gun. 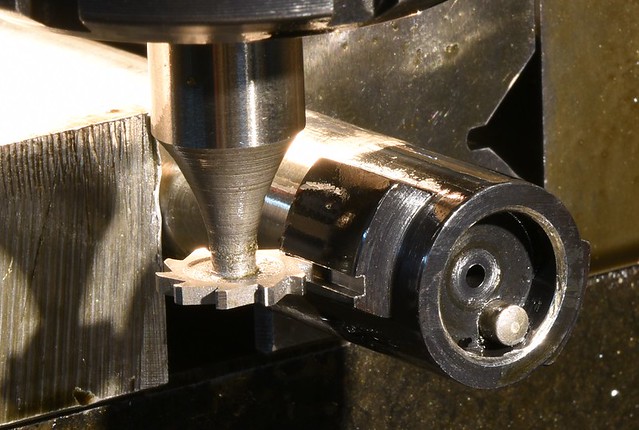 Remington 700 Anti Bind Slot by Rod Henrickson, on Flickr Remington 700 Anti Bind Slot by Rod Henrickson, on FlickrWhen I was a kid. I had the stick. I had the rock. And I had the mud puddle. I am as adept with them today, as I was back then. Lets see today's kids say that about their IPods, IPads and XBoxes in 45 years! Rod Henrickson | |||
|
| One of Us |
I had another blowup come in the shop. This is about the fourth for this year which is about average. (I class any rifle which has has suffered to much pressure and is non-reclaimable as a blowup. They don't actually have to come apart.) According to the owner it was a factory round and there is no evidence of any obstructions. I think I have probably seen more Sakos come apart this way than any other receivers. The thin receiver walls coupled with the dove tails cut in the front receiver ring simply come apart at about 100,000+ CUP. 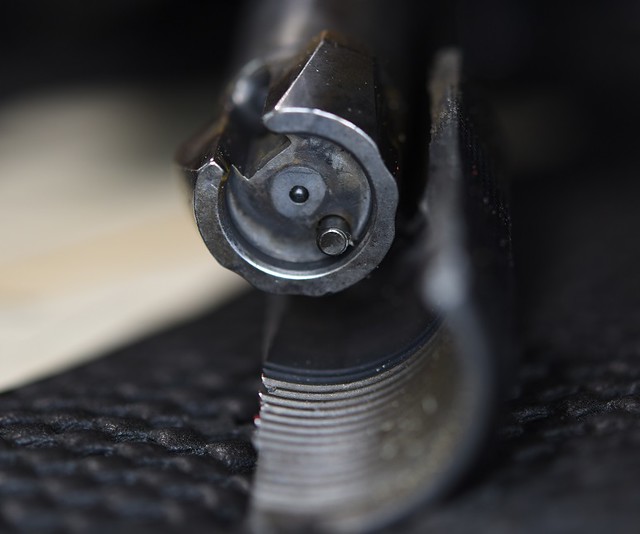 overload2 by Rod Henrickson, on Flickr overload2 by Rod Henrickson, on Flickr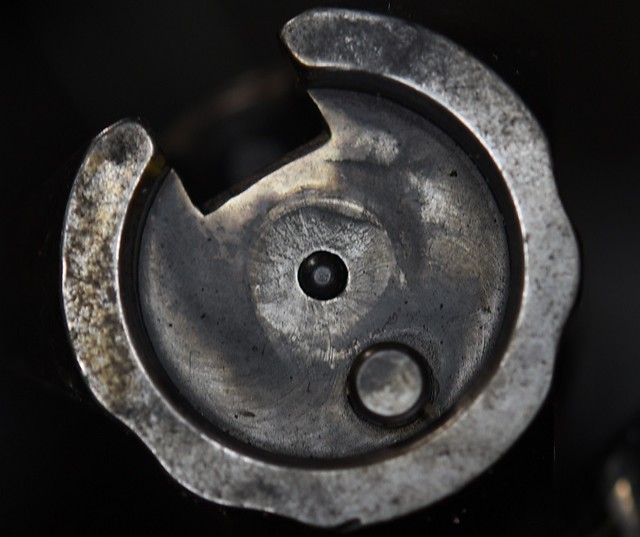 overload4 by Rod Henrickson, on Flickr overload4 by Rod Henrickson, on Flickr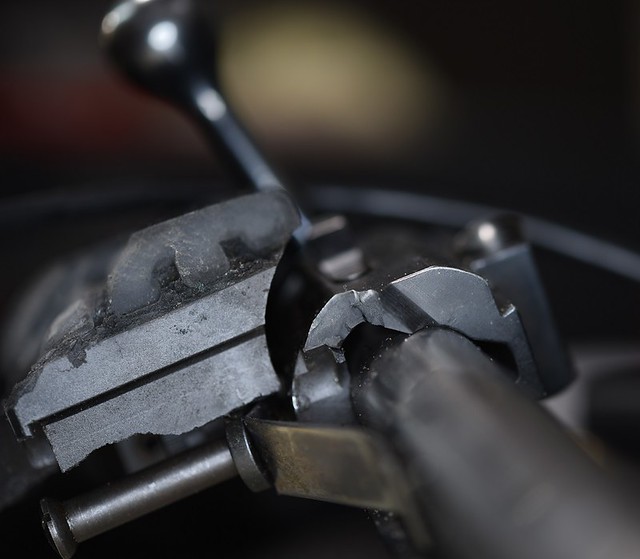 overload3 by Rod Henrickson, on Flickr overload3 by Rod Henrickson, on Flickr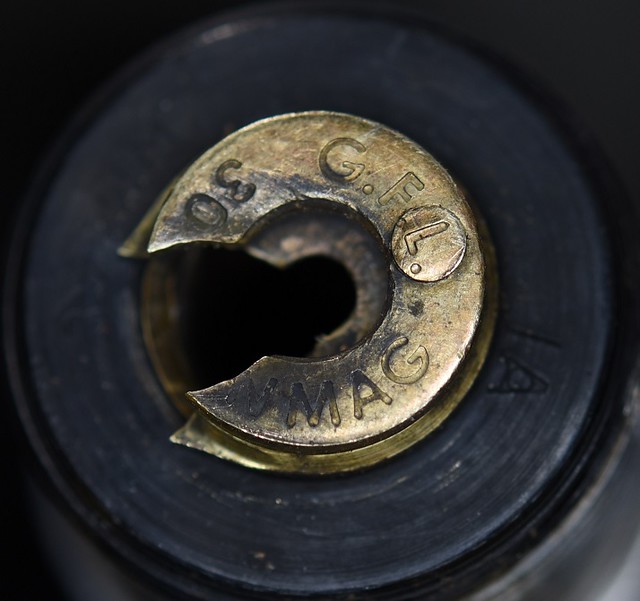 overload1 by Rod Henrickson, on Flickr overload1 by Rod Henrickson, on FlickrWhen I was a kid. I had the stick. I had the rock. And I had the mud puddle. I am as adept with them today, as I was back then. Lets see today's kids say that about their IPods, IPads and XBoxes in 45 years! Rod Henrickson | |||
|
| One of Us |
Had a friend that had a Sako extractor come down the right raceway. It went through a steel door trim. He got rid of all of his bolts with the Sako extractors as his girlfriend is a LH shooter and the little extractor would have entered her eye and then? I don't have any Sako extractors on my Remingtons now. | |||
|
| One of Us |
Ten years ago, you would have started a 40 page war with colorful metaphors flying faster than spy planes over Russia for saying that Butch! Has everyone finally come around to our way of thinking? Or have they finally realized that arguing with old peckerheads like us is about as pointless and productive as trying to keep crooks out of politics? When I was a kid. I had the stick. I had the rock. And I had the mud puddle. I am as adept with them today, as I was back then. Lets see today's kids say that about their IPods, IPads and XBoxes in 45 years! Rod Henrickson | |||
|
| One of Us |
You nailed it Rod | |||
|
| One of Us |
Well Butch. I suppose that we should be grateful that our reputations proceed us. Unfortunately, with reputations as bad as ours, we end up doin a lot of duckin-an-runnin ! When I was a kid. I had the stick. I had the rock. And I had the mud puddle. I am as adept with them today, as I was back then. Lets see today's kids say that about their IPods, IPads and XBoxes in 45 years! Rod Henrickson | |||
|
| One of Us |
For those who have never taken a road trip through a bulge in a Remington barrel, in 300 Ultra Mag with an endoscope, this is what it looks like.  barrel bulge road trip by Rod Henrickson, on Flickr barrel bulge road trip by Rod Henrickson, on FlickrWhen I was a kid. I had the stick. I had the rock. And I had the mud puddle. I am as adept with them today, as I was back then. Lets see today's kids say that about their IPods, IPads and XBoxes in 45 years! Rod Henrickson | |||
|
| One of Us |
Once a year (sometimes more) I get an old Cooey 84 that has to be converted from the stake in firing pin, to the new style screw type. I go through my notes and they're illegible because I spilled coffee or oil on them. Or I just can't find that page. Then I end up borrowing a new one and mapping it out and put the drawing in a secret spot where no one will ever find it again. Well, these are the dimensions. I'm to lazy to draw a proper drawing. The thread is #5-40 TPI and drill size is #38. The counter sink for the head is 7/32nds and .150 inch in depth. Location of the hole. 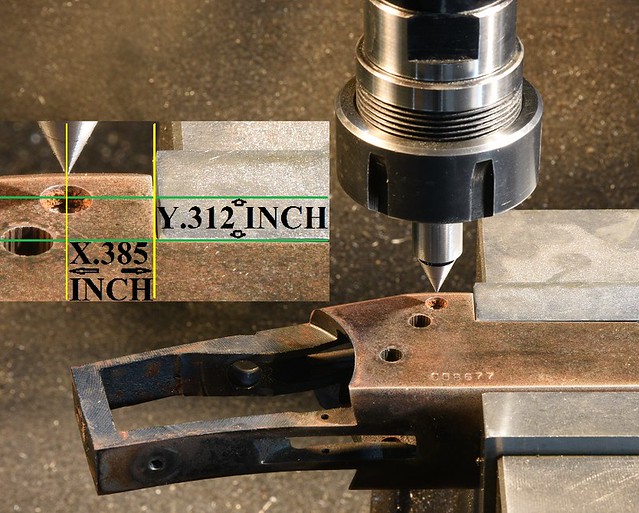 COOEY 84 1 by Rod Henrickson, on Flickr COOEY 84 1 by Rod Henrickson, on FlickrFinished job. 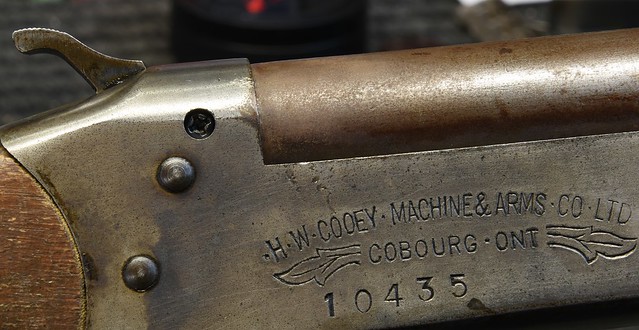 COOEY 84 2 by Rod Henrickson, on Flickr COOEY 84 2 by Rod Henrickson, on FlickrWhen I was a kid. I had the stick. I had the rock. And I had the mud puddle. I am as adept with them today, as I was back then. Lets see today's kids say that about their IPods, IPads and XBoxes in 45 years! Rod Henrickson | |||
|
| One of Us |
Some better shot's of recutting the model 70 safety cam. You must use a carbide end or slot mill to do this. The cam will eat HSS very quickly because the cuts are so light. The size of the end mill is 3/8ths inch. The firing pin is set on a parallel to keep it level and ensure repeatability when you take it out and put it back in. A material stop is set up to impact the cocking indicator or back of the firing pin for the same reason. The end mill is run in until the side just touches the cut made in the side of the cocking piece, which is usually the side of the firing pin. The X axis is then advanced until the cutter makes contact with the old cam. The object of the cut is not to re-cut the entire cam. What you are trying to accomplish is to make a bat wing shape so that the safety has new clearance to allow it to engage the OLD CAM. What I normally do is. After contact with the old cam is established. I will lower the table or raise the quill and then by moving the X axis to advance the cut .002 of an inch each time, I will then make the cuts with either Z axis off the bottom of the cutter as opposed to the side. This eliminates tool press which encourages chatter and it makes a cleaner finish. I take the firing pin out and retry it in the gun after each cut. Generally, only .002 to .010 inch must be removed to allow the safety to begin working again. The cutter will make a glass smooth cut in the hard material and the safety can generally be engaged and disengaged using only a finger tip after completion. There is no need to polish the cam after if it is done this way. You want to observe the movement of the cocking piece after refitting. The firing pin should move rearward at least .010 inch when the safety is moved to the first position. If it does not, you will have to removed a bit of material from the sear on the cocking piece to allow for more wink. Setup to make the cut. 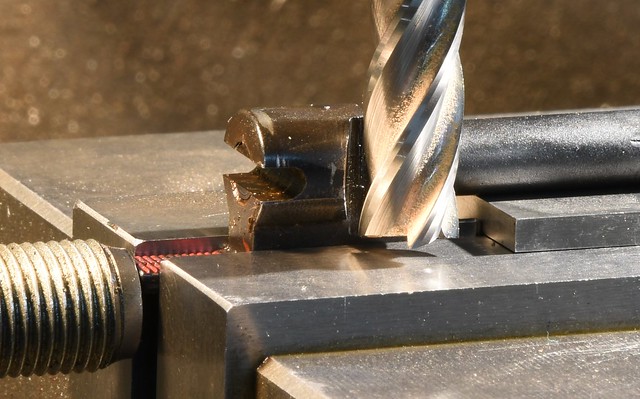 recut model 70 safety cam1 by Rod Henrickson, on Flickr recut model 70 safety cam1 by Rod Henrickson, on FlickrThe completed bat-wing cut on the cam. This is only .006 inch on this one. 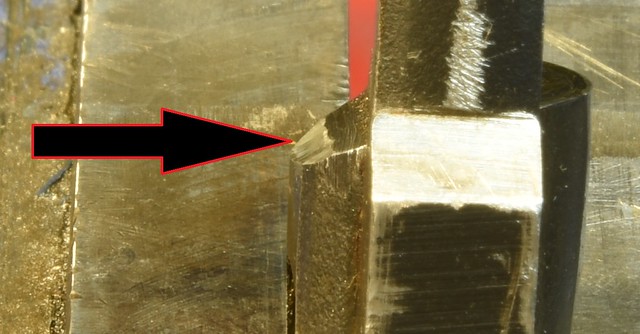 recut model 70 safety cam2 by Rod Henrickson, on Flickr recut model 70 safety cam2 by Rod Henrickson, on FlickrWhen I was a kid. I had the stick. I had the rock. And I had the mud puddle. I am as adept with them today, as I was back then. Lets see today's kids say that about their IPods, IPads and XBoxes in 45 years! Rod Henrickson | |||
|
| new member |
Speerchucker Do you have a drawing for the kimber 8400 size barrel shank? | |||
|
| One of Us |
I have rebarreled a couple, but I never bothered to do a drawing. If memory serves they were the same as the post 64 model 70 Winchester. 16 TPI, 1 inch diameter and 1 inch tenon length. But I'm not 100% sure and I am getting old and stupid so I wouldn't take it for gospel. Perhaps dpcd of Billy Leeper can remember for sure. When I was a kid. I had the stick. I had the rock. And I had the mud puddle. I am as adept with them today, as I was back then. Lets see today's kids say that about their IPods, IPads and XBoxes in 45 years! Rod Henrickson | |||
|
| new member |
Thanks. | |||
|
| One of Us |
One of my sillier competitors, (I actually do like the guy) whom I sort of tolerate called me in a panic and asked me if I would sell him a screw head slotting file and ship it to Quebec, overnight courier. Well, for a grenouille, he's not really a bad guy. Dumb as a box of rocks, but not a bad guy. So I had to ask:”what the hell do you need a screw head file for?” In his aggravating, french Canadian way he said: “Do gut hay screw haid yoo azzole !” So I asked him how the hell he did gun work without lathes, jacobs chucks and slitting saws? Of course, as it turns out he has all of that shit. I should have known because I've been to his shop and seen it. So I explained how to cut screw heads on his machine. He said he got it, but I could tell that he thought I was nuts so I made this quick video and sent it to him. Apparently, this is NOT something that is taught at the Pennsylvania Gunsmithing School. https://youtu.be/fT_0F1qL_ps A picture from the top to show what the video doesn't. 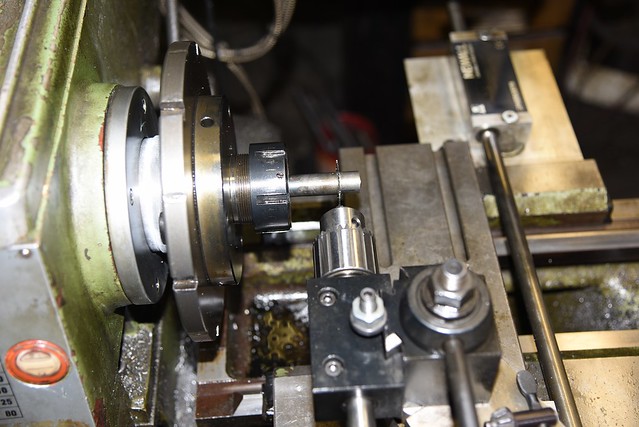 screw slotting by Rod Henrickson, on Flickr screw slotting by Rod Henrickson, on FlickrWhen I was a kid. I had the stick. I had the rock. And I had the mud puddle. I am as adept with them today, as I was back then. Lets see today's kids say that about their IPods, IPads and XBoxes in 45 years! Rod Henrickson | |||
|
| One of Us |
I copied this from another post. Sorry to waste space but I will know where it is if people ask. This is a video on using bedding pullers: https://www.youtube.com/watch?v=TV60DDda7LU I made a batch of them once for my evil associates here in Canada and gave the last of them to Western Gun Parts to peddle off. They may still have a few. If not, you're out of luck as far as commercial sources. Everyone generally makes their own. wgp@westerngunparts.com 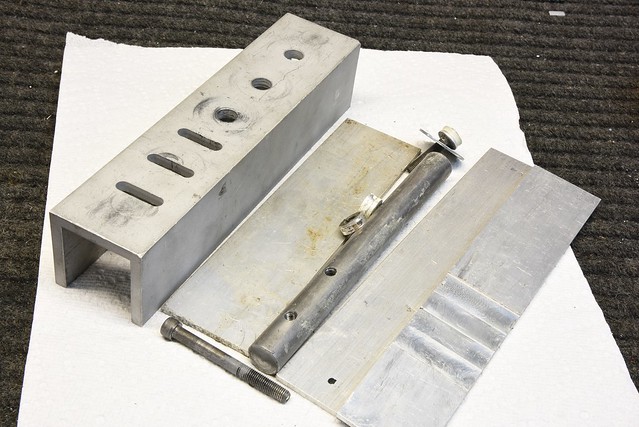 bedding puller by Rod Henrickson, on Flickr bedding puller by Rod Henrickson, on FlickrThey are dead simple to make if you have a mill. It's just aluminum, but you could make it out of steel too. Then whittle out the spacers for different action widths. You do have to use a certain amount of common sense when using them, but they are for the most part, idiot proof. It pushes down over their entire six or eight inches on the stock so there is very little pressure at any giving point on the wood. I very seldom if ever pull out any wood. And if I do it's my own fault and it would have broken out using other means. But it does eliminate all of the violence and almost all of the damage commonly caused during pulls. It's just very slow, massive, applied pressure. I can't see myself making any more of them as there is just no money in it. But for USA guys, I'm sure Duane or Tom or any of the other gunsmiths or machinists that frequent this forum would whittle one out for you for normal jobbing shop costs. I've gotten spoiled and I would never do bedding without one, myself. They are one of those tools that actually really do work well. By the way, I didn't invent the damned things. I saw Rudy VanOwen using one 30 years ago and I have seen other gunsmiths and hobbyists use them before I ever went to gunsmithing school. When I was a kid. I had the stick. I had the rock. And I had the mud puddle. I am as adept with them today, as I was back then. Lets see today's kids say that about their IPods, IPads and XBoxes in 45 years! Rod Henrickson | |||
|
| One of Us |
I came across something I hadn't seen in a while and thought some might be interested. Years back, when I was doing Remington warranty, a guy called in, all upset that his shells were over powered and his rifling had gotten pushed to the outside of the barrel by the extreme pressure. Well I had him bring it in because I was obviously just as confuzzled as he was. One look and I knew pretty much what it was and I explained it to him. He wasn't having anything to do with what I had to say so I called down to the plant and got one of the repairmen on speaker phone to outline the problem. As you see in the photo it is a spiral herring bone pattern in the bluing. Most, who have seen European rifles like the Steyrs know exactly what causes this. They are the marks left over by the roto, or hammer forging of the barrel. Steyr of course is to cheap to turn or polish them out. They simply buff or bead blast over them and tell everyone that it looks real purdy and costs a fortune to put on. Of course as soon as you hear that you instantly love the finish and show it to all of your friends and charge them a nickle a look and two-bits for a feel. Remington on the other hand, polishes the hammer forging marks out. But, as it was explained to me, a combination of worn out belts and polishing wheels will some times leave shadows of these marks in the finish that are not visible until after the guns are blued. Most of these are culled back and re-polished but some do slip by. This one slipped by I guess. 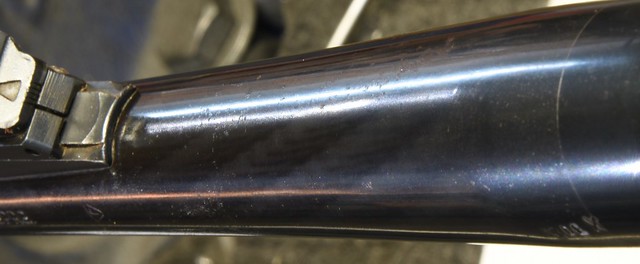 remington herring bone by Rod Henrickson, on Flickr remington herring bone by Rod Henrickson, on FlickrWhen I was a kid. I had the stick. I had the rock. And I had the mud puddle. I am as adept with them today, as I was back then. Lets see today's kids say that about their IPods, IPads and XBoxes in 45 years! Rod Henrickson | |||
|
| One of Us |
Every year between the end of hunting season and Christmas I get two or three weeks of dead time where everything is caught up and there is essentially nothing to do. So every year I have some hare-brained project on the go that generally gets blown way out of proportion and costs far to much than the end result is really worth. In the last 30 odd years I have bought, destroyed or just thrown away every pistol sight adjusting tool that has ever been made. Most of these tools would only work with one or two models and were constructed with feathers, frogs fur and the bones of diseased Smurfs so they generally lasted about a half a year. On top of that they were so flimsy and had so much flex that they would never move a sight precisely, but would build up pressure and flex until they would finally unload and move the sight in .030 to .050 inch bursts through the dove tail. After which it would be back to hammers, brass drifts, bashed knuckles and fawked up sights. For 30 years I have always sworn that I would one day build a sight press for pistols that would actually work. Universal enough to work with any relatively flat sided slide and stand up to anything I threw at it. So, this years pre-Christmas project was Satan’s little $3,000 pistol sight press from hell. I wanted something that would hold the slide and pressing assembly perfectly ridged with absolutely no flex and load which led me to settle on a Chinese Kurt machine vise clone. I refuse to fawk up a real Kurt vise for a silly project. Plus I'm sort of cheap. For the driving plungers I worked with 3/8ths HSS tool blanks so they would stand up, not bend and deform under heavy use. The screw itself is grade 8, pre-threaded material in 1/2-20 TPI. This thread will give me a round ton of pushing force without a lot of load on the wrench. One complete turn of the wrench will give me .050 inch of stroke and each hour the wrench is turned will give me .004 inch of movement which I felt was fine enough. The total stroke is 1 inch and there are two long pistons for pushing sights which are already installed completely through the dove tail and two short pistons which will allow another inch of space for installing new, wider sights or adjusting sights which are already installed. The design was worked out to keep the threaded bolts and the pistons in perfect alignment with one another to keep wear and tear on the piston guides down to nothing. This will also prevent the piston rods and threaded rod from loading up and giving erratic movements due to misalignment. The threaded rods were also drilled to accept ¼ inch bearing balls which ride in a corresponding centered concaves in the pistons to eliminate transferred turning force and keep the threaded rods from spaying out under pressure and friction. The threads which the threaded rods ride in are simply grade 8 nuts turned round and pressed into the unit so that they can be replaced if and when they wear out. Rather than build a whole new assembly. Later I will make some pistons with sloped pressing faces for use with sights with tapered sides. To prove concept, after the tool was finished, I tried it on every slide I had in the shop with a magnetic dial indicator against the back of the sight to track movement. Though perhaps it was all a bit of an over kill, it works exactly as predicted and it was quite easy to predictably move the sight .002 inch at a time. Even sights which I would have had to have practically destroyed by normal means were moved as simply as pushing a toothpick into butter. There was also no damage or marking of the sights or the slides even after repeated adjustments. When time allows, I will make a set of parallels in 1/64 inch increments to hold different slides perfectly flat and to the perfect height. For now, I'm calling it a complete success and it should last me until the day I die and another lifetime after. 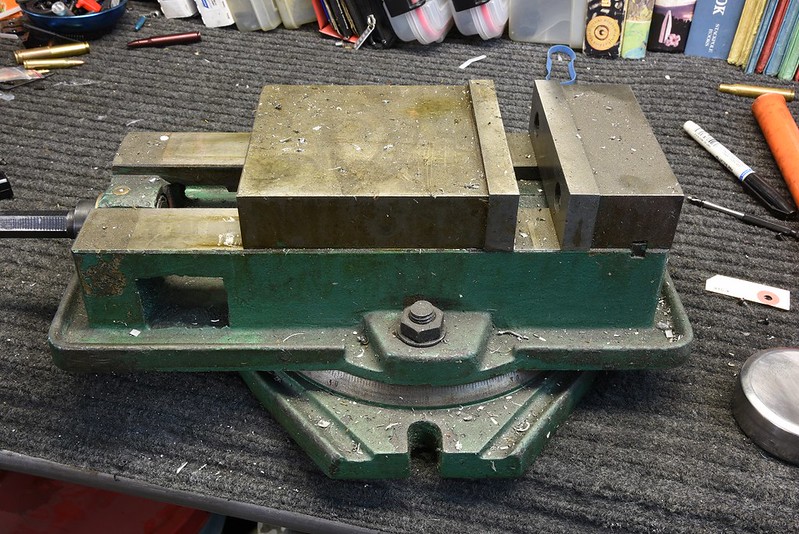 statans press1 by Rod Henrickson, on Flickr statans press1 by Rod Henrickson, on Flickr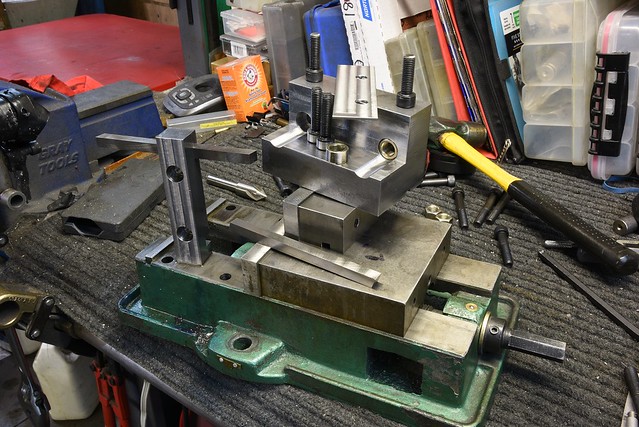 statans press2 by Rod Henrickson, on Flickr statans press2 by Rod Henrickson, on Flickr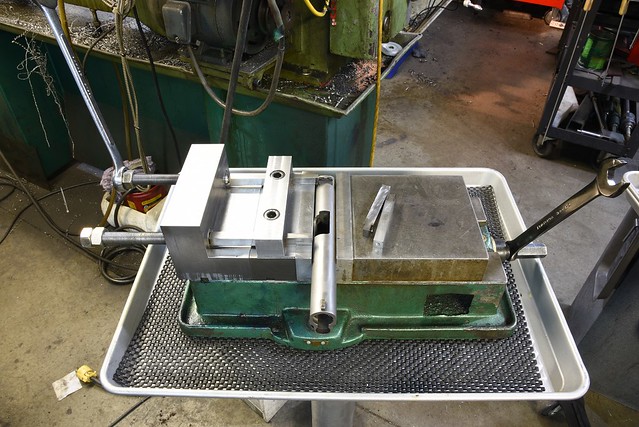 statans press3 by Rod Henrickson, on Flickr statans press3 by Rod Henrickson, on Flickr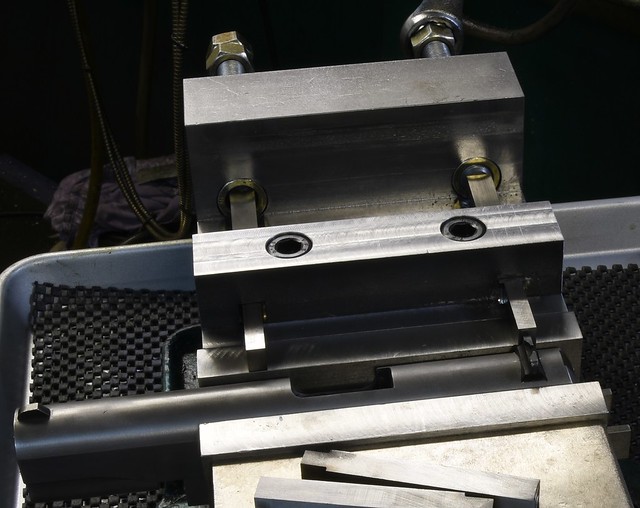 statans press4 by Rod Henrickson, on Flickr statans press4 by Rod Henrickson, on FlickrWhen I was a kid. I had the stick. I had the rock. And I had the mud puddle. I am as adept with them today, as I was back then. Lets see today's kids say that about their IPods, IPads and XBoxes in 45 years! Rod Henrickson | |||
|
| One of Us |
Like a lot of guys I'm a little bit to trusting and a LOT TO STUPID. Some time back I left my 303 British gauges on the service counter for 5 seconds and of course, I made them from air soluble steel and they dissolved. I made a new GO gauge as soon as I needed one, but of course I survived on masking tape on the back until the Christmas slow season. I finally got around to making the field today. There is not much point in making a NOGO gauge if you just work with the British Lee Enfield. You will never find one that will close tight on the NOGO anyway. If you happen to be made of time then by all means make one. But as far as I am concerned it's a pointless venture. Remember to cut the extractor slot on the gauges so you don't have to remover the extractor and cut the 45 degree angle into the rim area on the gauge or the hardened gauge will cut the face of the extractor. This cut in no way impedes how the gauge works. The only down side is that you have to shake the gauge out of the chamber every time. 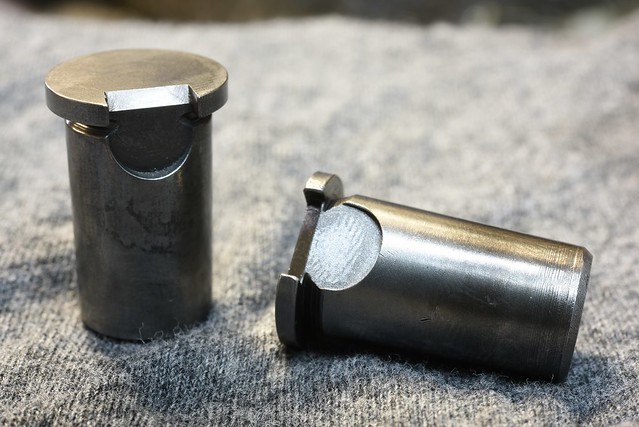 303 British Gauge by Rod Henrickson, on Flickr 303 British Gauge by Rod Henrickson, on Flickr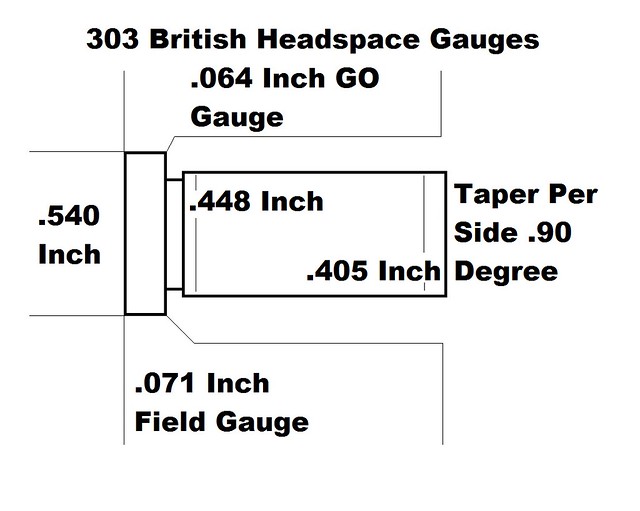 303 British Headspace Gauge by Rod Henrickson, on Flickr 303 British Headspace Gauge by Rod Henrickson, on FlickrWhen I was a kid. I had the stick. I had the rock. And I had the mud puddle. I am as adept with them today, as I was back then. Lets see today's kids say that about their IPods, IPads and XBoxes in 45 years! Rod Henrickson | |||
|
| One of Us |
Gas leakage on firing is damned near enough pressure. You know that you are using the EGGZACKERY amount of dragon dung, when your cases begin to leak out of the chamber ! 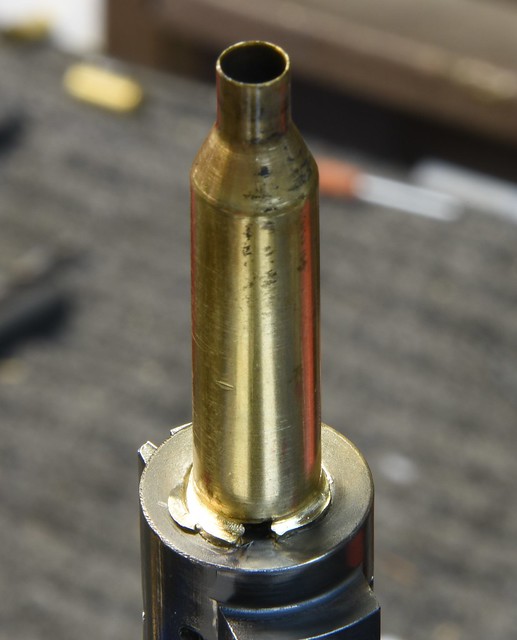 over pressure by Rod Henrickson, on Flickr over pressure by Rod Henrickson, on FlickrWhen I was a kid. I had the stick. I had the rock. And I had the mud puddle. I am as adept with them today, as I was back then. Lets see today's kids say that about their IPods, IPads and XBoxes in 45 years! Rod Henrickson | |||
|
| One of Us |
. An hour spent setting up the machine and cutting out the case. Only to find what I should have seen from the start. New bolt time. 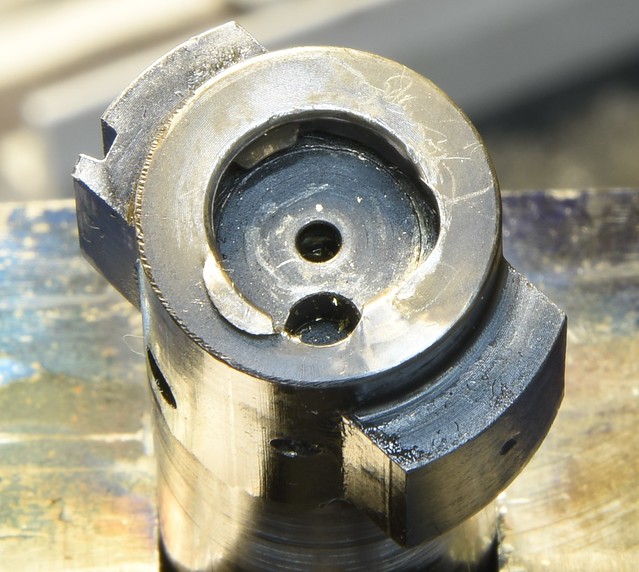 bolt face by Rod Henrickson, on Flickr bolt face by Rod Henrickson, on FlickrWhen I was a kid. I had the stick. I had the rock. And I had the mud puddle. I am as adept with them today, as I was back then. Lets see today's kids say that about their IPods, IPads and XBoxes in 45 years! Rod Henrickson | |||
|
| Powered by Social Strata | Page 1 2 3 4 5 6 |
| Please Wait. Your request is being processed... |
Guns, Politics, Gunsmithing & Reloading Gunsmithing

Visit our on-line store for AR Memorabilia