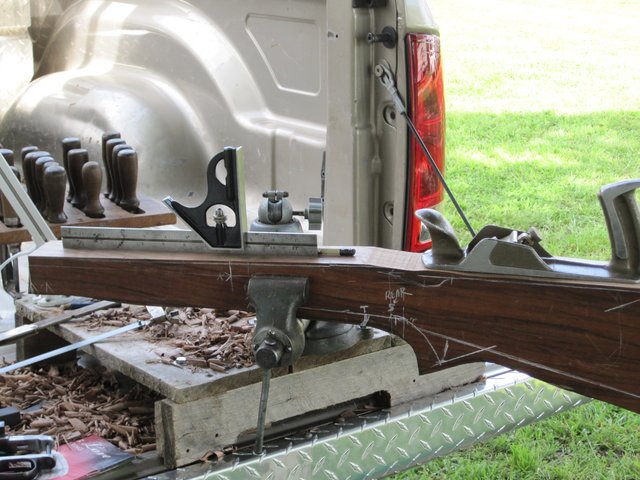
I have started my last stock on a mini Mauser 204 Ruger. This is my last and I thought I would show how to make a stock without power tools. I will use only a 1/4 inch drill motor to drill the holes. Metal work is not complete at this time, so it will be done when I get back to my welding equipment. Metal work should be complete first. As you see my shop is portable. Draw the lines on the blank for location of all the parts first. Start cutting
This project will take a few weeks to complete. I like to start with the inletting of the action and barrel installed. The trigger guard will be lined up off the inletting guide screws.
Maybe someone will start his own stock and become a stockmaker in the future. Keith Stegall's show and tell in the American Rifleman in the mid 50's helped me start on my career.
Posts: 965 | Location: Texas | Registered: 19 May 2004
Here is a question about the grip angle. I have seen it done as shown by Les and I have done it myself by running the angle to the heel BUT the curve of the grip can have an effect on the cap angle. If the more open English style grip is used is it better to run the grip cap square of the bottom of the curve or to run to a predetermined point on the heel or top line of the butt.
The walnut appears to be an English blank from California. I bought the blank from Chuck Grace a couple of years ago. He bought it at the guild show on auction. It is a very hard blank and will not be to wild with color or figure. This is going to be my field varmint rifle. This rifle will be shot from a rest most of the time in the field and the grip will be better for me if it is a standard length. This will be around 3 3/4 to 3 7/8 in. length. The angle of the grip will be located about where I have it drawn on the blank. The curve will be better when I start to shape the stock.
Posts: 965 | Location: Texas | Registered: 19 May 2004
Originally posted by Duane Wiebe: Something to read sided by side with this thread is Alvin Linden's booklets..hard to find maybe, but worth the search.
I think Brownells has them all together in book form.
Jason
"You're not hard-core, unless you live hard-core." _______________________
Hunting in Africa is an adventure. The number of variables involved preclude the possibility of a perfect hunt. Some problems will arise. How you decide to handle them will determine how much you enjoy your hunt.
Just tell yourself, "it's all part of the adventure." Remember, if Robert Ruark had gotten upset every time problems with Harry Selby's flat bed truck delayed the safari, Horn of the Hunter would have read like an indictment of Selby. But Ruark rolled with the punches, poured some gin, and enjoyed the adventure.
The purpose of making a stock without power tools is for a few people wanting to know how some of us have make stock in the past. Everyone has to start somewhere to learn and then they can add knowledge to their skills from all of us that have made this trade our income for many years. TSJC class of ‘63 Some people will have a different opinions on how to make a stock, but I will try to explain my method of approach. Dimensions, shapes, styles, and types of wood are the choice of the person wanting a custom stock. I have made all styles of custom stocks to please the customer. This AR gunsmithing forum seems to like only classic styles. Mr Roy Weatherby probably made more money than anyone that has started a gun company in the custom field. You may not like his style of stocks, but he had the best BS going to convince a customer to buy his guns. It kept us alive working on his styles of the ’50’s and ’60’s. The AR gunsmithing forum has some very good craftsman showing their work. I am not active in a business nor am I wanting to advertise for any work. I retired a few years ago and do not wish to become active again. The stock which I will show is for my use and it is the LAST STOCK which I will attempt to make. This started out with me winning a barrel from Kreiger at TSJC at our 60th anniversary. I wanted another light varmint rifle to carry in the field. The 204 Ruger looked real good for long range from the reports I read on the AR forums. Bought the wood from Charles Grace and found a mini Mauser rifle in south Texas for the project. Now lets get started
Posts: 965 | Location: Texas | Registered: 19 May 2004
You must know your stock dimensions for yourself. This is sometimes hard to know, but if you have a stock that feels good and you can see the scope without moving the stock it will be a close fit. Measure a few to see what the dimensions will show. I like a classic style with about 7/8 inch drop at the top of the heel and a length of pull of 13 ½ inches. The will allow me to see the scope with my head in an upright position so the rim of my glasses are out of view.
1. Lay a straight edge on the blank which is the bore line using the grain flow best through the grip area on the cheek piece side of the blank. 2. If this line is lower than the top of the blank you will have to remove wood off the top 3. Check the drop at the top of heel and allow about ½ in higher than where it will be when finished drawing and allow for the ¾ in. drop for most classic stocks. Check to see that the butt end will be at least 5 inches below the top of the heel. If all lines appear OK then draw a line which will be the center line of the bore all the way from the forend area to the top of the heel area. 4. Lay the barreled action and trigger on the left side of a right hand blank to locate the guard screws and the trigger location. Allow the length to be at least ¼ in. longer than the length of pull. My dimensions for this stock will be 13 ½ inches from the center of the trigger to the center of the 5 in. butt plate with the steel butt plate installed later. You need to allow for the curve of the steel butt plate that is the ¼ in. allowed above. I use a template for this curve. 5. If the top needs to be cut down to the top line which will be the center of the bore you make sure of all dimensions before starting to cut wood. All lines on blank are just for reference at this point and will be the true marks after you have the barreled action inletted later.
Posts: 965 | Location: Texas | Registered: 19 May 2004
If you have determined that all dimensions are correct you can start cutting the top down to the marked center of bore line. I use a saw to cut small sections to split off with my chisels. Next use a hand plane to cut the top smooth and square to the right side of the blank.
Posts: 965 | Location: Texas | Registered: 19 May 2004
Mark a center line on top of the blank with a 1 in. inset from the right side of a right hand stock blank. At this point you will use the markings on the side to determine the front guard screw on top. Center punch deep!!! Use a 1/4 in drill bit. I use a 2 inch square to help line up the drill and have someone with a precision eye ball help with line up the drill motor. Mark the bottom side with a large X in the spot where the drill comes through. It should be marked and square the same way you did the top location. The drill on this stock blank came out 1/32 inch off the spot. A very good start!!!
Posts: 965 | Location: Texas | Registered: 19 May 2004
Use only the front guard screw as a guide and place action on top of the drilled blank. Hold the rear tang area on the line looking through the rear screw hold. Mark with a fine hard lead pencil around the acton recoil lug. Start cutting to the inside of these line to allow the action to go straight down into the blank. When you are down with the bottom of the action on the wood, mark around the action and cut away some of the wood. At this point I will usually go ahead and mark the half way point for inletting the action into the blank. Use a square and mark a line along where the action bottoms out. I cut down until I am about a 1/16 in. away from the bottom and then coat the action with the inletting black. From there on it is cut and try with the chisels until the barrel is started into the channel area. Mark around the barrel and cut out keep the lines to the inside of the channel. I use the 1 in. straight chisel to cut the top lines to keep from splitting the wood out with the 1/2 round chisels.
Posts: 965 | Location: Texas | Registered: 19 May 2004
After the barrel channel is cut down about half way I will stop and cut the blank off for the ebony tip. This is a 24 in barrel and I will use a 10 in. forend length. the ebony will be about 1 5/8 in. long. Hack saw the stock and the ebony as square as possible. Next use the machinist square to check all areas. After it appears to be flat on both pieces I use blue carpenters chalk to check for a better fit. A 1 in. wide scaper will do the final fitting of the 2 pieces. Drill 2 dowel holes in each part to match up with the tip being slighly high on the blank. I made my drill jig with about 1/32 in. offset on the tip side for this be easiler to glue on a tip without having to have the parts so close of a fit. Glue allows part to slide out of place so the offset makes for a much faster glue up. I used Tite Bond glue on this one. Score up the two surfaces which you are going to glue so the glue will have a few spots to move into.
Posts: 965 | Location: Texas | Registered: 19 May 2004
This shows the jig which works for both square tips and 45 degree tips. I use a 17/64 drill and the 1/4 in dowels. This will fit tight in the drilled holes.
Posts: 965 | Location: Texas | Registered: 19 May 2004
God bless you Les for taking the time & trouble to share your years of knowledge with us. I just want you to know that I appreciate it very much. My eyes & brain are glued to this thread!
Doug Humbarger NRA Life member Tonkin Gulf Yacht Club 72'73. Yankee Station
Try to look unimportant. Your enemy might be low on ammo.
Posts: 8355 | Location: Jennings Louisiana, Arkansas by way of Alabama by way of South Carloina by way of County Antrim Irland by way of Lanarkshire Scotland. | Registered: 02 November 2001
Great post I am following with great intrest. This may be a little much to ask but can you give us a discription of the differnt chisles you use what their main purpose is and which you use the most. It is alot to ask but the information would be greatly appreciated.
Thanks, James
Posts: 130 | Location: Floresville,TX. | Registered: 12 June 2008
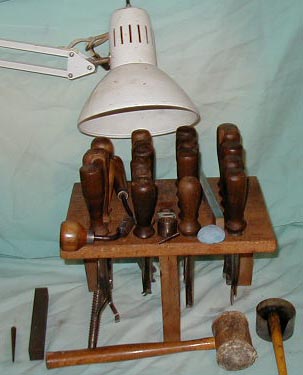
Most of my chisels were made by me in 1961 as part of the bench metal class at TSJC gunsmithing. We were required to make these tools in order to learn how to forge the chisel stock steel with about 0.85 points of carbon. The hammered molecules made a fine grain steel to hold a very good cutting edge. Hand filed, made handles, polish by hand and hardened in oil at cherry red color. Next was to drawn the temper from a bright blue to light straw color at the cutting edge. This is not required now in the gunsmith school. We shaped the flats with a curve on the bottom to give a little up lift on the cutting edge with the bottom of the chisel being flat. Gouges are made similar except we had a form to forge the round section of the gouges. These have been very good tools for all my years. A few picture with some more info to follow.
This gouge is shaped the best in all of my chisels. It is 5/16 in. cut and is sharpened from the inside to the bottom. It cuts perfect and is easy to get in a barrel channel to remove wood.
The cutting edge is on line with the center line of the chisel. Copy this if you want a very good gouge and use the same shape for several of the flats.
Posts: 965 | Location: Texas | Registered: 19 May 2004
The barrel channel is cut out mostly with the gouges after you cut in the lines along the channel with the 3/4 in. flat chisel. I use a few bottom chisels with the crook to allow the cutting edge to get deep into the blank. When I get the action partly inletted than I use the black inlett to mark the places which touch. The scrapers are used very slowly in removing wood to try not to have gaps.
Posts: 965 | Location: Texas | Registered: 19 May 2004
I finished the barrel and action inletting and now the bolt will clear the top of the stock at the front of the comb. Now I am able to check blank layout as originally drawn. I made of couple of small corrections and finished the stock layout as it will be. I use a couple of tools to line up the bore center to finish the stock drop and cut the top of the comb.
The trigger guard will be fitted next after I have removed most of the wood
Posts: 965 | Location: Texas | Registered: 19 May 2004
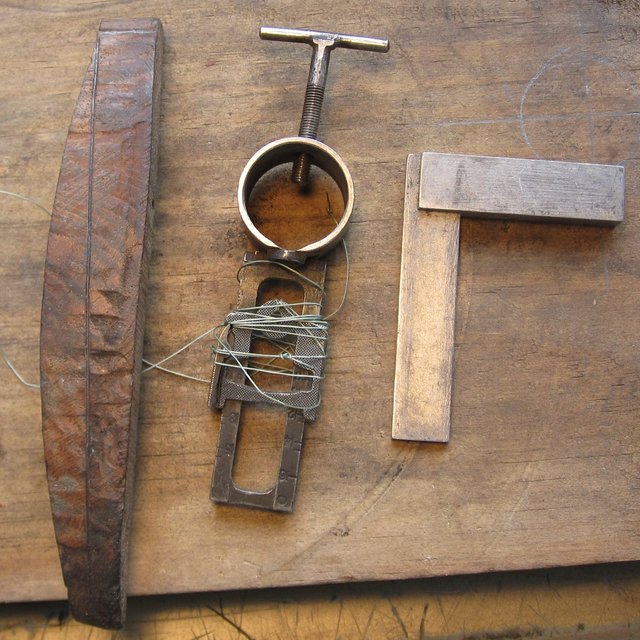
Here are three tools needed to help make the layout and do the check on the depth of the barrel channel.
The square is a the first project we made at school using a hacksaw and files. It had to be square in all directions and is made from 1/8 inch steel. You learn to file and rivet the pieces together. This has been used so much over the years that it is showing wear. It is used to check the 1/2 depth in the channel by laying it along the channel. If it is touching in the bottom of the channel you need to remove more wood. When the sides of the channel hold up the square and the bottom is clear you are good to go.
The Enfield rear sight parts are used to make the string holder and it is adjustable to height. Place the tool on the end of the barrel keeping it vertical to the top of the blank and check for the center on the bore line from above. Use it on the side and check for the amount of drop at the comb using the bore line as the referrance point. All stock lines of a rifle as based upon the BORE LINE.
The curved wood piece is used to help set the amount of pitch of the rifle butt end. The amount of reverse pitch that I like is about 1/8 in. in from the bottom of the toe. The short line on the upper part of the tool is held on the top of the comb. The line through the middle of the tool is held to 90 degrees from the side bore line off the string bore line. The tool has about the amount of pitch that I want on my stock. Mark the butt end butt, but don't cut to this line if you are using a steel butt plate. You need to think about the amount of radius of the butt plate being inletted into the wood. This requires about 5/16 in. more wood on the layout before you start fitting the butt plate. This is only on a skelton butt plate so that the wood can be radius cut to fit and fill the metal inside.
Posts: 965 | Location: Texas | Registered: 19 May 2004
Originally posted by Von Gruff: Here is a question about the grip angle. I have seen it done as shown by Les and I have done it myself by running the angle to the heel BUT the curve of the grip can have an effect on the cap angle. If the more open English style grip is used is it better to run the grip cap square of the bottom of the curve or to run to a predetermined point on the heel or top line of the butt.
I agree with you on an old English style needing an angle closer to the square of the grip area. However I am not a fan of the old English style, but favor the lines more like the American classic styles of the last 30 years. The Guild here pushes more for the American style from what I see. I do not belong to the Guild as I have always had more work than I could do.
The eyes of a stockmaker can see lines which he likes. I don't see any design that has lines which can not very from tradition within reason if this is what a customer wants. Everyone will have a slightly different body and holding style which must be taken into consideration.
Posts: 965 | Location: Texas | Registered: 19 May 2004
The trigger guard is the next step. I transfered the lines from the top side of the stock to the bottom. I have about 3/16 in. extra wood on the bottom to start with the inletting. Check the rear hold on top and mark the bottom hole with the same dimensions. Measure the distance from the center of the front guard screw hole on the action to the center of the rear guard hole. This measurement is 6.212 inches. Center punch to start the rear guard guard hole and use a 3/16 in. drill bit. Only drill 1/2 the depth of the hole from the bottom. Turn over and center punch the center of the top rear action hole. Drill and same as the bottom except match up the two holes. Hold the drill motor using the lines on the side to control the angle of the hole. I use my square and hold it on one of the lines marking where the hole will be drilled. Don't hurry this and keep the drill lined up with the outside marked lines. If the hole is straight through change the drill bit to 17/64 and redrill the hole. Lay the guard on the stock over the holes and drop in the guard screws to check everything. Mark around the guard and use the 1/2 in. gouge to cut around the rear and front area just enought to start an angle to the inside of the area. At this point use the 1/2 in. flat to start the cut of the outside lines. Angle this cutting to the inside of the guard area until you can get deep enough to start using the inletting black. Double check all cutting so you don't have gaps. After the black marking starts to show just keep removing wood until it fits deeper into the hole. When the guard is inletted to about 1/16 in. depth from the outside marked line it is time to start cutting the inside magazine box. The side rail on the original mini Mauser trigger guards are thin. Use care to keep from bending this area inside to hole.
Next will be inletting the magazine box.
Posts: 965 | Location: Texas | Registered: 19 May 2004
22WRF, The price was too cheap back then at about $300-400 dollars. Not many made stocks only, but had to do all of the work. An FN action new in the white was only about $55. I went to Bishops Stocks in Mo. and bought the best semi inlett for FN to save time. It was hard but we were able to feed the family.
Posts: 965 | Location: Texas | Registered: 19 May 2004
Drill the inside of the marked line with the drill slanted to the inside. Drill only half way from the top side. Use a flat chisel to outline the area so the wood can be remove after the bottom side is drilled the same way as the top. After you get the center wood removed then start the inletting of the magazine box. This is a slow process and you must make sure that the box and the action will meet correctly when seated. I use both the flat chisels and the flat scrapers to inlett the guard and box.
With the box and guard inletted to within 1/16 in. to the bottom of the action it is time to finish the layout lines to mark the cap location. I will mark the top lines of the stock blank along the barrel and start to remove the extra wood with the block plane. Keep the sides flat and 90 degrees to the top of the stock. Don't start to round over the edges at this time. Square the cap area to the flat side with the machinist square. Mark the center lines for the butt end at this time.
Next will be the butt plate
Posts: 965 | Location: Texas | Registered: 19 May 2004
This is cool. Portable shop on the back of a truck? Cool! When you're a "Yoda", you don't need much.
I've been teaching myself how to do this and it takes practice. Each time, I do more and more. Latest project was some hand picked walnut for my father-in-laws rifle. He hand picked the walnut, resawed it, and created a 3 piece laminate (he does lots of woodworking, furniture).
Had a semi-inlet, rough finish stock created from it by one of the stock companies - but it was pretty rough. I've basically reworked and reshaped it extensively to the point I said, dang, if I could do this, I could start from scratch next time. Which is what I plan to do.
"Evil is powerless if the good are unafraid" -- Ronald Reagan
"Ignorance of The People gives strength to totalitarians."
Want to make just about anything work better? Keep the government as far away from it as possible, then step back and behold the wonderment and goodness.
Hacksaw the butt end to remove some of the wood to form the curve and have the length measured so you will know how much to inlett the butt plate.
Butt Plate inletted, but not finished at this point. Check for butt plate being square to the center line of the butt end of the stock. Complete inletting and drill for the screws.
Next will be removing wood to start the final shaping. Once the stock is cut down close to the final size I will go back and check the final inletting and set the two point bedding in the barrel channel with 3 or 4 lbs of upleft on the barrel to seperate from the stock. If you noticed in the picture of the inletting of the barrel and action that the action was not bottomed out in the wood. I leave this until I can create the pressure point. When I finish the action to the correct depth then I will have about 1/32 in clearance between the bottom of the action and the magazine box.
Posts: 965 | Location: Texas | Registered: 19 May 2004

 Guns, Politics, Gunsmithing & Reloading