 Other Topics Recipes for Hunters
 Go | New | Find | Notify | Tools | Reply |
| 1 June 2014 Spare Rib Barbecue | Login/Join |
| one of us |
If you look at the two photos in the opening post of my "My Method for Barbecued Ribs" thread, which was written several years ago, you see some ribs with good colour, but that's about it: http://foodsoftheworld.activeb...ed-ribs_topic52.html They don't tell much of a story, and they never seemed - to me - to really show how well this method works in creating delicious layers of flavour. The photos represent a decent way to use decent flavours to get decent-tasting ribs; nothing wrong with that, but nothing special, either. Earlier this summer, I set out to improve this thread with some "better" photos; but as the project evolved, I realised that I was also demonstrating what I've learned over the years about barbecue and cooking in general. I think I have succeeded in applying these easy techniques in order to make good barbecue into exceptional barbecue, and I want to share this development with you. This cook is from 1 June 2014; I deliberately and closely followed my method in the opening post for the express purpose of demonstrating this method, with an eye toward using helpful and beneficial techniques as my experience has grown. I'll leave it to you to judge the results! Here we are, right after putting the meat to the heat at about 1130: 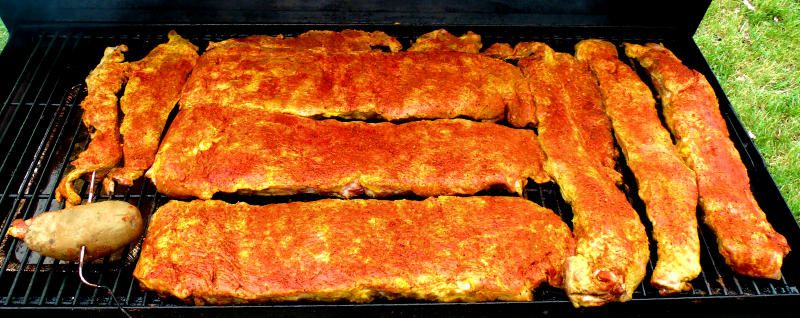 I had prepared the ribs as described above in my opening post: http://foodsoftheworld.activeb...ed-ribs_topic52.html The spare ribs are trimmed Saint Louis style, lightly slathered with yellow mustard and then generously dusted with my rub - in this case, I used my go-to rub: Rich's General Purpose Rub from Mad HunkyMeats: http://www.madhunkymeats.com After 90 minutes, the rub had "set" well into the mustard slather and ribs, forming a solid foundation for a wonderful, savory, crispy bark. At this time, I began "spritzing" the ribs with my time-honoured, olive-oil-based, Dr. Pepper/soy mop: 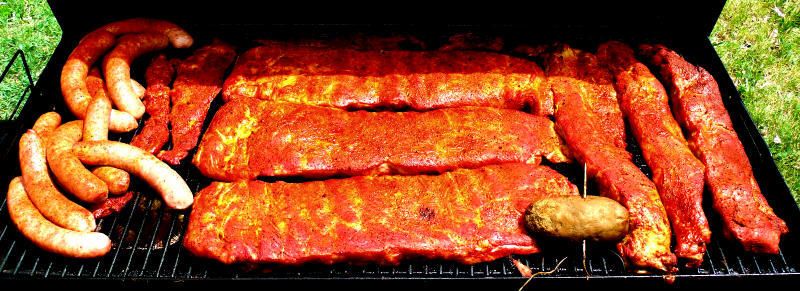 I also threw some sausages on, as you can see, so that they could pick up some smoke and flavour for a late lunch. The primary purpose of the mop is to protect the meat from the heat so that it doesn't burn or dry out, providing many of the benefits that meat will get when basting in its own drippings as it turns on a rotisserie or spit. It also adds to the layers of flavour and colour in the final product. I am sure that there is plenty of science behind it, but all I know is that my barbecue looks and tastes better when I use some form of mop, so I use it. My normal practice is to mop once each hour (give or take a few minutes); at the same time, I add fuel or smoking wood, clean ash out of the firebox or otherwise maintain the fire as necessary. Here's how the ribs looked at 1400: 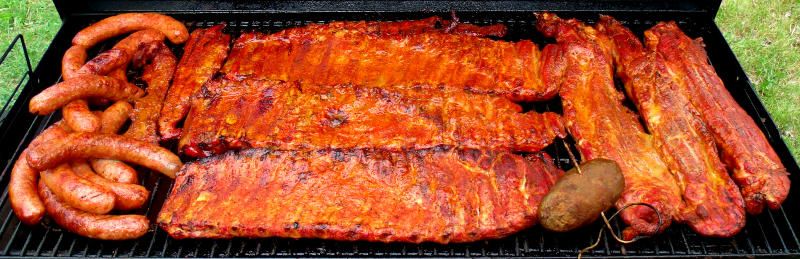 Since temperatures, airflow and other important variables in barbecue cooking are in flux during these "pit stops," it is a good opportunity to quickly open the lid and do a brief check of the meat while spritzing et cetera; as you can see here, it's also a fine time to turn the meat over and rotate it if necessary for even cooking. This picture was probably taken at 1500, but a lot of things were happening by now, so I neglected to really keep track of time: 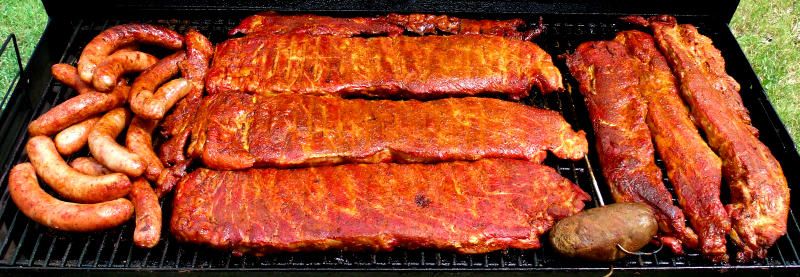 The important thing here is to keep rotating the meat around so that everything cooks evenly, and to continue to apply whatever mop you choose to use; also, at about this point in time (the back half of the cook), I tend to bump the cooking temperatures up from the 225-235 range (for promoting a good smoke ring) to the 245 to 250 range (for colour and good rendering of fat/connective tissue). I also lighten the amount of smoke on the meat, but for ribs I still keep some on almost throughout the entire cook. If you look here, you will see that something is missing: 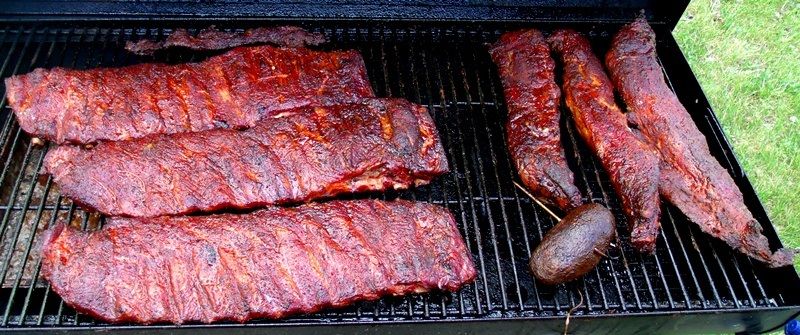 The sausages! The crowd could wait no longer, so off they came; also, it was at about this time that the "flap meat" that was trimmed from the ribs began to go missing. The benefits of the mopping and slow cooking can be seen here; the colour of the darkening meat shows good evidence of the Maillard Reaction, without burning or carbonisation of the sugars, and the ribs are starting to render their own fat quite nicely. At this point, you can - if you wish - discontinue the mopping, as the rendered fat can be brushed all over the meat when you rotate it. Or, you can continue spritzing/mopping as you rotate, if you prefer. I apologise for the smudge on this and the next photo; I didn't know that was there: 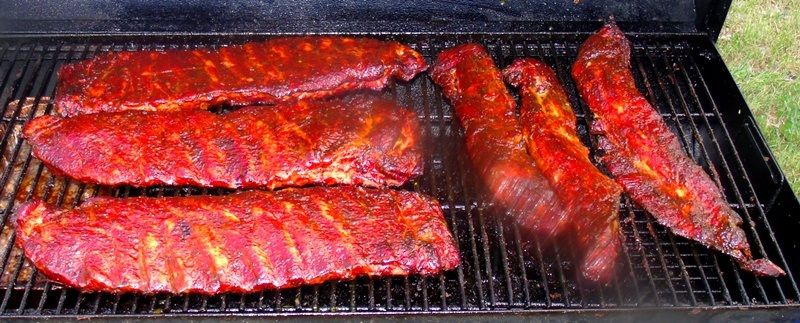 The ribs are entering their final 30 or 45 minutes here as I began applying my mustard/brown sugar/apple-cider vinegar glaze in thin layers, allowing 10 minutes or so between applications for the glaze to set in a beautiful, crackling sheen. I probably could have bumped the heat up a bit to 260 or so, in order to get some final pull-back from the bone, but didn't think of it at the time. The ribs look great to me, but I'll let you decide. And here we are, fresh off the heat and resting for a few minutes while last-minute preparations are made for side dishes, beverages etc.:  I really love the way that this method provides such deep and warm colours; the rich, mahogany reds and the mellow, golden browns are - to me - a beautiful representation of what perfectly-barbecued meats should look like on the outside. There are dozens of legitimate ways to achieve these results, but this, for me, works best. (Note - no foil!) For this particular party, I cut the racks into two-rib portions: 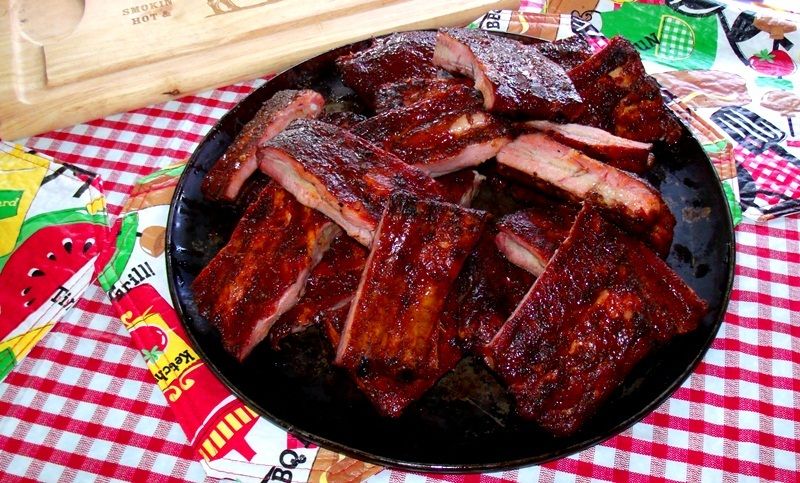 As you can see, this cook yielded an adequate smoke ring, but it could have been better; the flavours and aromas, however, were out of this world! Every single component - from the zesty rub to the sweet hickory smoke to the savory mop to the piquant glaze - contributed to elevating the pork toward the final story, which was full of rich, treasure-filled layers that would make a geologist smile in appreciation. Further, the more I learn about cooking, the more I am understanding just how important textures can be in food, allowing me to appreciate the crisp, crunchy bark in contrast with the bursting juciness and tenderness of the beautifully-rendered meat underneath, which was done to perfection and provided only a slight tug before removing itself cleanly from the bone. 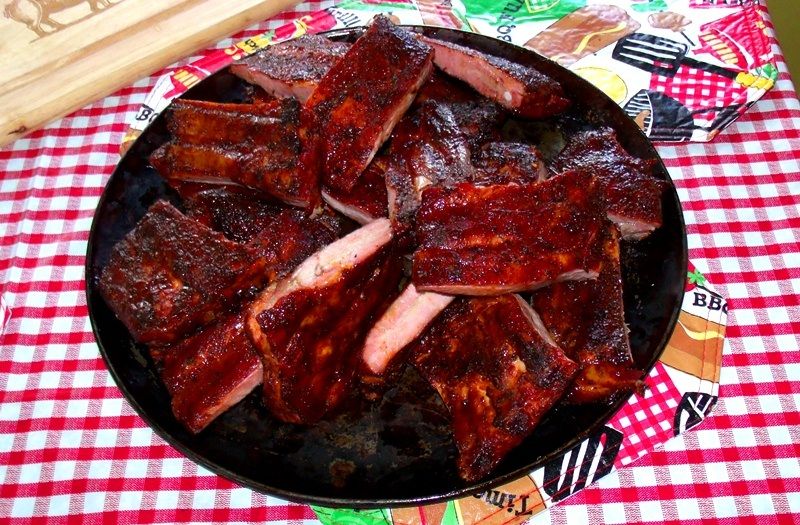 The difference between the opening post and this one truly represents my evolution in the art and craft of barbecue. It has remained essentially the same over several years where the ingredients and flavour profile are concerned; however, as I have learned more - not just about barbecue, but about food and cooking as well - I've been able to apply my knowledge and experience in order to substantially improve what I have found to be an outstanding basic method for truly delicious ribs. I have tried many different techniques and flavour profiles from all over the world, and have never really been dis-satisfied with any of them; so this is by no means the only way to barbecue ribs, but it is certainly is my way. I'd be honoured if you gave it a try, and would be grateful for any feedback. As always, if you have any questions, please do ask Ron | ||
|
one of us |
tasunkwitko I just came from a hot HOT day on the water, had a couple of really COLD beers and those ribs would be a perfect end to the day. They appear to be done to PERFECTION No where locally to get great BBQ anymore. Don't limit your challenges . . . Challenge your limits | |||
|
| one of us |
Those are indeed good ribs, Louis - if you give them a try, you won't be disappointed. The thing I like is that the basic method is pretty versatile where ingredients are concerned. Instead of Dr. Pepper in the mop, you can use Sunkist - or orange juice - or any number of things. Rather than brown sugar in the glaze, try molasses, or perhaps honey. Instead of vinegar in the glaze, use pineapple juice. Your imagination is the only limit.... Good stuff.... | |||
|
| one of us |
I think if we ever get to where we don't need real food, and can survive on "virtual" food, I could survive on T's photographs. | |||
|
| one of us |
High praise, indeed, Ken, and I do appreciate it. The truth is, though - I really enjoy listening to your ideas...there is a lot of creativity there as well as understanding of how flavours work together. As you learn the methods, I think you're going to be turning out some really really good stuff! | |||
|
| one of us |
I'm doing my first brisket in twenty-four years, the first weekend in October. I've promised myself that I'm not going to get caught-up in the action, and try to take a few photographs. I've really enjoyed getting back into the "smoking" scene after returning from overseas. Got the Venezuelan (oilfield) smoker out of storage, passed it down to a son-in-law, bought a new Texas Pit Crafters version, and never looked back. After the brisket I plan to smoke a turkey for Thanksgiving, then take-on a turkey and ham for Christmas. I can't bring myself to cook inside, but point me out the back door with a piece of meat and a pile of wood, and time flies. | |||
|
| One of Us |
An imagination is essential to be a good cook ! | |||
|
| Powered by Social Strata |
| Please Wait. Your request is being processed... |
Other Topics Recipes for Hunters

Visit our on-line store for AR Memorabilia