
 Guns, Politics, Gunsmithing & Reloading Gunsmithing
 Go | New | Find | Notify | Tools | Reply |
| Checkering: How To Questions | Login/Join |
| One of Us |
I need a bit of help with checkering. I know there are ACGG members here who are true craftsmen. I am not in the position to hand those guys their tools. I am redoing a pre 64 Win 70 stock, 18 LPI. The checkering is so worn that it is not much more than pencil marks. My two main questions are: 1. Do you recommend cutting the border first or last? 2. How do you apply finish to the finished checkering? I was thinking of a toothbrush? PA Bear Hunter, NRA Benefactor | ||
|
| one of us |
You might also get a copy of Joe Balicke's video, he makes it look easy, although it isn't. NRA Life Member, Band of Bubbas Charter Member, PGCA, DRSS. Shoot & hunt with vintage classics. | |||
|
| One of Us |
I'm no pro, I usually do the border about half finished depth - gives me a good line to stop on / checker up to. Do the border full depth once I'm happy with the checkering. I usually soak the checkering with a brush and soak up the excess (almost immediately) with a kitchen towel. I also de-feather the checkering after it is dry by running lightly over the checkering again with a fine cutter and repeat the finish application. Maybe a pro will pop in with his / her method. --- John 303. | |||
|
| One of Us |
I prefer to do the borders last. This tends cover up any run overs (a polite word for oh sh--). Icut the finish to about 50-50 finsh and thinner and apply sparingly a few coats until it looks right. The Balicke DVD is a good self help guide. Jim | |||
|
| One of Us |
Monte Kennedy's book has about as many reprints as the Holy Bible...get one...follow directions.. | |||
|
| One of Us |
I like the way he just pushes the four line cutters around. A toothbrush is handy through most every phase of checkering. | |||
|
| One of Us |
I'm no expert, and if I had to do it for a living, I'd starve, but I've done some checkering in the past 40 years. This winter I checkered two rifles. I use Dem-Bart tools and do 20 lines per inch patterns. The stock is held in a homemade checkering cradle. I also use one of those magnifying lights to help me see the work. To answer Arigun's questions, I first cut the borders to about 1/2 depth. Then I line the pattern with two layers of masking tape, trimmed on the borders with an exacto knife. This reduces over-runs. I use a tooth brush throughout the checkering process to remove wood dust from the checkering, and to apply finish to the completed pattern. I completely finish a new stock before I start checkering. This keeps my sweaty little hands from staining the rest of the stock while I am doing the checkering. Then I draw the pattern onto the stock with a Ultra Fine Point Sharpie pen. I also mark the first two guide lines using a flexible straight edge. Here's one of the stocks that I checkered this winter. This picture shows the borders and guidelines for one side of the grip. Note that the center point of the front of the pattern is drawn but not cut.  This shows the tape protecting the borders and the parallel cuts started in one direction. Do not make these cuts too deep until all cuts are made in both directions.  Here I've made all the initial cuts in one direction.  Here all the cuts have been made in both directions, and the center point of the front of the pattern was formed by extending the parallel cut lines to the desired location.  Here's the completed grip pattern with the tape removed. 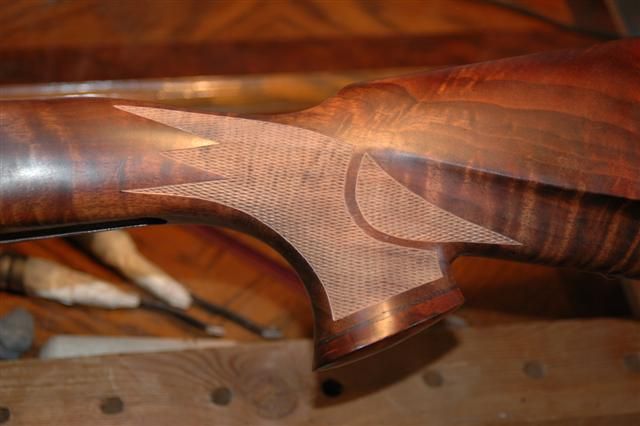 And with two coats of Tru-Oil, applied with a toothbrush.  Here's the forend pattern with the borders and guide lines. That light colored piece of wood has two sharpened nails that I use to scribe the top of the pattern parallel to the top of the stock.  Here's the forend with tape protecting the borders.  Here's the finished forend checkerng with two coats of Tru-Oil.  NRA Endowment Life Member Life Member Wild Sheep Foundation | |||
|
| One of Us |
That checkering doesn't look too bad to me! | |||
|
| one of us |
Yep no flys on that checkering. As usual just my $.02 Paul K | |||
|
| One of Us |
Thanks for the replies to all! Buf that is pretty nice work. 20 LPI looks so much better than 18 LPI but my 70 stocks are all 18 LPI except for my 1st year production 30-06 and it's checkering is in nice shape. But buf, I am no expert but believe your's is borderless checkering. I am going to cut the border to half depth on this next one and then mask. I thought a toothbrush would be just the thing to put a very light and thinned coat of finish on the checkering PA Bear Hunter, NRA Benefactor | |||
|
| One of Us |
Thanks for the compliments on my checkering guys. This was the 4th rifle that I've checkered with that pattern. Airgun, You're absolutely right about my pattern being borderless. I wasn't thinking about a double line border like this one I did on some 1911 grips 30 years ago.  As for when to cut the second or outside line of a double line border, if I was doing one, I would cut it before I cut the inside line to full depth. Good luck on your project. NRA Endowment Life Member Life Member Wild Sheep Foundation | |||
|
| Powered by Social Strata |
| Please Wait. Your request is being processed... |

Visit our on-line store for AR Memorabilia