

 The Accurate Reloading Forums
  THE ACCURATE RELOADING.COM FORUMS
  Guns, Politics, Gunsmithing & Reloading
  Gunsmithing
  First Checkering Lines
Go  | New  | Find  | Notify  | Tools  | Reply  |  |
| One of Us |
One of the best Christmas gifts I've received in a few years was a Dem-Bart checkering kit and Monte Kennedy's book on the subject, and I've started to learn how difficult learning how to checker will be. I've been anticipating this for awhile (been reading a bunch) but you never really know until you get the tools and sawdust on your hands. 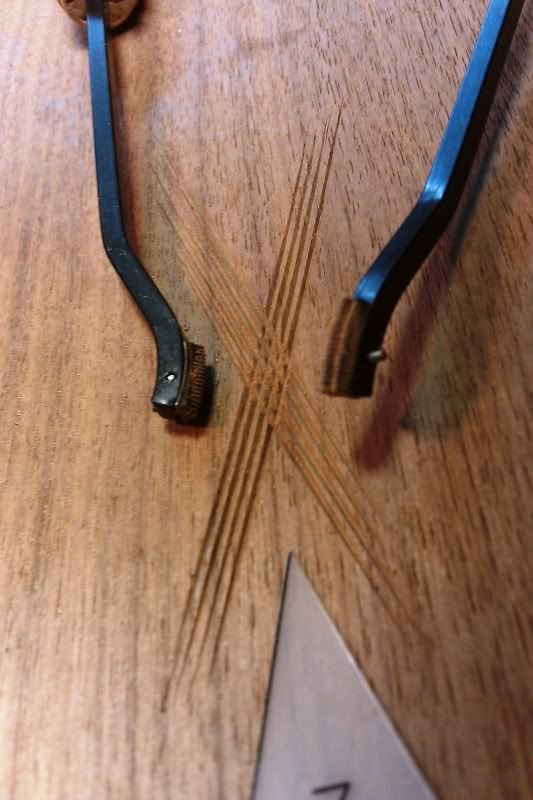 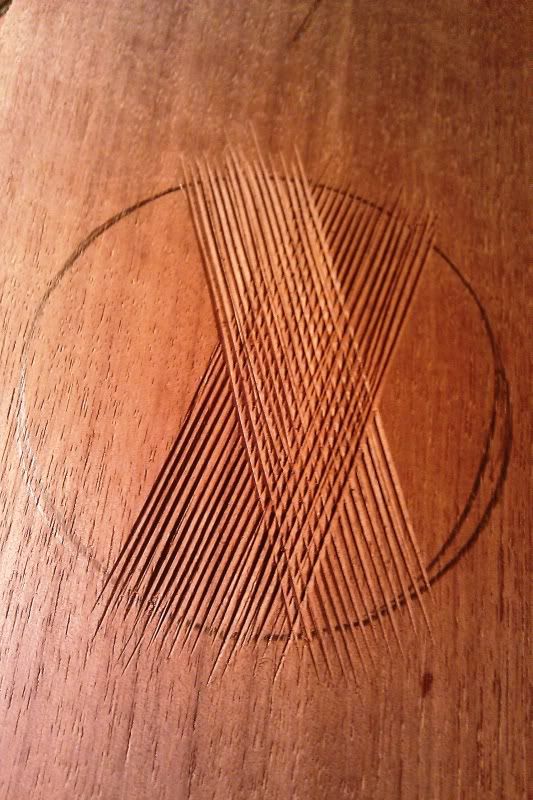 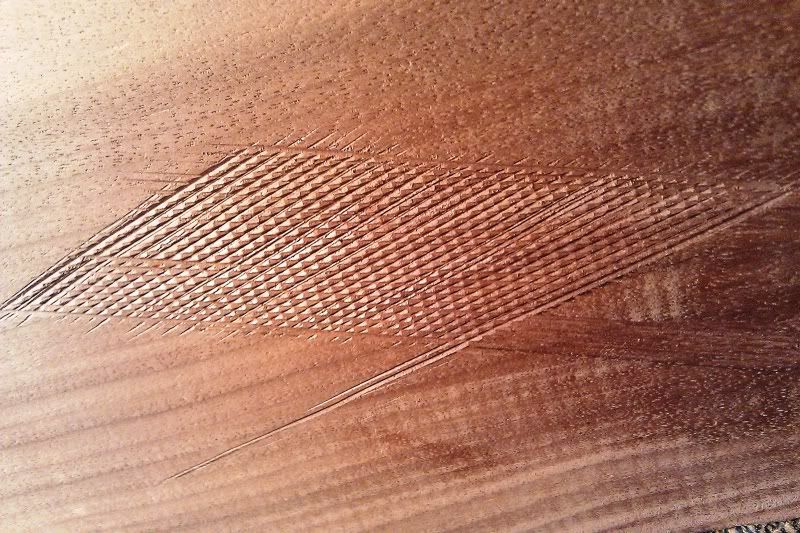 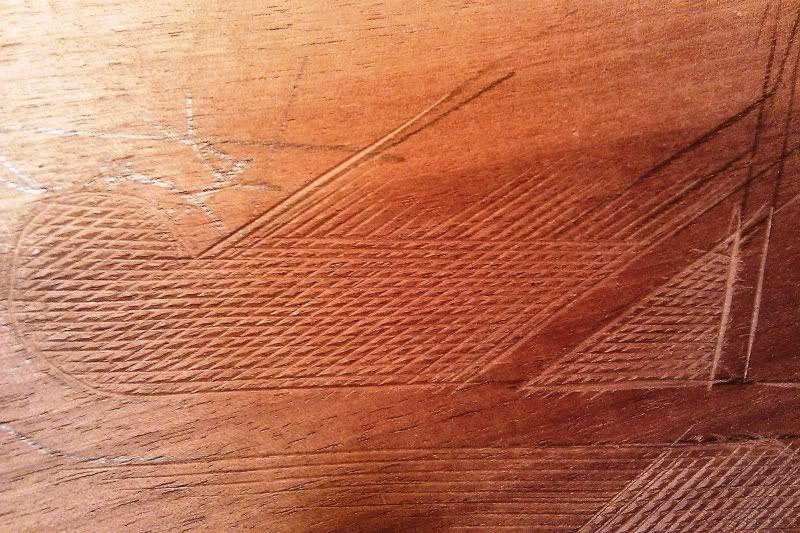 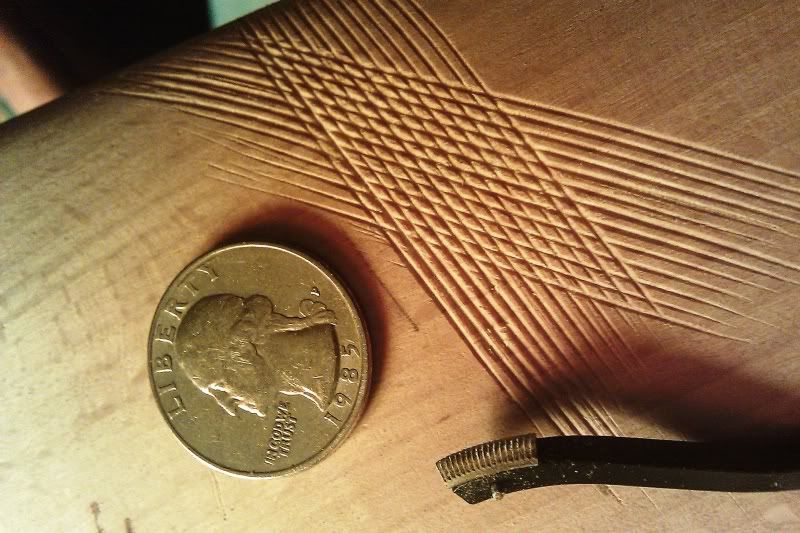 Uff da. One thing I need to do is make a good checkering cradle with lighting and eye magnification. Until then I've been trying to focus on making straight lines with even depth and making clean borders will be next. The dark wood is a flat black walnut board and the light is a stripped 10/22 factory stock. It's going to be awhile until I'm confident enough to do a job for real. If anyone is willing to share some wisdom with a beginner, it would be much appreciated. "If the women don't find you handsome, they should at least find you handy." | ||
|
| One of Us |
Uff da my friend. EvanK, you've inspired me to learn the checkering craft. I've often admired such talent and wished I could do so myself. Your post showed me that if you wish to, you can accomplish this craft and develop a talent for the art of checkering, and it is an art. Your approach made it truly conceivable. I thank you from the bottom of my envious heart. I have been inspired by your attitude. Olcrip, Nuclear Grade UBC Ret. NRA Life Member, December 2009 Politicians should wear Nascar Driver's jump suites so we can tell who their corporate sponsers are! | |||
|
| One of Us |
A cradle is a must. For two reasons and it's in Kennedy's book Lighting and the motion of your arm being inline with the cutter. The lighting so you can see the shadow contrast to bring out the diamonds. Then the alignment to keep you from putting in a natural curve to the lines. I've done one stock and just about ruined it. You're on the right track using scrap. and it's going to take some time. I personally love it. it's a nice break from machining and it give me an new area to focus on. it's tough. www.KLStottlemyer.com Deport the Homeless and Give the Illegals citizenship. AT LEAST THE ILLEGALS WILL WORK | |||
|
| One of Us |
I've been sitting in a recliner next to a good reading lamp and holding the board tight between the cloth arm of the recliner and my left hand while I work the tool with my right. I am understanding how good light is a must to see the diamonds. Getting a steady grip while looking straight down the tool is a whole 'nuther. Yep, it's time to make a cradle. I just planed a stack of black walnut boards that were a gift from my grandpa and am thinking it would make for good cradle and jig lumber. Dark, dense, air-dried wood. What doesn't go into a stock blank will be jig material. olcrip that's the best compliment I can be paid. I was inspired to take up stockmaking by what others have posted on messageboards like this one and am happy to keep it going. I have found that much can be accomplished by hard work and perseverance and predict checkering will be no exception. I can't emphasize enough how much I am still learning every time I sit down in front of my work bench. "If the women don't find you handsome, they should at least find you handy." | |||
|
| One of Us |
Make a cradle that is rigid. Use low angle strong lighting. Make your first line with the aid of the edge of an old measuring tape. On curved surfaces you should mark parallel line son the wood so you can see if you are splaying the line wide or narrow. Use Dymo labeler tape to protect the end of the pattern from run overs. Turn the heads around so you are cutting on the pull, this helps prevent run overs. Practice a lot. For me, chequering is mostly about the feel. If it sticks for you, get an electric checkering outfit. That said I did my most precise work with tools I made. | |||
|
| One of Us |
Dear Evan K: I'm no pro, and I've made lots of mistakes, but three things are necessary to successful checkering in my mind. 1. Natural light, if can get it; 2. A rigid checkering platform, and 3. A proper seat where you are comfortable (some people stand, and I do at times) and the work is slightly above your mid-section. You will be amazed how you thought that you were following one line, but had actually skipped half way down to another line, because the lighting was not adequate. Incandescent 100 watts seems to work better for me than flourescent lighting does, but flourescent works better for me when metal checkering. Odd, isn't it? Hard, close grained European walnut is a lot easier to checker than softer, more open grain American walnut. When I get a stock to checker, I spend the extra $100.00 for the higher grade wood. It is amazing how much time you save, and how much better the job looks. I use the 24 lpi cutters by the way. Another thing I'd add, and its been my downfall when re-checkering stocks, is to quit when you get tired of it. I sometimes don't, and I have to clean up borders. Sincerely, Chris Bemis | |||
|
| One of Us |
Yale I wouldn't even consider my self a novice at checkering but all the points you brought up are spot on what I've noticed in just the few days I spend practicing and checkering. That last point of knowing when to walk away is huge. You just get a little careless and like you said have to clean up borders. One thing I'd like to add is never get in a hurry. Lay out the pattern and go slow take as little wood out as needed to stay on track. Don't just dig in and go to town. Treat Practice like working on a fine rifle. Take your time paying close attention to every detail. Because only with time will you develop a natural motion and skill. I've go to dust of my box of tools and get to making some saw dust again www.KLStottlemyer.com Deport the Homeless and Give the Illegals citizenship. AT LEAST THE ILLEGALS WILL WORK | |||
|
| One of Us |
great start Everyone has given great advice. But they have failed to add one of the most important. "Never drink and drive!!! One beer will cause you much grief and lots of time to fix the problem. Elton | |||
|
| One of Us |
Ya know your right Elton. I'll have a beer for time to time while i'm working in my shop And I space them out so as to keep me safe. But on something that requires a high level of focus. It's done first thing in the morning right after my coffee. That's the same time I try to do my surface grinding as well. www.KLStottlemyer.com Deport the Homeless and Give the Illegals citizenship. AT LEAST THE ILLEGALS WILL WORK | |||
|
| One of Us |
Checkering on a flat board is OK just to get the feel of the tool but it won't get you vey far on a gunstock. Checker something you REALLTY want to turn out nice. Something that will cause anguish when you goof. At least a nicely finished pick handle! Keeping the rool vertical AND stopping at the border is where the descipline comes in. I agree...Kennedy's book is a good start | |||
|
| One of Us |
Tips I have found useful: Brownell (not Brownell's, but sold by them) 'window' type 2-rod handles have a splendid adjustment for cutter angle, and the dual rods serve as a reference to help keep the cutter vertical to the surface. One of the best investments I ever made. Do your first cutting sessions on hard, dense walnut that cuts cleanly, until you have gotten a good feel for the tool and how it's supposed to cut. Practicing on softer wide-grained wood will often cause difficulties for the beginner, discouraging him from further pursuit of the art. I recommend old military Mauser stocks (juglans regia) but make sure the wood hasn't softened or become oil-soaked. BTW this wood also makes super tool handles for non- or low-impact tools. Use X-ray film to fab diamonds of different aspect ratios such as 3:1 and 3.5:1, also fleurs of different sizes and leaf shapes. One of the handiest uses for the film is to cut it into a long narrow strip (1/4"-3/8") with perfectly straight and parallel sides, to use in making straight master lines around curves and to KEEP all the other subsequently-spaced lines straight by checking their straightness every few lines. Just a very few tips, hope they help. Regards, Joe __________________________ You can lead a human to logic but you can't make him think. NRA Life since 1976. God bless America! | |||
|
one of us |
Why bother with the film >>>> lable maker tape. My own method is to use auto masking tape (1/2" and 1/4") to put a straight grid over the entire pattern in both directions. That's a good aid in keeping your lines straight. Roger Kehr Kehr Engraving Company (360)456-0831 | |||
|
| One of Us |
Check out the very first part of this: http://www.youtube.com/watch?v=fl9n2OexV34 I don't think they even think of messing up and doing the work on an So10, let's say, becomes a metaphysical event. | |||
|
| One of Us |
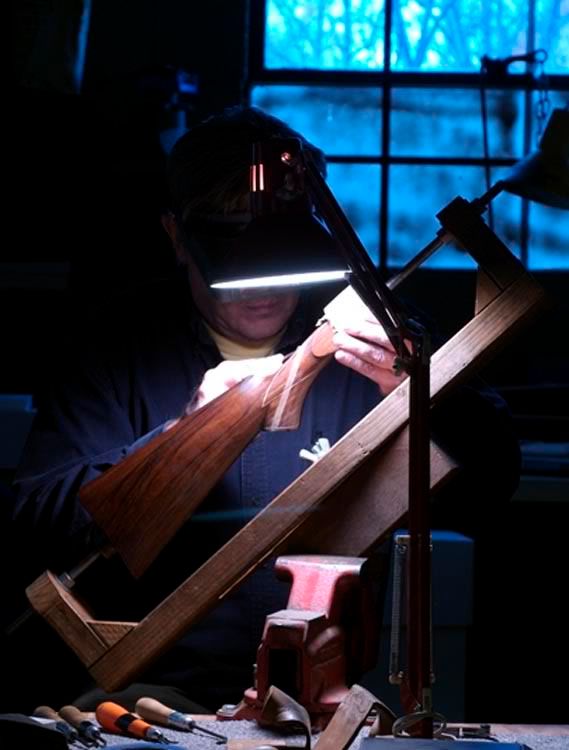 ACGG Life Member, since 1985 | |||
|
| One of Us |
Thanks for the replies fellas... that's a lot of good advice. SDH brought up a thought with that photo... I have young eyes that are sharp with contacts but was thinking a magnifying visor may be helpful. Should that be standard equipment? I decided my project for today will be gathering the parts for the cradle and if I am feeling ambitious, I'll go for assembly. Then I'll see where I can get the best light downstairs where I make my mess. I prefer natural light too but can make due with lamps. I've ordered some english walnut for the sake of getting some experience with it (never made a stock with it before) and to see why everyone raves about checkering and carving with it. Otherwise I have some black and claro walnut stocks that need checkering and are in line. I think this one will be first. 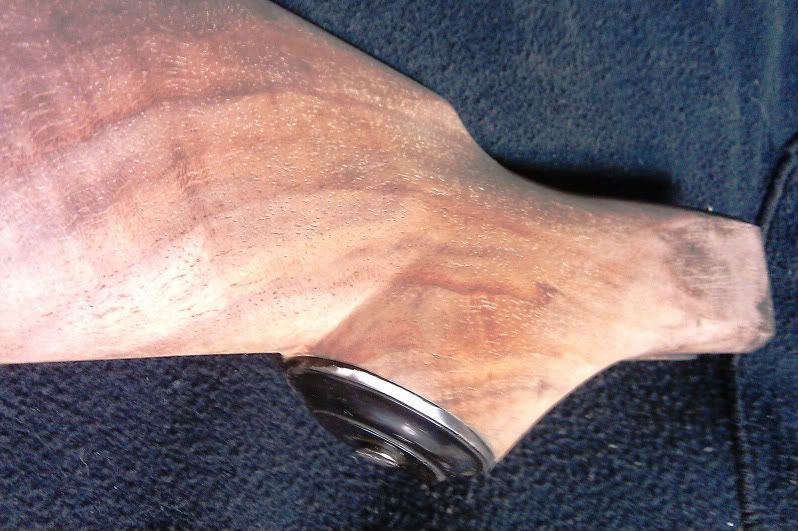 Until I've got the balls to cut the master lines on it (trust me I don't want to screw that stock up), I'm going to be practicing on some rough cut claro blanks I have since I'll be removing a good amount of wood on them to begin with. Once again I appreciate the wisdom that has been shared. "If the women don't find you handsome, they should at least find you handy." | |||
|
| One of Us |
I'm getting very excited about this new endeavor of checkering. I ordered a 22 line starter kit from Brownells last night. I'm inviting my buddy Beetle juice to learn with me. He's a retired carpenter and a gun krank like me. I have all kind of hard woods and old junk military stocks to learn on. I have a Olcrip, Nuclear Grade UBC Ret. NRA Life Member, December 2009 Politicians should wear Nascar Driver's jump suites so we can tell who their corporate sponsers are! | |||
|
| One of Us |
That was a Birds eye maple stock blank. Olcrip, Nuclear Grade UBC Ret. NRA Life Member, December 2009 Politicians should wear Nascar Driver's jump suites so we can tell who their corporate sponsers are! | |||
|
| one of us |
Her speed and the freehand scares the hell out of me!  Doug Humbarger NRA Life member Tonkin Gulf Yacht Club 72'73. Yankee Station Try to look unimportant. Your enemy might be low on ammo. | |||
|
| One of Us |
I know, I have looked at the video many times and am always amazed at her speed! | |||
|
| One of Us |
Put some oil on that wood, even when practicing. You will never checker a bare-wood gunstock. Purchase Brownell's checkering diamond pattern, make copies on your PC printer using heavy card stock. Save the original as a master and use the copies once or twice and toss when they get frayed. The ends of the pattern are different angles so you can cut the copy in half, using just the end you need. I cut straight edges from the clear plastic most everything comes tamper-resistant packaged in nowadays. Good advice above, practice on tool handles vs flat stock. Also VERY important....purchase the real Opti-Visor. The cheap magnifier (with the built-in lights) are optically junk and will ruin your eyes. Checkering cradle is also a must have. Mike Ryan - Gunsmith | |||
|
| One of Us |
The clear plastic and card stock for straight edges is okay but here is something I think works better. Go to the hardware store and buy a replacement tape measure refill. Cut off the first 9-10" of it and use that. It is stiff and you can't beat it. I got that tip from the great Kent Bowerly. Jim Kobe 10841 Oxborough Ave So Bloomington MN 55437 952.884.6031 Former Professional member American Custom Gunmakers Guild | |||
|
| one of us |
I never got past the ruining things stage of checkering, I found I don't have the time to master it at this point in my life. However, I have collected all the things recommended here, the tape measure, labeling machine tape. I didn't see anybody mention either that practicing on an unfinished stock also isn't the same because the finish actually makes for better diamonds too. I thought somebody told me that when i was trying it, that the finish being hard would help give better results. That video was awesome, not only seeing how the tools should/can be used, but seeing some of the things I thought were rules done different. i.e. sanding without backing and finishing with the pad and metal in the stock. I still have my tools and still have my cradle, you guys may have just given me the impetus to get back to trying it, lord knows I have enough stocks that need checkering. One more thing to remember, a checker at ACGG show told me once (I don't remember which guy) that it isn't that the experts don't make mistakes, they just know how to hide them. Red | |||
|
| One of Us |
We gotta also remember that the video has undoubtedly been edited and enhanced for publicity purposes. What it now shows to the viewer, well, like the song says, "It ain't necessarily so!" Regards, Joe __________________________ You can lead a human to logic but you can't make him think. NRA Life since 1976. God bless America! | |||
|
| One of Us |
Okay fellas, I made myself a simple cradle tonight. I should preface this by saying I've got some blanks with holes drilled in the tip & butt from duplicating and will be used for practice, so I made a cradle that would just fit these blanks. I had some 2x4 scraps leftover from a project this weekend and grabbed some leftover screws and a couple bolts/nuts/washers and went to work cutting and drilling. What I ended up with comfortably clamps into a bench vise and the blank can easily swivel because I've got 1/4" bolts stuck into the holes in the ends. Tension is provided by the nuts. A piece of scrap lumber with holes drilled and nailed to the main board serves as a tool holder. 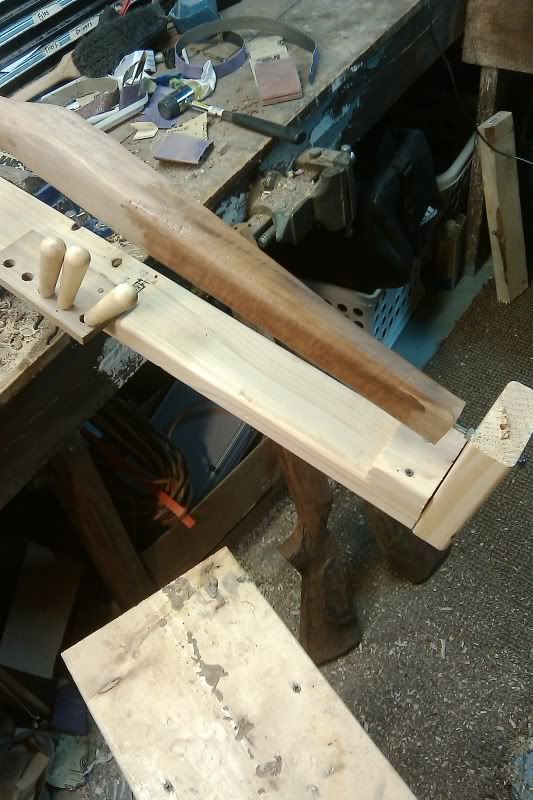 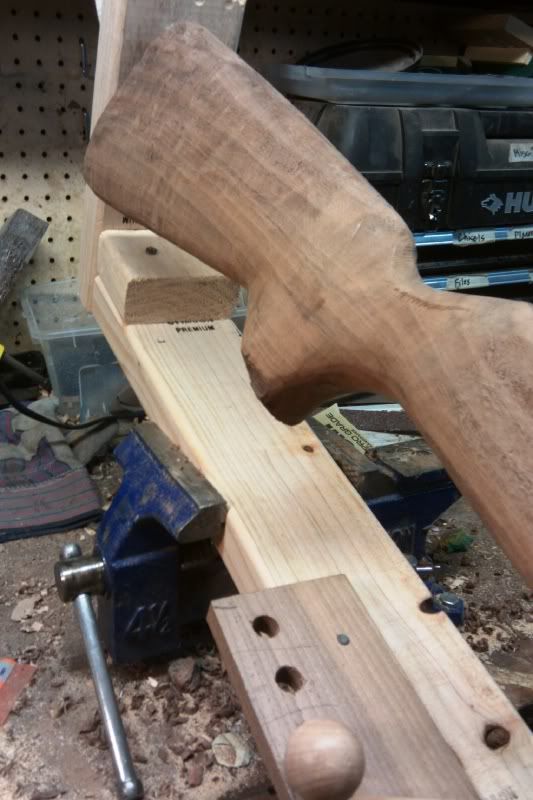 The cradle will only be usable for these practice blanks but it was made with scrap pieces, so it's all good. 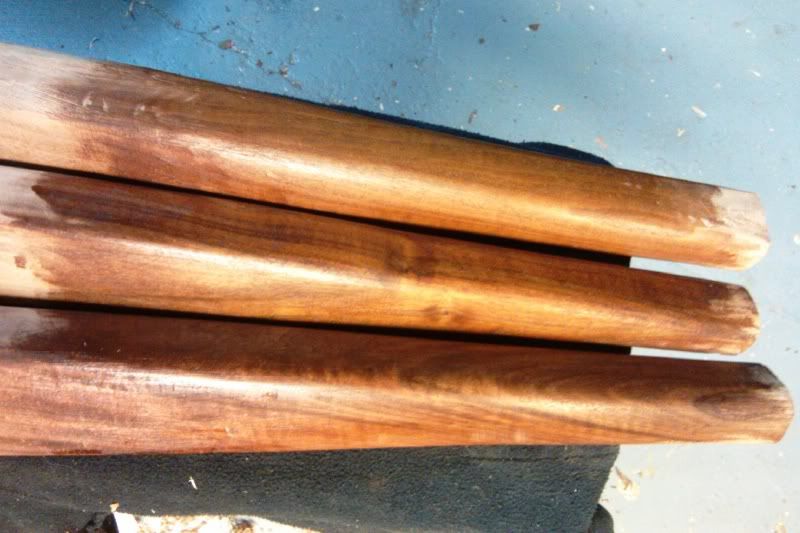 I sanded and put a layer of urethane on the fore-end of three Not too bad so far, eh? "If the women don't find you handsome, they should at least find you handy." | |||
|
| One of Us |
I got a pattern drawn out last night and on the stock. All of the angles are in alignment with the master lines and I added some points to balance the pattern and give me some more practice. 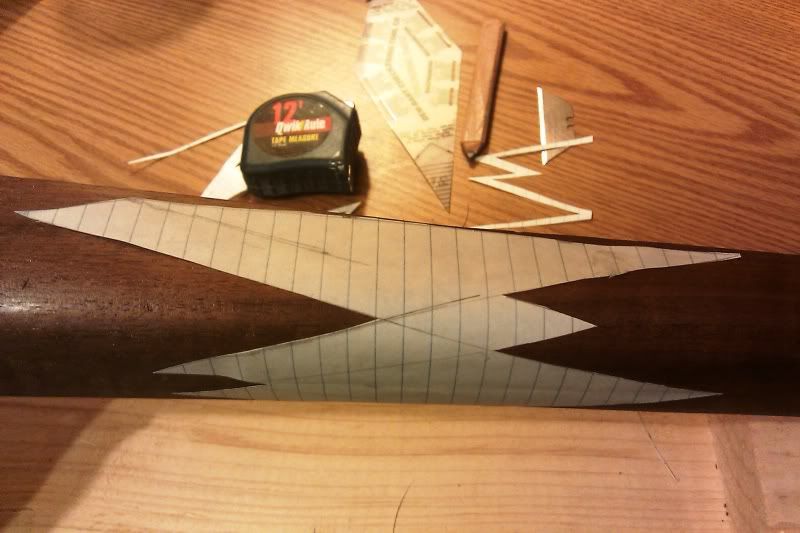 I cut one master line last night to get it started and put the tools down because at that point, I was just going to screw it up if I kept going forward. You can see most of the flat pattern in the background. 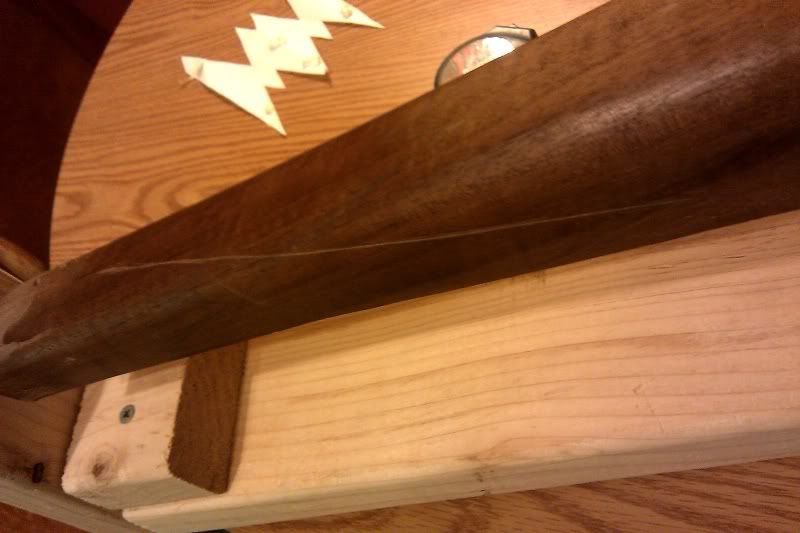 I think I already made one error there by using the border as a first line, but I won't touch that line again for awhile. It'll be my starting point and I can deepen it later or adjust the pattern if I run over it. If I'm headed for disaster, please lemme know. "If the women don't find you handsome, they should at least find you handy." | |||
|
| One of Us |
Evan K would you please post a picture of your stock cradle so I can get some ideas for building my own. Thanks Dude! Olcrip, Nuclear Grade UBC Ret. NRA Life Member, December 2009 Politicians should wear Nascar Driver's jump suites so we can tell who their corporate sponsers are! | |||
|
| One of Us |
Sure thing... it's pretty much a simplified version of what SDH shared. 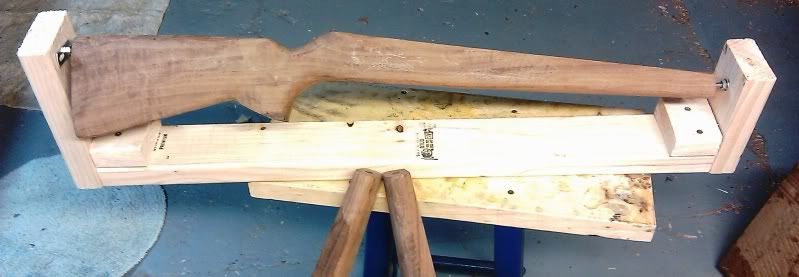 But but but... notice the blank is held in place by bolts going into holes pre-drilled in the ends. No bueno for a finished stock. It's not very adjustable for length either (limited to the bolt length), because I fitted it for the rough shaped blanks I've got that are all the same length. I'm thinking Les Brooks' design for the "long run" cradle. "If the women don't find you handsome, they should at least find you handy." | |||
|
| One of Us |
Thanks Evan K. That will give me a bases to build my own cradle. Mine will have to be adjustable for lenght, carving some Mannlicher stocks also. Olcrip, Nuclear Grade UBC Ret. NRA Life Member, December 2009 Politicians should wear Nascar Driver's jump suites so we can tell who their corporate sponsers are! | |||
|
| One of Us |
Have two tools for every type, one to cut on the push, one on the pull.. Invest in joiner tools (or make them)- they are required to keep your lines straight and straight they MUST be. | |||
|
| One of Us |
I didnt read, how many lines per inch. In gunsmithing school we started with 18 lines per inch. (Somewhat easier.) _____________________ Steve Traxson | |||
|
| One of Us |
20 lpi... seems fine to me for now. As of a couple days ago I have six nice claro and english blanks to have some fun with and another shipment of five is arriving today. Indeed, the grain and pores of the english walnut is much finer than the claro. I'm starting to see the light. dfcjr I'm gonna order some more cutting heads soon and I think I'll be picking up some extra handles and cutters for the push/pull... at least for the single cutters. I liked how Leonard Mews (in Kennedy's book) likened cutting the last bit of a line to a hound dog getting near the end of a scent trail- slowing down and taking shorter strokes (sniffs). At least that makes sense to me. With a reversed cutter, do you keep the border clean if you start the cut right at the border and pull short strokes towards yourself (vs. pushing into the border)? Like pushing to deepend the lines up to the last 1/4-1/2" and then pulling from the border to the rest of the line? "If the women don't find you handsome, they should at least find you handy." | |||
|
| One of Us |
You're better off approaching the border and then pulling cutter toward you. Some guys like to "bump" though; you kinda develop a feel for it. Jim Kobe 10841 Oxborough Ave So Bloomington MN 55437 952.884.6031 Former Professional member American Custom Gunmakers Guild | |||
|
| One of Us |
At the border it is best to pull the line to yourself. A rule of thumb..."there are NO excuses for over runs in checkering". This has been a guide in how to learn good checkering habits. Dennis Earl Smith Professional Member ACGG Benefactor Life NRA Life NAHC | |||
|
| One of Us |
I finally finished up the practice pattern I drew out. There's some good, bad, and ugly. 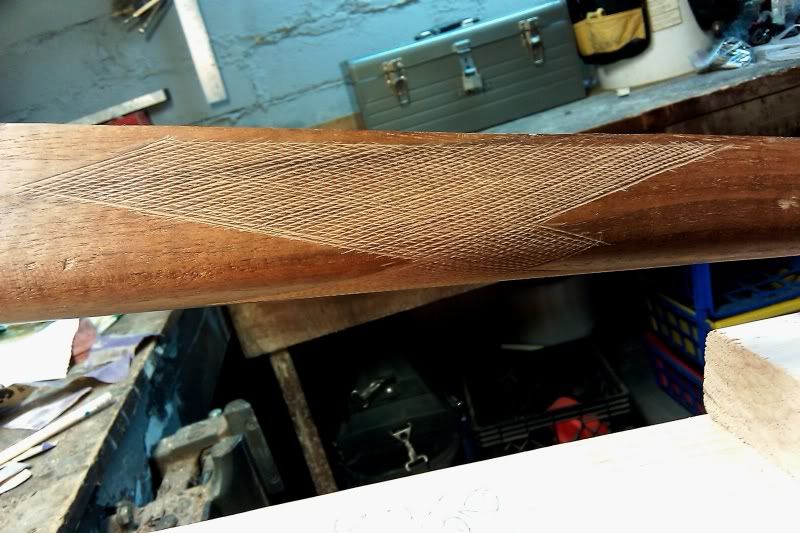 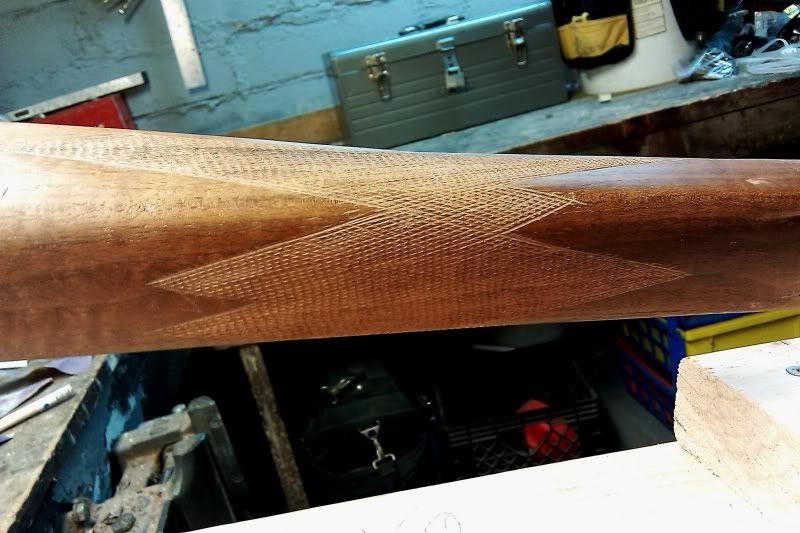 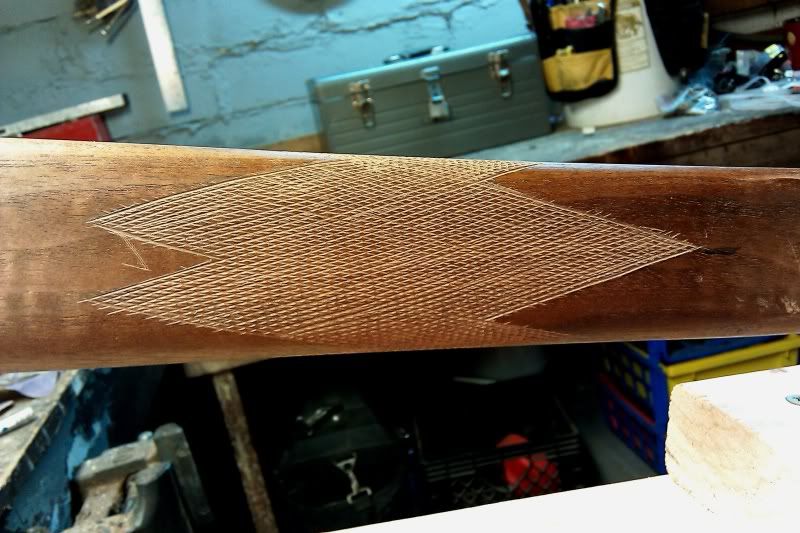 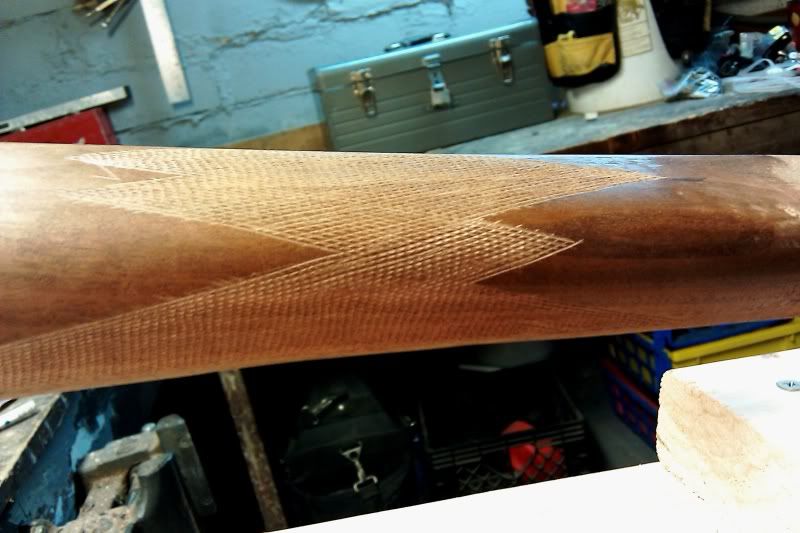 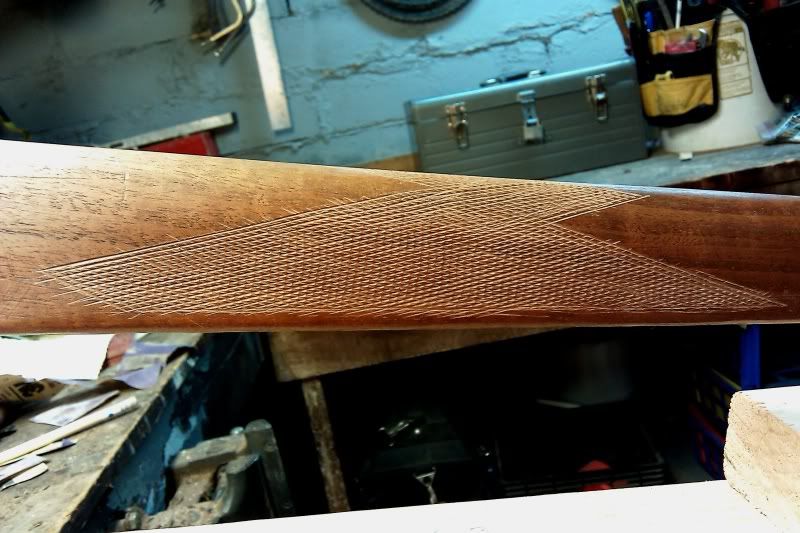 There's a lot of lines in there that need to be deepened and filled in to the border so I will get the practice I need to stop runovers. Gotta slow down and take my time on that. I think the pattern looks fine on the stock, but I didn't lay it down well and had some extra/squeezed lines where it was off. I also didn't mark the border lines well and some lines were crooked and just bad as a result. Also, I didn't level the top of this blank before practicing with it, and that meant marking the top line was a mess. I wanted to do a full size pattern just so I'd get a lot of lines in and a much better idea of what to do next time. Thanks for your responses! "If the women don't find you handsome, they should at least find you handy." | |||
|
| One of Us |
I don't know that much about checkering, but the runouts look like they can be sanded out and then the lines recut deeper, I think! Looks good sofar for a rookie. Keep it up and never ever get discouraged. I think I can, I think I can, I think I can, Damn it I know I can!!!! Olcrip, Nuclear Grade UBC Ret. NRA Life Member, December 2009 Politicians should wear Nascar Driver's jump suites so we can tell who their corporate sponsers are! | |||
|
| One of Us |
I applaud your efforts, one thing. When I get an over-run, it is usually with the spacer; I try to get too close to the border. Hold back a bit! Jim Kobe 10841 Oxborough Ave So Bloomington MN 55437 952.884.6031 Former Professional member American Custom Gunmakers Guild | |||
|
| One of Us |
Thanks Jim and Olcrip. One thing I neglected to do is try reversing the cutting direction and slowly back into the border vs. pushing into it. Do you ever stop 1/4" from the border while laying down lines and then go back to finish going to the border? The spacer was the tool of choice to run too far with (seems like there's more to focus on when using it). Once again I was probably going too fast anyways and not taking enough breaks to loosen up and uncross my eyes. I can tell I did my best checkering when I was fresh, which you can see in the last photo of my previous post. "If the women don't find you handsome, they should at least find you handy." | |||
|
| one of us |
Evan, About 20 yrs ago I was trying to teacher checkering at TSJC. I started off students using a short stock copy of about 18 inches long. This practise piece could be sanded, sealed, and made from scraps of left over walnut pieces. This was a way for the student to get the fill of running a duplicator which was made by the students on my design. You would have the correct shape as a stock and as some have said it is not the same as a flat board to practise checkering. Now that you have had time to cut a few lines try to not run over on the outside lines. I never complete the outside lines until the spaced line come out with the grease pencil line on the layout. I will never forget the first cradle I used in 1957 which was an apple box notched on the ends and the stock tied in place. We all started some place other than the ideal stock cradle.  | |||
|
| new member |
Les: Do you have a thread on the duplicator. | |||
|
| One of Us |
How do you like this pattern? Good, bad, ugly? 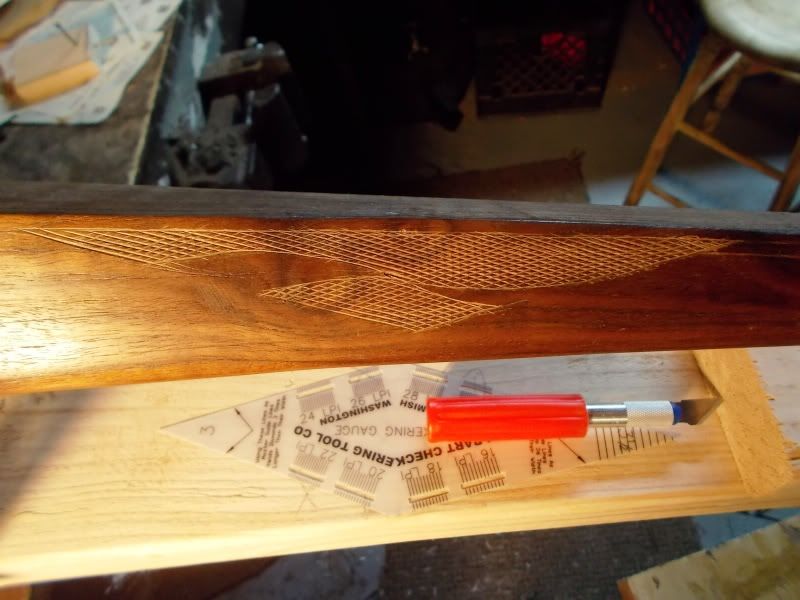 I haven't done a grip section yet so here's the start of one on the same practice blank. 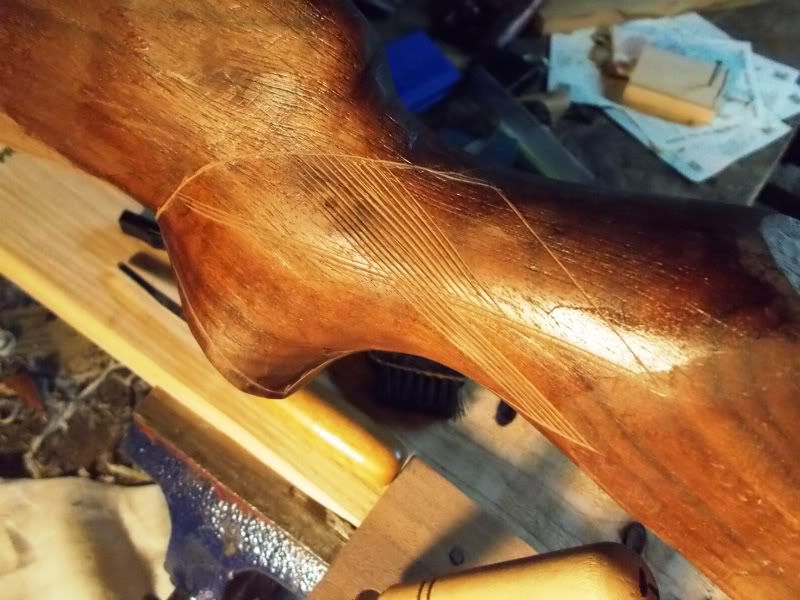 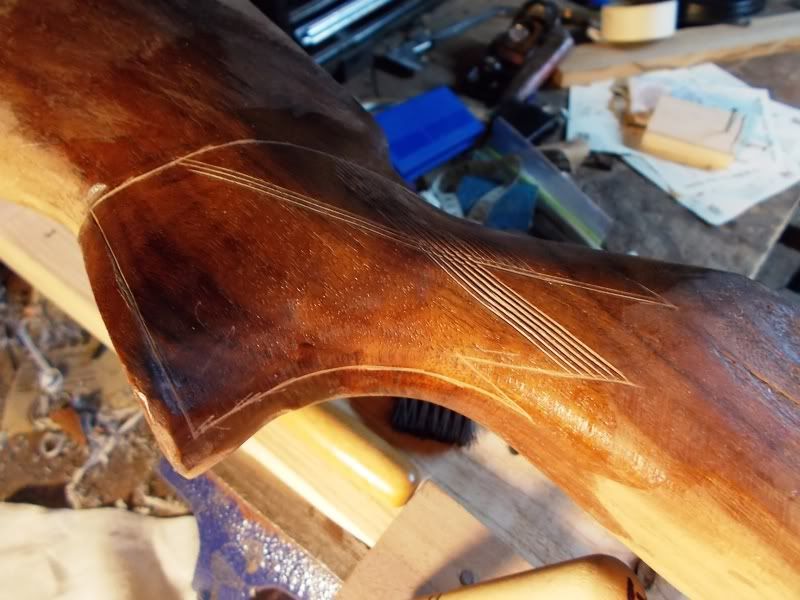 It has a knot that I went at right away. If it was going to screw everything up, I wanted to get it over with early. I'm hoping it doesn't fall apart when I put the other lines crossing over it. I have a pile of Claro (like this one) and English Weatherby factory second blanks to partially finish and practice with so I'm set. I haven't done any checkering on English yet so I think I'll try that next. Thanks, Evan "If the women don't find you handsome, they should at least find you handy." | |||
|
| Powered by Social Strata | Page 1 2 |
| Please Wait. Your request is being processed... |
|

Visit our on-line store for AR Memorabilia

