

 The Accurate Reloading Forums
  THE ACCURATE RELOADING.COM FORUMS
  Guns, Politics, Gunsmithing & Reloading
  Gunsmithing
  Project update - New Stock for take down model 1910 Mannlicher Schoenauer
Go  | New  | Find  | Notify  | Tools  | Reply  |  |
| One of Us |
Thanks Jason. A few other bits of info... The Schoenauer rotary magazine is so slick. But the rifles was not accepting 5 rounds in the mag. Even 4 was a bit erratic. I spent over an hour playing with the rifle in and out of the stock. I tried seating the bullets bit more in - half turn on the seating die = about 0.060 inch. Then I noticed that the Sierra 270 gr spire point bullets were the issue and that the rifle was originally made for round nosed ammo. My 1903 6.5X54 feeds the 160 gr Hornady RN perfectly. This also means that I do not need to take out so much wood from the magazine well. These rifles are also commonly broken in the wrist as they are so slim. So I am going to put a steel rod in the wrist - about 5 inches. I'll have to be careful to put it right in so that it does not interfere with the bolt from the trigger guard to the tang sight. The next steps are 1. CNC inlet the stock - various steps involved 2. Play with the Arkanet root infusions to see what I like best on the off cuts from the walnut blank 3. Play with polishing and rust bluing my guniea pig Rem 22 & decide if I need a sweat box or not. "When the wind stops....start rowing. When the wind starts, get the sail up quick." | |||
|
| One of Us |
Well .... this project is not easy .... but i am not giving up. I am determined to finish it and do a good job. I went and met with a local joiner who has a wood CNC machine. Turns out that he is a hunter and has done 3 stock himself. But I got no joy about doing my rifle as he said it would cost me to do just the programiong of the Solid Works and then the machining. But he loaned me 13 of his old small chistles and gouges. The other "old legend" who has been really helpful (he is 65+ and a real genius of a tool maker / machinist but knows nothing about guns). He suggested that I get some 2mm stailess steel sheets about 200mm wide and profile the outside of the barrelled action on both sides and then join them up at the ends to make the template. I could do that with a file and measuring tools and a steel ruler with a good scribe. Now I am doing a trial on a bit of pine whioch I am profiling. My past experience is that I will stuff up the pine blank but will get a lot of practice to be confident with the walnut. I'll post photos soon. "When the wind stops....start rowing. When the wind starts, get the sail up quick." | |||
|
| One of Us |
Ok ... at last I have made some progress. I finally managed to make a CAD drawing using a free software online & then paying for the dxf file format. This was sent to a local joiner shop and Wayne tidied up the drawing and cut a profile of the barrelled action & the trigger guard & magazine well in particle board. The one small positive out of the economic recession is that he has free time & is happy to help me on this project as he is also keen on it.  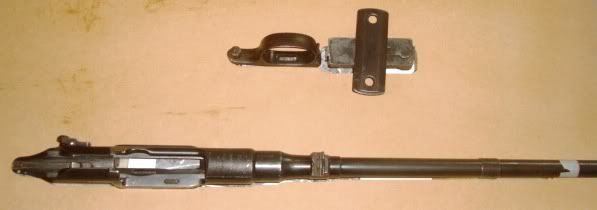 This was a major step for me as it now gives me the confidence that we can get accurate inletting on the walnut blank without ruining the wood or the end finish. I was still concerned about nicking the edges while digging out the insides, which will have to be done by hand tools & drills. So I also decided to make a template out of 3mm stainless steel plate (water jet cut - cost me $30), which I will clamp on to the wood after the joiner has cut the 10 mm deep profile with a router. 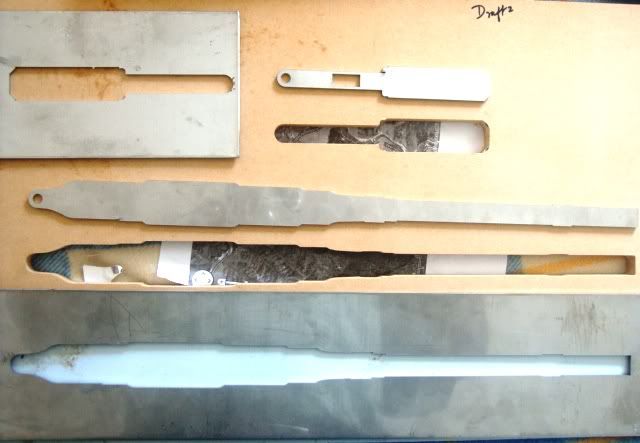 This will ensure that I can work quite quickly in removing the wood for inletting and yet be sure that the edges will be sharp & tidy. It has taken me a long time to come to this stage and now I can visualise the next steps quite clearly in my mind & am confident that I can do it myself. One other point is that the tang sight unit is at a downward angle on the top part of the pistol grip and the joiner said that the router will not be able cut that accurately. So I am making a stainless steel template out of that and will do the inletting by hand. I will just have to make sure that the center line is maintained. Next step is to visit the joiner again and try the router work on a piece of pine which I have shaped roughly like a stock blank. I have already located the one through-hole from the trigger guard to the tang sight. I'll post more updates later in the week after the douter work. "When the wind stops....start rowing. When the wind starts, get the sail up quick." | |||
|
| One of Us |
I think all Thomas Shelhammer needed to shape a stock was a hatchet. | |||
|
| One of Us |
Yeah, but he wasn't reinventing the wheel
| |||
|
| One of Us |
Yes I am reinventing the wheel & I have been practicing on some pine & here are the lousy results 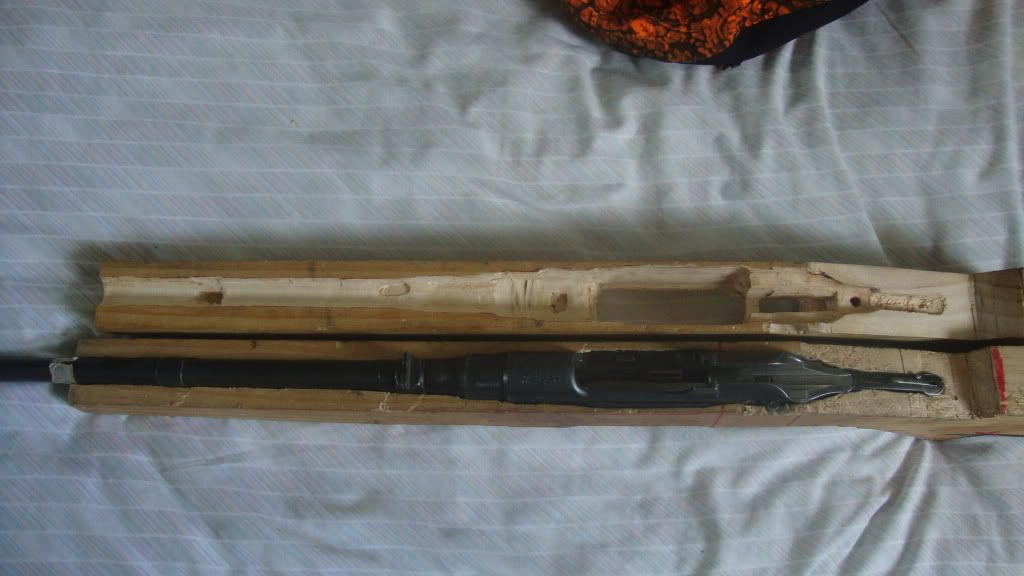 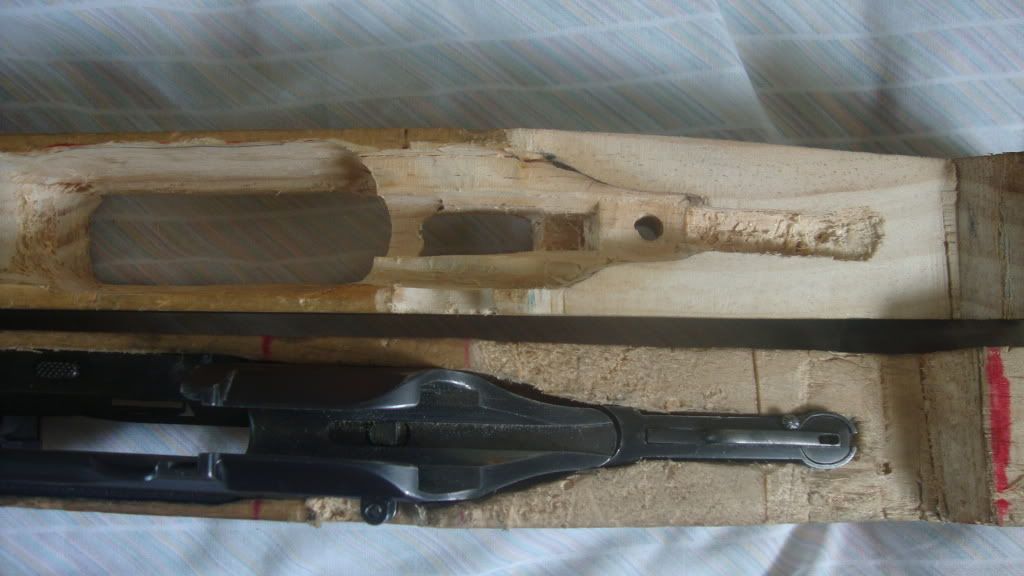 I started with the rear action bolt hole - which holds the triggerguard and the tang sight to the stock. Then I used the stainless steel templates and marked out the profiles in the top & bottom. using a router that I bought, I got the channels etc done and then used a drill press to remove the bulk of the wood. I used chisles and sand paper to fine tune the edges but that is not a good job! I found that it is possible to ge the bottom mortice wrong if it is not properly alligned to the top. So I marked the two profile on the top first and dug out the inner part first (for the magazine) and then did the rest. This also worked and gives me more confidence not to muck up the walnut blank. I am now going to use the CNC option to mark out the prfiles and then use the stainless steel templates to do the rest and keep the edgest sharp and straight. Like this - but in the real walnut blank    Two years since this venture started! "When the wind stops....start rowing. When the wind starts, get the sail up quick." | |||
|
| One of Us |
Slow - but some progress. Got the walnut blank sqared and partially inletted with a CNC machine.  The inner morise is the magazine part that will go right to the bottom.  Some more profile work and fine tuning the bottom wood needed befor I dig out the inletting fully.  I would appreciate some suggestions from the experts on how to proceed now. I am very nervous but also very determined! "When the wind stops....start rowing. When the wind starts, get the sail up quick." | |||
|
| One of Us |
Have you checked Les Brook's stickey at the top for shaping? | |||
|
| One of Us |
Thanks for the reminder. Yes I have seen this post and was highly motivated by it. I had forgotten the great info there. I even corresponded with Les. My problem is that my rifle is a take down model with no through action bolts. The bolt at the tang end connects the trigger guard to the tang peep sight. The action is held at 4 points - the tang end clips under the sight assembly, the magazine frame is latched to the trigger guard by a wing latch and the rotary magazine itself pulls the action into the stock as a snug fit and there is a cross pin on the front barrel band lug. If I get the location of the tang bolt hole wrong by even 2 or 3 mm, the alignment of the barrelled action and the bottom magazine & triger guard are messed up. Hence the start with a 5 mm hole going up slowllyy to 6 mm & then 8 mm. Les infact told me that this was probably the harest type of stock to make for a beginner! Too late now! "When the wind stops....start rowing. When the wind starts, get the sail up quick." | |||
|
| One of Us |
Some more progress..... Very tricky. I am very cautious and stop if I get nervous. I never start unless i am really positive and relaxed. YET I BUNGLED! I used a friends circular table saw to cut out the profile & all was going well until I went too far on the pistol grip area - forgot that the radius of the circular saw cuts more at the bottom than the top! 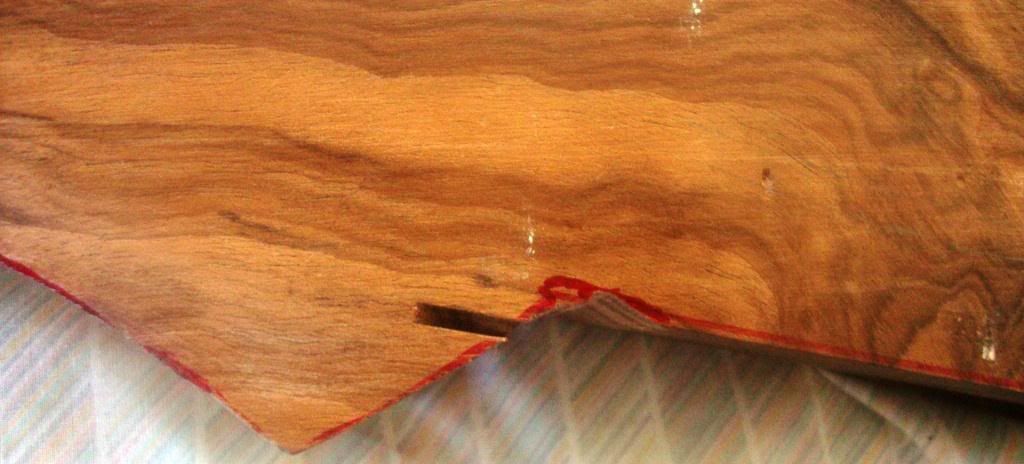 I then filed the grip and marked the cap layout & found that the major part will be under the cap and with a 3mm sliver of insert & checkering, I can hide the mistake.  The layout looks good to my novice eyes  I used a router with a 0.5 inch cove bit to do the barrel channel - 60%. I'll so the rest with gouge, chisel & dowel / sand paper   I used a drill press to do the action hole after a lot of careful measuring and over lay of the above stainless steel templates. The original 3 mm hole was expanded to 5 mm & then adjust a little with a 10mm bit. I used the drill press also to go down into the magazine mortise from the top. I then used the first few early holes to mark the center line from the bottom & yes they did line up! So I marked the bottom as well. When I did the mortise profile with the drill press it all lined up. I just hope & pray that the action now fits snug! I am so nervous - the magazine frame of the action is tapered toards the bottom & so I will now have to open out the wood at the top part of the action to get the action in. On the pine trials I messed this up a bit. I will now wait and think and ponder and work up the courage .....  Now for really tricky bit .. the tang peep sight. I laid this out by hand & eye with measurements from the center line and used the stainless template. It was tricky & it looked odd because of the comb cast off by 0.25 inch. • Marked the lines with chisel • Marked the oval end with gouge • Very slowly used chisel to remove wood from narrow straight part • Also shaped the action bolt end – tricky as the back bearing surface of the bolt hole area is at a angle • Used Dremmel at very slow speed to dig out oval part – very tricky – Thought I made a blunder but finally not too bad (< 0.5mm too much on one side) • First full inletting was 1 mm forward – used sharpie & Dremmel to remove wood from front bearing surface & rear of oval peep area • Used sandpaper to relieve sides 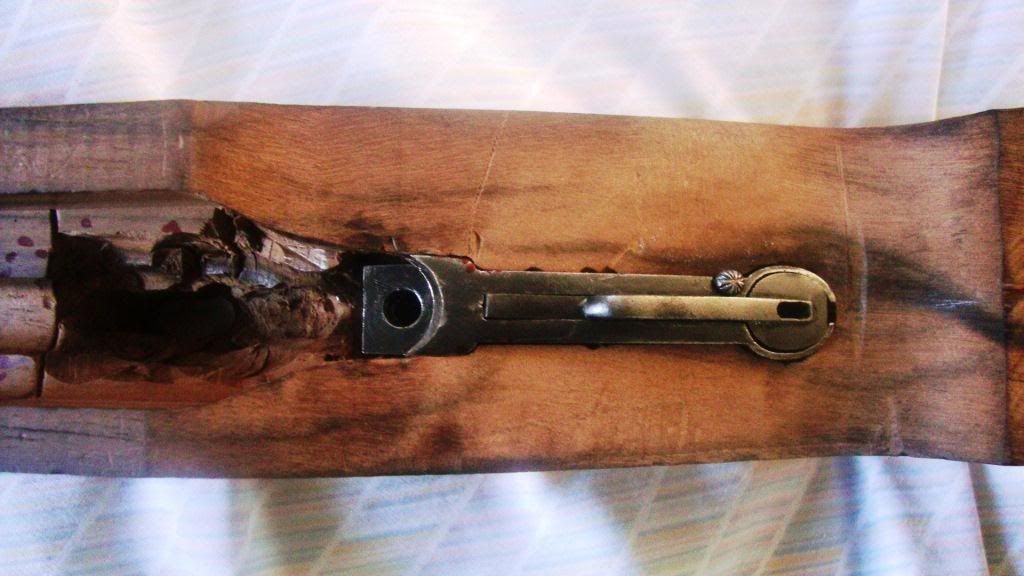 The 2 or 3 spots along the narrow straight part is only a surface error & will sand off. Looks far worse in the photo than in actual. The spring release of the peep works fine! I got that almost perfect with no visible gap on the side! 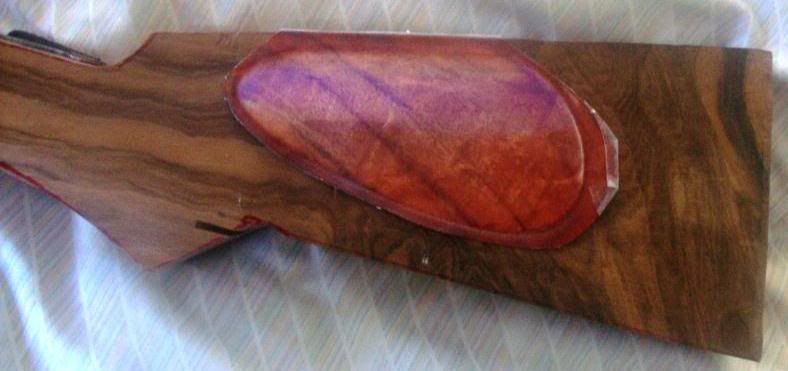 Here is the cheek piece layout. I just cut out a picture of a shape I liked & thought would suit the tyle of the rifle. What do you all think? I would appreciate comments and suggestions. Until I work up the courage & patience again...... "When the wind stops....start rowing. When the wind starts, get the sail up quick." | |||
|
| One of Us |
Great job so far Nakihunter!! Don't give up, it's giving me encouragement to finally try and restock my Brno No2 22lr...I got a beautiful Zambezi Teak blank for it but havn't had the courage to start shaping it. I'm following this thread with interest. Cheers! | |||
|
| One of Us |
Best to use a band saw instead of a circular saw. If you don't have a band saw, try a jig saw or hand saw. I actually over cut with a handsaw on a current project. I had to reprofile the angle on the bottom of the butt to fix it and when I was done it the profile matched that of a 1930's Mauser I have so I didn't feel all that bad. "Evil is powerless if the good are unafraid" -- Ronald Reagan "Ignorance of The People gives strength to totalitarians." Want to make just about anything work better? Keep the government as far away from it as possible, then step back and behold the wonderment and goodness. | |||
|
| one of us |
I know it's late in the game, but I have wondered throughout this thread why are you doing this. A mannlicher stock is not that different from a Mauser. I have a model 98 which, at some point, was installed in an original mannlicher full length factory stock. It require wood to be added at several points around the action. Whoever did it was pretty good and it is a nice looking rifle. It should be relatively easy to fit a mauser stock to a the mannlicher. I just had a stock duplicated for a Sako Forester by Al Lind. He charges less than $150 for this. I have never done it, but for an extra charge, he will take a cheap blank, hog out and glass bed your action to it, and then use this pattern to produce a tight fitting dupe. I think he charges less than $500 for the whole thing. I suspect if you contacted him, or some other stock maker, they could fit the mannlicher to a mauser pattern for you. Seems like a lot better option than what you are going through. | |||
|
| One of Us |
It seems that you Nakihunter next need very well sharpened wood carving chisels. These are not the same as normal chisels. And maybe some special inletting tools for barrel channel. | |||
|
| One of Us |
Grant me one small favor... please stop referring to the flip up diopter as a "peep sight". Best of luck with your project. | |||
|
| One of Us |
Hahvahd man? | |||
|
| one of us |
I think the point he is making is one I brought up before. It is not a sight at all, but a sight focusing tool. It provides a sharper view of the actual sight to aid in long range shooting. | |||
|
| One of Us |
Do you mean it is to view the rear open sight better? Asking is all; also, IIRC those have to be reset by hand for follow-up shots. | |||
|
| One of Us |
Yes they are an aid to focus, they work very well. M-S folk are mighty clever, every once in a while you'll see a carbine with flip out "tree hooks" (way cool). Jim | |||
|
| One of Us |
The action side inletting is not that much different than a Carcano. | |||
|
| One of Us |
Thanks for all the comments guys. This is why I just love AR! Art S - The issues for me are (1) this is a take down stock with no through bolts for the action. So getting the layout, mating the bottom & top etc. is very tricky. It is not like a mauser where you drill the front action hole at 90 degrees and then mark the rear bolt hole on top & bottom & slowly drill down. Once you have the action screws correctly drilled you just need the long gunsmith's action screws & you can just slowly work the action into the wood. (2) The MS take down action is a differnt kettle of fish. The bottom magazine part slides into 2 dovetails in the steel & also acts as a locking mechanism that holds the rifle firmly to the stock. so it has to be precise. The magazine frame is tapered and so it needs to be precise or you can have ugly gaps between wood & steel. (3) I live in New Zealand and I cannot find anyone here with a duplicator. You will see in the earlier part of the thread that I did fully bed the old rough stock with the idea of getting it duplicated. No luck there. To the traditional purists, Sorry about the "peep" comment. Yes they are diopter sights. BUT my rifle has that part missing & so it IS actaully now just a peep sight I have now completed the inletting & am very happy with it. Now I have to take off the excess wood from the cheek piece area, but area, bottom of the mag area, pistol grip, sides, fore end etc. In other words, get the outer shape of the stock 90% before sanding etc. I'll post more pictures in a week or two. Thanks once again for the encouragement. "When the wind stops....start rowing. When the wind starts, get the sail up quick." | |||
|
| One of Us |
First of all, let me thank all you guys for the constructive comments and encouragement. I just noticed that there are over 3400 views now. I started monitoring this about 3 weeks ago & found that the views jump up by 400 when I posted and then 60 to 70 hard core followers are checking this out each week! I am really humbled and flattered. I am also very encouraged! Thanks once again. I have made a little progress over all and some major break throughs in how to proceed next.        Firstly, I completed the full inletting when I last posted on the 16th. I got the tang diopter sight inletted correctly & then the barrelled action. The tang hooks under the diopter piece without exerting pressure - so it will not transfer recoil to the diopter piece. The barrelled action now fits snug without rocking or wobbling & the wood to steel fit is quite impressive to my novice eyes. The bottom - I made a dumb mistake when doing the trigger guard. Instead of using the action in the wood as a reference to get the inletting perfect, I used the pencil outlines to start. This lead to a 2 mm error at the back of the trigger guard & this will be an ugly gap that will need to be filled with wood and epoxy to hide it. Now the entire action locks up firmly and without any tight spots or wobbles. I kept looking at the stock and trying to work up the courage to remove wood for the external profile. Every time I looked at the bottom view it seemed to have a very skewed look. I mucked around for about 10 days as I was not happy with something but could not put a finger on it. Finally I used some fishing nylon to check the centre lines at the top and bottom - BINGO - the bottom was way off by almost half inch! I mulled over this trying to figure out why. Then I used a straight edged stainless steel plate that was cut on a factory machine & found that the blank was not square on the left / cheek side! It was about 3/8 inch casting off & so the reference lines using a triquare were also off. I also found that while using the drill press to take out the wood inside the magazine area, I had not gone down exactly 90 degrees. So the action had gone in at a slant. This had pushed the bottom center line further out! So I sanded off all the markings and started measuring and marking the reference points /lines agains. The top side was fine. I had to move the pistol grip cap in by 3 mm & the but pad had to be tilted to get the right alignment with the bottom centre line and correct cast off at toe. Using the nylon line a hundred times I am now comfortable that the stock is aligned correctly. The cast off is correct, the but pad will fit & so will the pistol grip cap. There is just enough wood to include the cheek piece. Again I have taken a few hundred measurements from my Simson Oberndorf & another MS without cheek piece. I will now start carving the stock profile. Yes I need to get the chisels sharpened correctly. Thanks once again for the encouragement. "When the wind stops....start rowing. When the wind starts, get the sail up quick." | |||
|
| One of Us |
It is more than 10 weeks since I posted last. It has been slow work and I am now really excited about the potential and really scared of screwing up and ruining it!. I have started the first major profile shaping. I have used chisels and come close to gouging too much wood (I know - not sharp enough). I have used the belt, orbital & mouse sanders and achieved some good results. I have also used sanding blocks to get under the cheek piece. 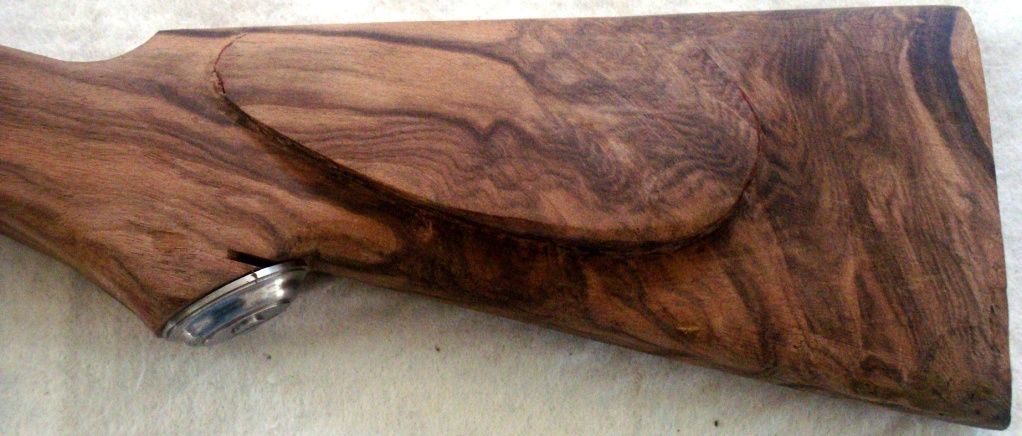 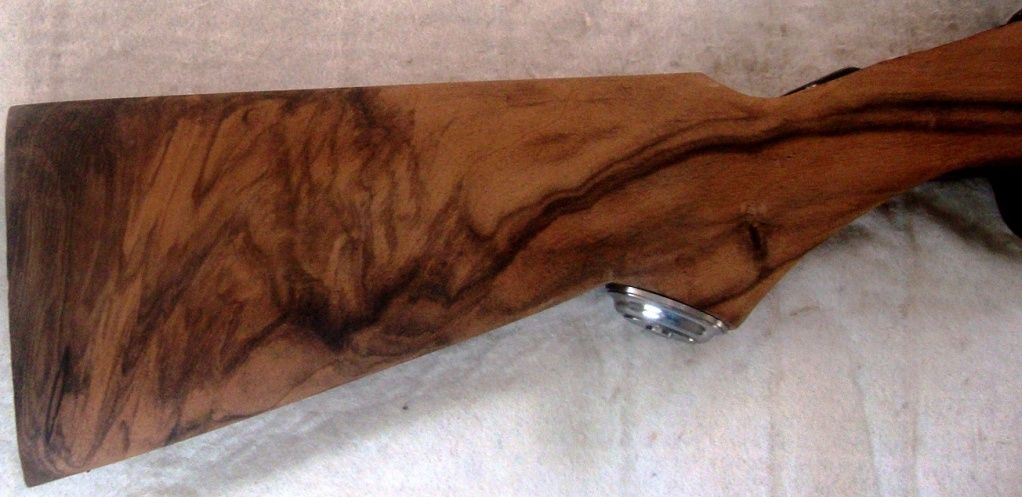       The grain in the wood is obviously very attractive. I have a few problems now. 1. How to shape the cheek piece properly? I am not sure how to get it crisp and sharp on the curve, without rounding the edges. Should I cut a stainless steel template and then sand against it? 2. Is the cheek piece thick enough? Or should I get rid of it completely? 3. What to do with the knots which have holes in them? 4. Does the cast off look ok in the picture? 5. Should I keep the stock length as it is with the mineral streaks at the heel and use the original trap door steel but plate OR should I reduce it 1" (and lose the wood feature on the heel) and put the red old English pad on? In the original layout I had the rifle at an angle to get more wood for the cheekpiece as well as castoff and also since it lined up with the grain. Before shaping, I thought I had stuffed up big time. But it was an optical illusion of parallel lines from the wood. After this last shaping it looks a lot better. I would appreciate any suggestions please. "When the wind stops....start rowing. When the wind starts, get the sail up quick." | |||
|
| One of Us |
Very usefull tools for shaping the cheek piece are different shaped files, rough enough for wood. And maybe some scrapers when shaping the cheek pieces concave side. | |||
|
| One of Us |
My gal posted a couple tools on "Custom Rifles instead of Gunsmithing..you might want to take a look. These cut quickly and accuretely | |||
|
| one of us |
Patch the cut behind the grip cap with an overlay cut from a darker section of your scrap wood from the blank. You don't want any straight lines in a patch. Irregular shaped patches will blend into the wood. Knots are much harder to match. Study the grain direction and try to find a piece to match. I don't like a knot hole cut out with a milling cutter. It will always show as a patch. I don't like to use expoxy to glue a patch. Try the Gorilla glue as it will give with the changes as the stock is exposed to moisture and heat. I find expoxy will turn loose as the wood moves ater a few years. | |||
|
| one of us |
Hello: Nice work. One thought ...offered respectfully. Your rifle is actually NOT a take-down, although it - like ALL Mannlicher Schoenauers does come apart after swivelling the magazine floor plate. There were some Mannlicher Schoenauers that had true take-down mechanisms; the stock had a cut in front of the receiver, and the barrel twisted off with the separated forward portion of the stock. Exposed cuts of the stock were protected by metal "plates". This was a factory feature. These factory take-down Mannlichers are hard-to-find. | |||
|
| One of Us |
I must respectfully but firmly say that yes, that rifle indeed seems to be an example of the most-common M-S FACTORY takedown system. My biggest clue was the small lever located on the outside front of the trigger guard bow. I've seen several and even owned one takedown M-S and all were half-stock single-trigger models with the lever in front of the TG. Funnily enough, all were the 1910 model in 9.5x57 and the steel buttplate was VERY unforgiving! In the factory system the barrel remains attached to the receiver and the barreled action minus the magazine and trigger assembly is removed from the half-stock by lifting the muzzle. The little hook under the rear upper tang is able to release from its 'patent breech', leaving the rear folding diopter to remain in the stock's wrist. A transverse pin running through the forearm secures a middle barrel band and is removed for disassembly along with the magazine. I assume that the M-S takedowns you've seen with the separate forearms were the products of early UK smiths rather than Austrian. Regards, Joe __________________________ You can lead a human to logic but you can't make him think. NRA Life since 1976. God bless America! | |||
|
| One of Us |
Les, Thank you for the great suggestions. I was wondering what to use for gluing the wood, as I know that epoxy will dull the checkering tools very quickly. I had not considered the issue of wood flexing while epoxy is rigid and virtually inert. The knots seem to be mostly on the surface. as I am shaping the stock and rounding out the profile, most of the knots are disapearing. JD Steele - you are absolutely right. Conifer - with respect - I disagree with you. The 4 key features of a Factory MS take down rifle are * No front action screw to hold stock to action * No rear tang screw to hold stock to action - BUT the trigger guard screw bolts on to the tang sight & the action just hooks under the tang sight - with a lug into a groove. * The wing latch in front of the trigger guard that locks the magazine area into the stock * The cross bolt on the fore-end that locks the action to the stock - through a barrel band lug. These 4 features are not present in a standard action. I have owned 3 MS rifles - still have 2 of them. I sold the sporter below a couple of years ago. Only the 9.5MS is a takedown rifle. 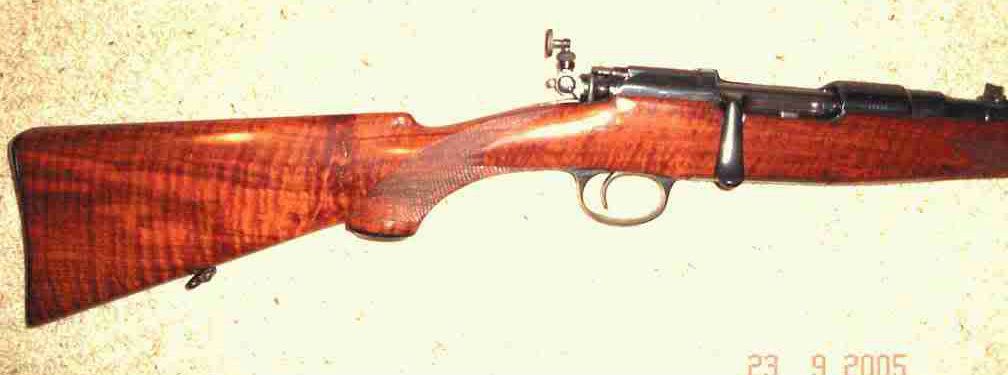 This one is a 1930 Greek carbine conversion that I restocked with a pre-inletted stock. 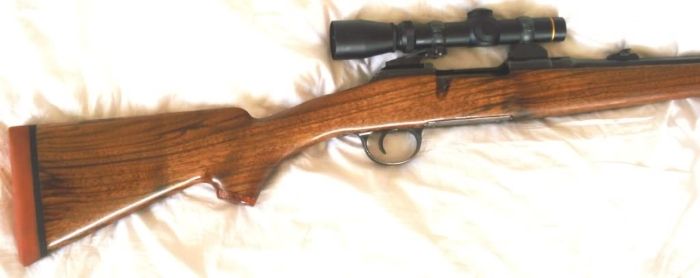 Both rifles have front & rear action screws & that lock the stock to the action like any conventional bolt action rifle. They do not have the wing latch in front of the trigger guard and the cross bolt through a barrel band lug. The takedownn barrel feature with a cut stock and metal bearing surface is a custom feature from UK gun makers. This one below is a 9.5 MS regular rifle with tang diopter sight from the H&H collection in NY city gun room which they kindly allowed me to photgraph in 2007. The only differnces from mine is that the H&H rifle is NOT a takedown & it has "shot and regulated by H&H" engraved on the barrel. My rifle was retailed by CB Vaughn, 39 Strand, London - does not have these details engraved on the rifle but only on the case label. Both rifles have the "Not made in England" mark with stippled borders 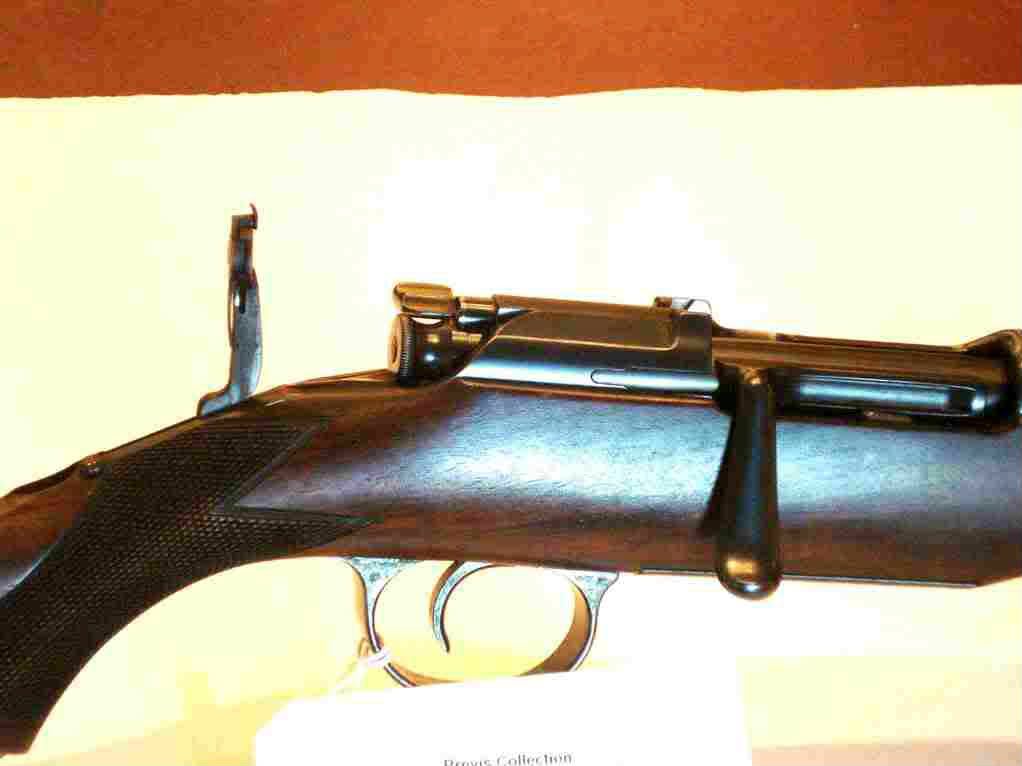 "When the wind stops....start rowing. When the wind starts, get the sail up quick." | |||
|
| One of Us |
At last - I have made more progress & I am on the home stretch - another 2 months I guess! I tore my left rotator cuff (supra spinatus) in June and had surgery in October. So I am just back to reasonable activity. I realised that I needed to shape the cheek piece better and also get the pistol grip shaped right. So i got some help from a local joiner - old school with hand tools. He also sharpened all my chisles. Here are a few photos of the status.  This shows the trim profile of the Mannlicher Schoenauer.  The bottom view. I need to bed and fill a few gaps around the rotary magazine. 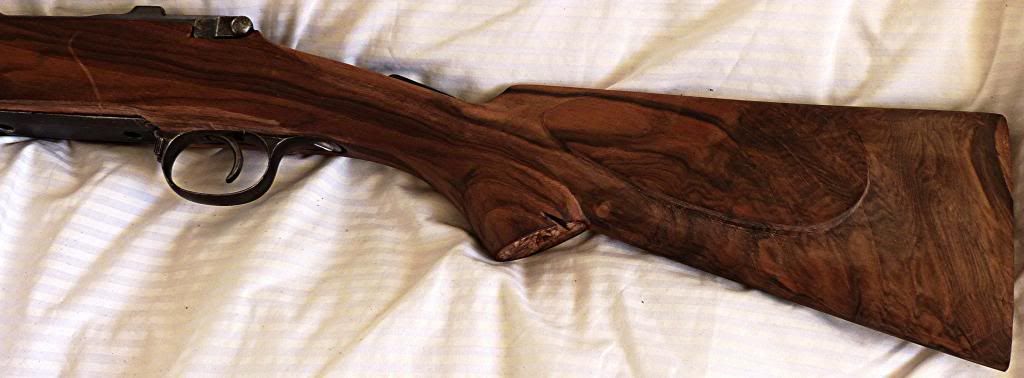 The major focus has been on the but stock, cheek piece and the pistol grip. The rest of the stock from pistol grip forward is relatively simple. Just slim and shape the wood. 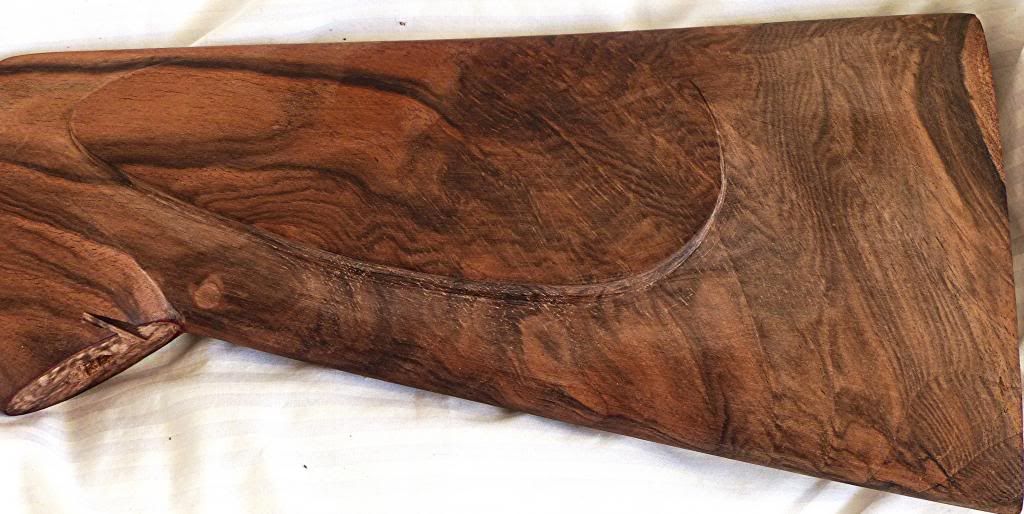 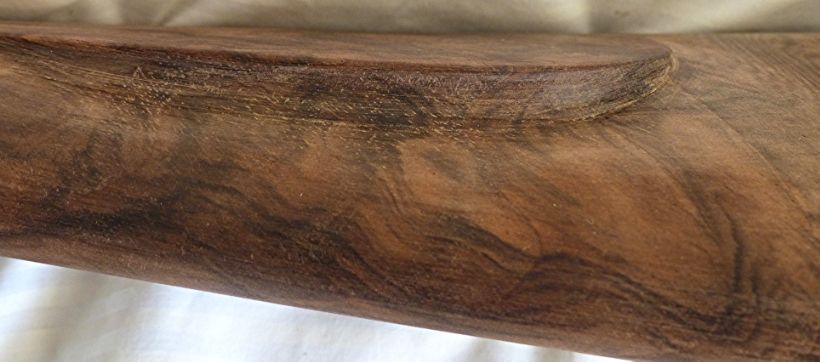 The flute under the cheekpiece has been shaped and now it needs to be sanded smooth. Unfortunately the edge of the cheekpiece as been rounded just a bit. It is not sharp and crisp like it should be. "When the wind stops....start rowing. When the wind starts, get the sail up quick." | |||
|
| One of Us |
Great work Naki, That piece of wood looks fantastic! Regards Hendrik | |||
|
| One of Us |
Thanks mate. Your rifle would also look great in a similar stock. Let me know if you want the inletting done on the CNC program. And thanks for the Kyno ammo lead. After my shoulder surgery last year, my project has progressed and the stock profile is almost complete. I am now really fine tuning the last 1% of the stock - takking of small bits of wood and getting the curves a bit more "perfect" etc. I am already in 120 to 180 grit sanding stage. I'll post an update of photos soon. "When the wind stops....start rowing. When the wind starts, get the sail up quick." | |||
|
| One of Us |
It is comming along now! Yes it has taken time but it is looking good. I think I have the profile right. Yes there are some errors but I am please with the DIY. The stock profile is a little stouter than the classic 6.5X54MS but it is still a slim profile considering that this is a 9.5X57MS. I am now doing the last 1% of shaping with very small chisle & mostly 120 to 180 grit sand paper work. I still have to install the grip cap, shape the wood flush around it, fill the cut in the pistol grip and sand the whole stock. I have got the preliminary 2 mm holes for the fore end lug screw in the barrel band and now I need to align the screw and make the right size hole so that the metal hardware can then be installed. I also have to bed the stock with Bisonite to ensure that the rear tang does not move and crack the stock or rip out the diopter flip up sight.       "When the wind stops....start rowing. When the wind starts, get the sail up quick." | |||
|
| One of Us |
Ok - made significant progress. I have achieved a quite a bit * Shaped the stock to final profile including pistol grip & fitting of grip cap 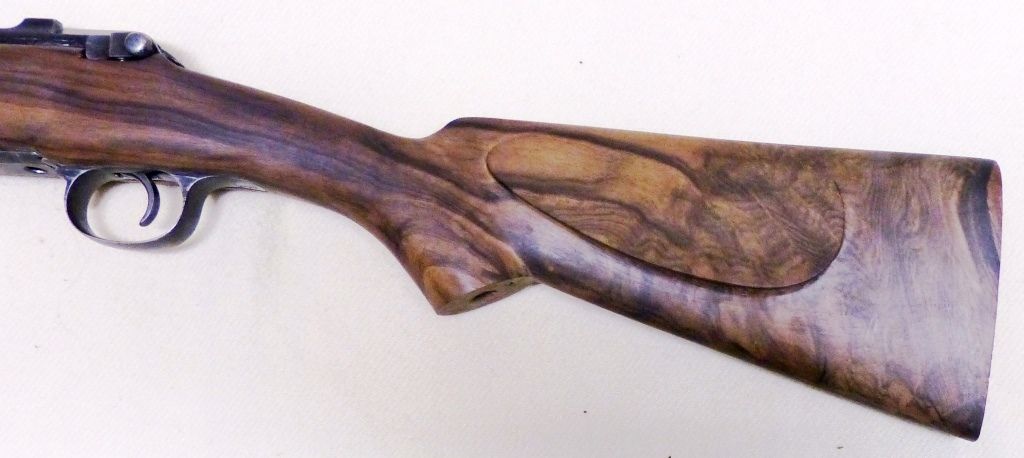 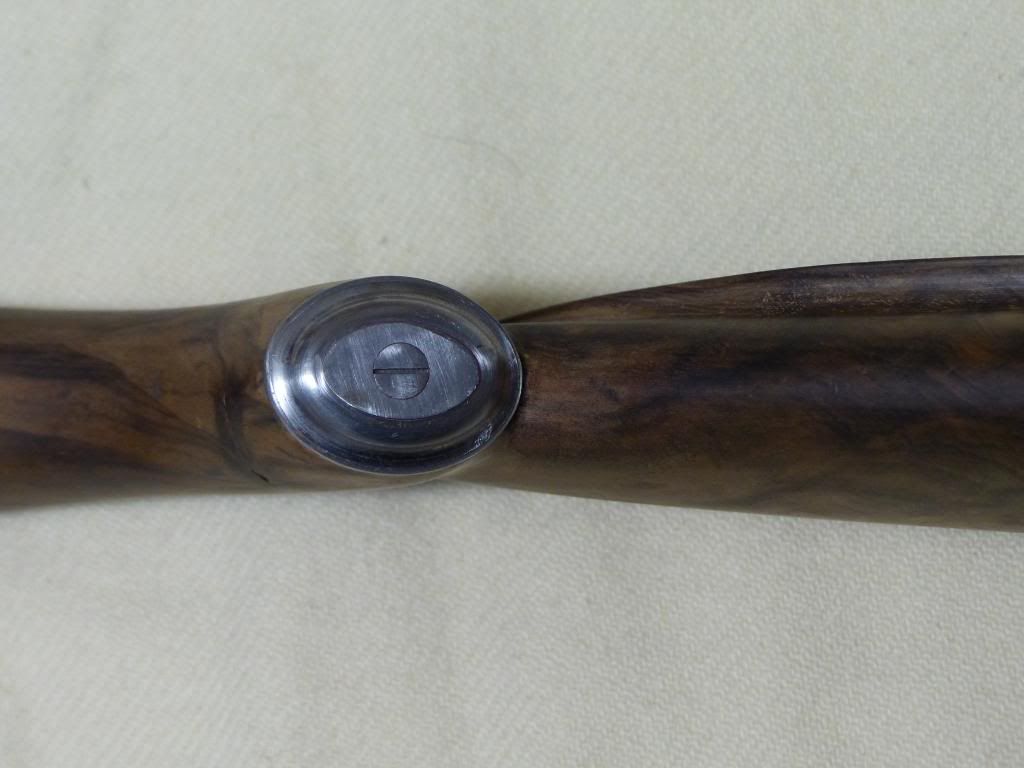 * Successfully aligned the front cross bolt on first attempt AND inletted the side clips without major errors!   * Inlaid walnut piece from the same blank to fill the cut in the pistol grip. I used gorilla glue like Les Brookes suggested. * Sanded this down and I am very please with the effect. Two friends who saw the gun did not pick this up. Future checkering will cover it completely. 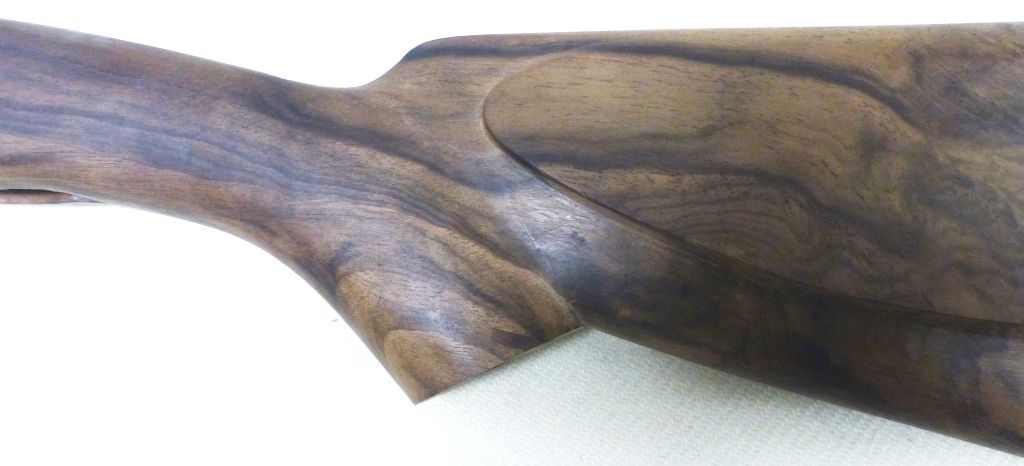 * Epoxy bedded the rifle in 3 steps with Bisonite. I still need to do some of the tiny details again to get a good look. Stock is now snug and not too difficult to take out.  * The main screw from the trigger guard to the tang sight was stuck with a bit of epoxy somewhere. I partially stripped the bolt head slot & so I got a machinist friend to take it oui and fix the slot. Very please that he did it without having drill it out. * The latch locking the magazine lug to the trigger guard was stuck with epoxy. When I tried to tap it out with a rubber mallet I sheared off the pin (1.75mm) holding the latch. My friend fixed that. You can see the inletted piece of walnut I put in to over the mistake i made earlier. After checkering that should not show. 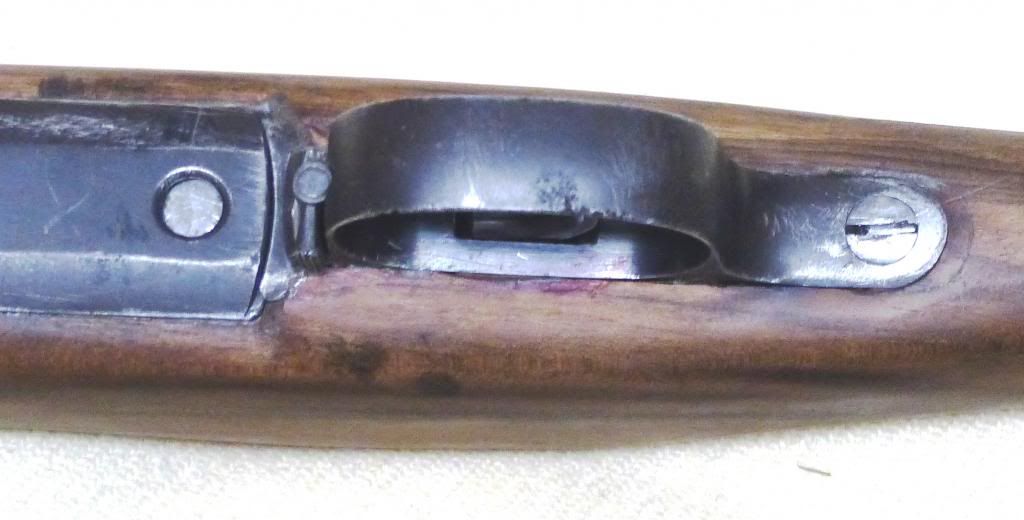 I replace the front barrel lug cross bolt. I had some threaded 6 mm rod that fit the thread of thew side clip. So I cut a piece off and put it on a drill and using a file and the drill I ground it down to the right taper. It fits perfectly & I was able to bed it. BUT I was not satisfied as I wanted a knob like the original with knurling. So I got my friend to turn a cap screw on the lathe. I'll shape it later. 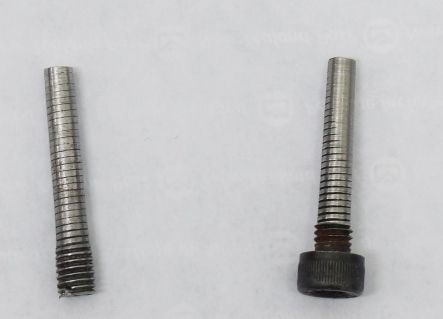 Next steps * Minor epoxy bedding details * Fit red recoil pad (No I am not going to use the original steel trapdoor but plate!) * Final sanding mostly by hand - 240, 400, 600 & 1000 grits! * Arkanet root staining - see earlier post on page 1 for infusion * Oiling with Boiled Linseed Oil and finishing with Truoil thinned with mineral spirits * How do I strip and prepare the metal????? * Rust blue! As the end gets closer I am getting more motivated! "When the wind stops....start rowing. When the wind starts, get the sail up quick." | |||
|
| One of Us |
Have you ever shot with yours rifle ? I have 6,5x57 caliber MS with original butt plate and it´s recoil is very tolerate. So I think it would´t be an issue with 6,5x54 MS too....? PS. Have you ever tested Tung Oil -besed Rustins´Danish Oil. I have used it in stock works about 10 years. It works as oil and wax together i.e. it first penerates in wood and after that when totally impegrated makes very nice wax-like surface.  | |||
|
| One of Us |
Thanks for your comments. This is a 9.5X57 cal & it has a strong recoil - similar to a 9.3X62. I have a 6.5X54 MS & its recoil is very mild. I have shot this rifle with the old stock & it was usable but not enjoyable. I made this new stock with a straighter comb so that I reduce felt recoil. I expect to shoot it in the next 2 weeks if all goes to plan and the weather stays dry. No I have not used tung oil. I like the Truoil finish and I have used it. I like the hard finish in the wood rather than the waxy finish. I suppose I will use wax later on to refresh it after I have used the rifle for a few years. "When the wind stops....start rowing. When the wind starts, get the sail up quick." | |||
|
| One of Us |
Then use Carnauba wax, it´s so hard that even those car waxes has it. It polish very well and it suits over the Danish Oil too. The bad thing with Tru Oil is the penetration, it doesn´t go trought the wood, just make a thin and bright cover on it. It´s more like warnish than oil. | |||
|
| One of Us |
I hear what you are saying. If you do internet research you will find many ways of using Truoil diluted with mineral spirit and applied with sand paper into the wood! Very thin coats sanded in and hand rubbed. I have done over 20 coats and it comes out very nice. You can see the 1903 Mannlicher Schoenauer on page 1. This time I am going to use Boiled linseed oil first and then seal the stock with thinned Truoil. I may consider a suitable wax finish after that. Let us see. "When the wind stops....start rowing. When the wind starts, get the sail up quick." | |||
|
| One of Us |
That souds good, linseed oil is always a good alternative to impegrate wood. | |||
|
| One of Us |
Last night i raised the grain on the wood with a wet cloth and a hot steam iron. Amazing how much of the fibre lifts. All the minor scratches and dents seem to have fill out again. Strange how at this late stage the sanding block exposes the minor imperfections on the surface. Found a few low sports and an uneven hump on the right side of the receiver where I wanted to leave as much wood on as possible. Also found a small "ridge" line on the right side of the forearm that was easy to round off with 400 grit. I just love handling the wood at this stage! So satisfying to see the improvement in each small step. Thanks for all the support - even the silent ones!. I see that there are about 100 followers each day! "When the wind stops....start rowing. When the wind starts, get the sail up quick." | |||
|
| Powered by Social Strata | Page 1 2 3 |
| Please Wait. Your request is being processed... |
|
 The Accurate Reloading Forums
  THE ACCURATE RELOADING.COM FORUMS
  Guns, Politics, Gunsmithing & Reloading
  Gunsmithing
  Project update - New Stock for take down model 1910 Mannlicher Schoenauer

Visit our on-line store for AR Memorabilia

