
 Guns, Politics, Gunsmithing & Reloading Gunsmithing
 Go | New | Find | Notify | Tools | Reply |
| Hey Chic, and other stock guys-leather for pad | Login/Join |
| one of us |
Hey guys, turns out Tandy has a local dealer/shop here. They have pigskin liner for a buck something per sq. ft., 6-7sq.ft pieces. They said they have 1 and 2 oz. weights. Which is the right weight to get? I thought I might try covering a pad I have laying around, and if I get it to turn out then try doing it to a new pad for my 375. One more question, which pads have you done this to that worked out right? I was thinking a kick-eze would give me that great recoil absorbsion with added slickness of the leather, alternatively thinking of a limbsaver. Comfort being key I lied, one more question, what dyes do you use that don't transfer to the clothing of the shooter? Thanks!!! Red | ||
|
| one of us |
I can answer question #3. Most leather you buy should be pre dyed. As long as it is not a Latigo leather color transfer should not be a problem. Latigo is usually a red or burgandy color and the term refers to the tanning process. I have never seen pigskin leather latigo tanned. You also might try The Leather Factory. They are a little more toward wholesale than their subisidary Tandy and are SOMETIMES a little cheaper. | |||
|
| Moderator |
leather... veg tanned is generally fine... I wouldn't buy dyed, as I would prefer it to be natural. veg dyed leather will stretch fairly well chrome tanned (and latigo generally is) WONT stretch enough. get a bunch, as you will be stretching and cussing this project a limbsaver MIGHT cover well, but you'll have to let enough for it to move back on the pad once pulled done. silvers pads are nice when leather covered... or spray painted!@@@@ pigskin has big grain.. if I did it, I would get ortho-goat... or kid. 1oz will tear... 1/2 might be okay, 2/3 would be better.. jeffe opinions vary band of bubbas and STC hunting Club Information on Ammoguide about the416AR, 458AR, 470AR, 500AR What is an AR round? Case Drawings 416-458-470AR and 500AR. 476AR, http://www.weaponsmith.com | |||
|
| one of us |
I figure picking it up local will save on shipping and let me look at it first, I'll see what they have when I go in. How does the silvers pad compare recoil wise to the 990 Packmayer, or to the factory Winchester pad (which is on it now)?? Thanks. Red | |||
|
| One of Us |
Hey, Dago! If you want something a bit different and somewhat exotic I have a bunch of brain tanned and smoked deer and elk hides. No chemicals to go after your stock finish. | |||
|
| one of us |
Hey rick, that sounds interesting? what is brain tanned, or do I not want to know? I alredy cut the holes out for the first one to try, a decelerator I pulled off a rifle that no longer exists, well I guess I have the takeoff stock out there, maybe I will try grinding this a bit too before I do it, just as I would for real.  As you can see I got the bottom hole a bit offcenter, the other one looks great. I ended up taking an 06 case, cutting it (ended up too short, we won't get into that, suffice to say pressing it into the pad with a vise doesn't work) chamfering it for sharp edge, then used a needle file to make a few teeth. Chucked it up in the big drill press and VOILA, plugs came out. If I had a longer case to play with I would have been able to get more that just the rim in the jaws of the chuck, no wobble and therefore better cut on that second hole. I'm missing the screws for this pad, I'll have to go by the hardware store, also gotta find the right size dowel. Red | |||
|
| One of Us |
Red, I use Tandy Leather pig skin liner in natural color. I stain it with Fieblings leather dye and when it is all done and the line is burnished at the bottom edge, I use some Neat Lac on it. | |||
|
| One of Us |
Red, Brained tanned leather is also called Indian tanned leather sometimes. It’s a process using the brain of the animal (or just good old cow brains from the store) to “tan†the hide. Very soft, and extremely strong and tear resistant. | |||
|
One Of Us |
Red - I've done a few of these for my personal use. There is a big difference between one done well and one almost done well. Grind your pad to fit (with a jig - preferably) then you've got to grind away the thickness of the leather all the way around. Then grind/polish the sharp edges of the pad to a rounded bevel. I don't know the weight of leather I've used, but thinner is better IMO. Wet it, stretch, repeat, repeat, repeat, repeat... until you can get it around the pad with minimal wrinkles. I find that attatching the pad to a piece of 2x4 and clamping the 2x4 in a vise helps with stretching. The 2x4 also gives you something to staple the extra leather to while it is stretched over the pad and drying with the glue on the face of the pad. After the glue on the face is dry, you can unstaple the leather and glue down the sides and the leather to the back of the pad. Polish the rolled-over leather (on the back of the pad with sandpaper and install. That may be more than you wanted but that's how I've done them. For me - - the grinding of the pad down an additional thickness of the leather is the toughtest part... BUT this is where a good job is separated from a bad job... so this is critical for the look of the pad IMO. Also I think the kick-eez may be too soft for you to strech the leather over. The decelerator is as soft a pad as i've been able to use. | |||
|
| One of Us |
new guy, what I found when I ground it to the thickess of the leather was that I ended up with a proud edge of wood that was not in contact with anything. I ended up by going about half the thickness and left a very slight "bump". Then the leather curve a the bottom edge would just touch the wood. It is a comprimise but I never liked the proud edge. One other tip. I don't repeatedly stretch the leather. I soak it in water and have an old stock that is cut down so that the pad over hangs the butt. I have dowel pins that position the pad on the old sock. The stock goes in a vice vertically. I use those big rubber bands from brocolli to secure the leather beneath the pad and hold it until it dries. I wet the leather and put some barge cement on the top of the pad and a bit down the sides. I wet the leather good and wring it out and put it on the pad wet over the barge cement. I wrap the rubber bands over the leather and begin to work the wrinkles out pulling the leather past the bands (3 or 4 at least). When the wrinkles are all gone I let it dry ovenight. then take the bands off and cut darts on the bottom of the leather and use barge cement to glue the leather to the bottom. Let it dry, cut the leather across the screw holes on the top, and glue the leaher down inside the holes, and make plugs and cover them. | |||
|
| One Of Us |
Chic - thaks for the info! | |||
|
| one of us |
Thanks Chic, I had gone through a thorough search of the forum and found that about the proud edge and I agree that it is better for the pad to have the edge rather than the wood, looks better. How do you heat up the washer to make the lines on the leather? I could hit it with the torch I guess. Maybe a lighter would be better, avoid getting soot on the washer that could mess up the leather? Red | |||
|
| One of Us |
Red, one more thing, the limbsaver would be too soft. It would deform when you pulled the leather tight. | |||
|
| One of Us |
Don't get it that hot. Wet the leather first and warm it with propane and apply it quickly. The water will keep it from burning anything. | |||
|
| one of us |
I've done a few, I used the leather from an old dress glove. Worked very well. I actually wrote a how-to that was published in an E-zine call DoubleGunClassics. Still available online but it's geared to double guns. I don't bother with plugs, but rather put the screws in tight to the backplate before I cover, and then coat them with release agent and epoxy them into the holes. They can be removed by small slits in the leather. I agree, not traditional, but neat. The brown is covering red rubber, the black is over a Decelerator pad. A friend is sending me some emu leather, this stuff looks like it'll work very well. 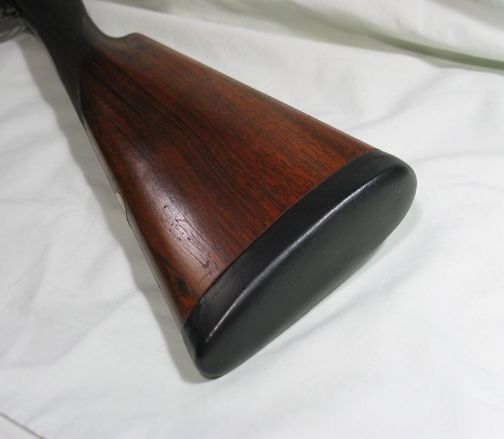 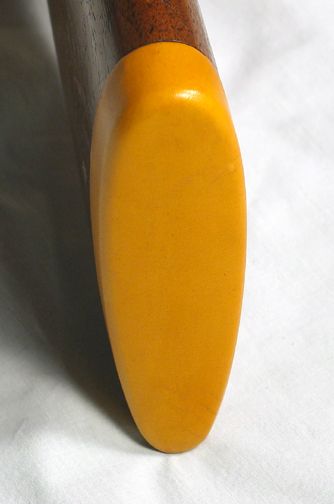 Rob | |||
|
| One of Us |
Rob, I read your post on double gun bb when you posted it. It is a novel approach. If the pad has to be taken off (through bolt stock) it is a problem but if you never see that necessity it appears to be a good way to go. | |||
|
| one of us |
I agree Chic, I wouldn't do it to a through bolt gun either. But I figured the only reason to remove a pad likr this would be if the gun was to be refinished or the pad replaced with a different size. In both cases, the pad would be replaced anyway. I guess someone would want to remove it to perhaps add or remove weight to balance the gun, but the pad can be removed through two small slits that, to my way of thinking, are less obtrusive than plugs, just not as traditional. Rob | |||
|
| Powered by Social Strata |
| Please Wait. Your request is being processed... |
Guns, Politics, Gunsmithing & Reloading Gunsmithing

Visit our on-line store for AR Memorabilia