

 The Accurate Reloading Forums
  THE ACCURATE RELOADING.COM FORUMS
  Guns, Politics, Gunsmithing & Reloading
  Gunsmithing
  Progress Photos
Go  | New  | Find  | Notify  | Tools  | Reply  |  |
| One of Us |
I’m working on a pair of rifles for one of the members here..I’ll leave it up to him to identify himself if he chooses. The rest of you might enjoy the photos though. These rifles will be a 300 H&H and a 375 H&H. 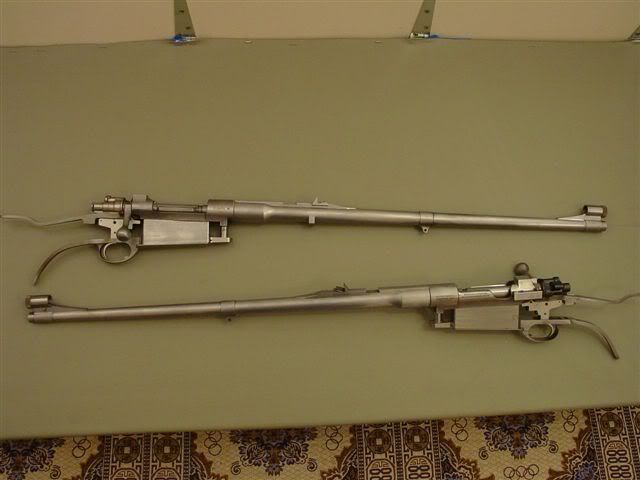 1909 Argentine Actions 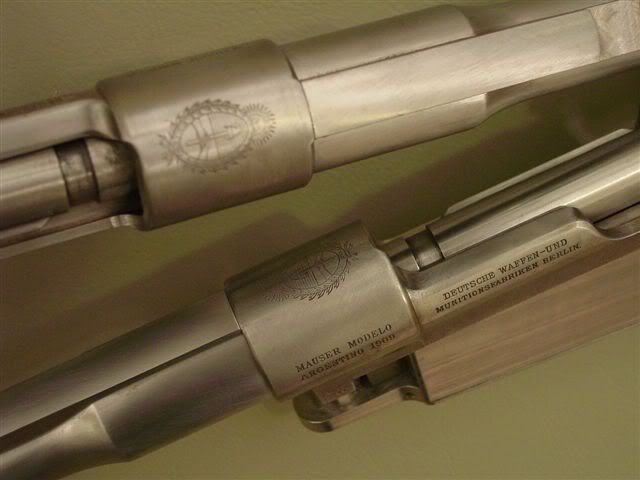 Single Square bridged. I’ll add claw mounts. 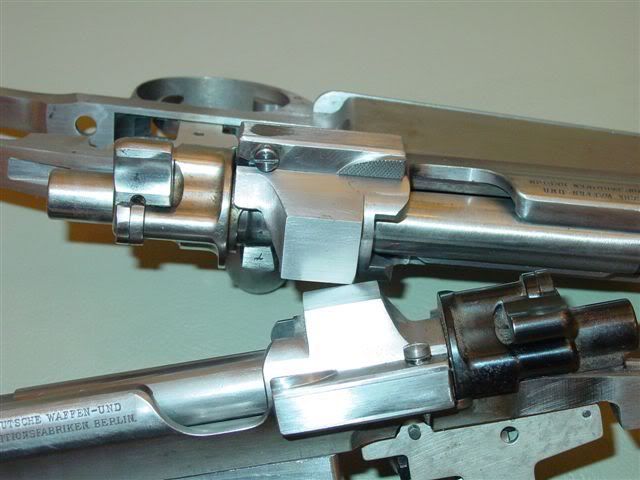 Integral quarter ribs 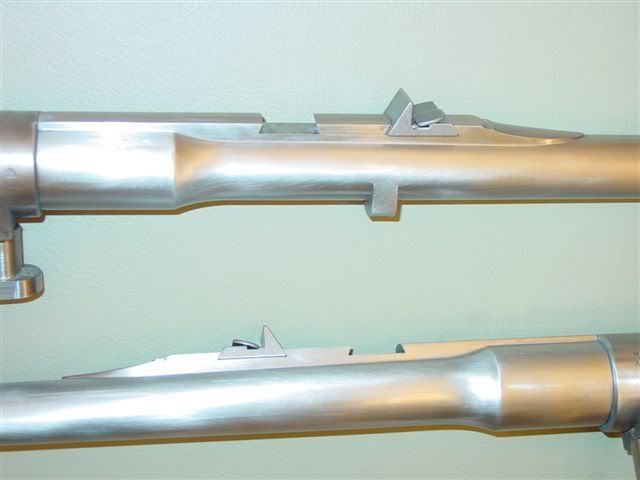 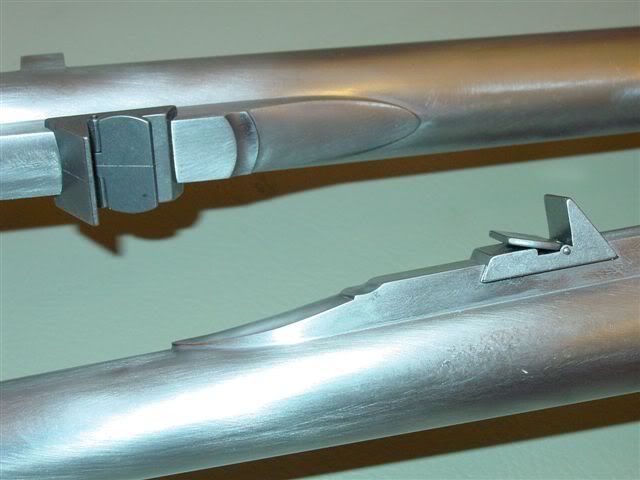 Banded front sights. 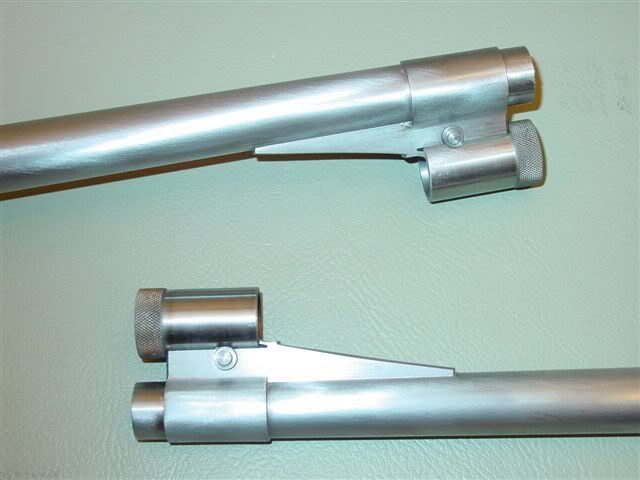 | ||
|
| One of Us |
Beautiful work. Tell me about the tang and trigger guard exstensions. Are they to be shortened and/or reshaped? | |||
|
| One of Us |
I like em too. ......civilize 'em with a Krag | |||
|
| One of Us |
Duane, AWESOME work!!! Kudos to the gunsmith!!! Please post more pic as you progress. Thanks for posting the pix. Don | |||
|
one of us |
Very nice. Terry -------------------------------------------- Well, other than that Mrs. Lincoln, how was the play? | |||
|
| one of us |
Thank you very much for th epics! I know I have said this a lot, but I really appreciate it when you post pics like htis. It gives me a high goal to shoot for and inspiration to do it better. I have never done extended tangs and have some questions if you don't mind. Did you weld the action tangs on after heat treating? Do you make metal gauges for your stock shape and then shap the tangs to fit? WHat is your procedure for inletting the blank when you have extended tangs on the action and bottom metal? | |||
|
one of us |
Gonna be nice. Proof again that the finest guns are being made today. NRA Life Member, Band of Bubbas Charter Member, PGCA, DRSS. Shoot & hunt with vintage classics. | |||
|
| One of Us |
Dear Mr. Weibe: Very attractive, creative and difficult work. If you don't mind, could you post a few pictures of the rail work that you did to get the 300 and 375 H&H to feed. I am very curious how you tackled that problem. Presently, I am converting a 1908 Brazilian to 416 Ruger, and will need to cut the original magazine sides off, and weld on new steel to get the requisite width for the fatter case to feed properly. Thank you. Sincerely, Chris Bemis | |||
|
| One of Us |
Duane, incredible flawless work as always from you. Absolutely stunning. | |||
|
| One of Us |
The quesions ae as follows: The lower ang is left long and a buit "closer" then it will be when the stock is shapes and lnletted...top tang is pretty close to finished dimension.. I do make up aluminum patterns...just band saw them out rough and use the vise to "squeeze" an old barrel, or whaever to form inside radius. No heat treating is necessary that far back on the action...and yes, I'll take photos of the rails....the "forms" too (you;ll be disapointed in the non technical approach) | |||
|
| one of us |
Lovely so far ... just lovely. The finished pair will be to die for! Mike -------------- DRSS, Womper's Club, NRA Life Member/Charter Member NRA Golden Eagles ... Knifemaker, http://www.mstarling.com | |||
|
| one of us |
Duane EXCELLENT work as always! I really like your attention to detail like lengthening the loading port to the front. Mating the barrel and rib, then radiusing the receiver face to highlight it. I do have one question. The pad on the ejector box, is it welded up then shaped or is that a separate piece that is silver soldered on? I would like to see some earlier pictures of the build if you have any. Thanks James | |||
|
| one of us |
Thank you for the info Mr. Wiebe. When I asked about doing it pre or post heat treating, I was curious about warping the long, skinny part. I guess it could always be annealed and bent back to shap later. I was just wondering how you did it and what issues you had with it. | |||
|
| one of us |
Incredible work. Will the extended tangs have a thru-bolt that connects them through the pistol grip? | |||
|
| One of Us |
Looks great! I always like the in progress pics. | |||
|
| One of Us |
Real eye candy! | |||
|
| one of us |
Duane Wow!! Did you do the barrel work? Is that front ramp integral? I am about to get the sweats, just wonderful to see and for you to share the progress photos. Realy just wonderful. Outstanding!! Many Thanks HBH | |||
|
| One of Us |
Duane, I like seeing the tangs on the bolt action. I remember some of the old southern mountain flintlocks that had tangs going back on top of the comb, some all the way to the buttplate. Are you aware of the inletting job that you've gotten yourself into? Blair "Peace is that brief glorious moment in history when everybody stands around reloading". | |||
|
| one of us |
Art in metal.  Doug Humbarger NRA Life member Tonkin Gulf Yacht Club 72'73. Yankee Station Try to look unimportant. Your enemy might be low on ammo. | |||
|
| One of Us |
Here are a few photos of the action that has been opened for a 375 H&H. 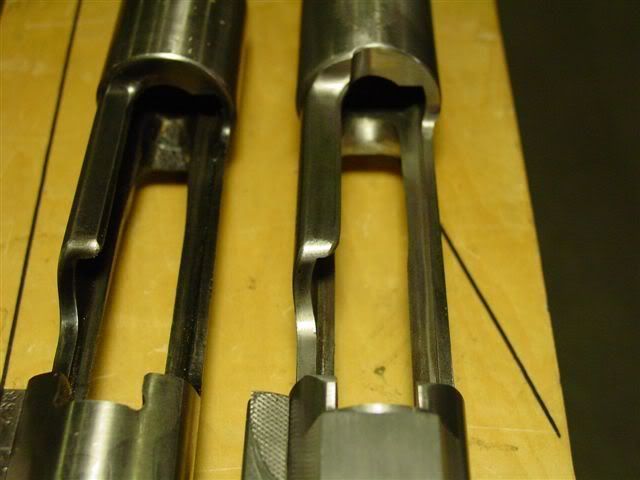 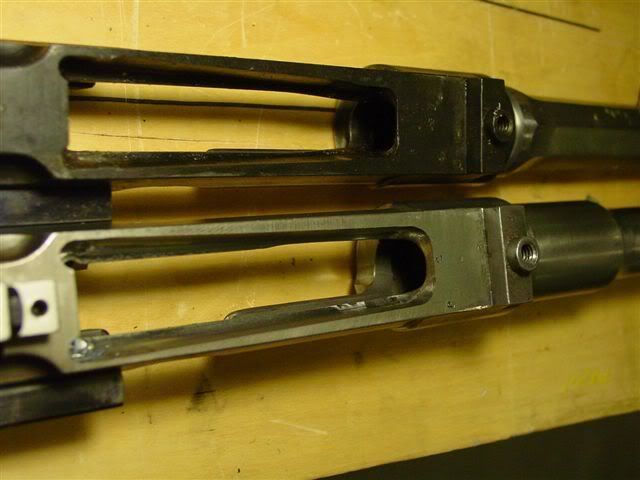 The front ring is cut back just a bit… 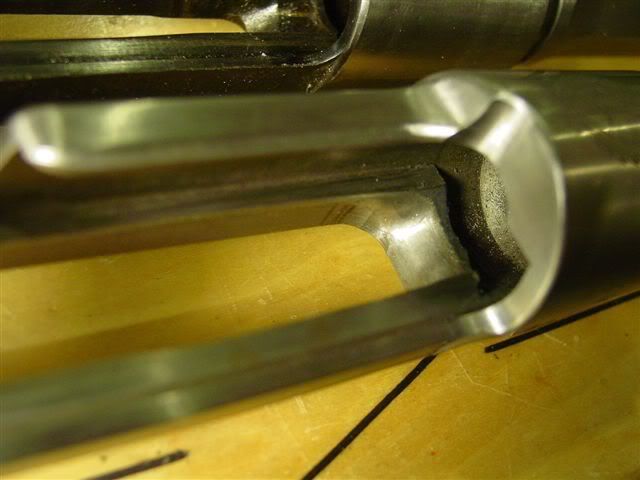 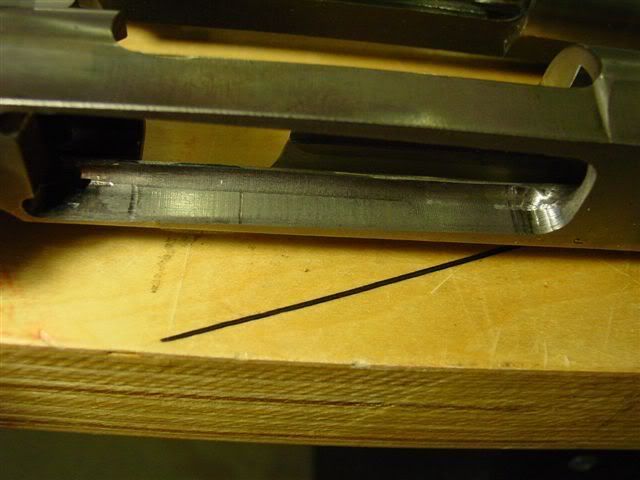 Here’s my state of the art tang fixture… 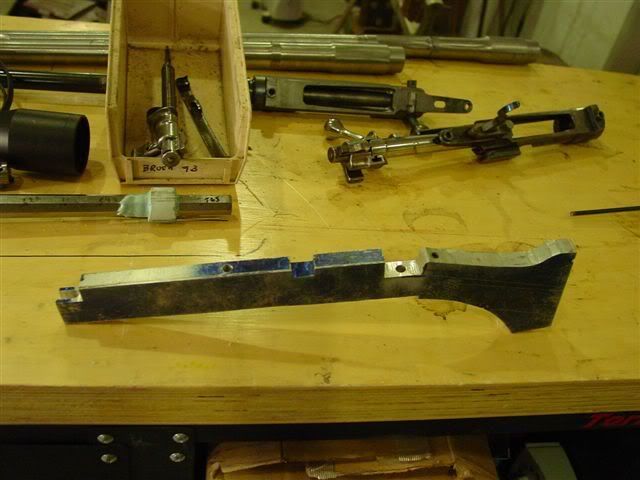 | |||
|
| One of Us |
Mr. Wiebe: I've admired your work for many years. These are beautiful. The owner of these rifles is a lucky man. I hope you'll post pictures of them when they're finished.
If I may be so presumptuous, no. The top one is the Baker extended top tang that extends the full length of the hand and up over the nose of the comb. The bottom is the full-length lower tang that will be notched at the end to fit up under a steel grip cap. The full length tangs are intended to strengthen the hand of the stock. If you want to see what they'll look like when finished, look at a Holland & Holland double rifle. I'm told that the extended top tang requires a real stockmaker, no wannabes. ------------------------------------------------ "Serious rifles have two barrels, everything else just burns gunpowder." | |||
|
| One of Us |
I'll kind of go down the list: The pad on the bolt stop is a seperate piece...I'll try and come up with earlier photos...Warping, even when color casing, seems to be a non issue with Turnbulls..bluing no issue a all...Top tang at the extreme rear is held by wood screw...Yes, I did an integral quarter rib, the swivel eye and front sight are banded | |||
|
| One of Us |
Beautiful work, Duane. Those quarter ribs are exquisite. Would the extended tangs work for a big kicker like the 500 Jeffery? | |||
|
| One of Us |
Duane That's very cool, Love too see the tool setup. Rich | |||
|
| One of Us |
CAS II...that's exacly what I did on this 500 Jeff 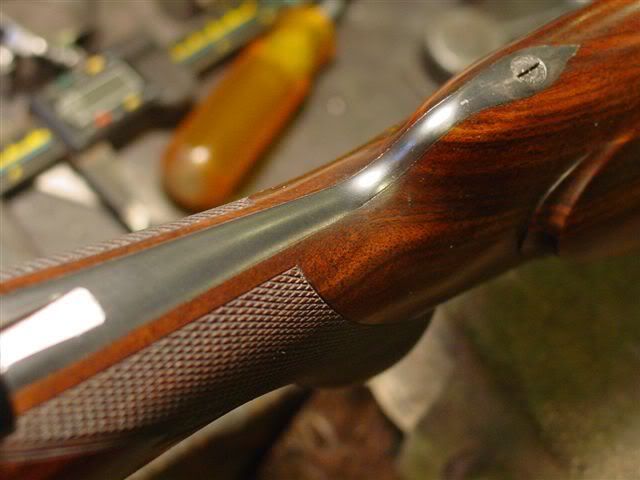 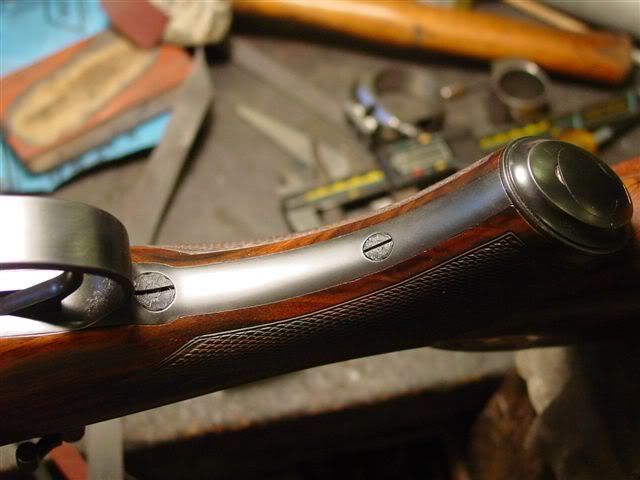 | |||
|
| one of us |
Absolutely beautiful work Duane. The problem is that you've given me an inferiority complex; now I'm going to have to have extended tangs on my rifles too. You might as well add extended tangs and a single squarebridge when you get started on this one: 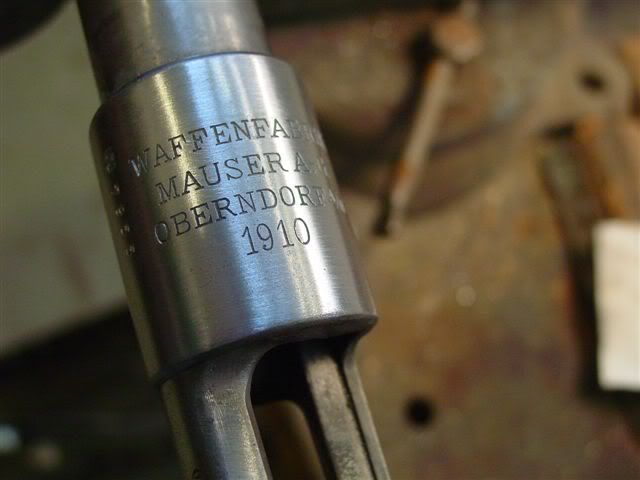 ______________________________ "Truth is the daughter of time." Francis Bacon | |||
|
| one of us |
Forrest, I have that one's twin. Duane, superb work. I was just discussing installing an old fold up tang sight on one of my rifles. The kind that is a tang extension of sorts. I was concerned about the removal of wood in that area but if that 500 Jeff doesn;t wreck the stock then I should be golden.  Aut vincere aut mori | |||
|
| one of us |
What is the purpose of the single square bridge? Howard Moses Lake, Washington USA hwhomes@outlook.com | |||
|
| one of us |
How about letting me have it so I can build a 9.3X62 twin to the 404 Jeffery I want to build? Howard, the squarebridge can be used as a base or housing for clawmounts, or a platform for a ghost ring sight, or just for looks. ______________________________ "Truth is the daughter of time." Francis Bacon | |||
|
one of us |
Duane, Your work is remarkable. Roger Kehr Kehr Engraving Company (360)456-0831 | |||
|
| One of Us |
Dear Mr. Wiebe: Thank you for the photographs of the interior of the action and the rail work. Please indulge me a bit further: What is the length from front to back of the opened up magazine well and what is the width between the rails. It appears that you milled straight from back to front at the top of the rails, or is there a slight taper towards the front? Sincerely, Chris Bemis | |||
|
| One of Us |
Thank ou for the pics., thats why i'm here. Thank you for giving straight answers also, my guess is even with pics and answers theres a lot of craftsmanship involved. Beautiful work, looking forward to the finished work. P.S. How many hours are involved in something like this? _____________________ Steve Traxson | |||
|
| one of us |
Wow ... the more you show us, the more jaw dropping your work is. Simply stunning! Mike -------------- DRSS, Womper's Club, NRA Life Member/Charter Member NRA Golden Eagles ... Knifemaker, http://www.mstarling.com | |||
|
| one of us |
Duane: The metal work is fabulous and it is very interesting to have you explain how it's done. Please finish so I can shoot them! M | |||
|
| one of us |
Duane At the Guild Show this year we were discussing the extended tangs on your 500 Jeff. I was interested in how you inletted the action and tang and asked if you inletted the action first then welded on the extended tang. We got interrupted but I think you indicated that you inletted everything at the same time. This seems like it would be very difficult to do it that way. Do you have any tips if one us were brave enough to tackle such a project? The thought of trying to handle the barrel, action and extended tang in one long awkward piece seems intimidating and loaded with pitfalls. Second, do you have any sequence photos of machining the integral quarter rib? Craftsman | |||
|
| One of Us |
Yale: Here's the fixture I made up for holding actions upside down in the mill vise. The tang can be moved over each way to establish taper. I use a 3/8" carbide ball end mill...yes, it's tapered to match the magazine box. Obviously, the real feeding issues take place with burrs, etc at the top of the rails. Hope this is what you wanted. Duane 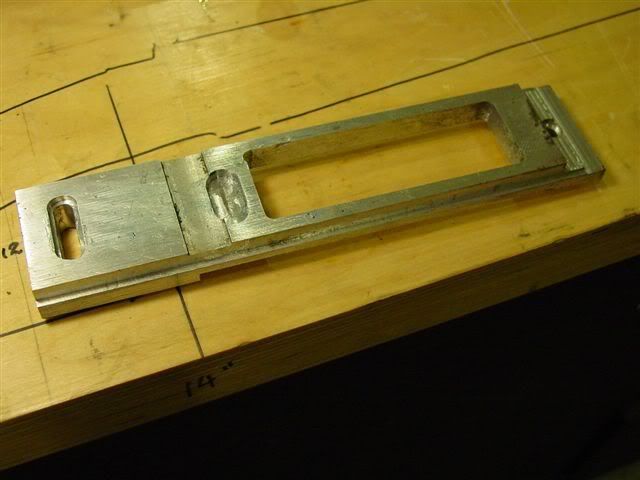 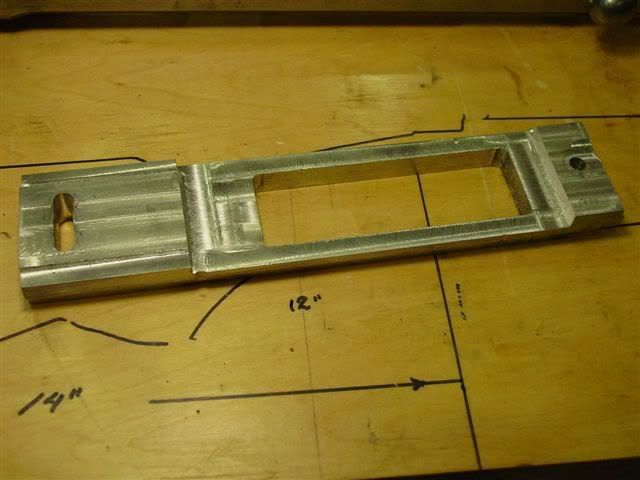 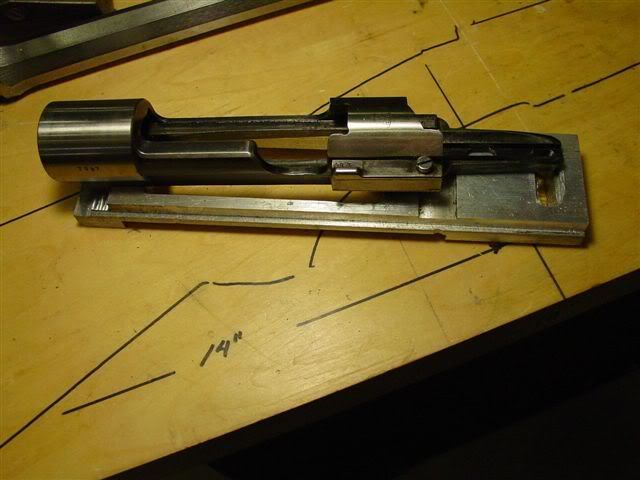 | |||
|
| one of us |
Craftsman, I'm also interested in Duane's answer as to why he adds the tangs before inletting. When I've spoken with Ralf Martini about extended tangs, he told me that he inlets the barreled action first and then adds tangs. My only guess as to the different ways of skinning the cat is that Ralf works from a patterned stock and Duane works from a blank. If you go look at Duane's photos of inletting and stocking the Scholarship rifle, he apparently inlets the barreled action, adds the buttplate, grip cap and other hardware to the squared-up blank and then starts removing wood until the stock shape meets his approval. I wish I could get Ralf to log on and give his views as well. ______________________________ "Truth is the daughter of time." Francis Bacon | |||
|
| one of us |
Dang! Another couple of M98 standard actions butchered up to H&H length! | |||
|
| One of Us |
RIP: Yeah...gunsmiths been doing this about 100 yrs! Fact is, FN did this for about 40 yrs...Weatherby about 20 yrs...yeah, new stuff!..groundbreaking!!! ...Inletting the barrel and action is pretty cubersome,, I inlet the action first, then the barrel,,concentrate on a smaller area...I don't find the extended tangs particularily daunting. Adding the tangs later would really give me heartburn..blending in the weld could easily result in inletting gaps...then again, I cut off the old tang quite forward of the rear guard screw . Everyone finds his comfort zone, I guess. | |||
|
| One of Us |
Dear Mr. Weibe: Thank you for picturing your jig. Great idea. Sincerely, Chris Bemis | |||
|
| Powered by Social Strata | Page 1 2 3 |
| Please Wait. Your request is being processed... |
|

Visit our on-line store for AR Memorabilia

