
 The Accurate Reloading Forums
  THE ACCURATE RELOADING.COM FORUMS
  Guns, Politics, Gunsmithing & Reloading
  Gunsmithing
  Filling The Pores
Go  | New  | Find  | Notify  | Tools  | Reply  |  |
| One of Us |
Does anyone have a good pictorial of filled and unfilled pores on walnut? Adam ______________________ Ammo, you always need more. | ||
|
| One of Us |
I dont know of a pictorial that shows it. But you can see it yourself. Hold the wood at an angle so that you can see the light as its reflected off of the wood. The reflected light will clearly outline any unfilled pores. If everythings filled then the reflected light will reveal a very smooth surface. Like looking at a reflection off of a car with a good paint job. Thats about the best explanation I can come up with. Hope it helps. Lots of pro's on this site maybe they have some real pictures. Ray ...look up, and lift up your heads; for your redemption draweth nigh. | |||
|
| One of Us |
I find it difficult to get good photos of unfilled pores in a really dense and hard walnut stock. The light and softer wood tends to show the open pores more easily. I have done only a couple of stock and the last one I spent many many hours on - I even wet the wood and sanded the "feathers". I finally oil finished it with 20+ coats and it was worth it. My current project is going very slow but one step at a time. "When the wind stops....start rowing. When the wind starts, get the sail up quick." | |||
|
| One of Us |
So the wood will stop absorbing the finish once they're filled or the wood may stop absorbing the finish and then you have look for imperfections in the finish? I know it's a personal choice but do you look for the "car" finsih (smooth and thick coats) or the thin coat look? Adam ______________________ Ammo, you always need more. | |||
|
| One of Us |
The object of a oil stock finish is to have the wood absorb as much finish as it can take, let that cure, then apply more coats until the pores are filled. The pores are the small dimples you see in the finish that are really small holes, pinpoint size. They are the tubes in the wood that transported water and nutrients up the tree. On a good oil finish, you don't want to bulk up finish on the surface until the pores are drowned out. What you want to do is fill the pores without building up a thick surface layer. That is the object of wet sanding. Wet sanding is applying the finish with a 400 or 600 grit sandpaper piece. What that does is abrade down the buildup on the surface, while letting the finish build up in the pores. The paste from the sanding operation also helps fill up the pores somewhat. I just started finishing a stock yesterday, I can take some photo's as I go if there's interest in seeing that process. dave | |||
|
| One of Us |
Yes that would be awesome if you could post pics. I have finished several stocks but I don't think I have ever filled the pores on one of them. I am making them from blanks to practice on, handing the tools to get a good feel and figuring out how to pitch and drop the stock. This is all a learning process before I head off to Penn State Gunsmith school. It may sound odd but I don't want to be a novice when I step foot in those doors. Adam ______________________ Ammo, you always need more. | |||
|
| One of Us |
You, sir, sound like a VERY bright fellow and I for one commend your preparations. Wish that I had had sense enough to do similar before attending TSJC. 2 suggestions: ASK QUESTIONS in an attempt to learn as much as possible OUTSIDE of and in addition to the established curriculum, and also attempt to build longer-term personal relationships with both the instructors and the more-mature and knowledgeable students. Good luck, Joe __________________________ You can lead a human to logic but you can't make him think. NRA Life since 1976. God bless America! | |||
|
| One of Us |
Mr. Steele, Thanks for the compliment. If the last decade in the military (USMC/USN) has taught me anything it's that preperation is the key to sucess. I have litterally read as much as I can on the subject but the fact is I have to do it to understand it. Physical learning is a pain sometimes. I understand the imperfections of unclosed pores and I understand the cut down/ build up process. Pictures though would help out immensely. Thanks for the help. Adam ______________________ Ammo, you always need more. | |||
|
One of Us |
Although I can't help with pictures or a tutorial, may I suggest aquiring some scrap pieces of walnut and experimenting on them? Doing this on smaller, flat pieces would help greatly with the learning process, likewise you can experiment on several pieces at the same time. ----------------------------------------------------- Do not answer a fool according to his folly, or you yourself will be just like him. Proverbs 26-4 National Rifle Association Life Member | |||
|
| One of Us |
So tonight when I was working on the stock I could see the little bubbles rising off the wood. That's a billboard if I have seen one. I have thought about using scrap pieces of wood but the blanks I get off Ebay are as much as a small "turning" pieces and this great California ecconomy the lumber mills here charge more than the shipping cost. Anyway I can clearly see that I need more filler. Has anyone expiermented with saving sawdust and making paste? ______________________ Ammo, you always need more. | |||
|
| One of Us |
I think the slurry you make from wet sanding will be far finer and to a better job than any paste you would make from sawdust. I have seen a few stocks where the pores were sealed with some sort of artificial looking light colored paste and it looked awful. The natural wood gives the best opportunity to fill pores with the right color match and not look funny. I have also seen photos posted where someone had used "bone black" (whatever that is...) mixed in while wet sanding to actually darken the pores. It looked fantastic in the picture. On my last stock I tried the same thing with powdered charcoal and I have no complaints about the look. Nothing dramatic to speak of because the pores were pretty tight to begin with, but if you look very close you can sort of catch the darker pinholes which I think looks pretty good. Just a thought... I have also heard of people using pumice, but I shudder to think what an abrasive like this would do to checkering tools. | |||
|
| One of Us |
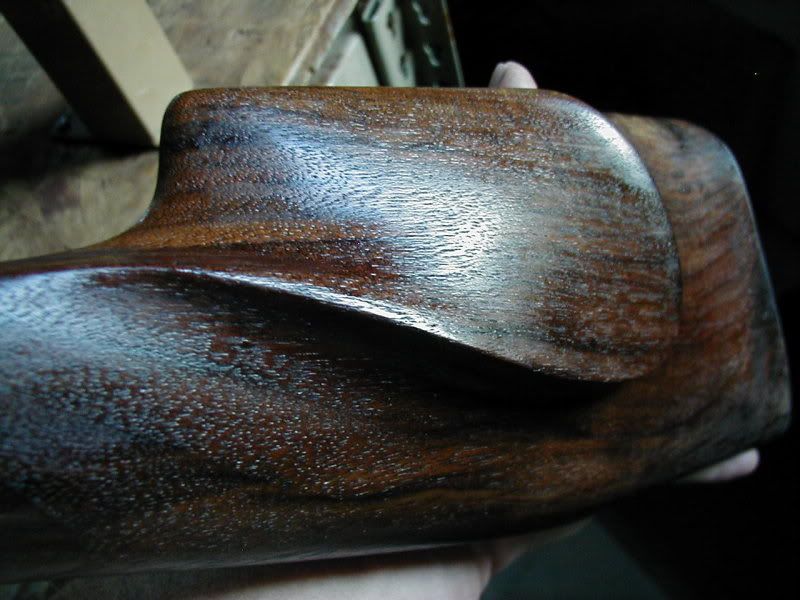
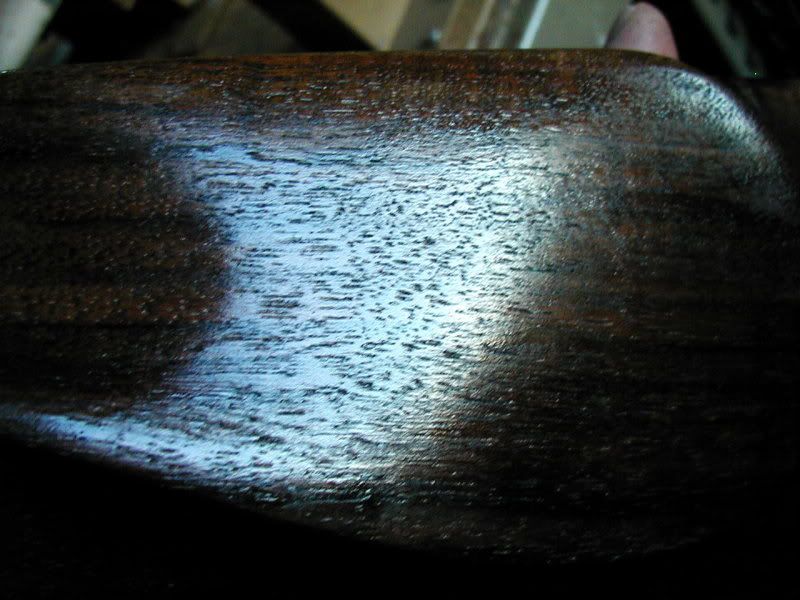
Here's a couple pictures of the unfilled pores in a stock just starting the finish process. I have sanded this stock to about 400 grit, and raised the whiskers several times by immersing in water, letting it dry, and sanding again. I repeated this until no grain raised when I wet it. Then, did one final light sanding, blew the dust thoroughly off the stock, and mixed tung oil half and half with turpentine. I slopped on the mixture as heavily as I could, and repeted about every 15 minutes for a couple hours. Let it sit overnight, and did the same thing again two more coats. Let it sit for a few hours and wiped off the excess slightly with a rag. There were no dry areas, so I know I've got it to take as much finish as it can for now. The cutback with turpentine is to promote deeper penetration into the wood. Now, I'll let it sit for a week or two, and let the finish dry thoroughly and the solvents come out of the wood before I proceed further. If you don't let it sit and dry enough, the solvents will keep the buildup in the pores soft, and just when you think you're getting somewhere, they will drag out and you'll have to start over. More pictures will have to wait for a while. I have tried filling the pores with gunstock pore filler which is very fine silica in a laquer like carrier, and have also used spray polyurethane sanded off to bare wood again. Other than cutting time off of the process, I see no benefits to those techniques, I prefer the traditonal wet sand filling technique when it's all said and done. dave   | |||
|
| One of Us |
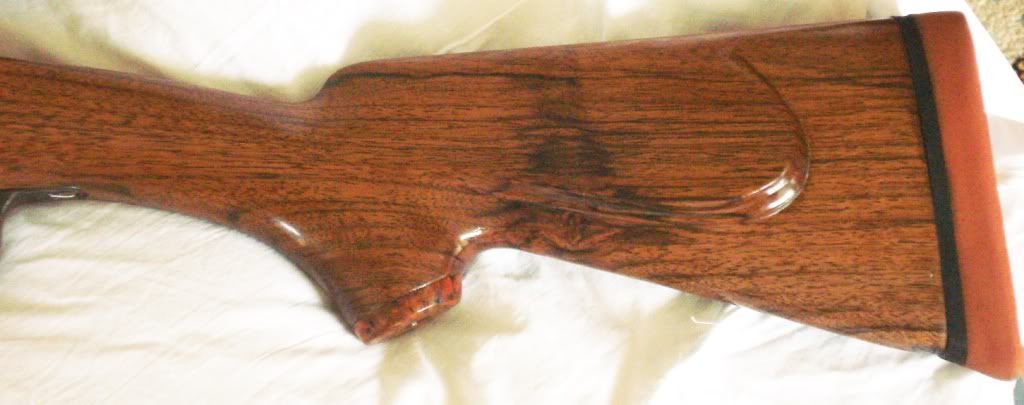
I used the Tru-oil kit and used their filler. Then sanded back to wood so that the pores are filled. then I dilutedthe tru-oil with mineral spirits and applied with my finger and sanded in with 400 grit. This got the wood dust into pores with the tru-oil and dried it. I repeated this over 20+ coats going down to 600 & 1000 grit wet & dry. Here is the finish I got    The wood work was very ordinarty / amature. But I can compare the oil finish to some professional work and feel happy. It is not rocket science, just a lot of patience and raw elbow power! Good luck "When the wind stops....start rowing. When the wind starts, get the sail up quick." | |||
|
| One of Us |
If you built that stock kudos. I can see the elongated grip arch but hey it's a learning "curve". The oil looks nice, I am using a Flecto 66 decendent, Varathane Outdoor Heavy Use Spar thinned to a light mixture. Now I am using a non cut mixture and it's filling in the knot holes and small knicks and it's looking good, but those bubbles were something else. The bone coloring is just that, fine dust cow bones for coloring, case color and such. Good idea on using it color the pores. Adam ______________________ Ammo, you always need more. | |||
|
| One of Us |
Adam, The sawdust fines are great when mixed with Acragls gel for filling knots or other imperfections. Careful of commercial fillers, they can speed the process of filling, but some are hell on checkering cutters (both silica and plaster fillers are quick cutter dullers)plus the wood/finish slurry is the righ color. I've seen fillers used and then tiny white spots exposed when checkered from the plaster type fillers. | |||
|
| One of Us |
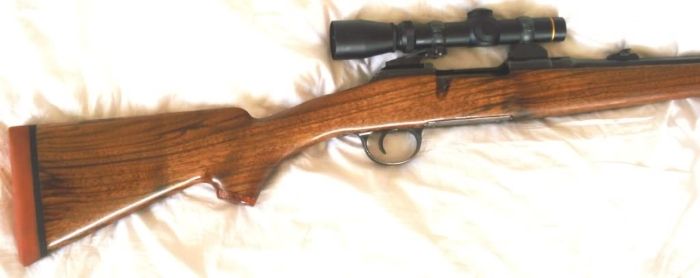
This is a rifle of mine....Browning A Blolt Medalion that I never finished filling the pores. I just gave up!!! I sanded and dried and tried but finaly said ENOUGH!!!!   ________________________________________________ Maker of The Frankenstud Sling Keeper Proudly made in the USA Acepting all forms of payment | |||
|
| One of Us |
I can really see what unfilled pores look like now. I take it a clear smooth coat is the opposite, right? Thank you all for the help. Adam ______________________ Ammo, you always need more. | |||
|
| One of Us |
Mine in oil and only that....a clear coat does help fill ________________________________________________ Maker of The Frankenstud Sling Keeper Proudly made in the USA Acepting all forms of payment | |||
|
| One of Us |
Yeah, kinda... I guess it depends on what you mean by "clear smooth". When I hear clear coat I think of glossy and thick built up varnish. I have seen very nice looking dull, flat coats that almost look unfinished, but the oil is in the wood and the pores are completely filled. There are lots of different ways to finish a stock. | |||
|
| One of Us |
Clear meaning clear, not necessarly a clear coat polyurathane. When I look at rifles like top rated stock smiths they always seems to be clear, not clouded or dull even thought they have a dull sheen. Adam ______________________ Ammo, you always need more. | |||
|
| One of Us |
I use Art's stock filler from Brownells . I plaster it right on and rub it in with burlap . Clean the checkering with a fine SS wire brush . You still end up filling with finish too , but it doesn't take near as much and I think you get a more even finish that way I'll apply 3 coats and wetsand with oil wipe down , let dry , rub with 0000 steel wool , wipe with tack cloth and repeat . I've started using Spar urethane as a topcoat , it's the only finish the checkering gets ! Stock finishing is like making Maple Syrup , there are as many ways of doing it as there are people doing it . Don't forget to have your Liberals spayed or neutered ! | |||
|
| One of Us |
Thanks for your comments. This was semi inletted stock from GASC in California. I made a bad nick at the toe of the stock when cutting it with an electric saw. The pistol grip opened out so much because I did not realise that I should have got the pistol grip cap on first and then shaped the wood around it! Currently I am doing another Mannlicher Schoenauer stock - take down model which you can see here http://forums.accuratereloadin...043/m/8611058421/p/2 Very slow work.
"When the wind stops....start rowing. When the wind starts, get the sail up quick." | |||
|
| One of Us |
I am glad to see you got your stock, many didn't. I have been watching that M/S stock for a while now, looks good. Adam ______________________ Ammo, you always need more. | |||
|
| One of Us |
I gave up on commercial fillers, and the 'sanding in' process long ago. All it took was a few drenchings in downpours and watching the stuff wash out of the pores to cure me. Now I rely on the old tried-and-true method of applying spar varnish to the stock and sanding down to the wood surface, repeating as necessary until the pores are filled. Then I proceed with the 'oil' finish if that's what I'm using. Actually, more and more I just use spar varnish to do the whole finish, about 8-10 coats sanded with 320 between coats, then the final coat rubbed out with rottenstone. Often those finishes are mistaken for 'oil' finishes by people who don't believe me when I tell them it's spar varnish. It's a lot of labor involved filling pores with spar varnish (or straight epoxy), but it's permanent. Like everything else in life, there are few shortcuts to doing the job right, IMO. | |||
|
| one of us |
If you want to cut the time down sanding finish into pores, use water to cut back each coat and not oil or turpentine. Those have enough solvent action that you wipe out some of your hard earned work each time you repeat. Water won't, just be sure you did an adequate job of sealing the wood first and make sure it is adequately dry before applying another coat of finish. You'll cut your time (and number of coats) in half. "Experience" is the only class you take where the exam comes before the lesson. | |||
|
| One of Us |
Somebody here, I think it was jeffeosso, suggested using Minwax Sanding Sealer as part of the finishing process. Never tried it, maybe he'll see this and share his experience using it. | |||
|
| One of Us |
   Here's what I got. Adam ______________________ Ammo, you always need more. | |||
|
| Powered by Social Strata |
| Please Wait. Your request is being processed... |
|

Visit our on-line store for AR Memorabilia

