
 Guns, Politics, Gunsmithing & Reloading Gunsmithing
 Go | New | Find | Notify | Tools | Reply |
| Better Gun Photography | Login/Join |
| one of us |
I didn’t want to hijack ForrestB’s thread on his Wiebe G 33/40 custom rifles so decided to start this thread instead. Not only are those three of the nicest rifles, but the photography is just fantastic. I’d love to get a few tips on taking better photos. Other than setting up a studio what can an amateur do to get better pictures? What equipment is needed? Light sources? A couple of example photos with specific information on how they were taken would be fantastic. ForrestB, any chance you can kick off with some information on what you used to take those photos? Thanks, - stu | ||
|
| One of Us |
Good question I would like to here about this as well. | |||
|
| one of us |
# one is to get a tripod.  Doug Humbarger NRA Life member Tonkin Gulf Yacht Club 72'73. Yankee Station Try to look unimportant. Your enemy might be low on ammo. | |||
|
| one of us |
I'm not a photagrapher, but here are some tips I've picked up in the last couple of years -- - Absolutely get a tripod and don't bother taking a picture of a firearms if you can't do it from the tripod. Even if you think you can hold the camera steady, you can't. - Use a shutter release, or the camera's timer to shoot the shot. You can't push the button any more smoothly than you can hold the camera without a tripod. - Photography is about handling light, and for firearms this is difficult because of the glare-producing spheres and tubes. You need to find a way to cancel them, and there are many ways to approach it, not one best way. One way is to create a "photo-box" of white sheets over a frame on your dining room table in front of your sliding glass door to outside. Or, illuminate the box with lights. Don't use a flash; it washes out colors and adds glare that you can't see to cancel before shooting. - Think detail. You can take a full-length pic of a rifle, but that leaves little detail to show. Shoot the pistol grip to the front of the action separately. - Leave off the tricky, distracting backgrounds, like deck rails, cats, hides, and so forth. - Get reasonably far (2 - 3 feet, maybe) from the subject and shoot it with telephoto; this allows more depth of focus and less blurring. - Get some photo manipulating software for cropping and enhancing. "Gimp" is freeware, and has much more than I will ever learn to use. Crop, resize, and "unsharp mask" are very useful. Basically, the only thing I've used it for so far is to make reasonable pics of rifles I've been selling. For that, it's been a great success. I'll never be even competent as a photographer, but this stuff is just self defense for anyone who ever plans to post a pic of a rifle for sale. Here's one of my Ruger M77:  See the glare on the bolt handle, shroud, and especially the buttstock? (You can see my patio doors on the bolt handle.) Clearly I have some work to do. OTOH, it's reasonably sharp and detailed, so I'm getting there. Jaywalker | |||
|
| one of us |
StuC, pictures are a hit and miss with me. I seem to do fairly well with the black guns but then comes SS ir a wood gun and I just can't seem to pick up what I want to show, wood grain and such. Then you have Forrest, Scrollcutter and others that post pictures that just jump out at you with detail. Here are a couple that turned out fair  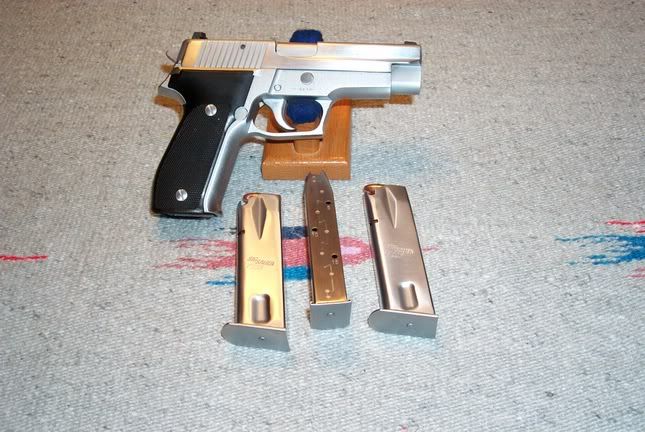 | |||
|
| Moderator |
some trick I have learned (and when I have time - use) 1: NEVER use digital zoom... optical zoom is okay, but digital pixalates 2: use a tripd.. if you can 3: your flash should be ABOVE the LOS of the lens ... means you'll have to crop the pic, but have the target in the lower 1/2 or 1/3 of the pic 4: outdoor light, in the shade, is usually better 5: wood pics NEVER show how nice... unless the guy has a tilting lens to tip plane of focus 6: oily guns are SHINEY jeffe opinions vary band of bubbas and STC hunting Club Words aren't Murder - Political assassination is MURDER Information on Ammoguide about the416AR, 458AR, 470AR, 500AR What is an AR round? Case Drawings 416-458-470AR and 500AR. 476AR, http://www.weaponsmith.com | |||
|
one of us |
Tripod is #1. Lighting is #2. I don't have any special lighting or skill with lighting. So I use ambient light. Fortunately for me, I live in an area where it's cloudy for 300 days a years. Perfect light for photography and moss. It seems that it's really true: Every cloud does have a silver lining. Roger Kehr Kehr Engraving Company (360)456-0831 | |||
|
| One of Us |
Photography is all about attempting to show a three dimensional object on a two dimensional medium, be it a piece of paper or a computer screen. (Or, How do you make something that is round look round on a flat medium) In order to do it effectively (realism) you need contrast. But what you have to remember is that the medium can only hold so much contrast as compared to your eyes. Your eyes can look into bright sunlight and dark dark shacows and see great detail. Film and digital media cannot. that is why you need to keep the ratio of light in the effective range of the medium you are using. You don't want the range too narrow as the photo will be flat, but you don't want too much because you will invariably lose detail at either end (i.e no detail in the highlights or no detail in the shadows.) (for example, a photo of a car on a sunny day. there will be glare that will be pure white, and the shadow under the car will be pure black) Generally, a light ratio of about 3 to 1 or 4 to 1 works well. That means that the brightness of the light on the highlight side will be 4 times stronger than the brightness of the light on the shadow side. If you don't have a flash unit, you can use reflectors to open up those shadows. Sometimes jewelry photographers will have as many as 10 little piece of white cardboard just out of range of the lens, directing light at a certain spot on a piece of jewelry, to get it just right. Cloudy days are fine. You won't lose much detail in the shadows or highlight, but you won't have many deeper shadows or highlights, and therefore you won't have "punch" in the photograph either. ONe of the best ways to light objects is to put a light above and behind an object so as to give it a specular highlight, and then to have a reflector on the other side to bounce light back into the shadows. If the reflector is close enough you will get a nice 4 to 1 ratio and you will show the roundness of the object. Another way, if you don't have a light, is to use a large north facing window. PUt a shower curtain over it to soften the light coming in. set up a table close, and on the other side of the table place a large piece of white foamcore board to reflect light back towards the object. Hang a nice piece of cloth of colored paper down over the table and then place the object on it. You won't have any distracting corners in the photo that way. Add a few other things to give the shot some interest. You will make great photos. | |||
|
| one of us |
Jaywalker, your second photo has a very distracting background, that's not good. Don't use flash . Use a tripod. Lighting should be diffused ,overcast day, through translucent material like cloth or plastic .Reflected light works well also. | |||
|
| one of us |
Yes, mete, thanks - those are issues I raised. The photo is an example of what not to do, as I mentioned. Jaywalker | |||
|
| one of us |
I put some new pics up of the rifle. Played around with lights, no lights...exposure etc.... | |||
|
| one of us |
I'd love to see them, but where are they? | |||
|
| one of us |
On the 24Hour Campfire forum, Ken Howell made a post a while back about photographing firearms well. He also included instructions on how to build a "light box" for proper lighting. If I remember correctly, it was outdoor use using only natural light source. | |||
|
| One of Us |
Seeing I do this for a living I feel qualified to offer a few opinions: 1. Always use a tripod 2. Probably the best lighting is "cloudy bright" outdoor lighting. 3. Either use a remote release for your camera or set it to go off by its self 4. Make sure the brackground is not distracking. When trying to capture the details of a firearm use something like a plain colored sheet, medium to light in color. Some sort of satiny material is also good. 5. To capture as much detail as possible remember to change the settings to lower the apeture to F16. Going any smaller generally results in lense distortion. 6. If you use a flash set it to fill flash and then it will bring out some dark details without blowing out the hi lights. A good rule of thumb is to set the flash to underexpose by 2/3rds of a stop. http://pawprintphotography.com/ My biggest fear is when I die my wife will sell my guns for what I told her they cost. | |||
|
One Of Us |
| |||
|
| one of us |
Stu.... Over here........... https://forums.accuratereloading.com/eve/forums/a/tpc/f/9411043/m/236105504 | |||
|
One of Us |
one thing that I might add that Im sure has been already said. Use a nice camera. it really does help. The better cameras have better lenses. Its like rifles scopes the better scopes just work better. It is much harder to get good pictures with a cheap camera. | |||
|
| one of us |
Snowwolfe gave some pretty good tips. Ken Lunde hase some good tips on his site as well. | |||
|
| One of Us |
PHOTO SET-UP This is the set-up I’ve been using for professional gun photography for about 20 years. I use four hot lights with tungsten bulbs, two 500 watt and two 250 watt covered with clip-on diffuser screens. These are bounced into white painted galvanized steel reflectors 5’ tall and 30†wide. the reflectors are rolled into a semi-circle. There is a sheet of white painted plywood above also for reflecting light. The gun is held vertically by a polished steel rod that slip fits into the bore. The rods are inserted into a wood base secured to a piece of 1/2†plywood so the gun won’t fall over. The background paper is 18% gray roll on a plastic pipe roller. When shooting full-length photos I poke a hole in the bottom of the background paper, insert the bore rod through it and drape the paper down in front of the base. For close-up backgrounds I also use non-glare matte board (32â€x40â€), like for matting a picture in a frame that I buy at the college bookstore and comes in a huge assortment of colors. The first photo shows the set-up from the camera’s view with the lens of my 4x5 rail camera showing. The second photo show the light, reflectors and the 4x5 on a massive Bogen tripod. I'll post again with the rest. Questions anyone? 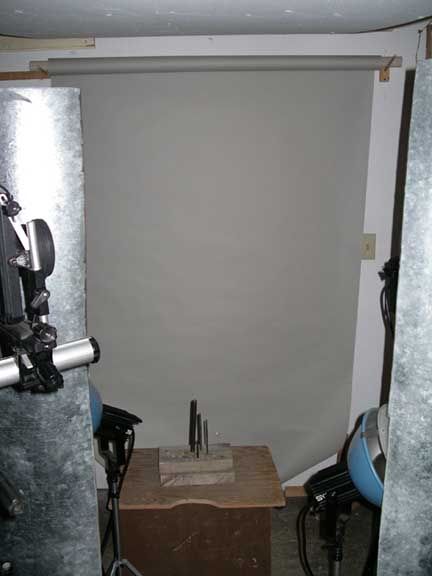 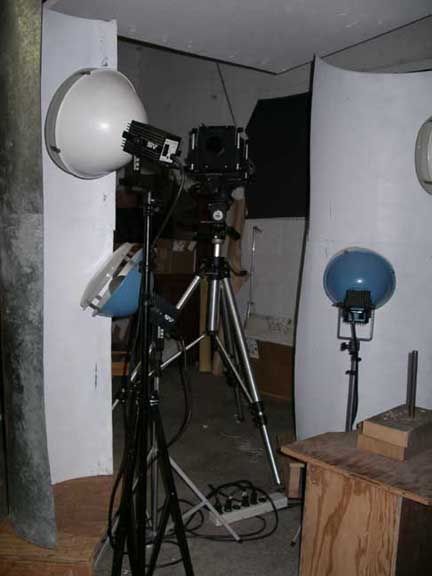 You can turn the gun or position the camera to virtualy any angle and no one knows it was a vertical set-up. ACGG Life Member, since 1985 | |||
|
| One of Us |
One advantage of gunmkr's setup is that by virtue of the curved reflectors, light tends to wrap around the gun. flaco | |||
|
| One of Us |
This is the set-up from the camera view with the lights off. The rifle photo was captured with this set-up. 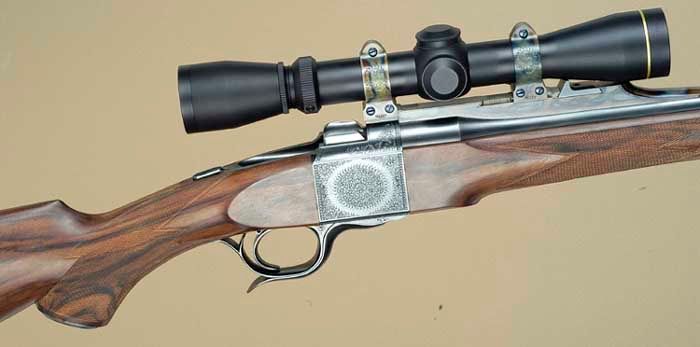 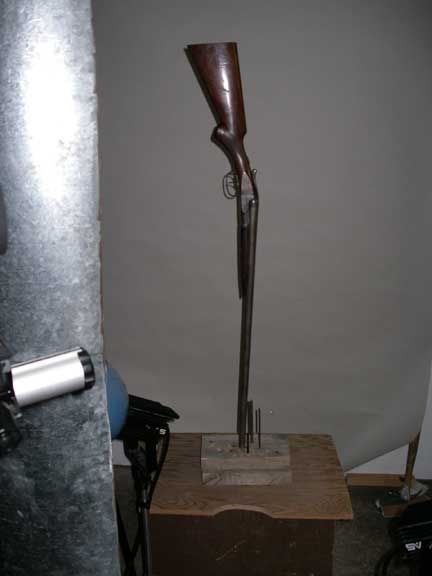 ACGG Life Member, since 1985 | |||
|
| one of us |
Guns have to be one of the most difficult items to photgraph. I like gnmkr's set-up a little better than mine. For my photo shoots, I drag my dog's kennel out into the driveway, throw a kudu rug over the top and snap a few hundred pics with a digital camera and hope a dozen turn out okay. I do use a tripod. After about the first hour of daylight in the AM, the glare gets too bad for nice photos. I'm going to try some of the ideas here and see if my results improve. ______________________________ "Truth is the daughter of time." Francis Bacon | |||
|
| one of us |
First of all, I'm no photographer. One thing I have noticed in many amateur's close-up photos is dust, dirt and other crud that looks as big as gravel in a really tight shot. What do the pro's use to get the subject really clean? "There are only three kinds of people; those who can count, and those who can't." | |||
|
| One of Us |
gnmkr That's one nice setup... I use my knife/watch setup for partial shots and natural light for bigger pictures if I can.    Outside  Setup  | |||
|
| One of Us |
one more with reflected light from the window.  | |||
|
| One of Us |
Richj Your photos illustrate what I was trying to say in my post above. Notice on the outside shot under very cloudy skies there isn't much pizzaz. the photo is flat for lack of contrast. But then with the windowlight photo with the reflector you have some very nice specular highlights and some well lit shadows. The gun shows roundness and believeability. Very nice. By the way, that rifle in your last post is lovely. Who made it for you. Tell us more about it. | |||
|
| one of us |
What great tips from everyone. I've got better information here than I could have expected. Richj, Can you tell me what camera you used for those shots? Nice Savage BTW. - stu | |||
|
| one of us |
Gnmkr, Thanks for the photos of your set-up. I’ve also got a copy of your book and have read about and seen the pictures of your set-up in it. Good information all round. I have a question about how you take full-length photos. How do you hide the block that the muzzle is resting on? Does the sheet of background paper sit between the base and the muzzle? I certainly don’t get the feeling looking at the photos that the background paper has been brought forward to cover that block. Also how far from the background paper is the gun placed? What about from the matting board when you’re doing the close-ups? - stu | |||
|
| one of us |
Completely agree. It has been a very long time since I've taken lots of flicks. Got a Digital Camera earlier this year and it has been a great source of enjoyment. But with the Tips you all provided, I'm sure it will help some of my shots. Thank you. | |||
|
| One of Us |
Great setups guys! When you want great pictures you need what these guys have reflected or "bounce' lighting! "Soft/diffused lighting and keeping off the background makes all the difference in the world. Rusty We Band of Brothers! DRSS, NRA & SCI Life Member "I am rejoiced at my fate. Do not be uneasy about me, for I am with my friends." ----- David Crockett in his last letter (to his children), January 9th, 1836 "I will never forsake Texas and her cause. I am her son." ----- Jose Antonio Navarro, from Mexican Prison in 1841 "for I have sworn upon the altar of god eternal hostility against every form of tyranny over the mind of man." Thomas Jefferson Declaration of Arbroath April 6, 1320-“. . .It is not for glory, nor riches, nor honours that we are fighting, but for freedom - for that alone, which no honest man gives up but with life itself.” | |||
|
| One of Us |
Stu You want to keep it away from the background some distance so that it does not cast an unwanted shadow on the background that you will be able to see in the photograph. The closer to the background the more distinct a shadow will be. Another thing to kind of remember is to not use a very steep camera angle to your subject. You can get by with it if you have a view camera (the kind with bellows) because you can then adjust the lens plane and the film plane to correct for distortion. But when you have a small digital camera that doesn't have a bellows you should try to aim straigt at the subject or maybe just a little bit above it so that you don't distort it. | |||
|
| One Of Us |
photoshop or other image editing software. | |||
|
| One of Us |
To make the gun disapear on the background, the paper is draped over the block in sort of an S curve (not done in shotgun photo) with a small hole in the paper for the rod. The gun's muzzle hold the paper in place and then the front is draped over the block and taped down. I like to have the gun about 18"-24" in front of the background, it is fine if it goes out of focus, you want the non-reflective softness, zero shadows and the color. I spend quite a bit of time removing any crud off especially dust from the scope with a fine bristle brust, wipe the stock down with a paper towel to buff it slightly and remove all traces of oil and fingerprints from the stock and metalwork. Those of you that shoot outside surely have had a fly land on the gun or background, only to magically appear in the finished image. I do use Photoshop, mostly to remove the anomilies that come up in the background, as can be seen in the lower right of the Dakota photo. My background being pure photo quality makes it difficult to rely on a program, but I use it when practicle. SDH 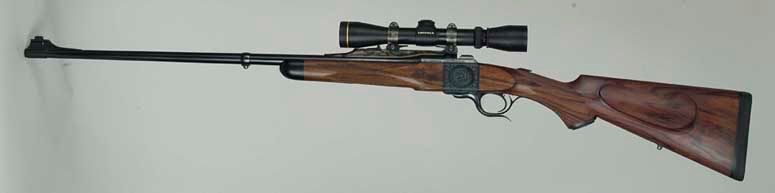 ACGG Life Member, since 1985 | |||
|
| One of Us |
Stu This 1909 was built by a gunsmith in Brooklyn, in NYC, a former Griffin & Howe guy. Here's a link to some more pics. I originally had a butcher in Laurel Deleware working on it. After 3 years I got it back with the 3 pos. safety installed and that was it. http://home.pipeline.com/~shootzg/custom/m1909n.htm
| |||
|
| Powered by Social Strata |
| Please Wait. Your request is being processed... |

Visit our on-line store for AR Memorabilia
