
 Guns, Politics, Gunsmithing & Reloading Gunsmithing
 Go | New | Find | Notify | Tools | Reply |
| Anyone know how to save these old guns? | Login/Join |
| One of Us |
I got 2 old .22's from my grandpa, found them in his basement rusting away. I took one, a Marlin Glenfield Model 20 a couple months ago. It's a real shooter, at 25 yards I shot a .13 C-T-C group. (I accidentally put down .12 in the pic) The other is a newer, but probably in worse condition Marlin Model 15 single shot. I took it yesterday, just with the open sights I shot 4 groups of 5 under an inch at 25 yards in a row, I decided I want to keep it too. They probably aren't worth much, but I want to fix them up because the Glenfield is form when my grandpa was little, and the other is used to be my dad and uncle's, plus they are darn accurate. Here are some pictures, remember, they are in BAD condition: The Glenfield Model 20: 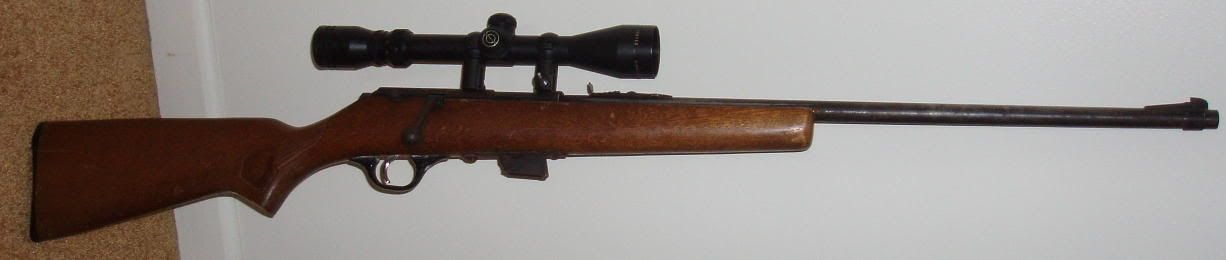 Here's what the stock on both looks like: 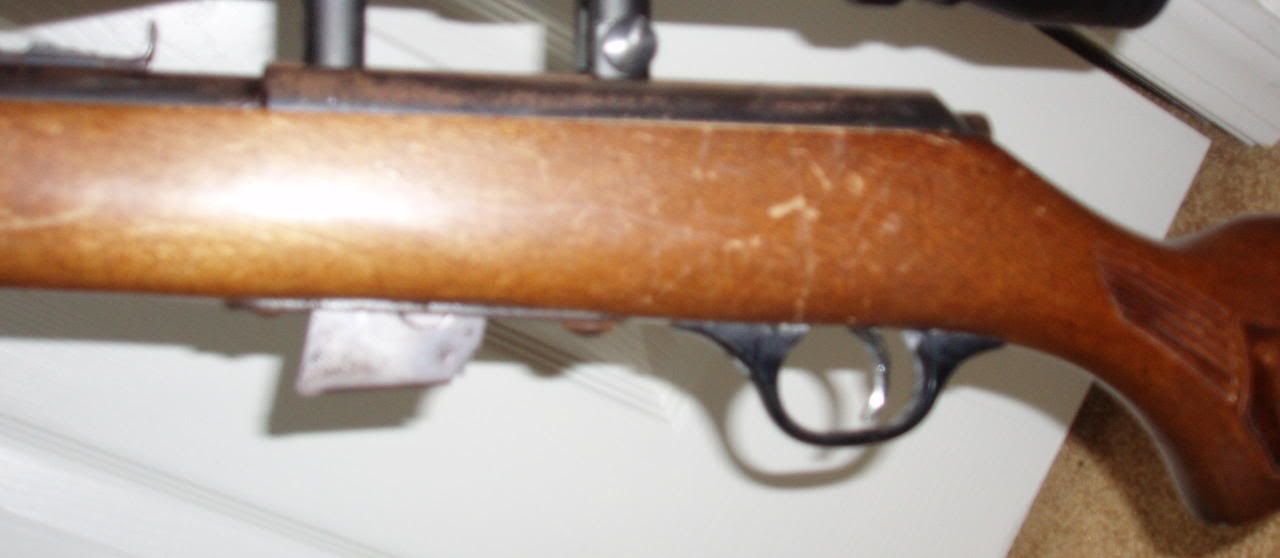 The Single Shot:  The Action of the Single Shot: 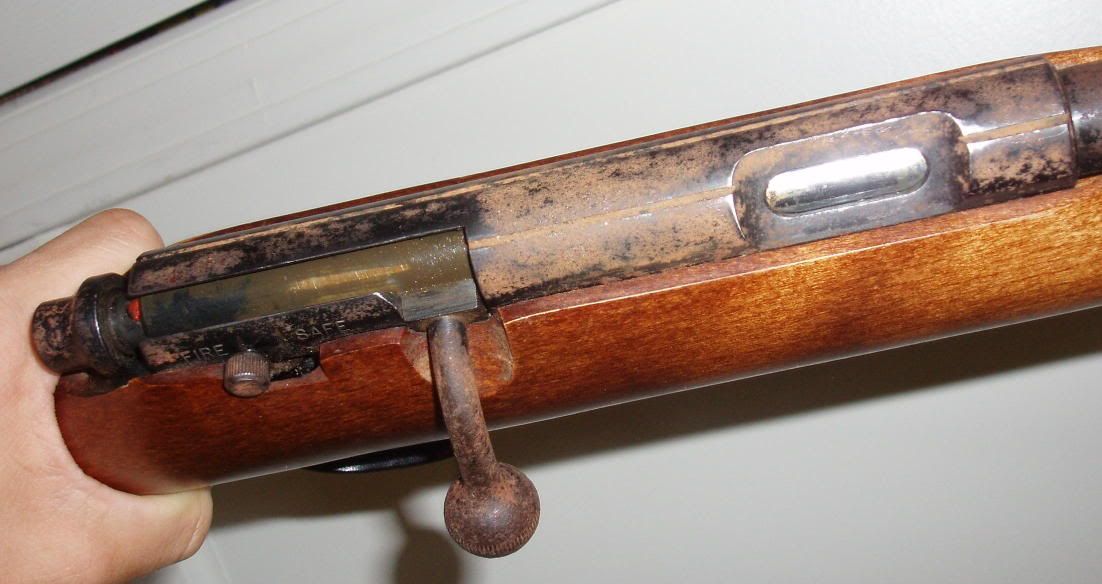 A 5-shot group shot with the Glenfield: 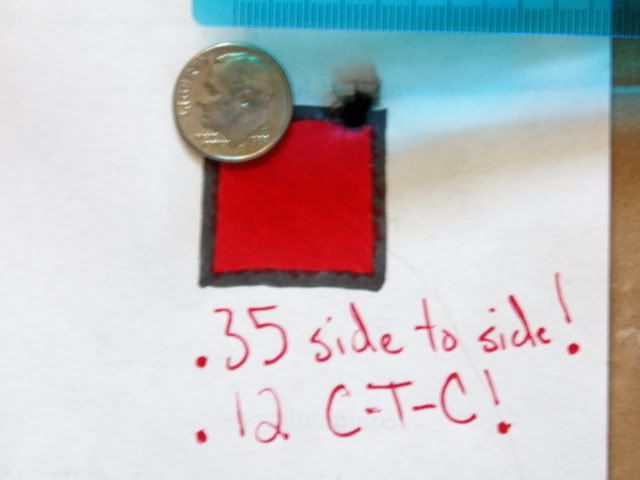 Love shooting precision and long range. Big bores too! Recent college grad, started a company called MK Machining where I'm developing a bullpup rifle chassis system.  | ||
|
| One of Us |
Wow, pics WAY too big. Sorry. Basically I just want to make the guns look better for not too much $$$. Thanks for any replies. Love shooting precision and long range. Big bores too! Recent college grad, started a company called MK Machining where I'm developing a bullpup rifle chassis system. | |||
|
| One of Us |
Sand paper, Naval Jelly and some Krylon should have it looking better fairly cheap. | |||
|
| One of Us |
Anything I can do about the stock? I've thought about possibly trying to paint it but it might look bad. Love shooting precision and long range. Big bores too! Recent college grad, started a company called MK Machining where I'm developing a bullpup rifle chassis system. | |||
|
| one of us |
Might suggest to go back to photobucket and edit the files. At least cut them by 50% maybe to 25%. Malm covered the metal. As to the wood. Sand it and refinish. As usual just my $.02 Paul K | |||
|
| One of Us |
I made the pics smaller on photobucket, but they didn't change. Do I need to edit my post and put them up there again or what? Love shooting precision and long range. Big bores too! Recent college grad, started a company called MK Machining where I'm developing a bullpup rifle chassis system. | |||
|
| one of us |
If you clicked the edit button on the original picture and chose a % reduction and then hit resize the picture should display smaller. If you made a second smaller copy you will need to attach that file to your original post. As usual just my $.02 Paul K | |||
|
| One of Us |
I did the edit thing, my internet is too slow to load them again even at half size in under a reasonable amount of time. Anyways, I have a electric sander with the sandpaper for it, some finish, cold blue (probably a bad choice, I know), new rings for the scope I wanna put on it. (Leupold see through mounts were the only ones tall enough, its a 4x12x50something) I also got "Krud Kutter", it's supposed to get rust off good, I didn't see anything that looked especially strong so I went with it. I also got 2 boxes of Mini-Mags, they are very accurate in the Glenfield so I'm gonna site the Model 15 in with it too. Love shooting precision and long range. Big bores too! Recent college grad, started a company called MK Machining where I'm developing a bullpup rifle chassis system. | |||
|
| One of Us |
I think that you must consider what you are willing to spend in time and money. If you want a fairly nice result and can pay for a reblue job, I'd have it refinished with a beaded finish. If you do that and apply a gray parkerized finish, it will be quite nice. On the stock, strip it, fill it with Minwax sanding sealer (about two coats and sandings), and then very light coats of Minwax polyurethane finish applied with a sponge brush. Use the side of the brush to smooth out any bubbles. You can break the gloss with 0000 steel wool. If you don't want to pay a bunch to refinish the metal, you can take the action, and take off all the sights. I believe you will have a long, steel cylinder. I'd suspend it in my work area with a piece of coated wire run down the barrel and out the receiver. Cut strips of wet/dry sandpaper, and wet the metal with a light oil, and start sanding by pulling the strip back and forth over the metal, rotate the rifle frequently if it does not rotate itself. Basically sand as much of the rust pits out as you can. If you use a moderately coarse paper you should end up with something like a beaded finish which will keep you from having to sand every bit of the pitting out. Be sure to keep the barrel rotating so you don't "flatten" it out on one side or another. Reblue with a cold blue carefully following the directions. Degrease with alcohol, apply the blue, let it set, and then polish with steel wool. I'd use gloves in a well ventillated area because the bluing compound is quite poisonous. Degrease again after polishing, and go through this process multiple times. It builds a deep base and holds up quite well and looks very nice. If you elect to sand out the rust, you can always go back when you are flush and have it refinished and parkerized. Best of luck. Kudude | |||
|
| One of Us |
Yeah I guess I'll sand it down with sandpaper, I did that once but the rust built up again a lot faster than I expected, even just in my house and not my grandpa's damp basement closet. With the cold blue, pour alchohol on the barrel or scrub it with alchohol? After that do I wash the alchohol off or let it stay? Thanks for helping a kid so new at this. Love shooting precision and long range. Big bores too! Recent college grad, started a company called MK Machining where I'm developing a bullpup rifle chassis system. | |||
|
| One of Us |
Also, do you think those see-through mounts will be ok? I've heard not to use them on higher powered rifles because the recoil can knock them off zero, but with the .22 I don't think it would be a problem would it? I'm hoping to do some of this stuff tonight, but I got football camp startin in the morning so I don't know how much I can get done. i'll post pictures later. (in a smaller size Love shooting precision and long range. Big bores too! Recent college grad, started a company called MK Machining where I'm developing a bullpup rifle chassis system. | |||
|
| One of Us |
NVM, can't start tonight, but football camp is over tomorrow at 10:30, before it gets too hot. Maybe I can work on it tomorrow all afternoon or something. I would really like them to look good for the materials I've got, maybe make my grandpa proud. Love shooting precision and long range. Big bores too! Recent college grad, started a company called MK Machining where I'm developing a bullpup rifle chassis system. | |||
|
| One of Us |
kudude gives some excellent advice- if it were me, I'd prep the metal like he describes, then give it a coat of Brownell's spray-on baking laquer. It comes in several colors, black, gloss black, OD green, tan, etc. It's self leveling, so it will fill any pits and scratches- anything deeper can be filled with epoxy and sanded flush before spraying it. if you go this route, make sure the barreled action fits in your stove before you get all het-up to do the job. you bake it for 45 minutes or so to fix it. I did a shot M1 carbine with three colors of camo, not on a random pattern, but one color on the barrel and receiver, another on the handguard and triggerguard group. turned out great. if you scratch it, touch it up and bake it again. it's cheap and effective. | |||
|
| one of us |
Tyler, I know this is not a light rust but why don't you try the steel wool and oil route first? That is the standard way to remove rust without hurting the blueing. Work the rust with oiled steel wool and wipe off. If you don,t like the looks of the rifle when finished you can still do what the other guys have said. | |||
|
| One of Us |
The pics of the bareel probably don't show it but there isn't very much blueing left at all. Especially on the Glenfield, it's pretty much bare metal on the barrel, with a lil bit left on the grooves and action. Love shooting precision and long range. Big bores too! Recent college grad, started a company called MK Machining where I'm developing a bullpup rifle chassis system. | |||
|
| One of Us |
When you sand, use a soft wood or hard rubber sanding block. You want to end up with the square corners, square, and the round surfaces round and straight, not dished or rippled. The same goes for the wood. Strip it with a chemical stripper, then lightly sand to eliminate raised grain. You will be much happier in the end if you do the job right. NRA Patron Life Member | |||
|
| One of Us |
What should I apply the blue with? The package says "a swab or sponge", others say cotton balls, and one site says a toothbrush is the best. I'm doing the whole barrel, so I need something that will soak up alot of blue. I guess I'll start finishing the wood and wait for replies about the blue. Love shooting precision and long range. Big bores too! Recent college grad, started a company called MK Machining where I'm developing a bullpup rifle chassis system. | |||
|
| Moderator |
Tyler, Lots of different ways to apply blue, but what kind do you have? Liquid or gel? I prefer liquid cold blues, but to each his own, lotta people prefer gels. I like to use either a toothbrush or a small wad of steel wool (degreased preferably but I've used un-cleaned wool too and it seems to work OK). Also scotchbrite pads cut up work really well too. Toothbrushes are great if the metal is pitted or rough, but you can also use both methods- toothbrush first to make sure everything gets covered, then wetted steel wool to help polish and darken the finish. Regarding cleaning the metal first, make sure you do a good job. First use hot soapy water with a sponge, now it will probably look clean to you after 10 seconds so what I suggest is you look at a clock and spend at least 2 minutes cleaning/scrubbing the barrelled action. If you have an automatic dishwasher use the detergent for that. Otherwise dish soap works. When the action is clean, dry it off- a heat gun works or the way the weather is just put it outside for 45 minutes. Then hold the dry action with a paper towel and dip another towel into a small dish of alcohol and rub the action down once more. Then hit it with the cold blue. Sorry if that seems like a bit of work, but you should get a nice finish that won't have any splotches in it. for every hour in front of the computer you should have 3 hours outside | |||
|
| One of Us |
I like to apply the cold blue with 0000 steel wool that has been cleaned in acetone. Much of the steel wool has a rust preventative on it, and that may interfere with the action of the blueing agent. NRA Patron Life Member | |||
|
| One of Us |
Ok, done with the blue, my dad and I gave it about 2 dozen coats. It's not really a traditional looking blue, it's more greyish, but I expected it to be like that. I applied it with a Mr. Clean "magic eraser", the sponge side worked good. It doesn't have any splotches on the barrel, but the action looks rough, it didn't blue that great. Overall I think it turned out ok. I put the bolt back in the barrel...but something's screwed up. I have to pull the trigger to allow the bolt to go down. I can work the bolt, but there is about a 1/4" that needs to come forward more to allow the bolt to go down. If I pull the trigger it lets it slide enough to go down, but then if I pull the trigger it doesn't make the "click" of the firing pin. Anyone know what couold cause these problems or where I could get a manual for a Marlin Model 15? Anyways, I also sanded my stock and then stained it, it looks pretty nice, the clear coat stuff is drying so I might have pics up of the single shot tonight. I have no blue left, so I can't do the Glenfield until I get some. I'll probably wait, blueing the barrel and sanding everything was a all day job. Love shooting precision and long range. Big bores too! Recent college grad, started a company called MK Machining where I'm developing a bullpup rifle chassis system. | |||
|
| One of Us |
Tyler, You've been busy! Your receiver may have been originally case hardened, which is why it is not bluing like the barrel. In some .22's, the trigger functions as the bolt stop. I haven't had a Glenfield, but that maybe what is causing the bolt to stop going in. Insert the bolt pulling the trigger as necessary for it to be inserted into the receiver, and then let the trigger up. Then the bolt should be cocked upon working it, and the firing pin should drop when you pull the trigger. Sounds like you did a good job. Your grandfather would be proud of you. Kudude | |||
|
| one of us |
Tyler, sorry I got here too late. You were half-way through a decent rust-blue job, friend! Seriously, next time you have this problem boil the rusty parts first and then brush them with a clean stainless toothbrush or steel wool. That will loosen and blacken the rusty areas and cold-blue will even-out the colors much better. "Experience" is the only class you take where the exam comes before the lesson. | |||
|
| One of Us |
Dang the poly-clear prtectant stuff takes forever to dry. The pistol grip is still sticky. The trigger serves as the bolt stop, but even when I let it in I can't work the bolt. I can lift it up and back but not forward again. In fact, I tried to work with it some more, just pulling out and putting in back in hoping to smooth it up, and now I can't really even get it partway in the chamber. I have no clue what is wrong with it. I've looked in the chamber and there is no obstructions, and the bolt looks normal, other than being old...hope I get this stupid thing figured out. Love shooting precision and long range. Big bores too! Recent college grad, started a company called MK Machining where I'm developing a bullpup rifle chassis system. | |||
|
One of Us |
Stocks are the easy part. You can strip the old finish off with a paint remover, sand them down with 220-grit paper, steam out the dents with wet cleaning patches and an iron, raise the grain, sand down again with 220 then 440 grit, raise grain againand sand down again with 440 grit. Next polish wood with 0000 steel wool, then use Tru-Oil according to directions. Steel is a real problem. You can't remove the pits, but you can polish the steel parts with emery cloth then reblue, being careful while polishing not to change the countours of the steel parts. Do it all by hand, avoid power polishing wheels, etc. These ruin the lines! "Bitte, trinks du nicht das Wasser. Dahin haben die Kuhen gesheissen." | |||
|
| Moderator |
if they were mine.... degrease some steel wool, and wipe "most" of the rust off dry... then wipe on coldblue with more steel wool. soak in wd40 to kill the smell.. over night, or 24hours. on the wood, i would put painteres tape (the bule stuff) over the checkering, after I steamed the dents out. THEN i would block sand the finish off. take off the tape, with a metal brush, clean out the checkering. use pro custom gun oil spray to redo the finish. wax all the metal with a paste floor wax, and put it back together. watch the metal for rust spots, and address immediately with petroleum jelly jeffe opinions vary band of bubbas and STC hunting Club Information on Ammoguide about the416AR, 458AR, 470AR, 500AR What is an AR round? Case Drawings 416-458-470AR and 500AR. 476AR, http://www.weaponsmith.com | |||
|
| <xs headspace> |
PS- Brownells Oxpho Blue is the only cold blue I know to give a real blue, and withstand wear, and help prevent rust. Rubbing the stuff on with rough brown paper towels gives the best results. | ||
|
| One of Us |
Well, I got the bolt back in, I think it was uncocked somehow, the back of the bolt moved when I pulled on it hard enough, and I got it move back and over and now it goes in and fires. There's still the little bit that doesn't wanna go in though, I have to press REALLY hard for the bolt to be able to move down. I don't know what it is. Love shooting precision and long range. Big bores too! Recent college grad, started a company called MK Machining where I'm developing a bullpup rifle chassis system. | |||
|
| One of Us |
For some reason the bolt now works ok...not real smooth but I don't need alot of force. Byt he way here she is! Not exactly a professional job, but hey it was a one day project with my dad.  I think we'll need to put one more layer of the protectant over it, but I'll do that later. Love shooting precision and long range. Big bores too! Recent college grad, started a company called MK Machining where I'm developing a bullpup rifle chassis system. | |||
|
| One of Us |
Looks good | |||
|
| One of Us |
Thank's, the stock should have more of a "sheen" when I get it coated a second time, which will make it look even better. Love shooting precision and long range. Big bores too! Recent college grad, started a company called MK Machining where I'm developing a bullpup rifle chassis system. | |||
|
| one of us |
Looks 200% better! "Experience" is the only class you take where the exam comes before the lesson. | |||
|
| Moderator |
... Tyler, you are doing well. You need, really, pro custom gun oil in the spray. opinions vary band of bubbas and STC hunting Club Information on Ammoguide about the416AR, 458AR, 470AR, 500AR What is an AR round? Case Drawings 416-458-470AR and 500AR. 476AR, http://www.weaponsmith.com | |||
|
| One of Us |
Tyler, Really nice job. Well, you're hooked now. Enjoy your grandfather's rifles, take good care of them, and pass them on to your grandchildren. Kudude | |||
|
| One of Us |
I'm planning on getting some oil to rub in sometime, so it will be more protected. I guess I'll look for "Pro Custom Gun Oil". Love shooting precision and long range. Big bores too! Recent college grad, started a company called MK Machining where I'm developing a bullpup rifle chassis system. | |||
|
| Powered by Social Strata |
| Please Wait. Your request is being processed... |
Guns, Politics, Gunsmithing & Reloading Gunsmithing

Visit our on-line store for AR Memorabilia
| View $GS_USERNAME's Public Profile | |
| Add $GS_USERNAME to my Buddies | |
| Add $GS_USERNAME to my Ignore List | |
| Invite $GS_USERNAME to a Private Topic | |
| View Recent Posts by $GS_USERNAME | |
| Notify me of New Posts by $GS_USERNAME |