
 Guns, Politics, Gunsmithing & Reloading Gunsmithing
 Go | New | Find | Notify | Tools | Reply |
| How to smoothen out a CZ 500 action? | Login/Join |
| One of Us |
I have searched the forum and found several old threads. I live in New Zealand & so AHR is not an option. Can someone please add photos to explain what to do with lapping etc. The Kevlar stocked rifle is a good fit and points well & is very steady off hand. I just do not like the rough bolt movement and know that it can be fixed. "When the wind stops....start rowing. When the wind starts, get the sail up quick." | ||
|
| One of Us |
Get some fine lapping compound, maybe 600 grit and coat the bolt and work it until it is smooth. Do not coat the back of your locking lugs. Brownells sells it. | |||
|
| One of Us |
I have no idea if it's valid for the CZ, but I remember reading that on the Brno ZKK 602 one simple but substantial improvement is to change the extractor collar with a standard M98 collar. (I hope I got the terms right, I'm not a gunsmith). _________________________________ AR, where the hopeless, hysterical hypochondriacs of history become the nattering nabobs of negativisim. | |||
|
| One of Us |
| |||
|
| One of Us |
Honestly, I have had such a good experience with Wayne at AHR why don't you call him, explain that you live half way around the world, and maybe he will walk you through it. AHR is a class act! | |||
|
| One of Us |
Nakihunter, I'll save you a phone call. Aside from the obvious, there are a couple of things to look for that can cause the CZ to have a rougher than normal factory bolt throw. By obvious I mean stoning or sanding any rough machine marks that are visible. Don't use too aggressive a grit, 240 max to start. You don't want to remove more metal than needed. Pay attention to the top and bottom of the extractor and top and bottom of the bolt lugs. These always need work. Wink was correct about the extractor collar needing attention. Some of the collars sit proud of the bolt and have a sharp edge to them. Remove the collar, hold it in a vise, and work it down with some fine paper backed with a file or something flat. Keep the flat surfaces flat and the round surfaces round. Another thing to look for is how the bolt rides over the ejector. This one thing can make the biggest difference in how a bolt throw feels on the CZ. I've found quite a few ejectors that don't recess all the way and end up putting pressure on the bolt forcing it against the top of the raceway. Remove the ejector and take a little metal off the top of it where it contacts the bolt. Be sure to round and polish the sharp top/front corner as it will catch on the extractor collar if you don't. I hope this helps, | |||
|
| One of Us |
Thanks Wayne. Much appreciated. Now I need to sit with my engineer friend who is also a hunter and work through this. "When the wind stops....start rowing. When the wind starts, get the sail up quick." | |||
|
| One of Us |
Valve grinding compound is usually too coarse for bolts. | |||
|
| One of Us |
I slathered mine up with Butch's Bore paste and cycled the bolt (not turning it down) about 300 times. Smoothest action I own now! | |||
|
| One of Us |
gwindrider1 Thanks for that. Could you please specify which parts you smeared the Butche's bore paste on? Would JB Paste do the same job? "When the wind stops....start rowing. When the wind starts, get the sail up quick." | |||
|
| One of Us |
Naki I think it just gives the metal something to slide around on while wearing against whatever is "binding" -- metal against metal. If so, any bore paste ought to do the same. (It would be like cycling the bolt a bunch of times as is only with something to take up the minute "shavings" removed.) Actual grinding compounds work to evenly wear, rather than just what's rubbing. _______________________ | |||
|
| One of Us |
Mothers mag polish works good too and you can pick it up at most any auto parts store. Don | |||
|
| One of Us |
The auto parts pastes are not always rendered. So the grit can impact on metal. There is another product called Autosol which works similar to JB paste but more agressive. "When the wind stops....start rowing. When the wind starts, get the sail up quick." | |||
|
| One of Us |
Following Wayne's advice I checked the lug contact with the rails and the ejector pushing the bolt upwards. Here are some photos of the upward pressure on the bolt at the end of the backward stroke - the red sharpie marks are worn quite a bit while the lower surface is not so bad, but for a few high spot scratches. The clear scratch from the ejector is also visible. 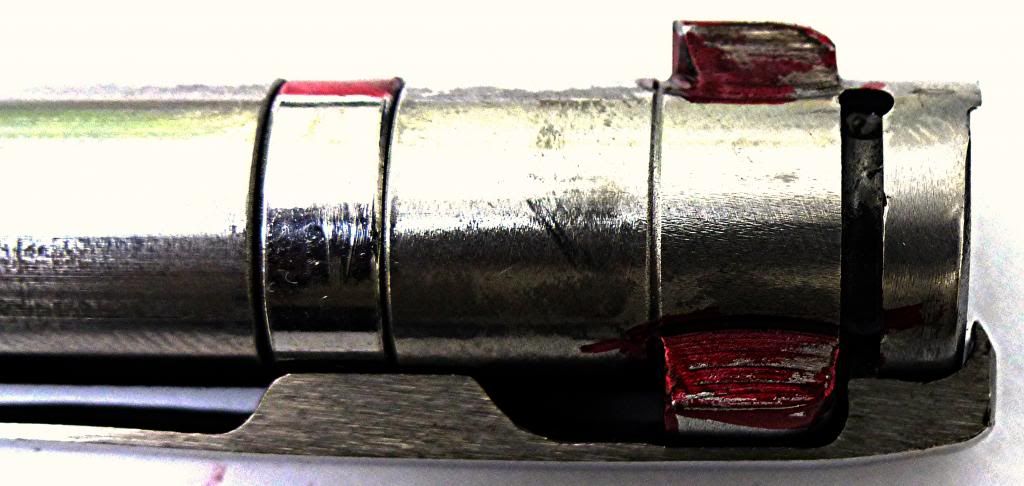 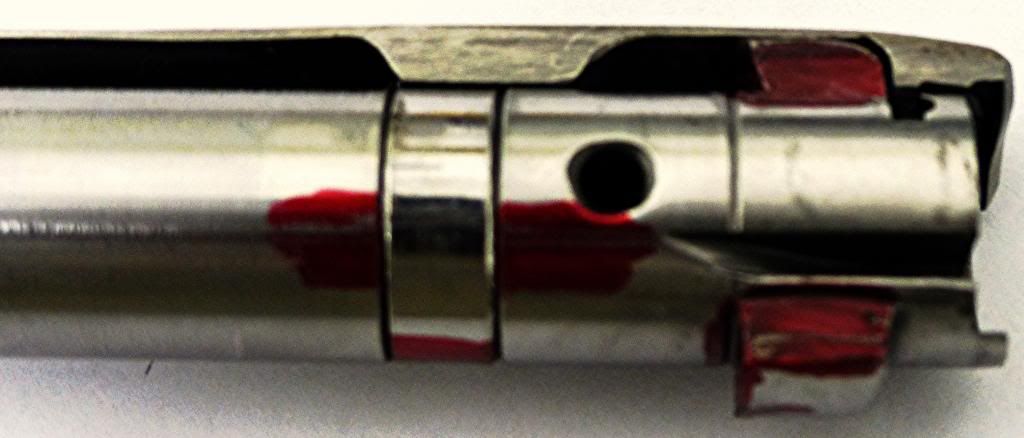 Wayne - could you please tell me how to access / remove the ejector blade so that I can polish it like you suggested. "When the wind stops....start rowing. When the wind starts, get the sail up quick." | |||
|
| One of Us |
| |||
|
| One of Us |
Thanks Wayne. Much appreciated. "When the wind stops....start rowing. When the wind starts, get the sail up quick." | |||
|
| One of Us |
I have worked the bolt some more and I am very happy with the improvement. it is now almost as smooth as my 100+ year old Simson M98 9.3X62! 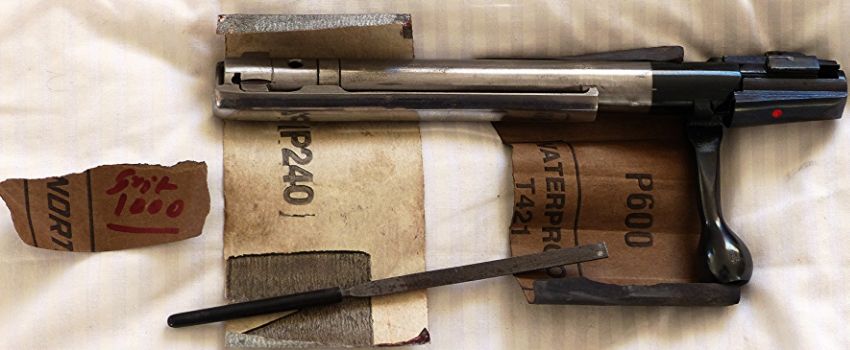 I used 240, 600 & some 1000 grit Wet & Dry. I used the small flat file as the backer. The upper part of the rear bridge is also a major point of contact but it is not relevant for cycling the bolt and for quick reloading in the field. Polishing the tool marks on the top & bottom of the lugs & the extrator makes a huge differnce. The bolt was quite slick even without any oil. I had cleaned the bolt with IP alcohol so that I could use the marker pen on it. As Wayne suggested, the sharp edge of the ejector blade was actually the biggest hinderance to smooth bolt function. I was not confident of removing the trigger and ejector units. So I used the same small flat file to first take some metal off. Probably 100 strokes from the back & front at an angle. 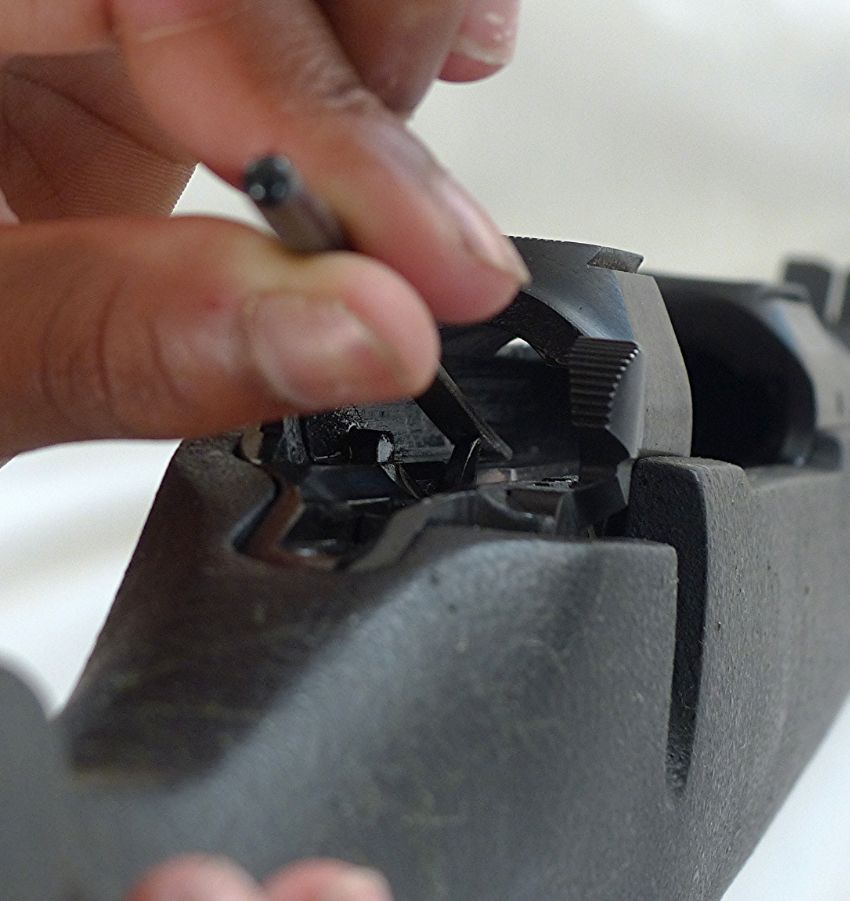 I then polished the ejector blade by wrapping the W&D paper around the file. Bingo - huge difference! The action rails have quite rough tool marks but I am not keen on using any grinding grit that might get into the bolt lug recess or the sear area. I might try some JB paste later but I might just leave it. I did ry to us the but end of a pencil to try and use the 240 grit paper but it was not very comfortable. I might try that again when I am fresh! The rings & ammo should arrive next week. "When the wind stops....start rowing. When the wind starts, get the sail up quick." | |||
|
| One of Us |
I looked at the magazine rails with the ugly tool marks and then played with the tools at hand. 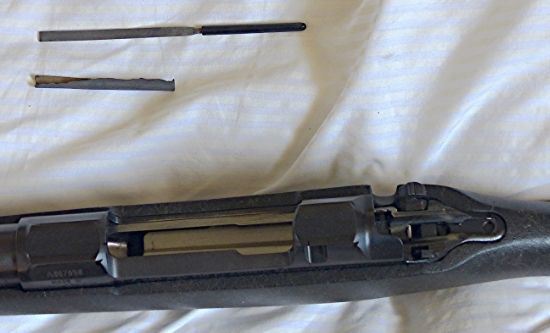 Yes the file and the W&D wrapped around it fits the rail perfectly. 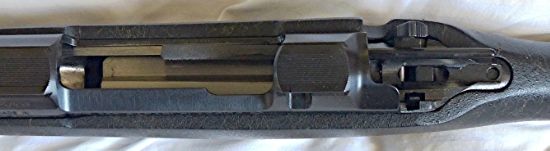 About 40 strokes of 400 grit followed by 600 grit was enough. The left rail was less of an issue. Now I tried the ammo which arrived today. The magazine takes 4 & the chamer takes one while the extracter does click over the round in the chamber. The 5 round cycle very smoothly. It is as good as my Simson M98 in 9.3X62! I am thrilled! Now to shoot her even if it is with open sights .... can't wait! Thanks to everybody for the help! "When the wind stops....start rowing. When the wind starts, get the sail up quick." | |||
|
| One of Us |
I shot the rifle over the weekend after fixing Warne QD mounts and a Leupold 1-4X scope. The ammo cycled very smoothly and I had absolutely no feeding issues. Very happy with rifle and the excitement is a deep, deep and slow one! "When the wind stops....start rowing. When the wind starts, get the sail up quick." | |||
|
| One of Us |
First blood - took my boy goat shooting and I shot a few. Shot one at 120 meters off hand. Totally fired about 9 rounds and I am really enjoying this rifle! "When the wind stops....start rowing. When the wind starts, get the sail up quick." | |||
|
| One of Us |
Thank you for the photos and the write up. Much appreciated! | |||
|
| One of Us |
It's refreshing to see someone perform their own work. As you're now aware it's not voodoo to work on a receiver, merely attention to detail. Thanks for the pictures and write-up. | |||
|
| One of Us |
Good Job Naki! I do the same thing to almost every rifle I get, But I have never done as thorough a job as you did. How is the trigger? IHMSA BC Provincial Champion and Perfect 40 Score, Unlimited Category, AAA Class. | |||
|
| One of Us |
Thanks guys. http://forums.accuratereloadin...801038581#1801038581 This is the other thread about the rifle. The trigger was fine. IIRC I did not have to do any polishing. I just adjusted the normal settings. Being a big bore I did not want it too light. The trigger was very crisp. You can see the good groups I got with all the loads I tried. "When the wind stops....start rowing. When the wind starts, get the sail up quick." | |||
|
| One of Us |
Perfect. IHMSA BC Provincial Champion and Perfect 40 Score, Unlimited Category, AAA Class. | |||
|
| One of Us |
A-1 rifle! I used the same rifle for a day in Africa. Super rifle and cartridge. It may not be as pretty as it gets but it is as good as it gets. The feeding on the one I used was a bit heavy/stiff. Hard to shove the new round up into the chamber. On that one I woud have cleaned up the feed ramp and that area bit. Easy job. You would have no trouble glass bedding the action, yourself, if you wanted to. ( Probably does not read it.) IHMSA BC Provincial Champion and Perfect 40 Score, Unlimited Category, AAA Class. | |||
|
| One of Us |
Naki, Come to think of it, I have the same one in 458 Lott, with the green laminiated wood stock. ( I forgot about it for a while! ) The weight-forward balance is so cool. I kind of wish that I had got a 416 Rigby like you. IHMSA BC Provincial Champion and Perfect 40 Score, Unlimited Category, AAA Class. | |||
|
| One of Us |
Excellent thread! I'll keep sending CZ's to Wayne as needed, but good information to know. | |||
|
| Powered by Social Strata |
| Please Wait. Your request is being processed... |
Guns, Politics, Gunsmithing & Reloading Gunsmithing

Visit our on-line store for AR Memorabilia