 Rifles Custom Built Rifles
 Go | New | Find | Notify | Tools | Reply |
| Mosin-Nagant Custom, possibly Takedown-converted by the time I'm done. | Login/Join |
| One of Us |
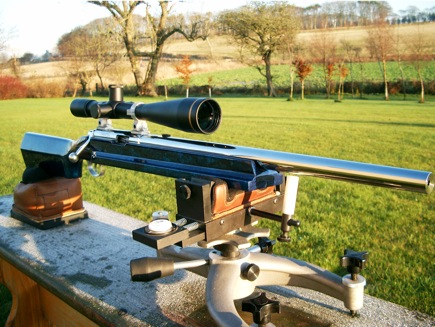
Yes, a Mosin-Nagant. No, I'm not kidding. The M-N 1891 pattern rifle I feel can make as good a sporter as any Mauser did, albeit just like the Mauser, it will have its quirks and oddities. Also, this is being built from a scrap receiver-one that had been cut to demilitarize it and deem it "Not a Firearm" anymore. The initial rework photos will be gory and not for the faint of heart, but rest assured that the heat treatment and strength of the action is perfectly fine. The cosmetics will clean up in the end, but it will take a bit more polish to get the shine to come up. Starting out, I have an 1941 Izhevesk production Mosin-Nagant receiver. It's been sliced lengthwise through the receiver threads, along the top bolt raceway.  A brass insert has been made to help with the welding.  Another brass insert will be machined to be a snug fit into the upper bolt raceway and inserted prior to welding the action. But, before the re-heat treatment happens, There is more welding to do. Just like the Mauser actions that have been shortened, this Mosin will be shortened to shoot .44 Magnum and .44 Magnum based wildcats. (I am planning a .44 Magnum barrel and a .357/44 Bain & Davis to start with)  Now the brass insert in the photo above is only used for the initial reweld of the action ring, or if I were to be welding up mis-drilled scope mount holes, or something else of that nature. it is not long enough to shorten an action. To shorten it up, I have to make a new set of jigs, which is the next set of photos. First up in the shortening is the magazine-how much needs to go?  5 rounds of .44 Magnum fit in the full length mag, by cutting the magazine down behind the floorplate hinge and ahead of the step in the magazine. Some felt marker lines showing some of the thoughts on where to cut:  Once the magazine was tacked back up and some details were observed, I made the decision to keep the 5 round capacity-which means making a new front action screw and making a few adjustments to the modified magazine-the front bolt hole section is cocked a little downward, and I'll have to trim and tack it back on a little straighter now that I know how the floorplate will have to work.  The downward run to the front of the magazine will be corrected and shortened up slightly, as I can't get any shorter in the main magazine body and keep the floorplate functional. It does hold 5 down with room for the follower, though!  To shorten the action, the short magazine body was used to judge how much to remove from the action length, and the action is shortened up behind the front ring-NOT from the rear, as it is done with a Mauser, because of the way the interrupter/ejector and the feed rails are cut. It can be done from the rear but a long slot will need to be cut in for the interrupter/ejector and its angle and placement are critical. Because the action will be heat treated after welding, the forward location of the weld is not critical. A copper bar is turned to fit the bolt bore snugly, and the action is split and the excess length removed.  Next up on the list is to finish the jigging for the action reweld-this aluminum bar will be milled and drilled to align and hold the parts during welding and after welding, will be used as a vise block to facilitate later machining operations.  Because the threads in the front of the receiver will have to be welded up, re-machining them will be a problem. Single-point threading them will difficult due to the interrupted cut, but as my receiver does not have the lug raceways broached all the way through like the later models, I am considering simply removing the threads at the top and bottom and building an interrupted-thread takedown rifle. I can find a few photos of complete rifles, but I have not found many of the process-so I am flying instruments-only on this part! More as it happens. This is to be a fine short field rifle, built from a destroyed bit of scrap metal-so there is quite a bit of work ahead to achieve that goal. If anyone has any details on how I can get the best out of my quarter-turn takedown methods, I'd be glad to hear them. So far, I'm thinking the traditional pair of steel plates and a forearm latch to lock them together. | ||
|
| One of Us |
I've done a lot with MNs. I do have to ask why the receiver ring is sliced through, lengthwise. It will cost you more in welding and machining it back and heat treatment than another receiver would cost, unless you just want to. The rest of what you are doing is a good project. Mans are super strong actions though; most people don't realize that. While you are at it, move the bolt handle back and then you can weld a bridge on, and use a regular Leopold one piece mount. I've done that a few times. | |||
|
| One of Us |
This is a "california demil". The state of California destroyed these, and they were very attractively priced paper weights. A new receiver is 200+$ these days...you can buy a complete Mauser action for LESS money! I do all the welding and heat treatment here, so it only costs me time and electricity. I have thought about moving the bolt handle back and will probably do that too, but seeing as I don't yet have a bolt, it'll be in the future. I'm mainly worried about having enough bolt length to get the firing pin spring to work. I think I can make it work, but it's one of those things...It'll take a bit of doing. | |||
|
| one of us |
Very interesting project. I shall stay tuned!  Doug Humbarger NRA Life member Tonkin Gulf Yacht Club 72'73. Yankee Station Try to look unimportant. Your enemy might be low on ammo. | |||
|
| One of Us |
Well maybe I shoulda left that magazine body alone. Fixed the length and angle of it today, but now it's got a bit of a tilt to the left...a little shrinkage here, little stretchage there... I'll get it. | |||
|
| One of Us |
Proves that California is more f'd up than I thought. | |||
|
| one of us |
Worth it just to get a Kal-demilled action back in harness. There is hope, even when your brain tells you there isn’t. – John Green, author | |||
|
| One of Us |
I think I have a 357 B&D reamer. Let me know if you want me to check. | |||
|
| One of Us |
Checked, yes I do. Sing out if/when you want to use it. | |||
|
| One of Us |
Neat project. I like this sort of thing. Ain't that neat.. I doesn't always have to make sense from a $$ stand point. Sometimes we just like to do stuff. De-Milled M/N's. Must've been a terrible run of MN crime in CA to get that serious about eliminating them from the landscape. Free needles and dope,,,give me that Nagant before you get hurt sonny. | |||
|
| One of Us |
Did a bit of work here and there on this during the week. Tonight I'll finish up the jigs and make some screws to hold the parts in position for welding. If I'm feelin' froggy I'll give a go at welding it tomorrow afternoon after taking care of the grape vines. With luck, it won't move around too much. Emailed with Cecil Fredi yesterday and today about getting a stock blank and extra forearm blank from him. I budgeted 150$ for stock wood, which is more than I've ever spent on stock wood before. And I've come out with some nice ones, too! There will be some Serious Planning going on prior to cutting into it, I can guarantee you that! I am looking into cleaning up the trigger guard a bit-I am a bit stuck with it as it's integral to the magazine, but I'd like to work out a mag floorplate release into the trigger bow, and I plan to convert the rear action screw from it's 10* angle forward, to parallel to the front action screw. | |||
|
| one of us |
Check out stalingradfront on instagram for the mosin nagant pistol he built. Bet the recoil is ferocious. Yeah I know that's illegal here in the U.S. but he's in Russia somewhere. Doug Humbarger NRA Life member Tonkin Gulf Yacht Club 72'73. Yankee Station Try to look unimportant. Your enemy might be low on ammo. | |||
|
| One of Us |
It's not illegal in the US if you cut the action the same way I did, or buy a demilled action and reweld it. Then it's officially a new reciever and can be built as a pistol. It's called an "Obrez" by the way, and yes, the recoil is unruly, to put it mildly. | |||
|
| one of us |
Doug Humbarger NRA Life member Tonkin Gulf Yacht Club 72'73. Yankee Station Try to look unimportant. Your enemy might be low on ammo. | |||
|
| One of Us |
Got a pretty good start on the welding jig now. I had to order in some tooling, as hand-grinding the 55* threading insert without having a 55* fishtail gauge didn't work so well. I kept getting it cocked one side or the other. Once that comes in, I'll make some screws to bolt the action into place. It's all built from scrap out of the pile, a purpose-built rig would cost quite a bit in just brass and copper. I may have to make a matching magazine jig, in order to get the dang magazine straight.  The copper bar was soldered to the brass bar, and then turned in the lathe and drilled for the screw. After the machine work was done, I desoldered and cleaned every trace of solder off of both parts, to avoid having them solder back together from welding heat.  The weld prep is quite wide-and will take multiple passes on each side. But it's the only way I feel like I can get 100% penetration on the thick sidewalls, without having burn-thru problems from too much heat at a time. It's only metal. Hopefully I can get it to blue up decently enough.   You can see that the action is jigged by the front recoil lug, which has to be milled square on the bottom and turned square to the threads before it will fit on, (and this is part of blueprinting anyway, so it should always be done I think) and only a few thousanths had to come off to get it square and straight. The rear section of the action is held by a magazine-well shaped island in the middle, and the little ledge in the rear AND it's held straight and vertical by the trigger ears as well. Another bolt comes up to hold the rear section by the trigger spring bolt hole.  This right here is why I wish I'd made the brass section a bit longer, and ultimately I made a solid copper bar that fits the whole length of the action to locate it after the receiver ring is welded up. Or, to do one that wasn't cut through the ring later. The brass bar isn't quite long enough to suit me for doing the action-shortening welds. I am working with Cecil Fredi for a stock blank-He had two that had enough material on them in my price range in Bastogne Walnut, one didn't really strike my fancy but the other is gorgeous. I have asked if he had any in English in my price range, and the size needed, but it's mostly to make sure I really like the first stock blank he proposed. Once the deal is done, I'll post some photos of the blank-I should be able to get both forearms and the buttstock from the same blank, as long as I make no gross errors. | |||
|
| One of Us |
After looking through some gorgeous English walnut blanks, I didn't find any that I felt had enough wood on the blank to make the second forend. So, Bastogne Blank #2 it is. It's on the way!  It is the bottom blank in the photo-the upper blank with its color change just wouldn't give the second forearm I was looking for-the bottom blank has enough material and is all one color. | |||
|
| One of Us |
Might have hit a snag here folks. The .44 caliber barrel I have is a 12 groove barrel. Just noticed it. That doesn't bother me-but it did get me wondering. So I grabbed a .440" round muzzleloader ball, and popped it down the bore. No tight spots, no inconsistency in the rifling. Not so bad. Diameter across the lands is 0.425", diameter across the grooves is 0.432", and it's a 12 groove barrel. Crap. I checked the twist rate while I was at it-seems to be 1 turn in 28". At least that's OK. So, knowing that the barrel will likely open up at the muzzle even more when I turn the profile, I checked the standard bores for the caliber. Turns out, SAMMI spec for handguns is 0.417 bore, 0.429 groove, but for 12 groove rifle barrels, the spec is 0.424 bore, 0.431 groove. I'm still oversize to meet that spec too. We'll see how it shoots before I cut into that nice stock blank...I'll bed the thing into a 2x4 first. | |||
|
| One of Us |
Receiver ring almost done-have to fill up that little spot still.  Jig slipped out with a tap from a mallet and holding the threaded bit in the lathe chuck, and turning it out. Inside, you can see full penetration through the cracked section. Even though I'll be milling out that section of threads, I wanted to be as solid as possible first. After that dot of filler and a clean up filing:  And with the full-length bolt raceway jig tapped in (it's a tight finger-press fit.) Two more welds, then into the heat treat oven for normalizing, austenizing, and then the quench and temper. THEN we'll know the true tale of how straight the action will be! | |||
|
| One of Us |
Well, unfortunately, this project is dead for now, until I find another receiver. After ultrasonic checking all the welds, the welds are all fine. But the action ring is cracked along the lower side, about 140 degrees clockwise from the welded area. It's cracked just above the recoil lug, about the spot someone would have had an action wrench on it. | |||
|
| One of Us |
Darn! I was excited to see how many different micro-brews you would have pictured by the end of the thread | |||
|
| One of Us |
From what I see so far,,I'd bet you ( not me!) could weld it. It's not like it doesn't already have a weld thru it in a few spots already. It's going to be re-HT'd. | |||
|
| One of Us |
The problem is the location of the crack. The threads under the weld would need to be removed in order to remove the stress riser formed by the still cracked threads-I can get in there to make the weld, but only to the root of the thread. I can't get the penetration through the thread without melting the brass backer. So if it was cracked lower on the ring, in an area where threads already needed to be removed, no problem just weld it up and remove the crack with the rest of the threads that get removed. But where it is, is a section of thread that normally wouldn't be removed for the takedown cut. As to how many Pint Night glasses...well, there's a few. The project isn't completely dead, I still plan to build a takedown .44 Magnum, but wether or not I can fix this action is in question. | |||
|
| One of Us |
I'm checking with some friends to see if I can turn something up. I want to see how this project would turn out! | |||
|
| One of Us |
ROUND 2! FIGHT!  Action #2 had a little rust pitting on it, and the pits won't file out easily. Only two or three pits, but the old one was spotless. I ran this one across the ultrasonic tester BEFORE I started working on it-I didn't find any cracking but we'll see after the ring is welded.This pair of actions is at least 76 years old, and they weren't exactly cared for the best. I upped the preheat a bit this time, heating to 350F before welding and postheating to 400F, then wrapping the entire thing in two inches of ceramic fibre blanket. The front action ring will still be 150F tomorrow morning. | |||
|
| One of Us |
Unwrapped the thermal blanket and blew off the dust. Here's what one of these looks like properly welded:  After filing down the excess weld, this is the result. No voids, no pits, no cracks.  Inside the ring, I was unable to get photos. Just blackness inside. But, the weld fully penetrates, with minimal overpenetration to file and smooth out. It's actually a little bit nicer job than the first one was. Now, back to fixing the first one. It's tweaked 20 thou. That's not so bad. I had a go with welding up the crack, and started by cutting the crack out past the end of the cracked area. After scrubbing, straightening, and polishing, I'll re-fit the brass threaded insert and have a go at fixing the receiver for a non-takedown application. I could feel a bit safer about that.  Here's a better look at how much material gets removed from one of these actions:  When the shop cools down below 90F, I'll go out and make the cut to shorten the action up and square up the front receiver ring. | |||
|
| One of Us |
Would you care to share your settings- amperage and voltage- for your tig set up as well as tungsten diameter. Good looking welding. I get carbon inclusions and still having trouble figuring what is going wrong. Sorry for the diversion. | |||
|
| One of Us |
For this project, 1/16" diameter 2% lanthanated tungsten, 1/16" diameter ER80-SD2 filler metal, #7 ceramic cup on a WP-18 water cooled torch (I just leave the water cooler on it, a WP-9 gas cooled would work fine for gun work), 1/16" stickout, 17CFH gas flow, and I run a foot pedal for amperage. TIG is a constant current process, the voltage will fluctuate with your arc length, current setting, and filler metal. For the above weld, I set the pedal at 0 to 100A, and run between 50 and 55A. You need to be in a real hurry at that speed, or you're gonna have a bad time. Trying to weld too cold will cause many, many more problems than going too hot-at least if you go too hot you can send it for heat treat and it'll still be safe to use after. Too cold, and nothing you can do but grind it out and do it over. | |||
|
| One of Us |
Thank you. | |||
|
| One of Us |
Worked on the weld cleanup some yesterday, and did a little heat shrinking of the long side of the action, to try and pull it back straight. It's within 5 thousandths now, but I fear the action threads and lug abutments will still be out of line by the original 30 thousanths of an inch-they may need to be recut to compensate.  I figure I should go through and finish the first action all the way through, and see if I should make different jigs to make doing the second one better. I'll just use the best of the two to complete the project with-and the other will make a good second project sometime down the road. | |||
|
| One of Us |
A friend on another forum suggested I may be able to set up and re-cut the threads to 1"-16TPI, which would clean up the weld root and pretty well eliminate my concerns about the thread root being cracked. I haven't figured out just how I'll do it yet, but it's an idea I plan to explore. I'm thinking a pipe-type cat's head will be what I have to build. | |||
|
| One of Us |
Sir, I'm not a welder but I have a friend that is a "real" welder. His to the point thoughts: The man needs to learn the correct procedures to "PURGE", as heat sinks will not shield the back side of a weld even if press fit. All of his heat effected zones & pulled carbon will take hours of extreme heat/oven time & can not be replicated in re-heat treating. In another post- He claimed that he has frozen parts to be welded in ice blocks to dissipate heat. Kentucky Hill Billy engineering at best. | |||
|
| One of Us |
Interesting that we keep consulting welders, and not metallurgical engineers. I do have a day job... And to put your mind at ease, I do have a full quality lab where we do weld analysis, as well as in-house heat treating. A back purge isn't called for here, as the internal surfaces are not particularly sensitive to decarburization or carbide formation. The material is fairly sensitive to HAZ cracking, as these receivers are made from the Russian equal to AISI C1040 carbon steel, and are through-hardened to RC 38-40. I can provide you the assay of the round 1 receiver, if you'd like. | |||
|
| One of Us |
Interesting thread..... Wasn't your post a bit harsh Butch? There is no aluminum heat sink involved here. Just brass and copper weld stops. Right? Life itself is a gift. Live it up if you can. | |||
|
| One of Us |
Wolf and custom bolt. I made no comment or opinion, I just copied and pasted my friends message. Just go for it and I hope it will be safe. | |||
|
| One of Us |
The thought goes through my mind "Solution in search of a problem," | |||
|
| One of Us |
Still don't much care for Mosin-Nagants. Yet I see a cut action being re-worked into something useful for plinkin' on the cheap. But I'm nothing more than a dreamer according to some. . Life itself is a gift. Live it up if you can. | |||
|
| One of Us |
I was a bit rude in my reply, I will admit. Wasn't exactly called for-but it's been a very common assessment from MANY people, and after being called out as a "Kentucky hillbilly engineer" I just cammed over the press and snapped back. Metallurgically, the receiver after heat treat will only be weaker in places where a crack or incomplete fusion is allowed to remain. If I hadn't had to weld up the demil cut in the receiver ring, I would probably be able to shorten the action cold enough to not need a re-heat treatment at all. But, in this case a demil cut and a crack eliminate that option. Duane, which solution are you referring to? I've seen a few of your short Mausers and have a 1894 Brazilian set aside for a short Mauser one day. I can only aim high and be satisfied with what I get if I aim to build one as nice as one of yours. | |||
|
One of Us |
Interesting project! Seems to me that welding up Mosin would be great practice for shortening a Mauser action. What force or guile could not subdue, Thro' many warlike ages, Is wrought now by a coward few, For hireling traitor's wages. | |||
|
| one of us |
Wow someone like a challenge. | |||
|
| One of Us |
Hell of a lot of difference in welding a cut in a front ring and shortening a receiver. | |||
|
| Powered by Social Strata | Page 1 2 |
| Please Wait. Your request is being processed... |
Rifles Custom Built Rifles

Visit our on-line store for AR Memorabilia