 Rifles Custom Built Rifles
 Go | New | Find | Notify | Tools | Reply |
| Better Photography | Login/Join |
| One of Us |
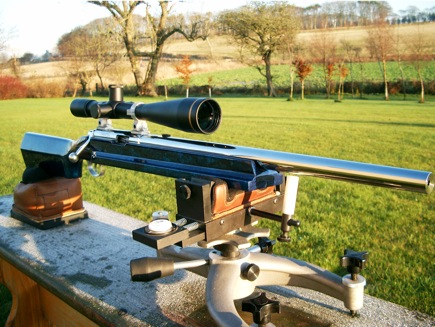
Since joining this forum earlier this year I've seen exemplary photos of custom rifles and have been challenged to take better photos myself. I've since ditched the blue table cloth on a folding table and have rigged up a tri-pod with brass rods that suspends the rifle away from the back drop. I've purchased different muslins and a stand to hold them. I've upgraded to a mid-level DSLR (D3400), and use a tripod to steady the camera. But I'm still not satisfied with the picture quality. Any suggestions? I am taking the photos outside since I don't really have any more space in the shop and realize this could be part of the problem. I've attached pics of the last shoot. It's a .275 Rigby build. Please keep the Cerakote bashing to a minimum   | ||
|
| One of Us |
I've been tempted to do that as well. The best photos seem to be the ones with no shadows. This means the light has to come from everywhere. using the sun you could try an opaque sheet/vellum between your light source and subject and/or a reflector under your subject. | |||
|
| One of Us |
I just googled "opaque sheer" on accident and got images I wasn't expecting Looks like I can get opaque ABS sheets on Amazon for fairly cheap. I'll give that a try. Thank You! | |||
|
| One of Us |
OK no problem - however blaser bashing is still warranted | |||
|
| One of Us |
Thank you Lindy2 for all of the pointers. A few questions: 1. What do you mean by an interesting background? Should it be some kind of pattern or just a different solid color? 2. You've given a lot of instruction for how to produce the proper light with different sources of flash. Are these only if shooting inside or would they also be beneficial for outdoor shoots when shooting in shady areas? I'm starting to learn the importance of shooting fine guns in their best light. My graphics guy is constantly berating me for giving him poor photographs when he's working on brochures. | |||
|
| One of Us |
Good advice above. I use a white background, and extend it at a 45 degree angle forward well above the rifle, and below the rifle I also extend it out at a 45 degree angle. With the flash on the camera, I turn the flash vertical, have a 45 degree bounce attachment. The bounce attachment softens somewhat, and both the 45 degree angle extensions help minimize the shadows on the backdrop. A solution that will not produce as good a result as the recommendations above, but better then and average photography seen in many forums. Clarence | |||
|
One of Us |
Have to get rid of the big shadows. That's a minimum. Here's a good, non-distracting background from a recent post here: http://forums.accuratereloadin...1019521/m/9051011032 "Evil is powerless if the good are unafraid" -- Ronald Reagan "Ignorance of The People gives strength to totalitarians." Want to make just about anything work better? Keep the government as far away from it as possible, then step back and behold the wonderment and goodness. | |||
|
| One of Us |
I see what you mean by interesting. I've seen photos with knives, zebra skin, etc and really like the look of those. Thanks for all the advice. Looks like I have quite a few more photo related purchases to make in order to get the quality up to snuff. | |||
|
| One of Us |
Thanks Austin Hunter. It was actually Butch's photos that got me going on the photo quality kick. Beautiful photos and rifle.
| |||
|
| One of Us |
stick in a can, my favorite photo tool as well as walmart polyester shower curtain on a frame as a soft box. This video shows it well. https://www.youtube.com/watch?...8CD82626F127&index=4 | |||
|
| One of Us |
Thanks gunmaker! That looks like an incredibly simple setup. I will be giving this a try. I also noticed he was using a roll of paper as a backdrop. That should work better than the polyester muslin I've been using since it won't wrinkle. I ironed the crap out of the muslin but it still was full of wrinkles.
| |||
|
| One of Us |
Try keeping the background way behind the subject. I usually use a gray or black twin bed sheet with a piece of conduit through the large hem to hang it. You can see the reflection in the bolt knob of my 2 home made "soft boxes" Stick in a can X6 with 3 clamp lights on each shower curtain. They are about 20"x60". My exposure times are very long and I have a great tripod and ball head. I focus and take the pictures wireless through an app on a tablet. Otherwise they would be out of focus. I use my spare garage so walking around during exposure doesn't shake the camera. If I take them in the house, I have to sit still or the picture will be out of focus. Due to my limited ironing abilities, I usually digitally replace the background using Adobe Photoshop. Here's a wrinkled gray sheet background and then a green gradient that looks much better. 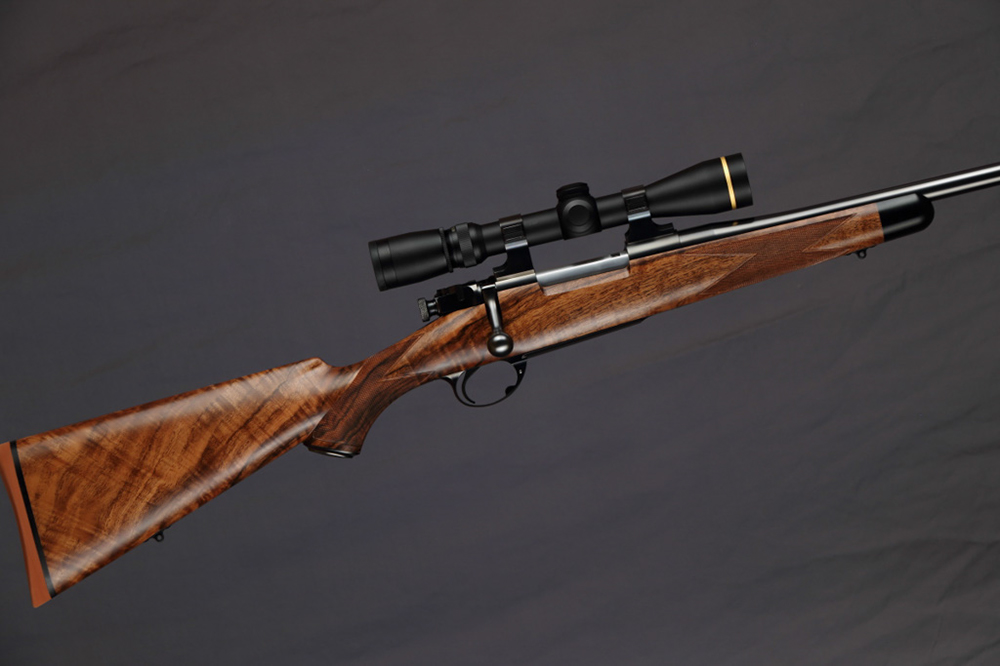 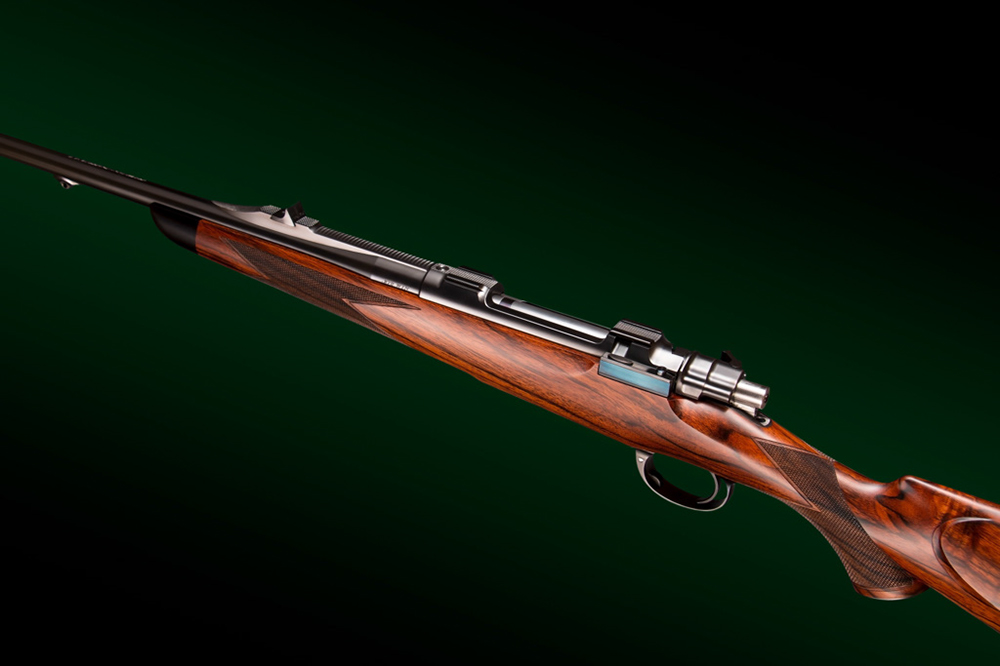 | |||
|
| One of Us |
The best light available on a budget is outside on a bright but overcast Day. There will be no hard shadows to deal with. | |||
|
| One of Us |
You're right Joe. Overcast is great diffused light. My problem in the shop, is by the time the rifle is ready to photograph, I need to get it out the door. I can't wait for an overcast day without wind, show or rain. Sometimes though the photography has to fight for space in the garage with something getting worked on. | |||
|
| One of Us |
I love the gradient green. I suppose it's easier to photoshop than to create a perfect backdrop. This may be a stupid question, but what does a longer exposure time help with? Gather more light? I have a remote for my camera so I'll be able to snap the photos this way.
| |||
|
| One of Us |
I have had the exact same problem. I know overcast is better but inevitably the day the rifle is finished it's either pouring rain or there's not a cloud in the sky.
| |||
|
| One of Us |
I turn the ISO down to 100 for a less grainy picture. With an aperture of around 8.0 the correct shutter speed is around 1 second. I block off all the light from windows and the only light hitting the rifle comes from the clamp lights. If I had strobes behind the shower curtain, then the shutter speed would be high enough to hand hold the camera. Replacing the background in Photoshop is not a quick task for me. Unless it's a quick job and that would look bad. | |||
|
| One of Us |
Thanks Lindy. I couldn't agree more. Now if only I had a Rolex lying around that I could use I will be putting yours and gunmaker's pointers into practice in the next month or so and will post an update with how it goes. "I once went to a seminar where a bunch of attorneys were complaining that they weren't making enough money and the guy giving the seminar told them to quit worrying about the people who don't have money and worry more about those who do. I never took that advice, preferring to help those who are financially disadvantaged, which is why I don't own any custom rifles, although I just love looking at them. My point is that for a guy like you who is trying to sell a premium product you need to associate YOUR product with other premium products. For example, try a photo with one of your very fancy custom creations along with perhaps a Rolex watch and a Loveless custom knife and possibly a passport, an expensive pair of sunglasses, and some quality leather goods, etc. Then, get that photo in a brochure and get the brochure in the hands of folks who have enough money to buy your product. That usually means going to them rather than waiting for them to come to you. And that means getting the brochure in places where people who shoot and have money hang out. Good luck.[/QUOTE] | |||
|
| One of Us |
MNR, Listen to James,not Lindy2. | |||
|
| One of Us |
I'd be curious to see how the pro's prop or support a gun for a full length photo. As always, many thanks! | |||
|
| one of us |
There's video available from the ACGG that has some good information on this subject, Mustafa Bilal gives the course. His setup doesn't require anything fancy or expensive. My greatest piece of advice came from Simon Clode at Westley-- he told me to buy the biggest softbox that I could fit in my shop. I bought a 6'x 9'and mounted it to my 500 watt strobe and found that my photos improved immediately. | |||
|
| One of Us |
Not sure how the pros do it, but I use a piece of 1/4" all thread and have made different sized brass bushings that thread onto the piece and fit snugly inside of the barrel. It's about 10" long and threads into my camera tripod. At the base of it I've stacked several rubber washers for the muzzle to rest on. Of course this requires some photoshopping afterwards to remove the contraption from the image but it at least suspends the rifle away from the backdrop.
| |||
|
| One of Us |
Most folks would be better off to forget photo props and concentrate on shooting quality documentary photos. I just completed a photo shoot for a gunmaker's web site and the ugly CZ on the cover of latest Sports Afield. Custom Low Wall, 17HMR  Calendar Cover  Precision Shooting Cover URL=http://smg.photobucket.com/user/SDH/media/PSJune08CVR-.jpg.html] 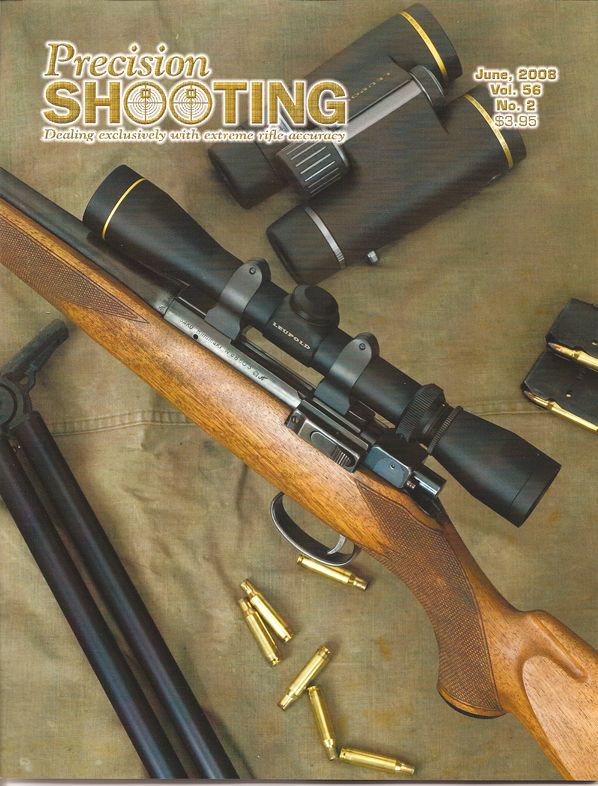 [/URL] [/URL]Workbench Photo  ACGG Life Member, since 1985 | |||
|
| One of Us |
SDH, The lines on that Low Wall are breathtakingly elegant. Dick Wright | |||
|
| One of Us |
SDH, your gunmaking and photography is impeccable. I've spent many hours examining the rifles you've documented on your website of other builders work as well as your own for inspiration and guidance. I see the importance of good photography when it comes to capturing the small details of a rifle. | |||
|
| One of Us |
Thanks for the kind words! Photography has been extremely important to my career. Once the guns are gone, the work is done the seminar is over... I currently have a Wiebe fullstock in the shop I'm very much looking forward to photographing for Sports Afield. Jerry Fisher fullstock .375 H&H  Lenard Brownell fullstock .243  ACGG Life Member, since 1985 | |||
|
| One of Us |
Thanks Austin Hunter for the link to the photos of my Lott. Workmanship was superb and the young fellow that did the photos did a pretty good job. He has not photoed any weapons before mine, but has a nice studio. | |||
|
| one of us |
TSquare needs to post on this thread. IMO, his photos are the best in the best when it come to custom gun photography. | |||
|
| One of Us |
AZwriter, Many thanks for the kudos and glad you like my photos. At one time, I had a pretty nice home studio in my garage, complete with strobes and all the other odds and ends. I also used 4x5 view, 2-1/4 x 2-1/4, 2-1/4 x 2-3/4, and both Leica and Nikon 35mm format gear. About twenty years or so ago, I put my strobe gear, large and medium format gear in storage and it is still there. Before the digital format takeover, I did sell my Hasselblad gear, but kept the Mamiya 6x7 medium format gear. I also kept my Sinar 4x5 view, but sold a couple others. I went back to nature, so to speak, and now use nothing but my Nikon 35mm gear and diffused sunlight. Living in Arizona as I do, I have lots of sunshine to work with, but it does require a bit of taming down before use. I do like a bit of related background items to enhance the images, but I have to be careful as I have a tendency of overdoing it with to much stuff and the image becomes too cluttered. It all depends upon the purpose of the image when I'm deciding on backgrounds. I remember doing one image once with a Tartan plaid background cloth. It was horrible! In doing my annual submission to Gun Digest on custom guns and engraving, I see a lot of images of guns and engraving sent to me by makers and engravers. With the exception of three makers that I can think of quickly, all of whom post here, maker or engraver made photos most often don't make the cut. The quick exceptions that I can think of are quickly James Anderson, Steve Hughes, and Dave Wesbrook. Their photography is equal to their gunmaking which is, of course, outstanding. Quite a few artisans have professional photographers that they use and most of them are uniformly excellent. Lo res images from a point and shoot rarely make it in the book. The attached images have been posted on AR before, but for those that missed them, here's a few.      | |||
|
| One of Us |
Guys, Here are a couple more that I posted with my original post, but for some reason, they didn't show up. The image using the camo coat as a backdrop borders on being too busy I think, but not nearly so bad as the Tartan plaid that I mentioned. TT   | |||
|
| One of Us |
It seems too simple to even mention, but perception wise something that really helps to make fantastic custom gun photographs is fantasic custom guns! You can possess all of the technical expertise in the world but if the gun isn't interesting then perception wise the photograph will not be looked upon the same. Also, I might mention proportion. When one places the gun for a photo its good to take a look at what size the gun will look like in relation to other objects in the photo. When you place the gun way in the back it doesn't look as natural, meaning that it looks smaller than other objects in the front that now look larger. T-Square I still am holding on to (and occasionaly use) my Hasselblad and my Sinar P2 with the Copal DB shutter. Curious which model Sinar you still have. | |||
|
| One of Us |
T-Square: Wonderful pictures. I actually like the camo jacket photo. The rifle really stands out. Lindy2: Couldn't agree more in regards to the subject having to be worth while. I love it when the gun rags are promoting the newest $200 rifle. Their photographs are usually incredible. So much so that you can see every gap in the stock, rough machine marks, and boulder blast finish | |||
|
| One of Us |
Lindy, It is a mint A-1 with a Schneider-Kreuznach Symmar-S 180mm lens in a Copal No. 1 shutter. Don't think I've used it in over 20 years and not much since I've owned it. As the couple photos shows, it's still in it's case. <iframe width="480" height="360" src="http://s147.photobucket.com/user/Tsquare_02/embed/story"></iframe> <iframe width="480" height="360" src="http://s147.photobucket.com/user/Tsquare_02/embed/story"></iframe> | |||
|
| One of Us |
Don't know why the photos didn't show. I'll try again shortly. TT | |||
|
| One of Us |
I'll try again and see what happens. TT   | |||
|
| one of us |
I need to work on my photography as opposed to just pictures for advertising a sale on the internet..I really like James Andersons work and his photography. I'll start by tossing my bed sheet and find a grey and a black background. Ray Atkinson Atkinson Hunting Adventures 10 Ward Lane, Filer, Idaho, 83328 208-731-4120 rayatkinsonhunting@gmail.com | |||
|
| One of Us |
Ray If you really like James Anderson's photography work and want to emulate it, you need to do more than toss your bedsheet. You need to learn Photoshop. | |||
|
| One of Us |
NO. Light comes from one direction and one direction only. The key to even light is to soften the source through diffusion and placing the light high enough, relative to the subject. If needed, fill can be used below the subject to keep the ratio between the highlights and shadows under or about 1:3, which yields nice depth. Light coming from a window is too low, light coming from a skylight is better. | |||
|
| One of Us |
Most of my pics are from a camera mounted flash using white cards to bounce the light. low tech, minimum setup, not catalog worthy.  or 2 light sources, one from low in front and one from above.  | |||
|
| Powered by Social Strata |
| Please Wait. Your request is being processed... |

Visit our on-line store for AR Memorabilia