

 The Accurate Reloading Forums
  THE ACCURATE RELOADING.COM FORUMS
  Rifles
  Big Bores
  CZ Stock Reinforcement
Go  | New  | Find  | Notify  | Tools  | Reply  |  |
| one of us |
CZ Specialists, I thought about just emailing DaggaRon with my questions; however, after following this forum for 8 months or so, I'm betting quite a few folks have bought CZ's in 416 or 458 recently. I'm also betting some have gotten the stocks glass bedded and reinforced and some haven't. So as a "public service" advisory ,I hope those of you experienced in this project you will answer some greenhorn questions that are specific to CZ's and hopefully in the process it may answer enough questions for others to help them "get it done" as well. 1. Making Room: How much of the stock do you �route out� to make extra room for the glass bedding -- and where?, any down the barrel channel? - or is the thickness of the glass bed not as important as simply removing dead space and �slack fitting spaces� from inside the stock regardless how thin the glass may end up being in any given spot? 2. Using Glass Bed and Steel.... On the main/action recoil lug seat (in the wood stock) there appears to be a small piece of black metal seated such that it reinforces the wood that the action/main recoil lug rests against. It's a bit thin, do you replace this and if so with what size piece of steel and of what type-- machinists keystock perhaps? Is this what is called an "internal cross bolt?" 3. Barrel Recoil Lug; On the front/barrel recoil lug which is shaped like a steel "F" laying face down on its side with the head toward the action, do you do anything more to the stock at this location other than glass bed it? That is, do you install steel reinforcing (internal cross bolts again?) into the stock for the two lug "fingers" to recoil against? 4. Silver Soldering: Regarding the front/barrel recoil lug, is it okay to use low temperature silver solder to "weld" it to the barrel so there will be no moving around or slack? I like the design, but it just kind of lays in there currently. (Note: Per your earlier thread, I'll fill the channel where the "sliding nut" for the forward stock screw with clay as part of the prep for the glass.) 5. Front External Cross Bolt: I can see the logic of putting it through the stock "right" behind the main/action recoil site how close to the action lug, or the installed "internal crossbolt") do you put it? 6. Rear External Cross Bolt: Tell me it's okay to put a cross bolt here (a'la M-70) behind the magazine? My only concern is that when I look down at the stock from above, there is very little wood in the trigger/magazine area and what little there is looks kind of delicate. Does an external cross bolt actually go thru here and how close to the magazine box? What is the mission? It appears it would do little more than just "hold the two sides of this "much hollowed out" portion of the stock together, i.e. mainly to keep the stock's "magazine sides" from flexing/bulging? I have bought the B-Squared jig for installing the external crossbolts and it should work well on the front one, but may be of less value for this rear one. 7. Pressure Bedding: I'm planning on using Brownells Accuglass. In their video (perhaps more in tune to accurizing than strengthening) they encourage �pressure� bedding, i.e. letting the glass cure while the gun is held upside down in the vice and a 5 to 8 pound weight hangs from the end of the barrel. Do you use this technique on rifles/calibers like a 416? If so then how much weight do you use? (BTW, just how does this idea create any accuracy benefit anyhow?) Sorry about asking you to write an encyclopedia -- feel free to answer in total or in part, but I'm betting quite a few out there haven't got the job done yet and some unhappy days may be awaiting some of our new CZ faithful that have delayed the project. Thanks In Advance, EKM [ 08-15-2003, 22:34: Message edited by: ELKampMaster ] | ||
|
| one of us |
ELKampMaster, Lemme take a stab at it, as I own and operate ten of the Magnum Mauser Clones, from .338 Lapua to .510 JAB, plus one little brute, the 9.3x62mm Mauser. One of the bigguns is a BRNO ZKK 602 (a bonafide CZ actually), one is a BBK-02, the rest are CZ 550's. I have one synthetic stock on a CZ 550 Magnum, one synthetic stock on the BRNO ZKK 602, and one laminate stock on the BBK-02. That leaves eight heavenly hogback Lux stocks that I have lovingly reinforced or paid to have done by gunsmiths. I think I have done every imaginable bedding trick in the book, variously, to this collection of shooters, and more is better with the bigger bores. I think the early stock cracking reputation came before CZ started adding the cross bolt rearward of the tang. Before that the CZ would often pop a divot or spring a crack behind the tang, on into the grip. I started off properly with glass bedding my first CZ .375. I got careless with a .458 and shot it about 50 times before reinforcements arrived. All that did was crack that delicate looking piece of wood between the magazine well and the trigger well. Yes that sliver is big enough for a crossbolt, and a good place to put one, along with one in front of the magazine well. 1. Some of our elitist sycophant (psycho infant) friends cringe if any epoxy bedding is showing on their rifles, anywhere. I do not. Just remove a minimum of wood in the barrel channel to show little epoxy along the barrel at the top edge of the forearm. You can go deeper underneath the barrel, but not much is needed, just enough to make an opaque layer of skin-tight fitting epoxy. I prefer to fill out the entire forearm full contact, and do some sanding later if free-floating is desired, for the part of the barrel beyond the barrel lug muzzleward. Yes, it is mainly about sealing the stock and filling in the deadspace. 2. That little strip of black or charcoal colored stuff behind the primary recoil lug is plastic. Pick it out. Hog out the recoil lug recess with reckless abandon, and lay a 1/8" to 3/16" diameter threaded steel rod/headless bolt in there to be buried under the epoxy, as a hidden crossbolt. Then install the visible crossbolts using your jig. 3. The "F" block in the barrel channel is just epoxied into place and allowed to have epoxy flow around it with modeling clay protecting the areas where the barrel lug settles in. No crossbolt necessary here, but a hidden one can be put in beneath the block, in a separate step before the barrel channel bedding. 4. The barrel recoil lug is integral already. You must be referring to the "sliding nut" that rides in the rails of the recoil lug under surface. This just applies downward pressure on the recoil lug to keep it in contact with the "F" block. If you want to keep the nut from sliding around, all it takes is a ding, with a punch, on the rails fore and aft of the nut to keep the nut lined up with the escutcheon in the forearm when it is seated. 5. The exposed cross bolt goes through the center of mass of the stock wood between the magazine well and the primary action recoil lug. Look and you will know. You can do this in addition to the hidden crossbolt in the epoxy under the recoil lug. 6. If you don't crossbolt in the finger of wood between the trigger well and magazine well, it will crack eventually. If you do not feel confident using the jig and drill press here, get a gunsmith to do it. 7. With the CZ big boomers I start with full contact neutral pressure then free-float beyond the barrel recoil lug if accuracy is not good, but it usually is with the CZ system, and light tension, just snug, on the forearm screw. I have not had to do any pressure bedding with the CZ's, but I have with light barreled rifles in fiberglass stocks of another make. Then I hung a mesh bag from the forearm swivel base with boxes of bullets to equal about 7 to 8 lbs., with the rifle upright/horizontal/level, not upside down. With the laminate BBK-02 stock for the 470 Mbogo, I did all the above plus an axial 1/2" steel bolt through the grip area. It had a visible crossbolt behind the barrel recoil lug of standard configuration. I did not trust the laminate as much as I do the excellent CZ Lux walnut. A couple of my hogbacks do have machined aluminum pillar bedding too. They don't all have all the tricks though. Aloha | |||
|
| one of us |
Oh yeah, everybody knows about relieving the wood behind the tang. CZ's come from the factory with this relief. Just don't get it too tight when bedding the tang area. And any area of wood inside the stock not covered with epoxy bedding can be painted with polyurethane or a thin layer of clear epoxy to seal it. Aloha. | |||
|
one of us |
Hidden crossbolts. Like Daga hath said, use screws. Here is a pic of my fix on my Hannibal stock. I used #4, #6 and a #8 stainless machine screws with the heads cut off since I wanted the very fine threads. More surface area to bond to. You can bend into an "L" shape and put into a corner where you think spreading may occur or anywhere for that matter.  How much wood to remove? How much wood do you want to remove? Don't be shy guy, break out The Home Gunhack's Best Friend, The Dreaded Dremel and turn it loose! Here is a Target stock I stiffened by adding stainless brakeline. I later added a second directly down the center. I also added two on the underside to reinforce the rail.  As for bedding showing? I say burn that bra....oops(!) wrong website...Let it show!! Left to right: Target stock with a 2-level bedding, Husqvarna Model 146 stock with no bedding and my .500 A-Square Hannibal Model stock in all their naked glory. Remember, you can slam shots or sip a single-malt Islay scotch, but both methods will get the job done. Sipping is highly recommended though.  [ 08-16-2003, 03:22: Message edited by: Nitroman ] | |||
|
| one of us |
Ah, yes, let's not forget the "full steel endoskeleton" approach as illustrated by Roger. | |||
|
| one of us |
ATTENTION! Nitroman's 3 Cupidfish.com photos (from just above) are shown just below. I had to scan these from my paper notes so sorry about the B&W... 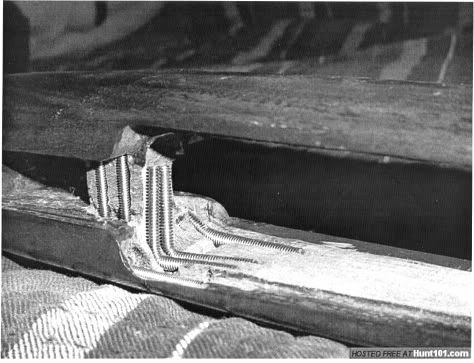 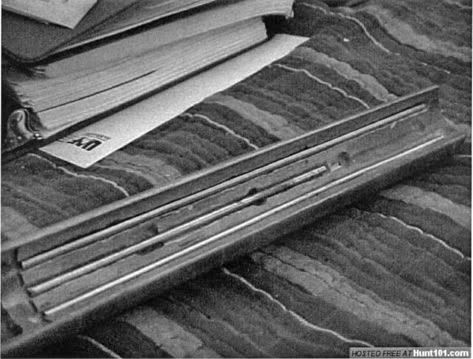 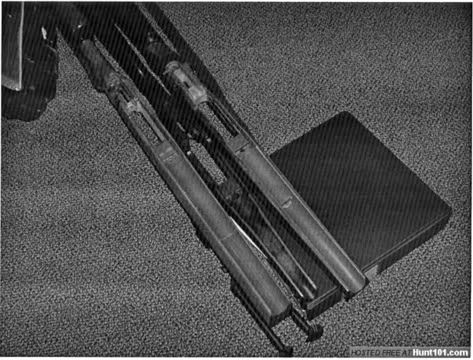 ============================================== Dagga & Nitroman, Dagga, thanks for your thorough replies - point on point, that kind of direct input ups our confidence substantially --- "A nice new rifle and you are going to do WHAT to it!" Nitroman, sometimes a picture is worth a thousand words --- "I see" said the blind man as he fell off of the cliff! Or in my case, "I see" ....... machine screws (not pointed wood screws); sometimes with an "L" shape to anchor with; massive routing and wholesale "infrastructure" reinforcement all to be smoothed over with the beloved glass bedding compound yielding a smooth, monolithic, stronger stock. Things are much clearer now! Dagga, one question, do you specifically recommend against silver soldering the "F" shaped front recoil lug to the barrel? Jack Lott would have been proud of you guys! Again, thanks EKM | |||
|
| one of us |
ELKampMaster, That F block is a bedding block in the stock. It should not be soldered to the barrel. The recoil lug on the CZ barrel is integral and works because its rather small bearing surface abutts the big steel F block in the forend, and the forend screw keeps it held down tight. You can get rid of all this contraption and get a standard recoil lug added to the barrel in its place, but that would involve a lot of work. When I rebarreled a .416 Rigby to 45 Lapua, I had a standard recoil lug on the McGowen barrel, and had the forend screw retained and screwed into the bottom of the new recoil lug. Then the F block may be retained to serve as a crossbolt in effect, sunk and buried in epoxy, or a standard crossbolt of hidden threaded rod may replace it, all filled and covered with epoxy. | |||
|
| one of us |
I think Robgunbuilder had a post awhile back on recoil lugs. I bought one from him and installed it with a single machine screw and Hi-force 44 solder. It has worked extremely well. I don't silver solder anything on a gun barrel. | |||
|
| one of us |
Dagga, Okay, no silver solder and in my case no solder at all. (and 470Nitro, "if you do solder, then use the good stuff.") All good points and well taken. The more I think it through, if we had permanently attached the "F" block to the barrel and dropped it into the glass bedding without a careful clay and resist job between the top side of the "F" block and the bottom of the barrel to establish an "escape" channel, then the glass bedding would have come up onto the top side of the "F" block and things would have gotten embarassing. The barrel would have been very permanently attached to the stock. Duh! I like to think I would have figured it out before it hit the "point of no return" but one never knows. Thanks for the catch! I assume the expoxy that temporarily holds the "F" block in place will be broke loose upon the seperation of the barrel/action from the stock and that one would clean it up a bit on the correpsonding surfaces and that would be it. A rock solid "F" block would now be intergral to the stock, but the (small) front recoil lug would be "custom fitted/guided" right to the bearing face by the glass job and held together snugly by the front forearm screw. Okay, got it. EKM [ 08-17-2003, 04:10: Message edited by: ELKampMaster ] | |||
|
| one of us |
ELKampMaster, The pointer about the Hi-Force 44 solder instead of silver solder is a good one from 470 Mbogo, but only needed if you are rebarreling and attaching a lug to the new barrel. Make the F block one with the stock and get the CZ barrel lug precisely mating with the F block in the stock. You got the idea. That CZ barrel contraption is O.K. and will deliver sub-MOA accuracy and strength of bedding. Don't change it unless you have to. Maybe the Kansas elephant slayer will note that more has been said in the forums lately about the virtues of the CZ Lux than simply his words: "Them hogback stocks sure are good." | |||
|
| one of us |
Daga, Nitroman, et al: (1) When one does wholesale and massive routing and laying of machine screw reinforcing (or stainless steel brake lines for that matter) what is your technique for making sure the glass bed gets back into all the little nooks and crannies for maximum strength and bonding to your steel work? (2) Especially regarding laying in steel extras, do you work the glass into the routed space and then press the machine screw internal crossbolts into its "final resting place" or vice versa? (3) Do you use a course syringe of some sort or just go with a spatula type approach? I've heard cautions against "working" the glass too much as it can create air pockets, yet I'm thinking this isn't your daddy's glass bed job. Another anal detail, but just trying to get it right! I'm hoping I'm not the only one warming up their Dremel and their drill! Thanks, EKM [ 08-18-2003, 08:23: Message edited by: ELKampMaster ] | |||
|
one of us |
Elk, Let's be careful with that, "wholesale routing". With the A-Square stock it was an all-or-nothing approach and with the target stock I had so much wood to work with I did not care. To your questions: 1. Determine where spreading or compression of the wood will occur. For spreading you need to reinforce the wood to keep it from happening and with compression, you want to spread the pain. 2. I used the machine screws becuase they were small, stiff and long enough for what I needed to do. Several top gunsmiths gave me advice on where to place them in relation to the crack you can see at the right edge of the white stripe of the blanket the stock is on. 3. I washed the screws in isopropyl alcohol to degrease and laid them aside with forceps until I needed them. I use popsickle sticks (available at hobby stores in big bags) whittled into various shapes to get where I needed to go. I would mix the epoxy, carefully coat the screw holding it with the forceps and place it into the cut that I had previously filled (carefully) with epoxy). Then I would cover all. 4. Use less than 50:50 metal powder mix. In other words, if you use a tablespoon each of resin and hardener, use one tablespoon of metal powder. I have found going any more will make the mix difficult to work and doesn't enhance the hardness. You can get pounds of powdered stainless steel off the web going through art supply house for $20. Forget going through Brownell's, they are super expensive for a little tub. www.artstuf.com for example. 5. Carnauba pastewax, heat your metalwork and put on one or two smooth even coats. Have fun! | |||
|
| one of us |
Nitroman, Thanks for the words of caution, I can see where you had leeway or necessity for being aggressive that I may not have. Okay, bring 'er back to center. Daga, You have mentioned internal cross bolts and machine screws --- a more specific question. (1) On a healthy, but non-target stock (like my CZ) do you use the "L" shaped machine screws like I saw in Nitroman's Hannibal, or (2) Do you just use short pieces crossways of the stock in behind the impact point a bit? (3) If using short pieces for an internal crossbolt, do you use more than one? As you can tell, I'm trying to regulate my Dremel activity here. Thanks Again, EKM [ 08-18-2003, 22:44: Message edited by: ELKampMaster ] | |||
|
| one of us |
EKM, Nitroman has a good epoxy recipe, but the "L" bolts are an extreme case of stock repair of a 500 A2. Do not use other than straight cross bolts unless doing Herculean repair jobs! Go to the hardware store and buy a 3' or 4' long piece of allthread, threaded steel rod, and you will have enough crossbolts for an army (small army). You can buy the spanner wrench headed cross bolts from Brownells for fancy jobs. Or have a smith fabricate some. Straight cross bolts, no L bolts in a healthy stock. I like to bury a 3/16" cross bolt near the main action recoil lug, then the exposed cross bolt through the center of mass between the magazine well and the primary action recoil lug. Then, a hidden cross bolt in the thin bit of wood between the magazine well and trigger group. Am I blue in the face yet? Now, I am off to my next CZ project: Attaching QD levers to the CZ factory rings. They're gonna be better than Talley or Warne, and homemade. Aloha | |||
|
| one of us |
Daga, Not only should you blue in the face, but you deserve to be nominated for sainthood for your patience. I am meeting with my friend tomorrow night to start in on removing the trigger group from the action, installing the external cross bolts, and yes, routing in the space for an internal cross bolt (straight, not L shaped), removing a little wood here and there and epoxying the "F" block to the barrel. The "point of no return" will come on another night. With your help and that of Nitroman, I am feeling WAAAAY better about tackling this ourselves! Again thanks! Aloha EKM | |||
|
| One of Us |
Daga, were can you get levers for cz rings I thought that they may return to zero as they have the lug just as the BRNO talley's and warnes do (Daga can you verify that ??). I have a set on my cz .375 and will be using them on my newly arrived lux 9.3x62 cz as well. I also had my .375 cz mounts tapped and rethreaded for standard leupold Torx head screws by my smith !! so theres an idea for you. And I agree daga the cz rings work well. | |||
|
| Moderator |
Thanks guys.. I wouldn't have thought of the nightmare frankenstock... but I am going to try it on my broken 500 stock... I like that one better, I think.. thanks gents jeffe | |||
|
| one of us |
PC, The CZ rings will return to zero as well as any, within a half MOA. However, I am not looking for that. I just want a way to quickly remove the scope in an emergency, no fiddlin' with screwdrivers, etc. I also have some discarded Leupold QRW rings, relegated to the "parts" heap. To make your own CZ QD lever rings: Drill and tap the QRW lever for the metric M6-1.0x25mm socket cap screw. Getting the levers to synchronize in the screwed down position is the only fiddly thing about it, involves a little incremental grinding or filing where the screw cap meets the QRW lever. When all is set right the screw can be set in epoxy in the lever as a thread locker and to prevent stripping the threads with vigorous torquing down the road. It works! Looks great! | |||
|
| one of us |
Even if you are keeping the stock CZ barrel I would dump their "hokey" Barrel mounted lug and attach a proper one. Particularily if you are doing so much work on your stock to Fix it! There is plenty of room and a proper lug is easy to fit. If you can measure the barrel diameter where you want a new lug to fit, I can machine one and send it out to you. You can then solder it on yourself.-Rob | |||
|
| one of us |
The CZ barrel lug contraption works fine, and when mine shoots 3/4 MOA in .416 Rigby, I wouldn't dream of replacing it with the standard barrel lug. If rebarreling, it is a great idea to start from scratch with a standard lug, fill in the escutcheon hole in the forearm with a walnut plug, checker the plug, and refinish the entire stock. Or have that forearm screw go into the bottom of the standard recoil lug. I have done all of these. All worked well. No difference but aesthetics. When you get the the CZ QD lever rings set up and timed right, matte blue or parkerize all components to match before applying the epoxy or red Loc-tite to permanently set the metric screw threads in the drilled and tapped Leupold QRW lever. [ 08-20-2003, 06:36: Message edited by: DagaRon ] | |||
|
| one of us |
I have started laying metal to wood on the CZ stock for my 416 Rigby starting with the internal crossbolts; in my hand for scale: 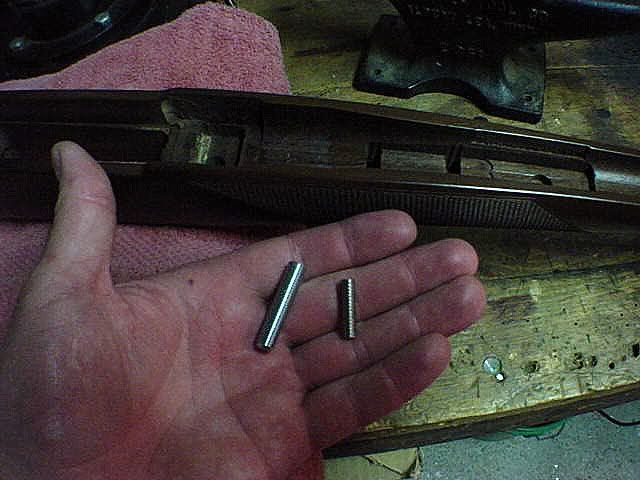 and laid into the stock: 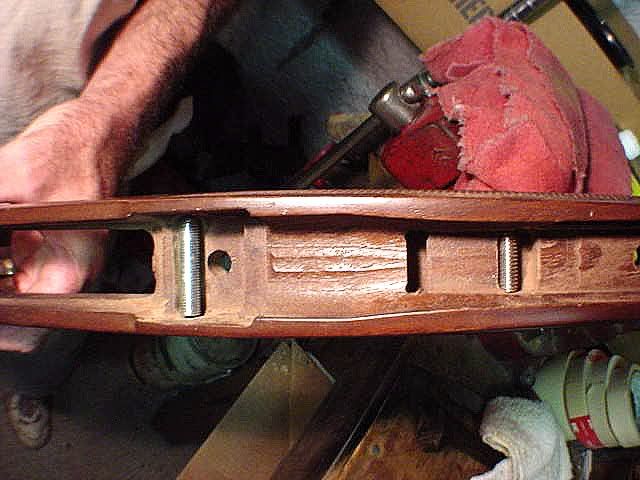 and we've glued the "F" block to the barrel: 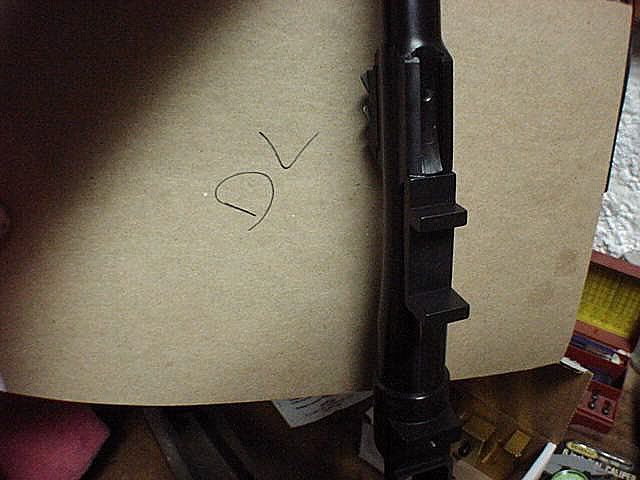 When re-assembling the action & barrel into the stock with the internal crossbolts "laid in" it is a semi-tight fit with just a hint of metal machine screw against recoil lug(s) metal as it goes together -- it does seat in all the way and smoothly though. We have "opened" up the lug sites on the "non-recoil" side so the glass bed can "flow" when we assemble the rifle and put the "squeeze" on the glass bedding compound (Brownells Accuglass. Question #1: Brownell's Accuglass makes absolutely no mention pro or con as to adding stainless steel powder to the epoxy/gel mix. Have any of you done this with Accuglass or is this a very product specific technique? Note: The B Squared Cross Bolt "Jig" is of no use with the CZ stock; however, some of the accessory pieces that came with it like the cross bolt "spanner" and specialized bits will likely prove to be handy. Question #2: We are working next on rigging the stock square to the drill press for drilling two holes for the external cross bolts. Any suggestions on how to "trap" the stock square for drilling since the general purpose B Squared jig doesn't work? We'll come up with something, but not reinventing the wheel is alway welcome (we have an old stock we are going to practice on before going after the CZ stock.) Question #3: Glass bedding is probably a week or two away. Anyone see any glaring wrong turns being taken here before it is too late to correct? Thanks For Your Advice, EKM | |||
|
| one of us |
Argghh!!! Supposed to epoxy the F-block into the stock, not onto the barrel!!! (DagaRon flee thread in anguish) | |||
|
| one of us |
Ah, Yoda (DagaRon)! Luke Skywalker has cut off foot with light saber! The idea was indeed to have the F-block captured in the glass bedding and "become one" with the force, no no the stock. We used a weak epoxy in securing it to the barrel with the idea that this will place it exactly against the barrel lug as the whole works submerges into the AccuGlass. Then the plan was for this weak epoxy on the F-block/barrel junction to give way when the barrel/action is "broke out" of the glass with the aid of the resist. We tested the removal of the F-block expoxy already and it comes loose fairly easy. Still flawed thinking? Or does one need to "do" the glass bedding in multiple steps instead of one grand "slather and squeeze"? With the first of the multiple steps being to epoxy (Accuglass) the F-block to the stock and let cure before proceeding to Acuglass rest of the stock. EKM (Luke S.) [ 08-30-2003, 10:37: Message edited by: ELKampMaster ] | |||
|
| one of us |
You might consider using Brownells stainless steel bed instead of their acraglass. As for setting up to drill the hole squarely use a 90 degree angle plate bolted to the drill press table & the stock clamped to it ( using squares & levels to make certain all is square & plumb. | |||
|
| one of us |
Just an update on the reinforcement of my CZ550 - 416 Rigby. We peened the dimples out of the magazine box as some rounds had been fired thru the gun with before hand and the recoil of the rounds in the magazine had "punched" the front of the mag well (see photo below) 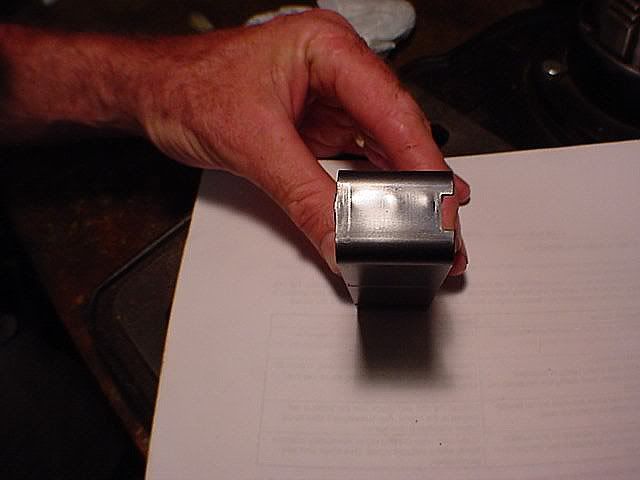 Then we reinforced the front (exterior) side of it per the Jack Lott article. Three photos follow -- notice in the third photo that when you assemble the box together with the action and the hinged floorplate you can only reinforce the exposed portion that lies between the two: 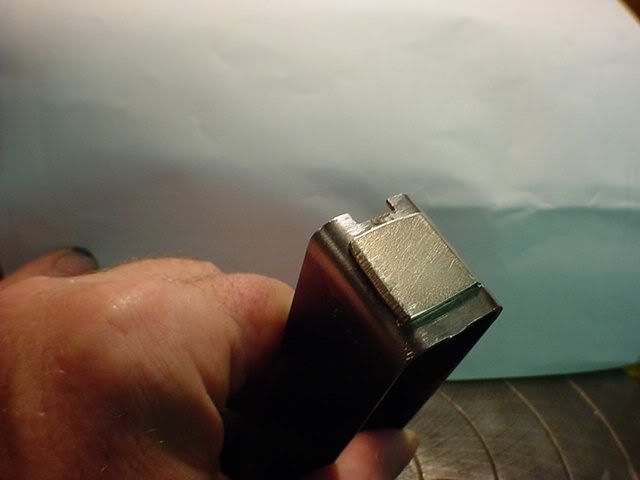 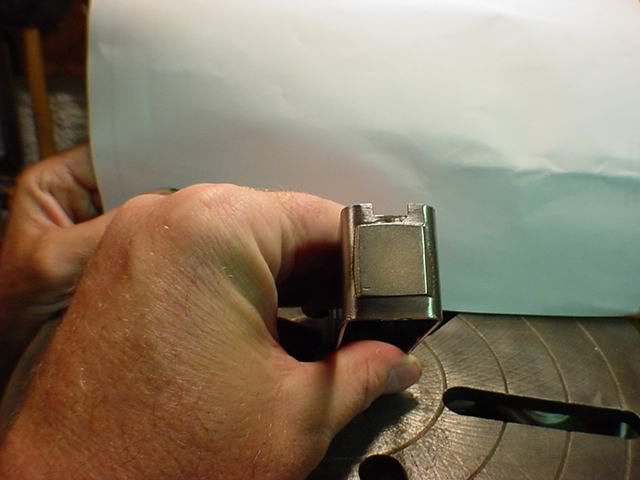 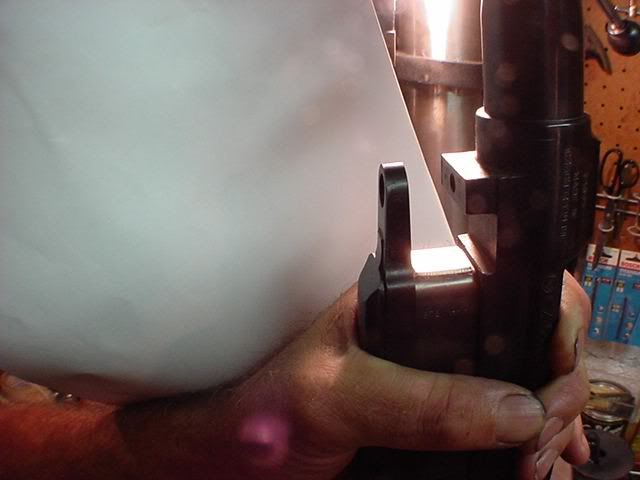 Next we tackled the drilling of the external crossbolt holes on the drill press. We covered the stock in masking tape and used straight edges and caliper "hole depth" measurements to "chart out" the meat/sweet spot from the inside of the stock onto the outside where we could "target it" with the drill press.... "X" marks the spot (with holes already drilled, sorry -- we didn't capture the "before" picture: 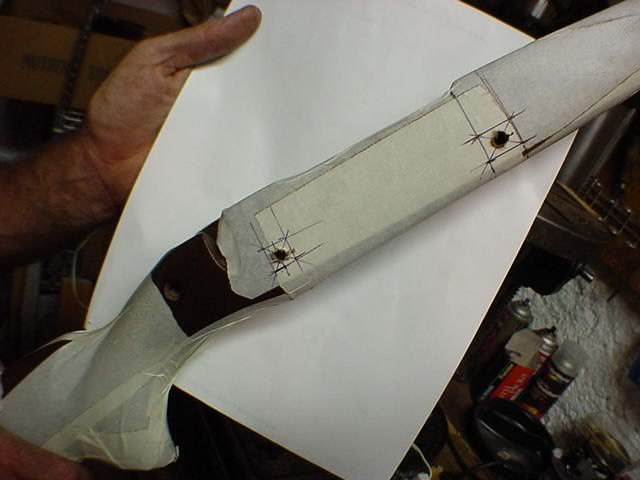 Some have recommended using levels etc. to get the gun "square" to the bit of the drill press. We generally found that unsatisfactory, as there are too many non-square surfaces -- so we removed the CZ factory installed external cross bolt from the wrist of the stock and put a drill bit into the press that was much SMALLER than the factory drilled external cross bolt located in the wrist and then used it as a "benchmark" and then positioned, wedged, clamped and mounted the stock on the attachment plate of the drill press accordingly. It is mounted properly when the small "benchmark" bit passes through the factory drilled hole without touching the sides and staying equal distant from the sides all the way through -- very direct. The "approach" of the "benchmark" bit to the factory drilled wrist external cross bolt hole: 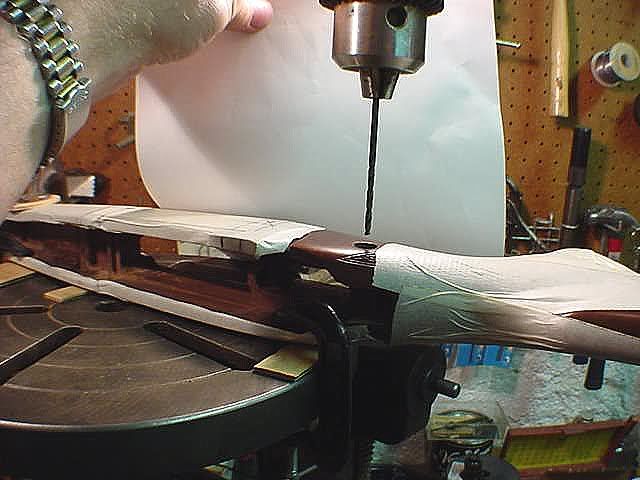 .... and a "dark picture" of the "benchmark" bit having passed clean through the stock (protruding from the bottom) without touching the sides -- great (and easy) allignment. 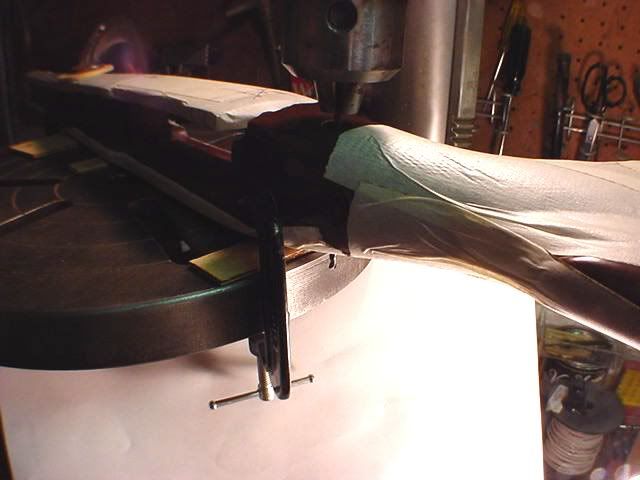 Notice the tip of the "benchmark" bit showing between the stock and the drill press "mounting plate" "Finishing in" the external cross bolts and the glassbedding are next on the agenda.... I'm going to know this rifle inside and out before I'm done. Thank you for your help and comments (and emails)! EKM | |||
|
| one of us |
ELKampMaster, I am relieved to hear about the knock-off F-block, as a little heat and a brass brush will get any epoxy residual off the barrel. I understand. sounds like a workable, different approach. I am also learning about magazine box reinforcement myself. Thanks for the illustrations and discussion. | |||
|
| one of us |
Here is a TIP for drilling crossbolt holes in gunstocks and 1) getting them straight and 2) not having the wood tear out,3) putting them in very tight places. Use a Lathe. Put a brad point wood drill in the headstock and use a 60 degree center in the tailstock. run the Lathe at 60 rpm or less. Using divinding calipers mark the sides of the stock for exactly where you want the hole to go through. This is extremeley important on CZ stocks where it's very very tricky to put in a crossbolt hole just between the trigger and the mag box. Lay the stock accross the Lathe compound and set the center and brad point drill exactly on the spots you have marked. Now turn the Lathe on and while turning the tailstock handle push the stock gently into the drill. You will get a perfectly straight hole that will stop exactly at the brad point without tearing out. Reverse the stock and drill through the other side. Perfect Job every time. If you don't have a Lathe find a #2 or #3 morse taper center that will fit your drill press table center hole and after making sure the brad point drill is on center, you can do the same thing after making some sort of levelling block.-Rob | |||
|
| one of us |
The job is nearly finished! The three external and 2 internal crossbolts are in.... [Note: Hunt101.com lost my photos so for these last three I had to scan B&W out of my paper notes.] 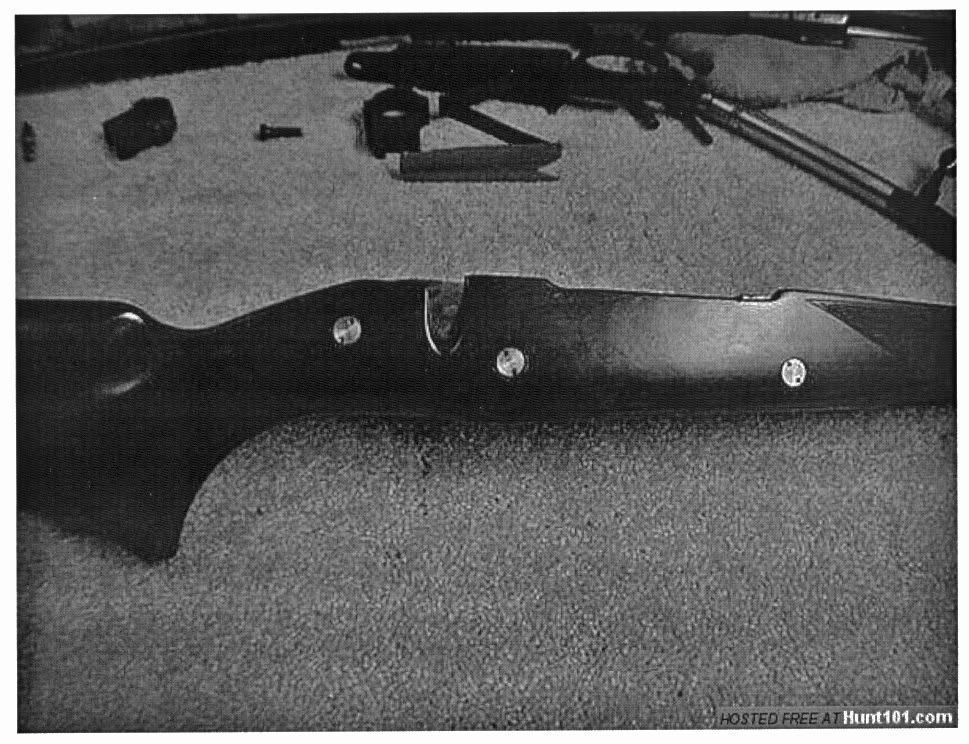 Also the glass bedding is complete. Main recoil lug/magazine area.... 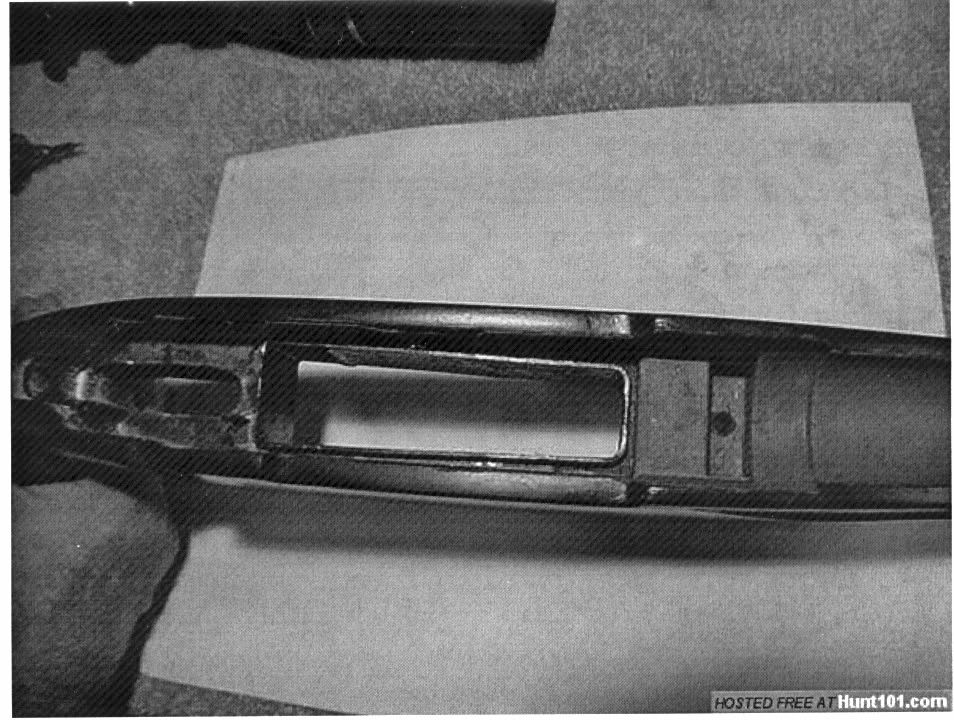 The "F Block" detached nicely from where it was glued to the underside of the barrel (per plan)and is now nicely embedded in the glassbed. Note the absence of glass in the sliding nut area as we filled this with clay to discourage infiltration of glass bed into this key area.... 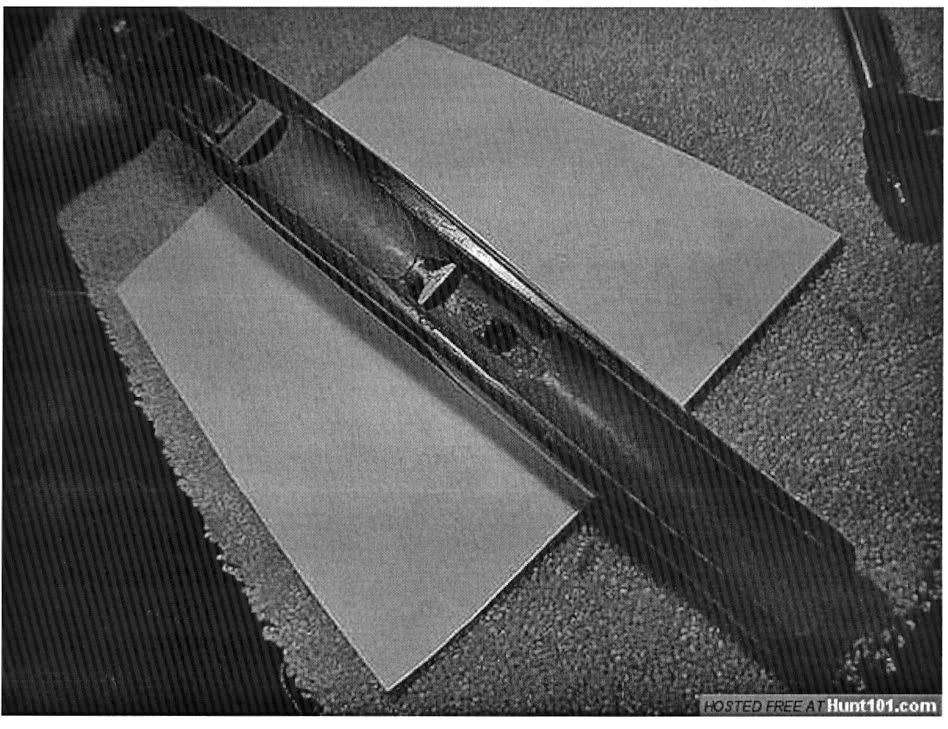 Interesting experience overall. The next one will be a lot easier; however, I did get to know the rifle pretty well this way. Thanks for all your help and inputs. Never Go Undergunned, EKM | |||
|
| one of us |
EKM, Wow! Built like a bank vault now. Warms the cockles of my heart. Strong work! | |||
|
| one of us |
I use a Brownells cross bolt jig that I slightly modified so it will work both front and rear...simplifies life and I can install a set of cross bolts in roughly 20 minutes...I use Talley cross bolts.... Two cross bolts and a simple glass bed job at tang, recoil lug, barrel channal to 2nd recoil lug, will hold any rifle together.... | |||
|
| Moderator |
WOW Luke.. remind me to send my PH barreled action to you for this. Excellent work, and and i hope it's as strong as it looks. steelbed would have been my choice. estheticly, I would have hidden the third xbolt, but WOW it looks great jeffe | |||
|
| one of us |
Great information guys. I have a question on the ZKK 602 barrel hold down screw at the barrel lug. What have you guys found to work best for accuracy? Presently, there is some clearance and the barrel can be pulled down giving it a curve. I don't think this is desireable or the original intent, but I'm guessing. I haven't attached a dial indicator yet but there is some definite movement downward movement of the barrel when the barrel screw is tightened. I am guessing that a person would like zero clearance at the barrel lug/retaining screw area (between the forend and barrel mount). To correct this problem, should the barrel be free of any pressure in the barrel channel(original pressure point at forend cleared of wood contact) prior to bedding the area around the barrel screw/lug? Once the new bedding has cured, a person could then experiment with accuracy - I.E. add forend pressure if required. Normally I would free float the barrel entirely, but the barrel screw is an area I have no experience with. BTW - would the area between the receiver and the barrel screw mount be free floated? [ 10-07-2003, 20:30: Message edited by: JJP ] | |||
|
| one of us |
Repaired thread --- got all the pictures back up by one means or another. Now available for viewing by those who are interested, of which there has been some recent interest. ---------------------------------- Never Go Undergunned, Always Check The Sight In, Perform At Show Time. Good judgment comes from bad experience! Learn from the mistakes of others as you won't live long enough to make them all yourself! | |||
|
| One of Us |
EKM, Thats a huge help. I appreciate you getting those pics for me. I'm a visual kind of guy and having pics to look at makes things much more understandable. I can't thank you enough. I'm sure I'll have more questions as I begin my work. Have steel bed, cross bolts on order. | |||
|
| one of us |
Just a quick general note: If you feel the need to lay longitudinal stringers as in the NITROMAN photos, modern carbon-fiber arrows beat the Hell out of brake line! Just fill inside and coat outside completely with epoxy before bedding them in. Model airplane hobby suppliers have "glass balloon" filled epoxy that is just as strong as and half the weight of pure epoxy. Use this stuff where you want "stiff" and "strong" but not where there will be impact loads. Don_G ...from Texas, by way of Mason, Ohio and Aurora, Colorado! | |||
|
| one of us |
I have since done the same stock reinforcement on a CZ 550 in 458 Lott using Steel Bed but the same internal and external cross bolting. However we did apply some different tricks: ** Cover every square centimeter of the stock with blue painters tape, where ever even a smudge of bedding goo gits on your wood, the finish there will never be the same! ** When "x marks the spot" for your cross bolts... use a dull pencil and draw lightly or you will indent (scribe) the wood right thru the tape. ** For your internal cross bolts, take the diameter of the bolt and determine how much of the wood you are going to grind away (on the butt end side of the world) and draw in a go/no go line so you don't go too far. Our goal was to have the bolt touching wood on one side and the steel of the lugs on the other and still have the rifle assemble easily --- test this BEFORE you open up and mix the bedding compound. ** Drilling cross bolt holes! The stock is NOT smooth, square, and flat like a 2x4! Using the "site the drill bit within the existing wrist hole" technique is a sound method to tell when the rifle is square on the turn table BUT keeping it there is an another matter! Trick #1: Take a 1" x 3" x 8" piece of oak and insert it half way thru the magazine well hole (no metal needed) to give the stock a pair of little stubby "wings" while it is laying on it's side. One "C" clamp on each wing lets you (a) firmly "trap" and hold the stock in place AND (b) lets you adjust the "roll" of the stock around its lengthwise axis by loosening one and tightening the other. [NOTE: This is NOT shown in the pictures} Trick #2: Use carpenter's shims to lift/lower the forearm end vs the butt end of the stock to get it square to the bit. However, where ever you put one shim in (from one side) you need to put one in from the other side just adjacent to it (maybe barely touching shim sides) this way it is "up hill both ways" and the stock (especially the forearm) rests in a mini-trough created by the two adjacent but opposing wedges. A clamp out on the end with the forearm end with the wedges will aid in discouraging the stock from moving due to the vibration of the drilling process. [Note: This is not shown in the pictures either, we were lucky!] These two axes (plural of axis) are all that are need to be secured to get a straight hole. Trick #3: We drilled a very small pilot hole to make sure where it was REALLY going to go. Even if your pilot hole is off some and you have to recorrect by adjusting the position of the stock the odds are that the larger size of the final hole will remove most of your error and if it is egregious, then some bedding material can remedy the rest. After you drill one cross bolt --- GO BACK to the wrist hole and make sure your clamps and shims are holding true before drilling the second cross-bolt. [I must admit that I was working on used rifles in both cases (416 Rigby and 458 Lott) that were already "dinged" a little plus I was concerned about utilitarian not necessarily "beautiful". That helped.] One more thing, regarding cross bolts, I found the B Squared and Talley Cross bolts to be the same thing and barely long enough on the CZ. These cross bolts come "white" and that is why they "glare" in the picture so much. We took a can lid with a 1/2" of motor oil in it and then heated them orange hot with a propane plumbers torch and then dropped them into the oil. Three times gave them a dark enough finish to look like they belonged. ---------------------------------- Never Go Undergunned, Always Check The Sight In, Perform At Show Time. Good judgment comes from bad experience! Learn from the mistakes of others as you won't live long enough to make them all yourself! | |||
|
| One of Us |
EKM, I picked up my rifle yesterday. It has no factory crossbolts so using your method of existing crossbolt hole for alignment is a no go. Any other suggestions to reach square. I still have lots of questions: 1) What method should I use on the F block; sink and epoxy into stock before or attach to barrel as you have done? If you recomend attach to barrel what epoxy did you use and how did you ensure release? 2) What, if any expoxy did you lay around the mag well and bottom metal? or did you just concentrate on recoil lugs and barrel channel? 3) Once the epoxy was laid down how tight did you screw the action down? Did you just tighten the two screws at the rear, or all three? 4) With the absence of a factory cross bolt in the wrist should I place a third hidden cross bolt in that area as advised by RIP? You don't happen to live near Bozeman, MT do you? I would try and talk you into helping me if you did. | |||
|
| one of us |
1) What method should I use on the F block; sink and epoxy into stock before or attach to barrel as you have done? **I'm an amateur compared to the likes of RIP, etc. so I guess I'd have to give their method the nod. I did my route so I knew there would be steel to steel contact with no "invasive" glass working its way into a gap. If you recomend attach to barrel what epoxy did you use and how did you ensure release? **Don't have it any more. Got it at home depot. It was packaged as two parallel syringes. In talking with salesman, he said, "the quicker it drys the weaker the bond, the longer it takes to dry, the stronger the bond." I went with the shortest drying time, I think maybe 4 minutes. 2) What, if any expoxy did you lay around the mag well and bottom metal? or did you just concentrate on recoil lugs and barrel channel? **All hopped up by the Jack Lott article, I glassed the mag well on the 416.... won't do that again, what a pain in the arse and contrbutes very little IMHO unless perhaps you are going up to 500A2 in which case perhaps it needs the imbedded "L" all thread to "hold it all together" --- I would NOT do the mag well on the 416 Rigby, everything at and forward of the main recoil lug, nothing behind (well, just behind, but not over "the ridge" into the mag well. And if you just have to do the mag well, then I'd recommend doing it in a seperate step, too much steel bed, too many parts, too little time, first time, "this stuff is gonna set up in 10-15 minutes" --- gets exciting.) 3) Once the epoxy was laid down how tight did you screw the action down? ** Real tight WITH A GOOD FITTING SCREWDRIVER. IMHO, you do want to put the fore arm screw in place otherwise the glass will invade that opening and "lock up" your rifle. Did you just tighten the two screws at the rear, or all three? ** "All three, the back ones tight, the front one in the forearm on the F-Block area just snug, otherwise you can "pull" the barrel where you don't want it to point. 4) With the absence of a factory cross bolt in the wrist should I place a third hidden cross bolt in that area as advised by RIP? **I'll defer to RIP on how to find a reference method for "square and level" without an existing cross bolt hole. The 3rd bolt at the wrist may be the least important especially with the "thicker" American stock; being sure to relieve the tang is more important IMO. You don't happen to live near Bozeman, MT do you? **Denver, CO I would try and talk you into helping me if you did. Consider this.... ** take your time on your first one and don't push it when the little voice says "stop and think about this" listen to it. My friend and I worked on the first rifle one night per week as a Winter Project/social thing. When the little voice said stop, then it was time for beer and cigars --- took about 8 weeks, but we were goosy about screwing something up, so we were ridiculously methodical and cautious. ** constantly visualize the migrating glass, where it can go, and then what happens when it sets up hard as rock. ** do it with a friend, two heads better than one and four hands better than two when it gets serious, i.e. when you have a near new gun gooped in glass, all the parts to put together, glass squeezing out here and there that has to be cleaned up (contained at least), and the meter is running. IT IS A RITE OF PASSAGE, it is a good thing once it is done and after that "no big deal." If you are concerned about your brand new big bore "baby" and making it your first project, then consider taking one of your other rifles that could benefit from bedding and make it your first one. Slo regarding cross-bolts you could take a scrap stock (gun shop) and practice on it before takling your Big Bore. Remember as an absolute fall back position, you buy a replacement CZ stock or a Macmillan and life goes on. Once you know how to do this you can cut a fair amount of money off of the cost of a given big bore project. ** Brownells sold a glass bedding kit that came with a video on how to do it. Mostly the guy worked on military rifles with a ton of slop and space in them (whereas my European CZs were really tight); however, it was useful viewing with several tips not mentioned here. It gave tips that I probably take for granted regarding making sure you don't "weld your barrel to the stock"! "I liked the spray on resist. ---------------------------------- Never Go Undergunned, Always Check The Sight In, Perform At Show Time. Good judgment comes from bad experience! Learn from the mistakes of others as you won't live long enough to make them all yourself! | |||
|
| One of Us |
Ron or anyone else for that matter, this may be a stupid question, but why wouldn't this be an acceptable, optional method? "They who would give up an essential Liberty for Temporary Security, deserves neither Liberty or Security." ---Benjamin Franklin "SIC SEMPER TYRANNUS" | |||
|
| one of us |
Methinks DagaRon (RIP) initially thought that I had massively epoxied the F-Block to the barrel in a fashion which once the glass/steel bedding migrated in arround it that the barrel would be "trapped" in the glass OR That it was going to take one hell of a beating to get it out to where it would not be good news for the accuracy of the barrel. Use the quick drying cheap expoxy, keep the metal to metal recoil contact surfaces "unglued" (metal to metal") and when you "pop" the barrel out of the the bedding then it comes right loose and then you can remove the epoxy -- kinda pick and peel it right off with your fingernail or a blade and you have a really clean connection..... the majority of the then F-Block lies entombed in the glass/steel bedding, except for the metal to metal recoil bearing surface. BUT that is just one way to do it. ---------------------------------- Never Go Undergunned, Always Check The Sight In, Perform At Show Time. Good judgment comes from bad experience! Learn from the mistakes of others as you won't live long enough to make them all yourself! | |||
|
| Powered by Social Strata | Page 1 2 |
| Please Wait. Your request is being processed... |
|
 The Accurate Reloading Forums
  THE ACCURATE RELOADING.COM FORUMS
  Rifles
  Big Bores
  CZ Stock Reinforcement

Visit our on-line store for AR Memorabilia

