
 Guns, Politics, Gunsmithing & Reloading Gunsmithing
 Go | New | Find | Notify | Tools | Reply |
| To Plug, or Not To Plug the Bore When Rust Bluing? | Login/Join |
| one of us |
I'm about to do my 1st boil in the morning & I think I will just forego plugging the muzzle/chamber. If I swab them out immediately after taking the barreled action from the boiling water will that prevent rust in the bore/chamber? GOOGLE HOTLINK FIX FOR BLOCKED PHOTOBUCKET IMAGES https://chrome.google.com/webs...inkfix=1516144253810 | ||
|
| one of us |
You shouldn't have an issue if you keep the solution out of the bore. If you are concerned, swab the bore with a patch soaked in lacquer. Remove it later with lacquer thinner. | |||
|
| One of Us |
When I first started I would coat the bore/chamber with clear lacquer for protection. Wasn't worth the time and effort. I don't coat the bore or plug it anymore, just a couple of patches after the barrel comes out of the boil tank. The hot metal dries out real quick. | |||
|
| one of us |
I coated the bore/chamber W/LPS-3 & allowed it to "set" for a while to drain & set up. Then I degreased the exterior toroughly before the application of the rust agent. I'm using a tapered wooden dowel tapped into the muzzle for handling purpoes only. So far, after removal of the dowel, it looks like I have avoided getting the bore rusted. I'm using an action "T" bolt screwwed into the top of the tang to hold the action off the bottom of the tank & an "S" hook through the barrel band swivel stud to suspend the barrel. I gave it the 1st "double application" @ 1:00 & 2:00 PM. (per the instructions) The action/barrel is hanging in the bathroom (in a corner away from the shower) & is getting a nice even coat of rust. After I take my shower before bed it should really get to rusting. It says in the instructions to let the 1st application rust for "up to 24 hrs", but I'll check it 1st thing in the morning. After that 1st cycle, I have had good results on smaller parts letting it rust for 3-6 hours before boiling. GOOGLE HOTLINK FIX FOR BLOCKED PHOTOBUCKET IMAGES https://chrome.google.com/webs...inkfix=1516144253810 | |||
|
| One of Us |
LPS-3 contains petroleum distillates, I' be afraid it might contaminate things. Oil contamination is rust bluing's worst night mare. | |||
|
| one of us |
The instructions in the "Brownells Classic Rust Blue" suggest using "RIG" in the bore/chamber. If RIG would be OK I figured the LPS-3 would work too provided it didn't get on the exterior prior to the boil. I thoroughly degreased the exterior W/acetone before appying the solution. The rust coating looks good & as soon as the water comes to a boil, I'm going to enmerse the barrel/action & see the results. GOOGLE HOTLINK FIX FOR BLOCKED PHOTOBUCKET IMAGES https://chrome.google.com/webs...inkfix=1516144253810 | |||
|
| one of us |
Here are the results of the 1st rust/boil/card cycle. 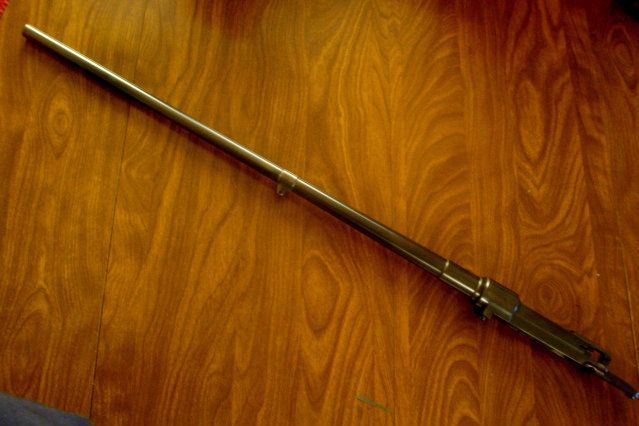 No discoloration near the muzzle from the LPS-3 but the barrel band swivel stud came out a shade or 2 lighter. Probably because of a different metal composition? Overall I am very pleased. I swabbed the bore/chamber as soon as I took it from the tank. The bore/chamber are still nice & shiney. The LPS-3 is pretty tough stuff. I believe it was developed for the mining industry to protect parts stored underground. I probably won't apply any more between cycles. If the barrel band does not even out over the next few cycles, I might just give it a few extra cycles to darken it before the final few rust/boil/card proceedures.. GOOGLE HOTLINK FIX FOR BLOCKED PHOTOBUCKET IMAGES https://chrome.google.com/webs...inkfix=1516144253810 | |||
|
| One of Us |
Looks good! | |||
|
| one of us |
I just finished the 2nd rust/boil/card cycle about 1 hour ago & it looks even better. A few more cycles should do it. I should be able to get this R/B/C cycle done before bed time, apply another coat of solution & let it rust overnight.. GOOGLE HOTLINK FIX FOR BLOCKED PHOTOBUCKET IMAGES https://chrome.google.com/webs...inkfix=1516144253810 | |||
|
| One of Us |
When these things are commercially blacked they don't have the time to waste with RIG or anything like that. The simplest and quickest is to put two softwood dowels in the muzzle and in the breech. No wax etc down the bore. The ADDED advantage of this is that it gives you something to hold the barrel by when carding (taking off the rust) between blackings. Such that, if you use OIL FREE wire wool dipped in acetone to be totally grease free, that you won't need to waste time degreasing after each process. Anyway that's how some do it here in the UK. I have never plugged shot gun barrels BTW when re-blacking although some do. | |||
|
| one of us |
I only applied the LPS-3 once & allowed it to drain out of the muzzle overnight. Swabbing out the water after each boil will probably result in some film remaining. Maybe not, but it is a very tough film after it has "set". I felt better having a little insurance if any solution happened to get into the mozzle. I use a muzzle plug for handling purposes only (not while boiling) when applying solution & carding as I was concerned about moisture saturating the plug. I am just about to do the 6th boil/card & from the color I had after the 5th cycle, this should be the en result I am seeking. GOOGLE HOTLINK FIX FOR BLOCKED PHOTOBUCKET IMAGES https://chrome.google.com/webs...inkfix=1516144253810 | |||
|
| one of us |
One More Time? Here's what I have after 6 R/B/C cycles. 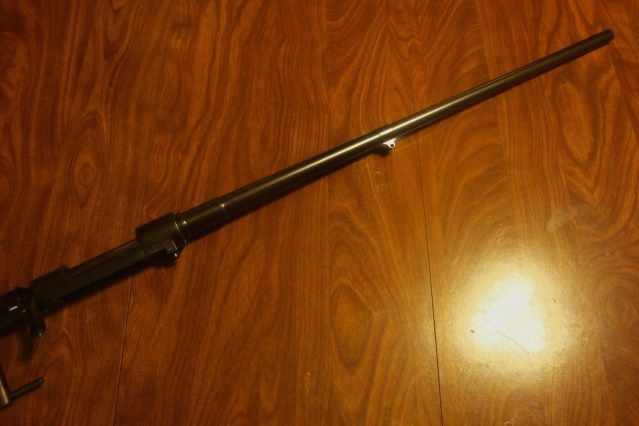 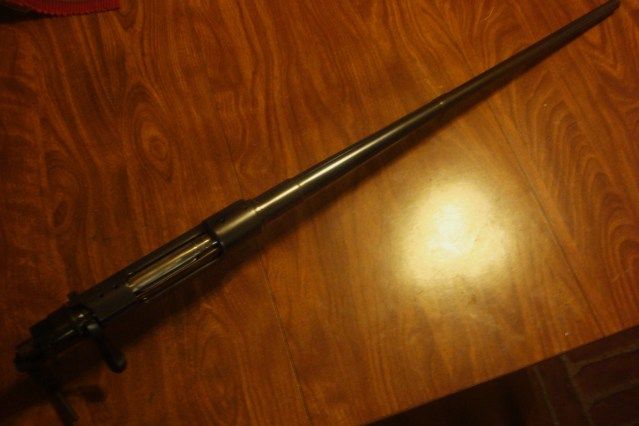 No oil applied yet. It seems to be just a tad lighter than the bolt handle/shroud. (which were done almost 1 year ago & have been oiled) Will it darken once oiled? Should I stop now or try another rust/boil/card cycle? There's always a chance to screw it up. Maybe I should quit while I'm a head & oil it down. GOOGLE HOTLINK FIX FOR BLOCKED PHOTOBUCKET IMAGES https://chrome.google.com/webs...inkfix=1516144253810 | |||
|
| One of Us |
After the last rust/boil/card cycle I do a final finish boil. A bit longer than the other boils, it seems to darken the color. I then oil while the parts are still hot. After a few weeks I wipe down again and then re-oil. Some guys use wax rather than oil, whatever trips your trigger. Your blue job looks great. | |||
|
| one of us |
It can get a little darker if you do another boil or steam it. Oiling will definitely darken it. I like Johnson's paste wax as it fills the oxide pores and seals the metal from oxygen and moisture. If you want a virtual weatherproof finish, airbrush or spray a couple of coats of auto lacquer, then wax that.
| |||
|
| One of Us |
Looks nice. Add another coat or more if you like. The blue gets darker looking when the surface is oiled. Change out the tank water if needed,,keep it clean. I dump it after 3 cycles anyway regardless of how it may look. I've never coaedt the bores with anything. Never had a problem in over 45years. Only time a bore gets a coating is in a damascus finish so the etching solution won't effect it. I use plain shellac applied with a cleaning patch. A few heavy coatings and let it dry. It lasts through all the repeated boilings/etchings ect. Everyone has their own little way of doing rust blue. Results are what count. I spray the completed barrel set, barreled action or parts down with an all purpose cleaner when they're done. A quick light scrubbing with a soft (small paint) brush and a hot water rinsing. Best way I've found to stop after rusting which can be a problem w/some solutions. Others not. I let the parts set for 24hrs, rub them down dry again and if all set to go, oil them up. | |||
|
| one of us |
I'm on my 3rd coat since the last picture. I was going to stop after 1 more coat but I gave it another & it darkened up quite a bit. I'm now letting it rust for 24 hours before boling & it gives a darker color. The last coat looked dark enough but I figured 1 more for good measure. It now matches the bolt handle/shroud for darkness. Almost black! I'm at 9 coats & I will probably quite after this one. I too am doing an "after boil". Since I am using well water straight from the softener, I change it out for each coat. It gets pretty nasty if I let it in my carbon steel tank overnight. I'll take PIX of the finished product tomorrow. GOOGLE HOTLINK FIX FOR BLOCKED PHOTOBUCKET IMAGES https://chrome.google.com/webs...inkfix=1516144253810 | |||
|
| one of us |
The rust bluing is done as far as I'm concerned. (except for some touch up welding work on the bolt handle) 9 coats & I'm happy W/the results. Here are some PIX: 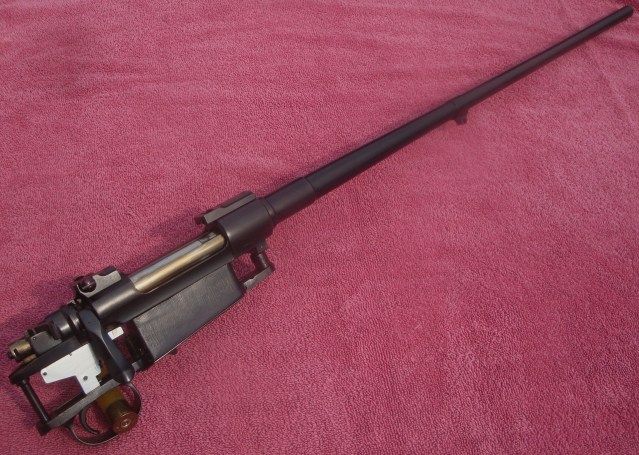 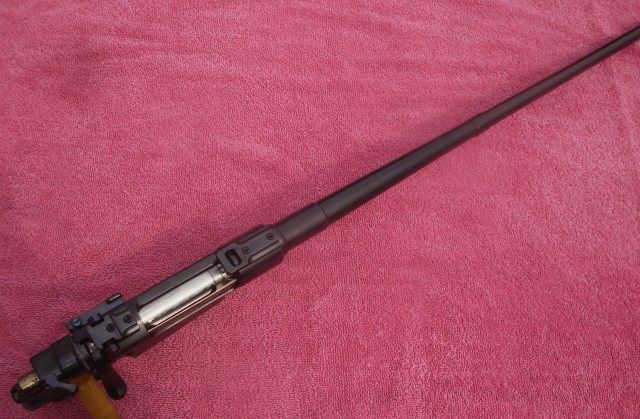 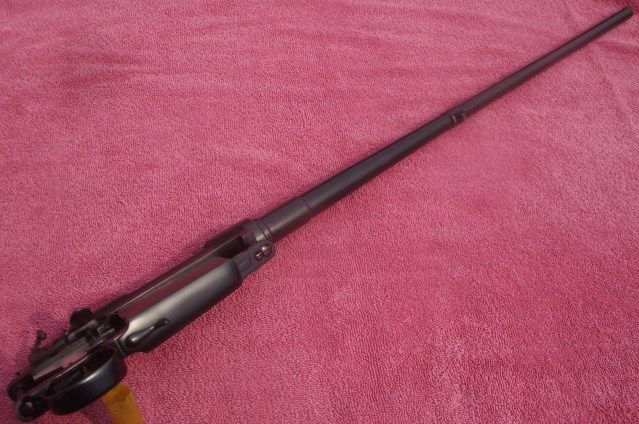 The only real flaw in the rust blue is seen here on the bottom off the barrel just under the woodline between the barrel band & chamber cylinder. It only came up after the last coat was carded off. 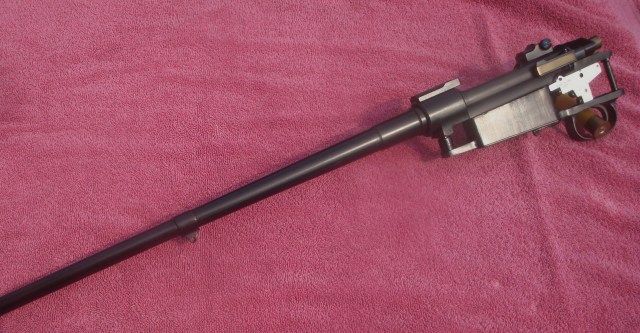 The light made for some optical illusions on the rear barrel step right in front of the receiver. (I lost the cloud cover on this one) There is no discoloration as it appears in the picture. 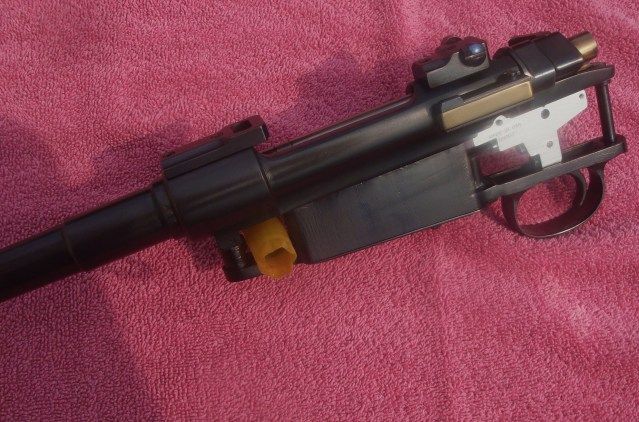 I've been working on this rifle off & on for almost 5 years now. I've hunted W/it for the last 2. The only thing left now is to weld up some porosity in the bolt handle & reblue it. Then I want to try to find someone that will trade some metal work for a simple checkering job to put the finishing touch on the rifle. GOOGLE HOTLINK FIX FOR BLOCKED PHOTOBUCKET IMAGES https://chrome.google.com/webs...inkfix=1516144253810 | |||
|
| One of Us |
I'm surprised no one posted the way I was taught. Use dry dowel plugs every trip--no problems. Goat The possibilities for disaster boggle the mind. | |||
|
| One of Us |
Nicely done! Dave | |||
|
| One of Us |
Looks great! | |||
|
| one of us |
Nicely done. A7Dave, you are a braver man than I will ever be; flying a sewer pipe onto a itty bitty boat is what Gus McCrae would call "Sporting, but it ain't very safe".  | |||
|
| one of us |
Thanks everyone. It's not perfect, but the overall appearance is quite handsome, @ least it is to me. I kinda botched it up on the last coat. I had already oiled it down & tried to buff out some swirl marks W/a carbon steel brush which made it worse. I degreased W/acetone & gave it one last coat, but the degrease job was not perfect. I ended up W/the imperfection under the wood that I mentioned in the post above. I was OK W/that, but after I gave it a liberal spray/soak W/LPS-3, let it gel & buffed it, I noticed a very tiny pin head spot on top of the barrel just in front of the objective lens of the scope. One has to look very closely to see it. Not enough bother with, but a (small) disappointemnt none the less. I'm still happy W/the overall appearance. I learned a few things. 1. No need to plug the bore as long as the bore/chamber is swabbed out immediately upon removal from the boil. (I do use a plug in the muzzle for handling & assuring no solution gets into the muzzle, it is removed before immersion in the boil tank) 2.Longer rust cycles result in a darker color but also a more matte, bead blasted look in the finished product. I was striving for a satin/matte finish on this one so the 24 hour rust cycles did what I wanted. I would use shorter 12 hr cycles & more coats for a little more luster if that was the result I was looking for. (it wasn't on this rifle) 3.When you think you have achieved the desired color, do one more coat. 4.Make sure that when you card off the rust, you do a thorough job as once it is oiled, it is impossible to remove any swirl marks W/O marring the finish. 5.If you do decide to do one more coat after the parts are oiled, do a thorough degrease job. Acetone alone is not sufficient. In addition to acetone, I used "Comet" cleanser for for degreasing on the small action parts. It did a great job & made for easy, even application & flow of solution after a thorough rinse in very hot tap water. I will do that for every application in the future. It really does work to prep the surface for the solution. I used to use Comet on aluminum arrow shaft to prep them for fletching & it gets metal "squeeky clean" if rinsed W/hot water. GOOGLE HOTLINK FIX FOR BLOCKED PHOTOBUCKET IMAGES https://chrome.google.com/webs...inkfix=1516144253810 | |||
|
| One of Us |
Thanks for the Comet tip. Will use it on an upcoming job. | |||
|
| One of Us |
Looks, very nice. If you're not completely satisfied,,then you're well on your way towards producing top quality work. Be your own best critic. When in the middle of a bluing you chance to get a patch of discolored blue in an area or two you can remove them with scotchbrite and move on without disturbing the rest of the process. Sometimes a waterspot shows up from a touch of oily debris in the water,,a spot not really clean,,what ever it is,,after it's carded. Take a small square of new clean scotchbrite pad (I use either the maroon or grey color depending on how bright I polished to begin with) and lightly repolish that area with it in the same direction as your original polish. Yes you'll remove some color,,maybe all of it. But with at least a coating or more on the bbl already, the next coat or two will bring the color back to an even match with the rest of the undisturbed piece. Don't re-use that small square of scotchbrite for the next spot you come accross. It'll have what ever contaminant in it that caused the problem in the first place. Toss it. That's why you only use and need a small piece anyway each time. A few times I've repolished the entire bbl or part with a scotchbrite pad after the first carding when a particulaly ugly coating appears. Sometimes it'll do that, Bad water, cleaning, soln, wrong one, bad contaminated,ect,,lots of things can go wrong. Then go on and everything evens out from then on. Change the water too if you get one of those reactions as well as the solution. That's why I always only pour a tiny amount of soln into a disposable cap to use. Never dip into & possibly contaminate the whole bottle. Trying to recoat after an oil down...you need to go through a complete degreasing process. Powdered cleansers are good,,they can degrease as well as polish. I use pump spray household cleaner alot. But you have to watch out as they put some weird chemicles in them. You just want to cut the oil. Then follow it up with a hot water wash down with laundry soap & a soft brush then rinse. Dry it off. Short cycles,,less etching,,less matting of the surface. You don't need a solid bright red covering of rust to produce a coating of color. If you see a hint of a reddish color but the blue color of the previous applied coating still showing,,boil it. It's plenty to provide another coating of color w/o matting the steel. I actually run my fingers very lightly over the part or bbls to feel the roughness. If I can feel the rust,,it's off to the tank. I often just lightly handle parts w/o gloves or plugs,,just a lucky coincidence that I don't seem to mark them with fingerprints. Some dilute the rust blue solutions with distilled water to cut down on it's aggressivness. 1/1,,2/1,,even up to 5/1 water to solution when they get past the first couple of full strength coatings. More diluted the application as the coatings build up. I've never had very good luck doing it that way,,I just use the shorter rust times,,less humidity and lower temps to slow things down. Everyone does it a bit differently. Results matter, don't be afraid to experiment though. With enough practice, the right soln and getting everything right you can put a rust blue finish on a set of barrels that looks like a prewar Colt revolver if you want it too. It's all in the technique. | |||
|
| one of us |
I'm not disatisfied to the point that I want to disassemble the rifle & go through another cycle. Absolute perfection is very hard to achieve & since this is my personal rifle, it is satisfactory to me. Back in the days when I was involved W/a group in Southern Indiana that built muzzle loaders from "the block", I made the aquaintance of a man that made numerous beautiful traditional muzzleloaders. He worked on consignment, building rifles to order. He took me under his wing & let me in on some building secrets for inletting metal into the wood. He once confided in me that "If I ever completed a rifle W/O any mistakes, I would keep it for myself". Excellence does not require perfection. GOOGLE HOTLINK FIX FOR BLOCKED PHOTOBUCKET IMAGES https://chrome.google.com/webs...inkfix=1516144253810 | |||
|
| one of us |
I use an old toothbrush to get into all the nooks & crannies during the initial scrub as well as the rinse. GOOGLE HOTLINK FIX FOR BLOCKED PHOTOBUCKET IMAGES https://chrome.google.com/webs...inkfix=1516144253810 | |||
|
| One of Us |
Great Job. I am thinking of rust bluing a 96 Swede that I have been working on. Do have a question for all. What type of tank works best and worst, steel, stainless or aluminum ? Whats the best length. | |||
|
| One of Us |
Mine are stainless, 36 x 4 x 4. | |||
|
| one of us |
My tank is plain steel. It works just fine, but there is the issue of preventing rust when the tank is not in use. Stainless would be better in that respect, but if cost is an issue, the steel tank will work just fine. GOOGLE HOTLINK FIX FOR BLOCKED PHOTOBUCKET IMAGES https://chrome.google.com/webs...inkfix=1516144253810 | |||
|
| one of us |
Mine's 3 in PVC. You guys really should try steaming. Compact,cheap, effective, and eliminates water problems. | |||
|
| One of Us |
How do you boil water in a PVC tank? Or do you just fill the tank with boiling water and dunk? | |||
|
| one of us |
I was kidding. I use a pvc pipe mounted on a 6 qt pot. The barreled action can be lowered into the pipe on a wire (straightened coat hanger) and hung from a cross bar. The pipe is then capped. Cap and pipe notched for cross bar. Boil tap water in the pot and steam the barrel for 10 minutes. No water problems since it is pure steam. This whole set-up was purchased new from a dollar store and a home improvement whse. Total cost was $26.00.  | |||
|
| One of Us |
Now thats some one thinking Bobster....Do you have a flange on the bottom ? I could do this or build a tank of aluminum or steel. Stainless, unless I get lucky is going to be too costly. What I like about the boiling water and PVC, I don't have to build a burner to heat the long tank. O yea, you guys to great work, now I am motivated. Thanks | |||
|
| one of us |
Yes, that is a standard toilet flange. It is bolted to the pot lid w/SS screws and nuts. I drilled holes in the lid to let steam through. | |||
|
| Powered by Social Strata |
| Please Wait. Your request is being processed... |
Guns, Politics, Gunsmithing & Reloading Gunsmithing

Visit our on-line store for AR Memorabilia