
 Guns, Politics, Gunsmithing & Reloading Gunsmithing
 Go | New | Find | Notify | Tools | Reply |
| Checkering Cradle | Login/Join |
| One of Us |
I am new to this site and have been reading some of the post on checkering. I was looking for pictures of checkering cradles use for some ideas on how to build one. Some of the post discussed the topic but there were no photo's. Does anyone have any good photo's they could share of their checkering cradle. Thanks | ||
|
| One of Us |
Rob C channel. I have a homemade cradle made with a piece of c channel and sliding screw arbors. Pics later today or send me your e.mail. Rich rjackson@dtcc.com | |||
|
| One of Us |
Come on guys give a newbie a helping hand! | |||
|
| one of us |
I still use the cheap $35 Brownells checkering cradle I was using from Day 1. Well, the first stock was checkered without a cradle, so actually been using it since the second stock I made. If you look at the sticky at the top of the page for the Searcy Scholarship Rifle, you can see Mr. Wiebe's cradle. Here is a pic of what some folks use to mount their cradle on: swivel pic Here is the Brownells unit I still use: http://www.brownells.com/aspx/NS/store/productdetail.as...eckering%20cradle&s= I clamp it in a vise that hangs over the egde of my bench, and can swivel the heavy vise around the Y axis. Every year I say I am going to make abetter one, but never get around to it. I do a lot more metal work than wood, so it has never been that pressing. Now if something need fixing on my lathe... A guy I've met made his cradle rotate around a bowling ball: bowling ball cradle I highly reccomend the Balickie checkering video. In it you will see a cradle he made out fo square tubing. I also reccomend the Kennedy book on checkering and carving. With the video and book, you will know everything you need to get going. And of course if you get stuck, ask for help here! The tools you use are very important. I use W.E. Brownells cutters, but the last batch I ordered really suck. The quality has dropped off the chart. I have used them for years. Midway sells something that, at leat in pictures anyway, like the exact same cutter design. I will buy some of them when I need more. These cutters have individual teeth that you can sharpern. I do it basically just like Balickie shows in his video. We all have little tricks that we do. | |||
|
one of us |
This is not mine, I found the picture somewhere on the web. Looks great though. 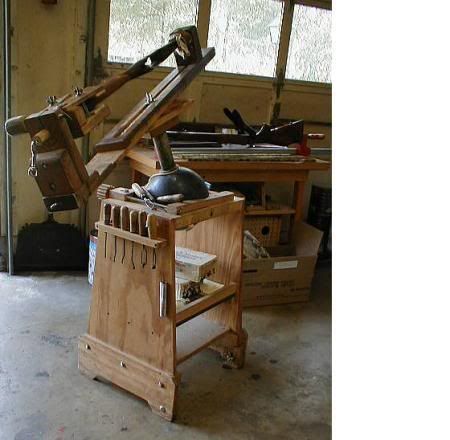 | |||
|
| One of Us |
Thanks I had seen those photos but I could not find any that had some closeups of the ends and how the ends are constructed as far as the adjustment pieces. I am still searching thru some of the older post but have not been able to find anything just yet. Thanks | |||
|
| one of us |
OK, I am cheap. I am not a professional! I don't expect anyone else to do it. Having said all that, I use a long parallel clamp which I have glued leather facing to and clamp it into my (also cheap) multipurpose vise which is mounted to one of my benches.   Necessity is the mother of invention. It works for me. Clamp both tight enough to hold. The vise swivels in all directions. Did I say I was cheap. And I can use both for other things and put them away easily. Let the laughing begin. Larry "Peace is that brief glorious moment in history, when everybody stands around reloading" -- Thomas Jefferson | |||
|
| One of Us |
Hey larry if it works for you thats what counts thanks | |||
|
| One of Us |
Here's the pic.  | |||
|
| One of Us |
Thanks Rich | |||
|
| One of Us |
Rich how are the arbors constucted? Is that a piece of all thread with a nut welded to the upsright piece? | |||
|
| one of us |
For the muzzle end of stocks, I screw a piece of old barrel into the forarm. I have several old pieces of barrel about 10" long with old bolt handles welded on each end. THe round knob acts a the ball in a ball and socket joint. I have holes drilled in th barrels so I can attach it to the forarm with 2 screws. The "socket" is just a half-round hole in the wodden end of the cradle. For the butt, I have a piece of walnut that I milled a recess in that is larger than any butt I can imagine. Well, we are not talking Rosie here, but larger than any gun butt I can imagine. It doesn't have to be deep. It is maybe 3/8" deep. The butt of the stock fits in there and a screw pushes against the butt and this jams the ball (on the other end of the stock) firmly into the socket. I always wrap something to protect the butt of the gun. Usually wrap it with pieces of old T shirts and use masking tape to hold it firmly on the wood. | |||
|
| One of Us |
I was thinking of using a small diameter pipe with a series of holes drilled thru. The pipe would fit in the contour of where the barrel would go and be attached to the stock thru the mounting hole. This end would be fixed at one end of the cradle. You could loosen it for rotation of the stock and of course the opposite end would allow for horizontal adjustment for different size stocks. | |||
|
| One of Us |
I'll get a better picture of it tonight. It was given to me, so I'm not sure where the parts came from. Heavy "L" brackets. Looks like threaded rod with a stepped/tapered point on the ends. A nut with tee handle welded to it.
| |||
|
| one of us |
This simple cradle is a 2 X 4 X 24 inches. The ends are made from 7/16 X 1 in. and 1/2 in. allthread for the centers. Reverse ends on the wood and you can checker any piece.   | |||
|
| one of us |
A machine leveler will let the rear butt end swivel in any direction without binding when turning the stock. These parts can be ordered from MSC.  Other pieces  | |||
|
| One of Us |
better pic.     | |||
|
| One of Us |
Rich and Les, Thanks for the close ups that really helps a lot. Now to fabricate something | |||
|
| One of Us |
I wanted to share this. I have not completed due to being out of town and work but should be able to by this weekend. I used stainless unistrut. Inside the unistrut are stainless spring nuts that will slide the full length of the unistrut in any direction. It is similar to the setup of the channel but does not require slots. The unistrut is very rigid. The angles that attached to the spring nuts will be threaded to allow for final adjustments with the end pieces. I will post the final pictures when complete. I have a few pictures but do not know how to post them. As soon as I can figure that out I will post | |||
|
| One of Us |
 | |||
|
| One of Us |
[IMG]http://outdoors.webshots.com/photo/2567671590042037790OIvUtN][IMG] | |||
|
| One of Us |
| |||
|
| One of Us |
Mark: Your comments about Brownell's stuff has not gone unnoticed by me either....Methinks bean counters have taken over | |||
|
| one of us |
I would have to concur with Marc and Duane on the W.E. Brownell cutters. I bought 3 mullered border cutters a few months ago from them. Broke the damn teeth off two of them the first time I used them. Im not sure what happened with the steel but its incredibly brittle. | |||
|
| one of us |
Here're a few shots of my cradle. It's made out of unistrut components and cheap C-clamps, using a Wilton Powr-arm for the base.    John Farner If you haven't, please join the NRA! | |||
|
| One of Us |
I had a little spare time this weekend to work on the checkering cradle. I added a few more pictures. I have just a few minor changes to make and it should be complete. Thanks again for everyones help. | |||
|
| Powered by Social Strata |
| Please Wait. Your request is being processed... |

Visit our on-line store for AR Memorabilia