The Accurate Reloading Forums
Stock repair after water damage. REPAIRED PICTURES ADDED
04 January 2011, 20:29
ramrod340Stock repair after water damage. REPAIRED PICTURES ADDED
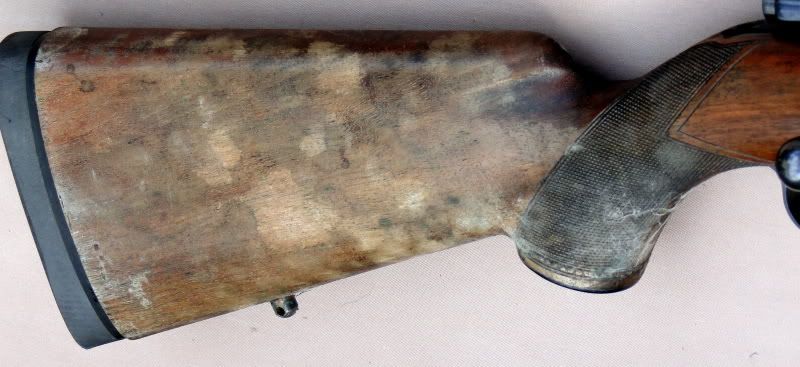
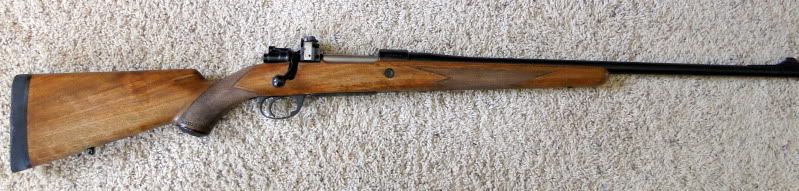
Well this was my 98% condition FN stock that was on my 380PDK. As you can see it suffered some water damage from the move. The stock had been flush with the recoil pad. So you can see it drew in some water. Sitting in the 10% humidity of the house the wood has returned to being flush.
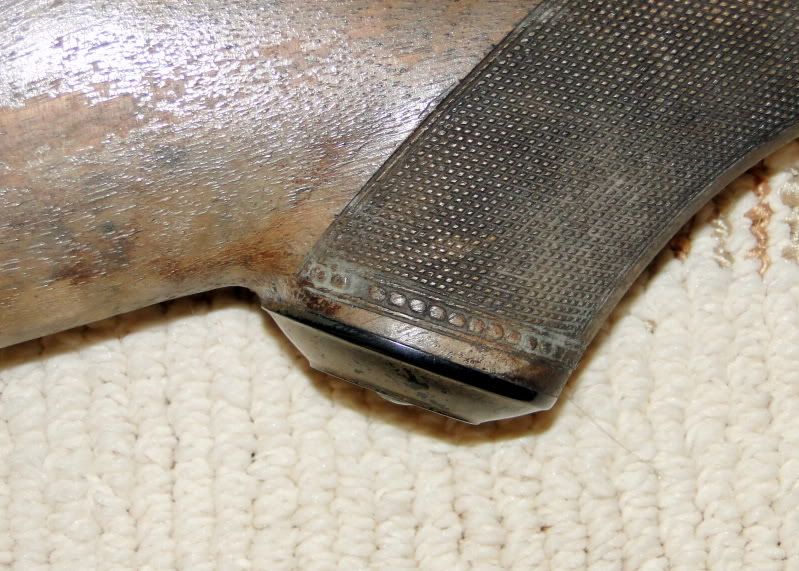
So I will be removing the rest of the finish, refinish and recut the checkering. Any hints on how to clean around the accent portion along the bottom of the pattern???
As usual just my $.02
Paul K
04 January 2011, 20:36
craigsterWood bleach (oxalic acid ) has worked pretty well for me. Sometimes more than one application is needed.
04 January 2011, 21:04
ramrod340quote:
Wood bleach (oxalic acid )
I had already planned that. I was more curious about cleaning the bottom of the pattern. IF I end up having to recut the checkering how best to clean the bottom to match the recut wood in the pattern.
I'm probably not being clear.

As usual just my $.02
Paul K
04 January 2011, 21:10
jeffeossolooking at the pad.. did it swell THAT much?
04 January 2011, 21:25
ramrod340quote:
looking at the pad.. did it swell THAT much?
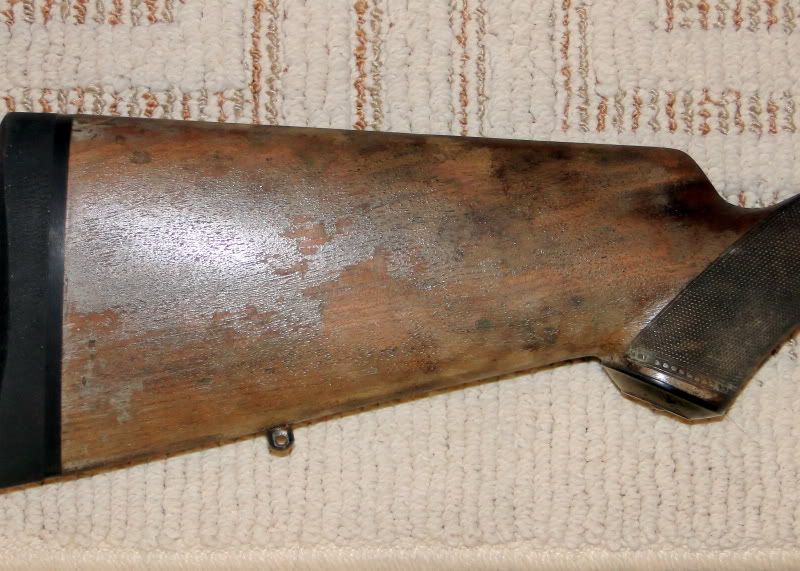
Yep!!!!!!!!!!!! The rifle was sitting butt down in an inch or two of standing water. Based on a plastic box outside the safe the water got about 1.5" deep. I "think" the water entered the safe via the holes in the bottom for the anchor bolts. I don't know how long the water was there but enough to do damage. The finish on the stock was original so I doubt it provided much resistance. That picture was taken the day we found the damage. Most of the white is mildew or something cause by the sock the rifle was in also wicking water up. Most of came off. Since that time it has been sitting in the house here in Parker with an average humidy of around %15. The stock had returned to being smooth. I was going to let sit a couple more months then start working on it.
As usual just my $.02
Paul K
04 January 2011, 21:36
Doc224/375First remove butt pad and anything else , then strip ALL remaining finish off the stock use a stripper or solvent Acetone lacquer thinner or ?.
Then use an organic mold remover or black mold killer to kill mildews and mold. Some people use chlorine bleach however unless properly done isn't always 100% effective . Rinse well with water , now use oxalic acid and again once finished rinse thoroughly with water .
A stiff tooth brush works well cleaning around and in checkering during initial clean up removal .
Now I would use acetone and brush it literally all over the entire stock if possible even soak it ( helps wick moisture out of the wood ).
OK now allow to set somewhere with Dry air movement NOT directly on the stock !" BAD " things could happen , indirect air movement is best. Once a few days or a week goes by warm your oven about 200 degrees , turn off the oven and place the stock in there . If you or a friend has a moisture meter after doing the oven treatment on and off for a few days poke the butt end with the meter . What's it read ?.
I would be looking for 7-8% and preferably 7% at this point . Now carefully sand and re-cut checkering detail if necessary ,then stain an apply finish of your choice .Some people prefer application of a finish prior to fooling with checkering you'll need to consult others on that aspect of your project .
quote:
Yep!!!!!!!!!!!! The rifle was sitting butt down in an inch or two of standing water.
Regrettably this is an area where many people fail to apply a waterproofing finish ,END GRAIN is the straw of life for wood !.
Even factory finishes leave a lot to be desired under the Butt pad !. The Best Oil finishes are a POOR barrier against standing water regardless of area in which water sets .


05 January 2011, 00:02
ramrod340quote:
looking at the pad.. did it swell THAT much?
Jeff like I said the first picture is right after I found it wet. Here it is 5 months later. You can see that the wood has almost returned to being a smooth fit to the pad.
I appreciate all the suggestion on how to deal with the refinish and mold. I believe I have that under control. What I need is a suggestion or two on how to clean around the bottom of the grip pattern.
As usual just my $.02
Paul K
05 January 2011, 01:06
ulav8rStripper and a fine wire stainless or brass hand brush used gently.
05 January 2011, 01:11
doubleriflejackDo as Doc 224/375 says, but use a water soluble stripper; follow directions on can (it works beautifully for such jobs).
05 January 2011, 01:27
ramrod340quote:
Stripper and a fine wire stainless or brass hand brush used gently.
That was my plan. Maybe I'm getting ahead of myself. I figured is the checkering didn't clean up I would have to recut it. If I do recut then I felt the checkering would be clean (newly cut) surface. I have concerns about how to get the same new cut look around the bottom of the pattern.
Maybe I should just wait and see after a good stripping and cleaning.
As usual just my $.02
Paul K
05 January 2011, 04:36
lee440Paul, after applying a good stripper, I use a very soft stainless toothbrush. When running it parallel to the master line, it will do a great job cleaning out all the gunk without harming the diamonds. Send me a pm with your address and I will send you a couple, I have a bunch. Lee.
DRSS(We Band of Bubba's Div.)
N.R.A (Life)
T.S.R.A (Life)
D.S.C.
05 January 2011, 04:50
ramrod340quote:
Send me a pm with your address and I will send you a couple,
That would be great. Thanks
PM sent
As usual just my $.02
Paul K
05 January 2011, 08:06
lee440In a padded mailer to be dropped at the P/O in the morning.
DRSS(We Band of Bubba's Div.)
N.R.A (Life)
T.S.R.A (Life)
D.S.C.
05 January 2011, 08:16
ramrod340quote:
In a padded mailer to be dropped at the P/O in the morning.
Fantastic

As usual just my $.02
Paul K
13 January 2011, 04:41
ramrod340quote:
In a padded mailer to be dropped at the P/O in the morning.
Received the brushes today. Thank you very much.
As usual just my $.02
Paul K
13 January 2011, 07:07
craigsterPlease post some "after" pictures when you get there.
13 January 2011, 07:13
ramrod340quote:
Please post some "after" pictures when you get there.

As usual just my $.02
Paul K
21 April 2011, 23:22
ramrod340I want to thank everyone for their help and suggestions. A big
thank you to lee440 for the stainless brushes.
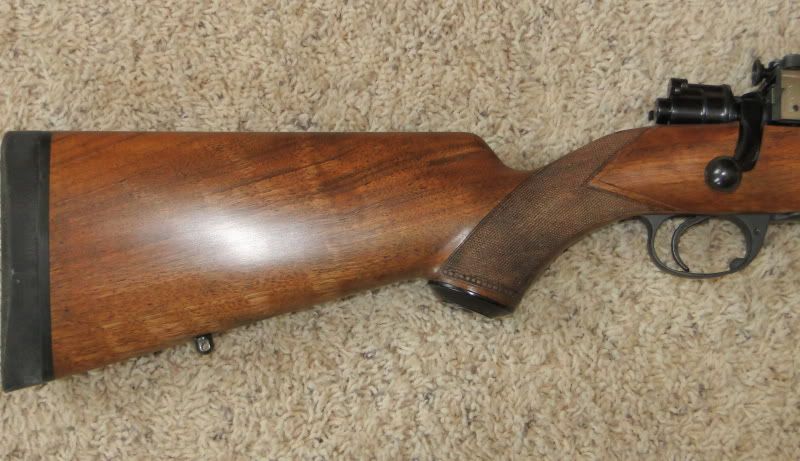
As requested here are some after pictures. I fist stripped the old finish with a varnish remover. That removed the majority of the old finish. However the checkered areas were still BLACK! I then made up a solution of liquid TSP and alcohol and a stainless brush. It kept the raising of the grain to a bare minimum. A total of 6 times for the grip area and 3 or 4 for the forearm. I then used the same solution twice on the entire stock along with a course plastic pad.
The grip area was the same color as the remainer of the stock. NO black remained. I was a touch disappointed that some of the dark returned on the right hand side of the grip.
After all the cleaning the pores were huge. I lost count of home many filling and sanding coats it took to fill the poors. For the state it was in last fall I'm very happy with how it turned out.
As usual just my $.02
Paul K
22 April 2011, 00:05
plainsman456Don't see any damage now Good Job.
I have a 870 wingmaster that went swimming for a solid week then sat in the police Dept for another 2.
The stock was about a 1/2 in larger than when new and the barrel has a etch track where it was sitting in the gun rack in the trunk.
She cleaned up fine and work like new today.
22 April 2011, 00:23
Boss HossEverything considered---WOW. Nice job!
22 April 2011, 00:37
jeffeossolooks fantastic!
22 April 2011, 00:57
craigsterVery nice.
22 April 2011, 02:46
Bobsterdamn nice job! the next time you see a water damaged you'll snap it up cheap won't you?
22 April 2011, 02:48
ramrod340quote:
the next time you see a water damaged you'll snap it up cheap won't you?

I still have 3 or 4 of my own to repair.
As usual just my $.02
Paul K
23 April 2011, 06:06
Doc224/375quote:
ramrod340
It came out pretty nice , may I ask how long you applied bleach too the checkered areas ?. Did you use Chlorine bleach first ,an then the Oxalic ? or just Oxalic ? One application or ?
NEXT TIME If I may suggest in regards too the checkering . If your handy with checkering or veining tools ,lightly trace pattern a couple of times during bleaching processes ( which can take a couple of days to accomplish ) and that should greatly diminish mold an blue stain .
Chlorine Bleach is an effective remedy for molds. Chlorine acts by oxidizing the mold and effectively killing it. However, chlorine is only a surface oxidizing agent and cannot penetrate the main body of mold. For complete killing of mold, deep penetrating biocides have been developed effectively killing the mold. If you have only chlorine or chlorine based solutions for killing the mold, you would have to repeat the application over a period of time to completely eliminate molds an stain .
Precautions when using chlorine based chemicals: Chlorine based chemicals can cause respiratory problems skin allergens among other things .
Common Species of Molds
There are a variety of common mold species know to effect coatings performance. A list of 19 of the most common species appears below:
Alternaria sp., Aspergillus flavum, Aspergillus niger, Aureobasidium pullulans, Botryodiplodia sp., Cephalosporium sp., Cladosporium sp., Fusarium sp., Helminthsporium sp., Monilia sp., Mucor sp., Pacacilomyces sp., Penicilium sp., Pestalotia sp., Phoma sp., Pleospora sp., Rhizopus sp., Stemphylium sp., Trichoderma sp.
Of these species, Aureobasidium pullulans and Aspergillus Niger are the most common mold species encountered.
Necessary Contributing Factors
Regardless of specific species, all mildew require oxygen, water, a food source, and a narrow temperature range to metabolize and reproduce. Typically, mildew causes problems with the finish after it has been applied and dried, and does not affect the product in the can as there is usually insufficient oxygen present for metabolism. Mildew needs water to grow. Consequently, as the humidity of the environment continues to rise, the mildew flourishes. For food, mildew generally metabolize organic food sources like starches, sugars, proteins, and some oils found in finish systems. Specifically, mildew can also feed on pollens, bacteria, or many other organic contaminants on the finished surface. Temperatures from 70 to 90 Fahrenheit to 20 to 30 Celsius are ideal for mildew growth. Below freezing, mildew fungi become dormant, however, they do not die. (
Why I suggested the oven at 200 degrees ,then shutting it off place stock in there , bleach again an repeat the next day or so . Scratching or tracing the checkering patterns helps remove some stain , however more importantly OPENS the pores to allow bleaches to work more effectively . Soaking in Acetone or liberally applying it with a stiff paint brush does two things , Helps clean any finish or oil wax stain residue as well as kill fungus an drys wood out by displacing water . Sodium percarbonate is an excellent detergent and bleaching agent based on hydrogen peroxide. It is a good cleaning and bleaching agent at normal temperature, and has strong fungicide effect, it can kill staphy lococcus, and colon bacillus .
This product is a white particle powder, non-toxic no contamination, non-flammable, non-explosive, easy to get damp, and soluble in water.
Hy-Tech Oxygen bleach,(sodium percarbonate) is excellent for cleaning and removing organic stains (such as coffee, tea, wine, fruit juices, foods, sauces, grass and blood) from fabrics, plastics, fiberglass, porcelain, ceramics, wood, carpets, asphalt, concrete, etc. Oxygen bleach can be used in any place in or around the house that need to be destained and deodorized; it is efficient, safe and economical. It is non-toxic, environmentally safe, biodegradable, and leaves no harmful by-products or residues which can harm the environment Except for industrial-strength cleaning or stripping jobs, sodium percarbonate is our hands-down choice for most average wood preparation jobs.
Mix (6 fl oz per quart) as you want a powerful industrial solution 
Hydrogen peroxide, less dilute which is sold in hardware stores, paint stores as part of "2 part wood bleach" kits or solutions. This hydrogen peroxide is generally 40% concentration, as opposed to the 3% antiseptic solution from the drugstore. Thus it is not "concentrated," but it is far more potent than your garden-variety peroxide. Caution is definitely advised. You may be forced to buy 2 bottles of solution together in a kit when you really only want the peroxide bottle. The other bottle usually contains a solution of sodium hydroxide, sodium silicate, or a mixture of the two. I have found that "Daly's" brand wood bleaching solutions are sold unbundled, so I can just buy as much peroxideas I want without wasting money on the other solution.
http://www.dalyspaint.com/stor...n_page=index&cPath=5 Bottom line Upon water an stain damages too a stock . First strip everything immediately DON'T allow it to dry out . Clean vigorously with I prefer solvent stripper rinse with appropriate solvent , allow partial drying preferably in a heated but turned off oven 200 degrees for a few hours or the day . Now start bleaching process Chlorine first . Allow it set time an repeat ,now rinse well distilled or filtered water preferably . Followed with 2 part wood bleach or 40% Hydrogen peroxide . My last resort is Oxalic bleach for really bad stains . Now after bleach an several rinses , use Acetone again preferably soaking it .At very least use a METAL bucket with stock butt setting in acetone and using a nylon brush ,start liberally wet brushing entire stock . Now allow stock to set somewhere in a garage or ? with slight air movement for a few days week , back too the oven treatment on an off NEVER MORE then 200 Degrees and it can be 125-140 . Check moisture again preferably with a meter stuck into the end grain of Butt .7-8 % checked in 2-4 spots GOOD TO GO !!!. Start sanding then check out those stained areas with wet solvent ,if they appear dark repeat bleaching . I'm doubting they will if instructions are followed . Now once sanding checkering touch up is completed ,start staining because the stock will need it !. Finish as desired !!! 23 April 2011, 07:18
BaxterBwow! My stomach dropped when I saw the first pic but you did a damn fine job in returning this to great shape? Good on ya for not just giving up like I would have done!!
23 April 2011, 21:21
ramrod340quote:
Doc224/375
Thanks for the suggestions and info.
Between the first set of pictures and the second I had wiped the stock a couple times with a dilute chlorine bleach. I had Oxalic on hand planning on using it on the wood after I removed the finish but never did.
Thanks for the acetone reminder. After the first several times of using the TSP mixture I did saturate the wood with acetone. Once it appeared dry I then stuck the end of the stock in the oven low heat for a while. This stock came off of a damged "C" ring FN so it had age on it. I think some of what I got after the heat was oil from years gone by. After I no longer saw any residue after the oven I stopped doing it.
I also did "lightly" hit the checkering with a single point. Since it is old style and more or less flat on top I didn't want to cut deep. More just kind of removed any fibers from all the cleaning and brushing.
As usual just my $.02
Paul K
24 April 2011, 06:03
Doc224/375quote:
ramrod340
As I stated it looks really dam good for what you had to work with !. I'm curious an hope I'm understanding sequence of events correctly .
After removing action Butt pad etc. ,You didn't strip the finish prior to bleaching ?. If this is correct may I inquire as too why ?.
This is in NO way criticizing what you've accomplished ,I'm simply trying to put it in some resemblance of order that's all .
24 April 2011, 21:00
Michael RobinsonApropos of Easter Sunday, you
resurrected that rifle! I never would have thought it possible.
Looks like an oil based finish? What did you use?
Again, congrats on bringing that stock back to life.
Mike
Wilderness is my cathedral, and hunting is my prayer.
24 April 2011, 22:25
ramrod340Machael, Thanks it is Pro Custom oil from Brownels. With the gloss cut off of it.
Doc, it was a simple case of necessity. We were moving ourselfs from Houston to Denver. The damage happened in storage. I took the guns apart oiled and cleaned and wiped down the wood with bleach. Then spent the next several months repairing and refinishing the house full of furniture that was damaged as well.
2-3" of water in a storage unit makes a mess.
Several of the normal factory stocks I simply replaced. Why work on a $50 EAA stock.
When I did get around to this stock and removed the old finish I didn't feel it needed bleach.
As usual just my $.02
Paul K
26 April 2011, 05:53
Doc224/375quote:
ramrod340
Fully understand priorities and thank you for the explanation . I was simply under the assumption when a stock is as damaged as that one obviously was ,a complete stripping would be a priority , prior too anything else being done ( pertaining too the Gunstock of course !. ) .
This is a Learning forum in which ALL of us benefit from others experiences, an unfortunately sometimes Misfortunes !.
So the knowledge obtained is the KEY of success . I read that statement somewhere while in college !!!.
25 December 2011, 06:15
olcripRamrod340, you are an artist! Much patience and perseverance restored a really bad situation. Congratulations, you earned it! Merry Christmas.
Also thank you for the lesson. I learned much.

Olcrip,
Nuclear Grade UBC Ret.
NRA Life Member, December 2009
Politicians should wear Nascar Driver's jump suites so we can tell who their corporate sponsers are!