
 Guns, Politics, Gunsmithing & Reloading Gunsmithing
 Go | New | Find | Notify | Tools | Reply |
| 1891 Mauser upcock conversion - one method | Login/Join |
| One of Us |
The 1891 Mauser is often a PITA to convert since no one makes a replacement cocking piece for it. This usually means welding an extension onto the nose of the original 1891 cocking piece and then shaping & hardening it. However long ago folks discovered that the striker assembly from the later 1893/95 Mausers would screw into the 1891 bolt, with the length of the striker nose being the only functional difference. For this particular conversion I used an 1895 striker assembly along with a replacement upcock-style cocking piece made for the 1895. The fitting was very straightforward with no glitches and I lapped the cocking cam surfaces to a 1200-grit finish. Shortening the striker nose and forming/polishing a new hemispherical tip took only a few minutes and I adjusted the protrusion to 0.050". I noticed that the new assembly was just as long and awkward-looking as the original 1895, not quite as short and pleasing as the 1891 cocking piece's minimal rearward protrusion from its bolt sleeve. A few minutes comparison conviced me that it would be easy to shorten the rear of both the striker and the replacement cocking piece, making the appearance a little more appealing. I used an orphan left-side wing safety from an FN commercial action and shortened the 1895 bolt sleeve to match it, then cut & polished a matching cam notch in the newly-shortened replacement upcock cocking piece. Made things a lot shorter and more pleasing to the eye as well as shortening lock time. Here's a photo of some of the replacement components compared with the originals. Original full-length 1895 striker on the left, next is another 1895 striker with the nose shortened to work in the 1891 bolt (you can see why I chose to form another one, the small-dia portion of the nose is too long), next is the final replacement 1895 striker shortened at both front and rear, and on the right is an original 1891 striker. At the top right is the newly-shortened replacement bolt sleeve with FN safety and shortened replacement cocking piece, below it in the middle is an original 1895 bolt sleeve and new upcock replacement cocking piece and on the bottom is the original 1891 bolt sleeve and cocking piece. 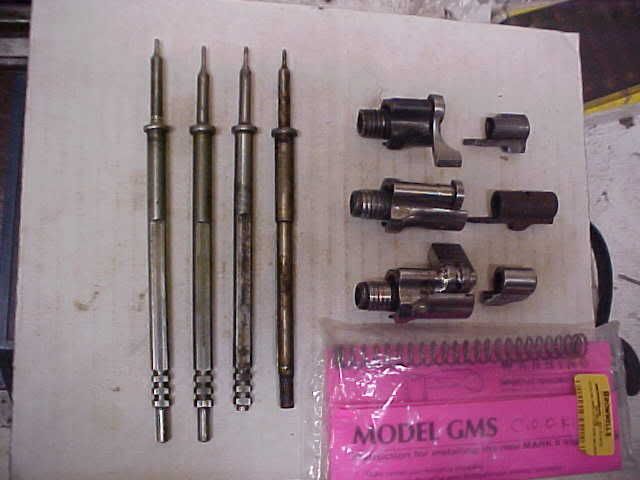 Here's another photo of the installation, cocked. The steel is rough & unpolished, the photos were taken for a record during the fabrication process, but you can get the general idea. 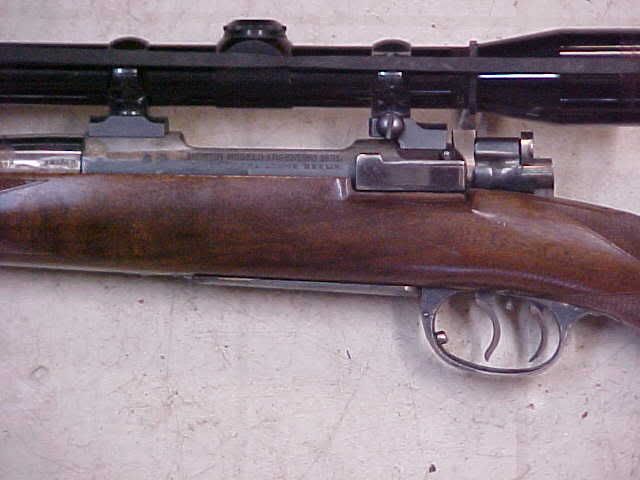 Hope a few of you found this to be interesting, I had fun doing the fabbing and the rifle, although plain, shoots well under 1 MOA.. BTW the DSTs are by James Wisner and are, hands down without a doubt, THE BEST I have EVER seen or used and I've used A LOT of 'em. Sadly I think he doesn't make them any more. Regards, Joe __________________________ You can lead a human to logic but you can't make him think. NRA Life since 1976. God bless America! | ||
|
| one of us |
Thanks for sharing the how-to JD. Can you also elaborate on the hinged floor plate modification? What did you use for the magazine internals? Straight feed/stagger? Capacity? Thanks, Bob | |||
|
| One of Us |
Bob, I'll take some more photos later but here's a quick-&-dirty on the flush magazine. I used a floorplate from a hinged 1909 Argentine guard, salvaged from the parts box after replacing with a straddle. Should be no problem to find one in most smith's spares. I cut the 1891 TG for the 1909 hinge tongue, and the slot hides the original hole for the 1891's front mag lock screw. The 1909 FP is almost long enough for a straddle but not quite. I cut & reshaped the 1891 TG & its inset mag release lever, and added a crude protrusion onto the original button. Then used a shortened magazine from a Rem 788 (rifle is 223 cal) that's silver-soldered to the inside of the floorplate and so swings down with it. Mag capacity is 2 down plus one in the chamber, single-column of course. Not a bad concept but I'm going to change the magazine to a fully-removable one, for ease of loading. I also installed a kicker spring to assist in the opening of the floorplate since the mag follower doesn't provide any tension and the parts are fitted snugly. First stumbled onto the 1891 back in the '60s when I NEEDED (VBG) a 17-222 but couldn't afford a Sako action. It was child's play to weld an extension onto the original extractor hook and install a collar into the bolt face and presto, there it was! Regards, Joe __________________________ You can lead a human to logic but you can't make him think. NRA Life since 1976. God bless America! | |||
|
| Powered by Social Strata |
| Please Wait. Your request is being processed... |
Guns, Politics, Gunsmithing & Reloading Gunsmithing

Visit our on-line store for AR Memorabilia