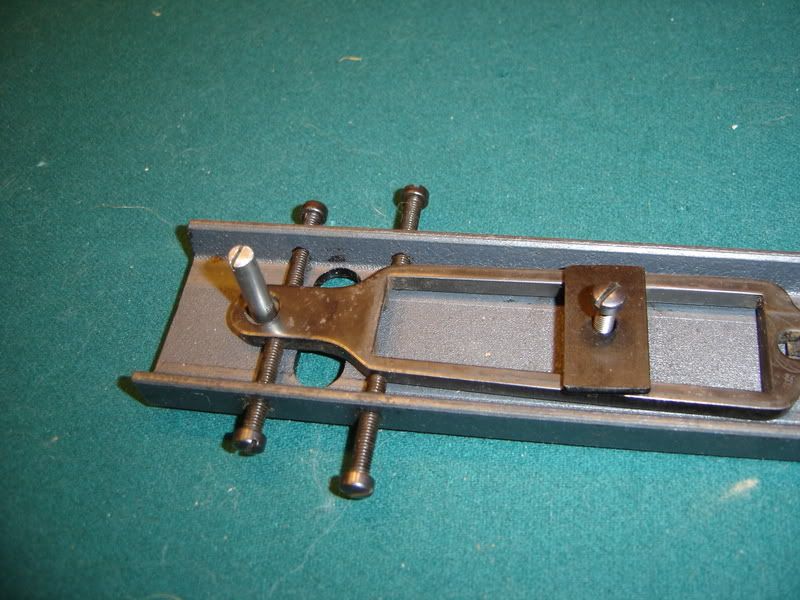
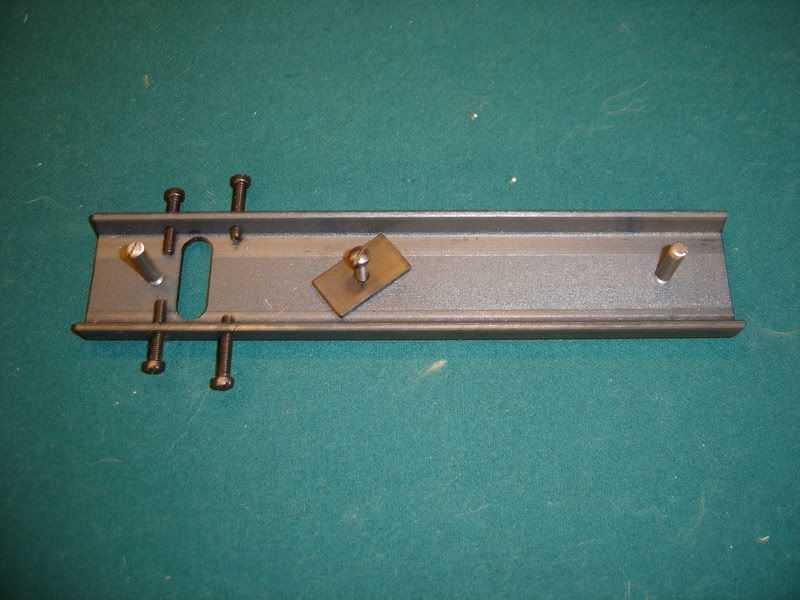
One of Us

| Don't need no jig for welding; only need one for forging. Cut the front tang off and measure the distance between screw centers. |
| | |
One of Us
| And then C-Clamp it to a table? Do you do anything to hold it steady or control the hole spacing? |
| | | Posts: 1138 | Location: Washington State | Registered: 07 September 2005 |   IP
IP
|
|
One of Us

| If I remember correctly from gunsmithing school we took a piece of flat stock and 2 'C' clamps cut off the front and positioned and welded. We only had gas welding then.
SCI Life Member
NRA Patron Life Member
DRSS
|
| | | Posts: 2786 | Location: Green Valley,Az | Registered: 04 January 2005 |   IP
IP
|
|
One of Us
| quote: Originally posted by montea6b:
And then C-Clamp it to a table? Do you do anything to hold it steady or control the hole spacing?
Shoot me an email with your address and I will loan you my jig. I don't use it very often anymore. So no hurry on returning it Don |
| | | Posts: 1088 | Location: Detroit MI | Registered: 28 March 2006 |   IP
IP
|
|
One of Us

| if you can find one of the old copies of "How to convert military rifles"... published by the Williams sight company. it shows a jig they sold... it would be east to duplicate it... in 1959 they charged $5.00 to do it... btw, you'll probably need a longer front guard screw, according to their literature...
go big or go home ........
DSC-- Life Member
NRA--Life member
DRSS--9.3x74 r Chapuis
|
| | | Posts: 2862 | Location: dividing my time between san angelo and victoria texas.......... USA | Registered: 26 July 2006 |   IP
IP
|
|
One of Us
| Thanks guys. I've had a couple offers on the side and I may just buy one to save myself the trouble. (I just have a cheap wire feed welder and I don't do real well with it.)
I do have the Williams booklet, somewhere. I decluttered and boxed up a bunch of books and now I can't find it.
Cheers... |
| | | Posts: 1138 | Location: Washington State | Registered: 07 September 2005 |   IP
IP
|
|
One of Us

| Someone is reprinting the Williams book. Saw a pile at a gunshow recently. |
| | |
One of Us

| quote: Do you do anything to hold it steady or control the hole spacing?
Yes, you make a jig! 
_____________________
Steve Traxson
|
| | | Posts: 1641 | Location: Green Country Oklahoma | Registered: 03 August 2007 |   IP
IP
|
|
One of Us

| Its just a piece of aluminum plate, I had 4 to do at one time...so I made this jig.
_____________________
Steve Traxson
|
| | | Posts: 1641 | Location: Green Country Oklahoma | Registered: 03 August 2007 |   IP
IP
|
|
One of Us
| |
| | | Posts: 1088 | Location: Detroit MI | Registered: 28 March 2006 |   IP
IP
|
|
One of Us

| You guys are making something that is really easy, really complicated. If I did more than one every few years I might drill a couple of holes in a scrap bar... |
| | |
One of Us
| quote: Originally posted by dpcd:
You guys are making something that is really easy, really complicated.
Those jigs look pretty simple to me. Don's is a little bit fancier, but nothing I would call complicated. That is all I was asking for, a basic idea on how others do it by photograph. quote: Originally posted by dpcd:
If I did more than one every few years I might drill a couple of holes in a scrap bar...
Isn't that basically what they did? Back to my question above when you stated no jig was needed, do you do anything to hold it steady or control the hole spacing? I haven't done a lot of welding, but when I have tried to weld small pieces without some sort of clamp or jig I invariably bump something out of position in the process of lowering the hood and striking an arc. P.S. Thanks Steve and Don! |
| | | Posts: 1138 | Location: Washington State | Registered: 07 September 2005 |   IP
IP
|
|
One of Us

| Of course you have to clamp both pieces down to a bar before welding; I use aluminum and c clamps. I measure the distance between the holes; scribe the holes on the plate before clamping and line it up straight. I see your problem though; I did not realize you would be stick welding it and didn't have an auto darkening helmet. MIG or TIG and a modern helmet makes precision welding much easier. |
| | |
One of Us
| Give me the step-by-step on altering the triggerguard from military to flat sporter, if you would. I mean I get it as far as cutting the front tab and welding it back on minus the extra metal, but then some have used the term forging, which is not welding, to me. Anyway  |
| | |
One of Us

| There is no extra metal as far as length goes; the hole spacing has to stay the same. The extra metal is in the angled reinforcement, which you will mill or saw off. Forging means to heat it red hot and beat it with a hammer until it is flat. In this procedure you must have a fixture to hold it in so as not to distort it and make it longer. Welding is much easier. Forging is definitely not welding. Although back in the old days, [pre 1900, )all welding was "forge welding"; heat both pieces, flux them, and pound them until they fused together. |
| | |
One of Us

| Forgot to mention; here is an easier way and I usually make a new front tang. Use 1/4 inch steel and weld it on being careful not to damage the floorplate recess. Then drill a new front guard screw hole, 7 15/16ths center to center. Round the end. This way is easier as there is a lightening cut in the original front tang which makes it thinner. If you use a flat new piece, it will be easier to manage. |
| | |
One of Us
| If I remember correctly, Roy Dunlap showed in his gunsmithing a simple way of cutting and welding to remove the hump in a 1917 Enfield-a quite simple way. I did one,but that was in the 1960's and I don't own the book anymore. He had some simple ways of doing complicated jobs. Hope this might help.
Don |
| | |
One of Us
| I remember that section... another book I have that is boxed up somewhere. That's why I started this thread, all my good information is inaccessible! Maybe I will dig around this weekend.
P.S. Good pointer on fabricating a new front tang. I was looking at this and also thinking that I would like narrow it to match the back, more like the Mauser, for aesthetic reasons. I will be stocking it from a blank so any gaps will be of my own doing.
I also thought about dressing the side edges more even with the floorplate for a trimmer look. The stock piece just looks really wide, Has anybody done this before? It seems like there is plenty of extra metal there... |
| | | Posts: 1138 | Location: Washington State | Registered: 07 September 2005 |   IP
IP
|
|
One of Us

| I have his book; page 247; no picture or drawing, just a description and he says it is the hardest welding job he has ever done; talks about pitting and scale (he did not have a TIG or MIG welder either). He does not give much detail so I found his instructions not much help. My way is ultra simple; saw the front tang off, throw it away, and make a new one, which is already flat and easy to weld back on. But it is a great book and these old books offer us information that no one knows about today. You might have seen Ackley's book; I have that one too and I will check it for pics. |
| | |
One of Us
| Greatly appreciated, thanks all. |
| | |
One of Us

| You can certainly thin the side walls and floorplate; I have made them without any side walls at all; just the front tang and rear TG, with the floorplate in the middle. Like most modern bolt actions are made; you don't need the side rails anyway. Think Win M70. |
| | |
One of Us
| montea6b, Sorry I gave you an incorrect referance in the Roy Dunlap book. It should have been GUNSMITHING SIMPLIFIED by Harold McFarland.
It should help a lot.
Don |
| | |
One of Us

| I have McFarland's book "Introduction to modern gunsmithing", which, on page 118-120, only shows how to forge one flat; he says welding is too hard. I don't have "Gunsmithing Simplified". |
| | |


 The Accurate Reloading Forums
  THE ACCURATE RELOADING.COM FORUMS
  Guns, Politics, Gunsmithing & Reloading
  Gunsmithing
  Enfield Triggerguard Jig?


