
 Guns, Politics, Gunsmithing & Reloading Gunsmithing
 Go | New | Find | Notify | Tools | Reply |
| Feedback on a first checkering pannel | Login/Join |
One of Us |
Hello. I'm posting what is actually the 2nd panel that I have attempted. Don't know what happened to the first panel pics. This is 20 lpi. A bit more difficult place to start from what I understand. I did not bother with borders on this panel preferring to focus on line consistency. As you can see, you professionals have nothing to fear! I do want to perfect technique and checker for my own enjoyment. My "anchor" lines were cut too deeply. I cut all lines to a moderated depth in one direction then came back and picked up off the opposing "anchor" line and cut the other direction to complete the diamonds. I see inconsistencies in depth and come cross over lines. I feel that I knocked the top off a few rows along the way. I see high and low spots also. Please feel free to instruct on technique and means of consistent depth. Look forward to learning. lc 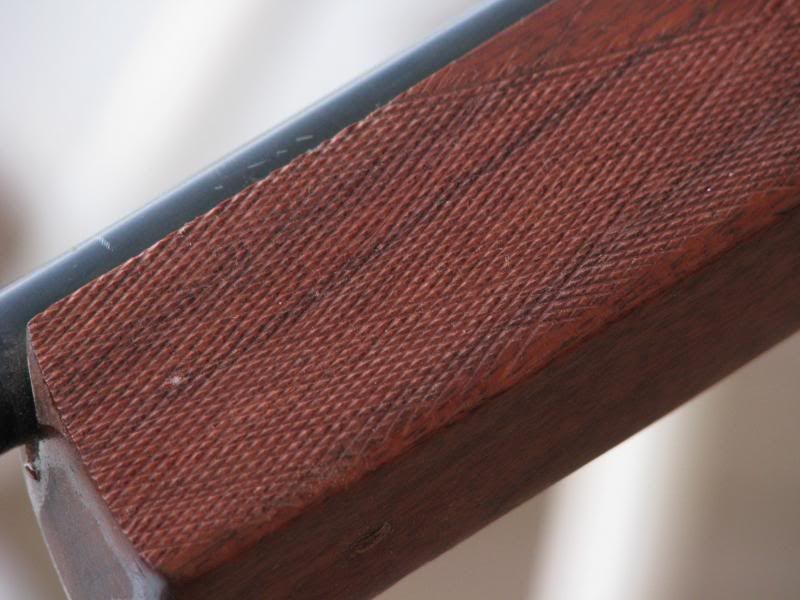 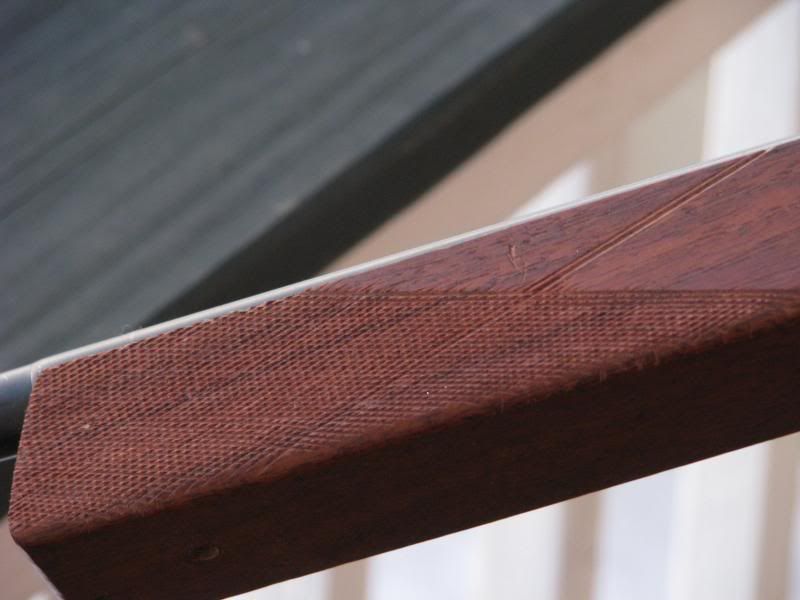 | ||
|
One of Us |
Keep going! I keep wanting to learn as well. It only gets easier! "Evil is powerless if the good are unafraid" -- Ronald Reagan "Ignorance of The People gives strength to totalitarians." Want to make just about anything work better? Keep the government as far away from it as possible, then step back and behold the wonderment and goodness. | |||
|
| One of Us |
Your lines look good. Work inside your borders with the pull technique ________________________________________________ Maker of The Frankenstud Sling Keeper Proudly made in the USA Acepting all forms of payment | |||
|
One of Us |
When doing the first cuts, only go 1/3 down in each direction, then go over twice in alternating directions, until the bottom of each cut meets the bottom of the cuts in the other direction. Use pull cutters at the border ends to prevent runovers. Hippie redneck geezer | |||
|
| One of Us |
I was expecting a huge mess, second panel? Looking good! | |||
|
| one of us |
First let me say there would have been no way in heck I would have posted my second checkering panel Yes there are a could screwed lines but for the most part it is simply practice needed. As Lanny says cut part way then come back and clean and deepen. A pull tip does work wonders on the border area. I wish you luck. While I can do an acceptable pattern, the stress leaves me wasted. I simply don't enjoy it any longer So my last couple I had someone else checker them. As they say practice makes perfect and you have a good start. As usual just my $.02 Paul K | |||
|
| One of Us |
Me too. I had tried checkering and was making progress. Then I tried to hurry the job and simultaneously the cutter dulled and it went to shit in a short period of time. So, I concluded I couldn't slow down enough to make a decent job. My recommendation to the O.P. is slow down and keep your work rigid in a cradle or padded vise. You must be able to see the actual cutting edge as it rides in the guide cut and cuts the new groove. Use plenty of incandescent light and a magnification visor. Change cutters at the slightest sign of dulling. Dull cutters don't cut, they plow through tearing the grain of the wood and have a huge tendency to ride up. Besides that, the cut that it just made is round down in the bottom of the groove which makes for a lousy guide for the next row. Keep wood particles out of the grooves and cutter tip. Well anyway. Those were all my mistakes. If you have the patience to slow down, good eyes and the right tools, you could put out some nice work. I hope this helps a bit. CB Life itself is a gift. Live it up if you can. | |||
|
| One of Us |
Turn the cutters around to cut on the pull. This will cut you run overs way down. I use plastic tape from the Dymo label machines. Use the tape to protect the area outside the pattern. If you can't find that break up a little measuring tape. Use the strips to protect the border, tape them down. Having a stop at the end of the line and cutting on the pull will elimnate the run overs. I also see you have some lines that went astray. When it gets screwed up stop and fix it. I put parallel lines with grease pencil to tell when I get put of parallel. Better to fudge the spacing gradually over several lines than try to get back on track on one line with a bend and an extra line thrown in. Mostly just practice. Practice as if it were for real and pay attention to detail. You will find that you can feel when it is going right or wrong. Finally use bright oblique lighting. | |||
|
| One of Us |
Oh, yeah, having a stock cradle that lets you rotate the stock is needed to keep your lines, and your neck from getting bent out of shape!! I forget how bad it is, and do it once every 2 years. Crossed eyes, hand cramps, back aches, jangled nerves....shot of Yukon Jack helps... not more than 2, though! Hippie redneck geezer | |||
|
| One of Us |
LC- I've no advice to offer...never checkered a thing (yet) If I got the kind of result in your pics on only my second time around, I'd be beside myself with happiness. Great Work! Doug Wilhelmi NRA Life Member | |||
|
| One of Us |
I was given advise early on in my checkering career...use the "inch worm method". Cut one inch wide and three inches long, move to the next inch bring up to one inch short of the first series, go back to first section move three inches, next section, start NEW section. This will allow you to keep the lines straight and not become confused with line placement by diamonds starting too soon. I also move no further than half the pattern before I start on the other master line pattern going the opposite direction. That way I complete one quadrant of the pattern with diamonds and can keep the lines moving in a parallel and equidistant array from the master line. It also keep the pattern straight in the center of the rounded grip and forend. Count lines often to keep yourself sure of your center line orientation. I noticed you have one line that "dead ends" into another on the lower left side of the pattern. For a novice checkerer this is to be expected... by the way the pattern looks good. Unfortunately the "dead end line" is a common occurrence with checkering. Even professionals do it...we just know how to correct it as it happens (or when it is pointed out to us)! The trick I use is superglue and walnut dust. The dust has been collected from my palm sander for over 30 years of stockmaking and from Kimber of Oregon's sanding room dust collector when I first learning that I wanted to stay in this trade to feed my family. A little dust on a plastic butter tub cover and superglue dot mixed with a paperclip. Applied with the same paperclip, in the spot needed. will allow you to fix most holes, double lines, broken diamond tops, or just plain old carelessness because one got in a hurry. Dennis Earl Smith Professional Member ACGG Benefactor Life NRA Life NAHC | |||
|
| One of Us |
Wow. Just what I was looking for. I appreciate the advice. It's been a crazy week at work. I hope to sit and read these posts when able to concentrate. I'm sure I'll have some more questions over the weekend. lc | |||
|
| One of Us |
I really can't add much more to what's been said, and I only have 2.5 stocks under my belt, but I will say that mental attitude is important. There is nothing worse that finally putting the files to that stock you spent so much time shaping, sanding and finishing, then having a line go astray. The important thing is to stop, take a deep breath, get the cus words out, and if you are still upset at all just walk away. When I try to fix things angry they generally get worse. Adrenaline is not your friend here. The next day it never looks as bad, I can take a joiner and usually make an acceptable, calm correction. (Get a joiner if you don't have one.) Recognizing the drift early is key as others pointed out. Try on some curved pieces before you get on a stock. I got over confident early on flat practice panels, but keeping lines straight on a wrap around pattern is much harder. Also, if are making large panels in complex areas of the grip be conscious of area where spread occurs. In other words, where more surface area comes in to play... Your lines may be perfect, but you may need to subtly increase spacing, (fan it out slightly) to keep the pattern going. Get a good cradle if you don't have one. I tried without at first but it makes a huge difference. And finally, I previously cut my patterns with a double or triple cutter. I only recently got a left and right handed spacer where one "V" does not have cutting teeth. I have not yet tried them on a stock, but the little practice I have done they seem like they will be much more resistant to "jumping the tracks". The cutting edge you let ride in the previous track is still cutting, and it doesn't take much for it to cut in a direction you don't want. With the non-cutting V it seems that you can press it down more firmly in the previously established line. Keep at it! It can be painstaking work, but satisfying when you are done. | |||
|
| One of Us |
Ok, I am totally embarrassed now. Mine should have looked that good, maybe I would have kept at it instead of starting over again. Good Job | |||
|
One of Us |
I thought Littlecanoe's chequering a damned good effort. I've only done two rifles, so many years apart that by the time I did the second one I'd forgotten almost everything learnt on the first one. Also. the only instruction I had was the the scrap of paper that came with the Herters' two-row cutter, and that got lost decades ago. The most important thing I remember is always to keep the tool square to the curve of the wood at every point, hence the need for a cradle or the agility to maintain your hand angle. I don't think I'd have the nerves or patience to do it for a living. | |||
|
| one of us |
Sometime after I was in gunsmithing school I visited Remington. The checkering area had a bunch of grey haired women doing it !!! So I fugured if they can do it why shouldn't I be able to ? There's nothing like practice to improve your skills .A comfortable seat, good lighting .STOP when you're tired .Be patient . | |||
|
| one of us |
Looks pretty good for a first try, I'm afraid mine would look like that crazed drunk one eyed beaver decided to quit inletting and tried it's paw at checkering. Steve......... NRA Patron Life Member GOA Life Member North American Hunting Club Life Member USAF Veteran | |||
|
| One of Us |
You will get a "feel" for when things are going well. Whenever I "feel" things may be off, I take a photo with my digital camera. Inspecting your work via the photo, you will see errors that somehow manage to remain invisible to the naked eye. Above all, don't hurry, and lay the tools down before you sneeze or cough. Mike Ryan - Gunsmith | |||
|
| One of Us |
Just wanted to thank everyone for the tips and advice. You have graciously given me a lot of help that has filled in some gaps for me. I appreciate the replies here and PM's! Work has been off the chart for the last 5 weeks and doesn't look to change in the near future so I'll be a bit delayed in practicing but look forward to being able to actually start a small project. lc | |||
|
| one of us |
I found an improvement when I turned the cutters around so they cut on the "pull". Not tipping the cutter to the side is important; it has to be vertical to the work. I have worked without a cradle but it is easier with one. My first attempt was bad enough that I liked to throw my coat over the rifle if anyone was around. I am only marginally better now. I've watched some guys who were very good at checkering (Martin Hagn, Klaus Hiptmayer)and try to banish the memory from my mind so as to bolster my self esteem. They are not only very good but incredibly fast. Regards, Bill | |||
|
| One of Us |
Thank you for posting your pictures. I was inspired to pick mine up and try again. A customer asked me to restore a SXS Remington 1900. I rust blued it and ordered a "Semi Inletted" stock and it was worthless so I tried my hand at inletting and shaping one. That went so well I decided to try my hand at checkering (which I haven't tried since 1985). While all I could see were my mistakes, the customer was overjoyed at nd actually teared up when he got it back. It seems that this was the gun his grandfather let him use while they went hunting together. When he inherited it he took it to a gunsmith that told him he could not afford to fix it and that it was unlikely to ever shoot again. While my earnings were less than I could have made doing other work, I feel I have been amply rewarded by knowing I have made it possible for a few more generations to treasure a family heirloom. Thank you again for inspiring me to give it another shot. | |||
|
| One of Us |
This is always interesting. Talking and checkering | |||
|
| One of Us |
Very interesting, just got done with a Parker repro checkering job. I can't do it that fast. The trick with the portion of a tape measure, in the video "Pam Checkering" is a very good Idea to keep the lines straight. Jim Kobe 10841 Oxborough Ave So Bloomington MN 55437 952.884.6031 Former Professional member American Custom Gunmakers Guild | |||
|
| One of Us |
That video is flipping amazing... I figured anybody checkering professionally would use a powered cutter. I'm on my third rifle now and I work at geological speeds compared to that lady. I noticed she doesn't use anything to keep the dust clear. I find that it piles up quickly and obscures my view of the lines. I blow with my mouth, and have developed a rhythmic "file-file-file-puff routine", but it is not as efficient as if I could concentrate solely on the lines. I don't want to have a noisy shop vac running, (I like to work with background music in the shop) and was thinking of finding a way to funnel air from a quiet fan into a flexible duct that would gently blow the dust away as I worked. Does anybody else have thoughts on this, or similar systems for dealing with the wood dust? | |||
|
| Powered by Social Strata |
| Please Wait. Your request is being processed... |
Guns, Politics, Gunsmithing & Reloading Gunsmithing

Visit our on-line store for AR Memorabilia