The Accurate Reloading Forums
Blackburn Bottom Metal Thought Experiment
24 June 2016, 02:18
Quick KarlBlackburn Bottom Metal Thought Experiment
Disclaimer - I am not doing this work or having it done. However, I am naturally curious...
This came about through a discussion about fitting a Blackburn bottom metal to a Mauser. Of course, finding information is challenging. Nevertheless, using information from an article about converting an Enfield to 416 Rigby written by a guy named Wisner, and dimensions taken from a Blackburn bottom metal, I thought I would do some 3D model analysis using a VZ24 I modeled some time ago.
The article specified a .375 ball mill canted at 8 to 10-degrees. That would not have removed enough material to clean up the area indicated in yellow on the illustration. Instead, I used a .1875 ball mill tilted at 5-degrees (best I could figure to match the angle of the existing Mauser feature) - and it cleans up lots better.
Key:
Red = first milling operation to clear back of Blackburn bottom metal.
Yellow = .1875 Ball mill at 5-degrees operation to follow inside profile of Blackburn bottom metal magazine box (I realize that I have to extend this operation to the rear of the action some to clear the back corner of the magazine box).
Green = portion of factory feed rail remaining untouched by machining operations.

So, just for the sake of conversation, is this the right idea?
24 June 2016, 06:33
Toomany ToolsYes
John Farner
If you haven't, please join the NRA!
24 June 2016, 06:53
J WisnerYou do not state what caliber you are opening the standard Mauser receiver to.
The ball nose cutter radius will change depending on what the caliber is.
The Angle of the taper in the rails to the center line of the bolt will remain fairly constant at the 8 to 10 degress. To steep and feeding issues will surface, to angled and other feeding issues will surface.
The max width I feel the standard M98 receiver will do is the 404 width, of 1.010" at the rear of the box.
J Wisner
24 June 2016, 07:08
Quick Karlquote:
Originally posted by J Wisner:
You do not state what caliber you are opening the standard Mauser receiver to.
The ball nose cutter radius will change depending on what the caliber is.
The Angle of the taper in the rails to the center line of the bolt will remain fairly constant at the 8 to 10 degress. To steep and feeding issues will surface, to angled and other feeding issues will surface.
The max width I feel the standard M98 receiver will do is the 404 width, of 1.010" at the rear of the box.
J Wisner
Wait... the same Wisner as the cited article?????

I'm stunned!
Is the 1.010" that you reference at the back of the box an interior or exterior dimension? The Blackburn bottom metal I have is 1.100" exterior and .975" interior
It is for a Wildcat caliber -- a 405 Winchester in a belted magnum case.
Here is an illustration using a .375" ball mill @ 5-degrees (vs. .1875" ball mill in preceding illustration).

I will create one at 8 to 10-degrees and post.
24 June 2016, 07:28
Quick KarlThis is .375 ball mill @ 10-degrees

24 June 2016, 20:26
J WisnerOK so if the rear inside width of your mag box is .975". Which by the way is an odd width. Most of the normal belted mag boxes ID at the rear would bee .990" - .995" That would be the width of the tapered bottom opening of the receiver you are going to.
Try to blend in those two width's as close as possible, +/- .005" to prevent the cases from stopping at that juntion.
Most of the time I use an 5/16" carbide ball nose cutter to clean up that M98 rails when going to magnum. You also have to understand that you also need to thin vertically the feed lips as once the machine work is done as the width of the lips will be wider and IF you leave the feed lips to thick vertically then that means pulling special tricks out of your pocket in order to make the dang thing feed.
So the 5/16" cutter will normally clean up about 90% - 95% of the old cuts and make the new feed rails smooth.
The blend in at the back of the feed rails to the width of the feed lips and the receiver can get fun, hence a few more tricks to pull out of your pocket.
No need to use two different ball nose cutter to clean up the old rail cuts.
PM sent about some current pics of an M98 receiver going to a 404.
J Wisner
24 June 2016, 20:48
Quick KarlI have no tricks, sir, I just draw well!
PM and email sent.
26 June 2016, 01:17
Quick KarlThese illustrations are .375 ball mill @ 10-degrees to follow the interior profile of the Blackburn magazine box while reducing the feed rail thickness from .0625" to .03125"


26 June 2016, 06:42
Quick KarlDuane,
Thanks for the comments!
You would be surprised how many people I have met in the last 30-years that look at something I've done and then tell me they can do the 3D modeling too, and then they call me or email me and ask me how to do something simple! I am sure you've had similar experiences. I always help when I can!
What little machining experience I have enjoyed so far has turned out fairly well because I am able to sit in front of my computer and draw things out and let the software generate the geometry!
27 June 2016, 14:13
John Chalmersquote:
Originally posted by Duane Wiebe (CG&R):
Pretty pictures! and...shows the careful thought and application that must go into part of the process if you want to end up with a reliable conversion.
I settled on a 3 degree (per side) ball EM with .187 radius, I do not tip the action side to side. But...I'm not completely convinced that the taper HAS to be 3 degrees...4 or 5 should work just fine, but I have no desire to start farting around with something that works for me.
Followers have not been addressed so far on this thread, but I have a bunch of configurations I made up and sure enough, a certain follower will find the "sweet spot"
The extractor and bolt face are soooo important to feed and function, ejection, etc.
So many times, on AR, I have seen advice about feeding and it usually is something like "put in a stronger spring"
I applaud efforts by Karl and Jim to bring out the complexities of this very demanding operation
Thanks for that Duane, I had that exact feeding problem with a ZKK Brno I bought recently.
The feed was terrible until I smoothed it from floor plate to chamber.Just removing lumps ,bumps and sharp edges with emery cloth.
It's feeding 90%improved but I think could be even smoother with a weaker spring. The strong one was probably fitted in the first place because the smoothing I done was skipped over.
The spring in my Sako is much weaker by comparison and takes five down and feeds like a hot knife through butter...?
01 July 2016, 17:37
Quick KarlJust for the heck of killing some time I worked up a jig for holding a Mauser action upside down for milling a magazine well with a tapered ball mill. Doing a little math to calculate the diameter of the cut of a tapered ball mill at the depth desired, this could help make the milling portion of a conversion a bit simpler even on a manual mill, and probably very easy on a CNC mill.
The image does not show it but the front clamp does clear the front of a 3.400" magazine well with room to clear the machining operation - not by much, but enough to work!

02 July 2016, 02:45
jeffeossoi'd add clearance by putting the front over the front screw, and make a little longer in the rear .. it doesn't need to be clear underneath, btw, so, as drawn, you could cut down on fixture creation, if made from a single piece..
i am certain you took into account the bridges are different heights, and might need to be shimmed, due to variations in milling off the charger hump -- any consideration for the guys that like to leave the hump?
I ask, as your mauser fixure could likely sell on brownels, especially if there was some way to reverse the action and mill/drill for sights/scope bases
02 July 2016, 03:13
Quick Karlquote:
Originally posted by jeffeosso:
i'd add clearance by putting the front over the front screw, and make a little longer in the rear .. it doesn't need to be clear underneath, btw, so, as drawn, you could cut down on fixture creation, if made from a single piece..
i am certain you took into account the bridges are different heights, and might need to be shimmed, due to variations in milling off the charger hump -- any consideration for the guys that like to leave the hump?
I ask, as your mauser fixure could likely sell on brownels, especially if there was some way to reverse the action and mill/drill for sights/scope bases
Thanks Jeff!
I wanted to leave the front action screw boss accessible to indicate off of and making it longer in the rear only puts pressure on the unsupported area of the tang. I though that shims could be used front or rear to get the action level and I positioned the rear step far enough to the rear to avoid a loading hump if one exists.
Other than that I have no idea how to make it work for sight or scope base drilling and taping!

02 July 2016, 03:44
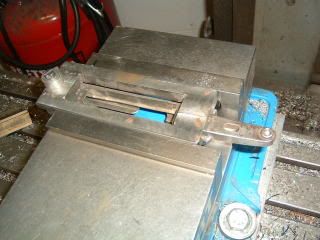
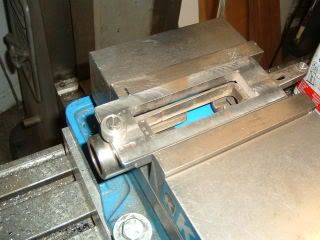
Quick KarlClearance front action screw boss so one could position the bottom metal to check work

Alternate view

Side view

Thanks Karl for this thread, you've put some serious thought into it.
I personally have never had to open a 98 out, but when I do I want to get it right, the thought of f'ing up a good action scares me.
If you didn't know, Duane put out a neat booklet on the subject, well worth a look. I would definitely use a tapered EM.
Regards,
Metal.
02 July 2016, 18:35
Quick KarlNo one has ever mentioned that Duane has a booklet on the subject.
02 July 2016, 21:44
Quick Karlquote:
I remember that thread - I asked how I could purchase the booklet and never got a reply.
No worries - I am not interested in doing this work myself or having it done. I am only interested in learning about how it is done.
03 July 2016, 20:41
srtraxI went to Duane's web sight...cant get one there. Duane's a busy man, may not have had the time to mess with it?
_____________________
Steve Traxson
10 July 2016, 21:30
Fal GruntFantastic thread and many thanks to Mr. Wisner and Mr. Wiebe for their input.
Karl if I can assist with any dimensions for the action let me know. I have full blue prints for the 98 Mauser reciever from a German Arsenal. No tolerances, at the time they used gauges to verify. They came in a great book about the Gewehr 98.
Re: your fixture, I started to make something very similar for the same purpose but ran into so many variations between rear bridge heights, front ring diameters, and of course the actions themselves (not parallel, twisted, etc). I wound up not finishing the project.
Ideally I had always figured the angle and radius used would vary depending on the cartridge providing contact at the tangent points of the case at 6 and 9 if you will based on how your reciever is oriented above. The taper of the rails should match the taper of the whole of the case. Likewise the second case off the rails supported by its first cartridge and the rail should be tangent of its contact points 180 degrees opposed. Did I make that too complicated?

wow I think I confuse myself.
None the less fantastic thread and fantastic input from two who have decades of experience.
Nathaniel Myers
Myers Arms LLC
nathaniel@myersarms.com
www.myersarms.comFollow us on Instagram and YouTube
I buy Mauser actions, parts, micrometers, tools, calipers, etc. Specifically looking for pre-WWII Mauser tools.
10 July 2016, 23:33
Jim KobeHere is the one I use, pretty simple
Jim Kobe
10841 Oxborough Ave So
Bloomington MN 55437
952.884.6031
Professional member American Custom Gunmakers Guild
11 July 2016, 00:20
Quick Karlquote:
Originally posted by Fal Grunt:
Fantastic thread and many thanks to Mr. Wisner and Mr. Wiebe for their input.
Karl if I can assist with any dimensions for the action let me know. I have full blue prints for the 98 Mauser reciever from a German Arsenal. No tolerances, at the time they used gauges to verify. They came in a great book about the Gewehr 98.
Re: your fixture, I started to make something very similar for the same purpose but ran into so many variations between rear bridge heights, front ring diameters, and of course the actions themselves (not parallel, twisted, etc). I wound up not finishing the project.
Ideally I had always figured the angle and radius used would vary depending on the cartridge providing contact at the tangent points of the case at 6 and 9 if you will based on how your reciever is oriented above. The taper of the rails should match the taper of the whole of the case. Likewise the second case off the rails supported by its first cartridge and the rail should be tangent of its contact points 180 degrees opposed. Did I make that too complicated?
wow I think I confuse myself.
None the less fantastic thread and fantastic input from two who have decades of experience.
Thanks Nathan!
I thought that by using shim stock one could use the jig with almost any standard length large ring Mauser. In my thought experiment, I wanted a way to control the position of the action as rigidly as possible for the best finish and cutter life, as well as making setups pretty straightforward. With a tilting head Bridgeport type of mill it shouldn't be too bad, presuming the machinist is good with a calculator and a test indicator. I am sure that other ways work just as good, but I was thought-experimenting from scratch...
I sent you an email!
16 July 2016, 06:08
AtkinsonTurn it over and make a surface grinding jig, they would sell pretty good Im thinking.
Ray Atkinson
Atkinson Hunting Adventures
10 Ward Lane,
Filer, Idaho, 83328
208-731-4120
rayatkinsonhunting@gmail.com
21 July 2016, 22:20
capowardquote:
Originally posted by Quick Karl:
Clearance front action screw boss so one could position the bottom metal to check work
Is there a strength issue preventing moving the front clamp further forward so that the clearance notch occupied the front 1/3 of the clamp? Seems like that would still provide your indicating capability while allowing sufficient clearance for the occasions where the forward lug area requires milling for 3.6" length cartridges.
Also perhaps modify the base so that the front clamp could be used for both the standard length action and the intermediate length action?
Just questions as I'm not a gunsmith nor am I capable of utilizing the equipment necessary to perform this work.
Jim
 "Life's hard; it's harder if you're stupid"
John Wayne 
