
 Guns, Politics, Gunsmithing & Reloading Gunsmithing
 Go | New | Find | Notify | Tools | Reply |
| question re 1903 Springfield rear bridge | Login/Join |
| One of Us |
I've often speculated about scope mounting the 1903, it's such a pain to work around the rear bridge's awkward protrusion. I've done top mounts and side mounts and AAMOF have a nice complete NOS never-installed Jaeger side mount with undrilled base sitting in the shop. But my thoughts turned to making the rear bridge into some sort of integral QD base and then fabbing a front base to match. Can anyone tell me the dimensions of the Brno dovetail(s)? The 1903 rear bridge is too wide for the Kimber/Warne Premier dovetail and the Weaver shape is too large and bulky for my taste. I've thought about using the Sako system but with the rings reversed since, again, the 1903 bridge is too wide for the Sako rear ring but the Sako front ring would fit on the 1903 rear. Has anyone used Talleys here, in an integral application? I have an orphan set of Sako rings and a fairly nice 1903 receiver, guess I'll find out SOMETHING but would appreciate any info that anyone can offer! TIA and regards, Joe __________________________ You can lead a human to logic but you can't make him think. NRA Life since 1976. God bless America! | ||
|
| One of Us |
Hello Joe The large Brno dovetail is 19mm, the medium 16 (Foxes and 527's etc) mm. Cheers | |||
|
| One of Us |
Thanks Foster, that means it'll work! I've already welded up the 1903 rear bridge to be wide enough to fit the Sako front dovetail, now I'll measure it to see how close it comes to the Brno sizes. Regards, Joe __________________________ You can lead a human to logic but you can't make him think. NRA Life since 1976. God bless America! | |||
|
| One of Us |
Joe, you are missing something here. Run the bolt thru the reciever and you will find the third lug does not touch the "circle" of the inside of the reciever ring. I have in the past simple removed the lump compleatly and radiused the rear ring then ground and lapped the base and ring and silver sodered. I have also tig'ed a Tally or two strait to the lump. Works but is high. My shop is in incomplete disaray with building the new shop but I believe I can find a couple recievers showing what I have done in a day or two. | |||
|
| One of Us |
Big Earl, I've thought about silver-soldering a Talley or Kimber base to the top, but as you point out it ends up a little taller than I wanted. However your idea about the complete removal and replacement is a stroke of genius, and I'd sure appreciate a few pics if you get a tuit! Regards, Joe __________________________ You can lead a human to logic but you can't make him think. NRA Life since 1976. God bless America! | |||
|
| One of Us |
Here's a pic of the roughed-in Sako ring adaptation, with a Leupold Compact scope and low Sako rings. You'll notice that the small eyepiece of the Compact just barely clears the safety lug, so the normal-sized Leupold eyepiece would require Medium rings. The front mount needed to be ~0.100" tall, I used an orphan Kimber front base and cut it down to fit. 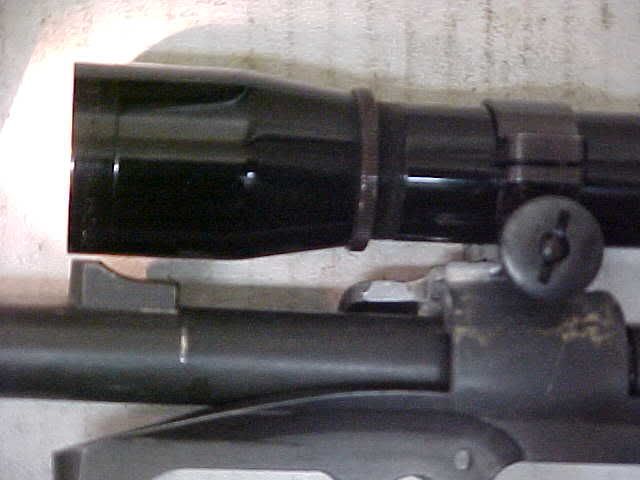 I know, I know, it doesn't look very finished, that's 'cause it's NOT(grin). I'll make a better-looking front base later, after I cogitate upon the best shape for it. I think the Brno size might look better, can't wait to see photos of yours! Regards, Joe __________________________ You can lead a human to logic but you can't make him think. NRA Life since 1976. God bless America! | |||
|
| One of Us |
Joe, I have this on the mandrel now. I ground the rear lump off on a 24” G&L grinder and plan to weld the little “fisher” in before final grinding. I lapped the front base on then will just touch up the top of the base with a surface grinder to clean it up. I will mount the rear base in the ring and tighten it on 1” round stock. I can then grind the contour on the bottom of the base to match the receiver’s new contour (radius’ed wheel) then fit to where a single sheet of paper will just evenly slide between the two bases. Then hit everything with a bit of clover compound for a good fit then clamp the base firm and silver solder. Run over the top with the surface grinder again and it done except for final shaping. I have done this only about four or five times and this is the first time since photography has been considered an essential part of gunsmithing. I believe the first time was to my buddies “truck rifle” that he used for at least fifteen years before it was stolen. He abused the heck out of that rifle and the base stayed firm. That was also one of the ugliest jobs I ever did and am glad I do not have pics of that one. Personally I would check out Matt Williams post about the new rings and bases, you might get close to what you want starting with a nice base. As for the welded Tally, I will need to dig that one up. All gun work stopped when they poured the footers for the new shop and the old shop is in chaos and will remain so ‘till I move everything. Hell, I can’t even find my vise! It’s not a bad looking set up until you put a scope on it then it looks way to high. The alternative would be to cut the underside to match a ground and radius'ed lump. I never tried this before but have though it a wee bit.  | |||
|
| Powered by Social Strata |
| Please Wait. Your request is being processed... |
Guns, Politics, Gunsmithing & Reloading Gunsmithing

Visit our on-line store for AR Memorabilia