
 Guns, Politics, Gunsmithing & Reloading Gunsmithing
 Go | New | Find | Notify | Tools | Reply |
| Cheating on recoil pad installation | Login/Join |
| One of Us |
I wanted to do one of those cool recoil pad installations where the butt of the stock is crescent shaped. Using my Ptorotrak to mill the arc, here's some pics of the steps. First sand the pad perfectly flat.  Then set up the stock in the mill with the length of pull minus the pad thickness marked. The level is to make sure the butt is flat. I can adjust it with the two blue screws under my hand. The top line of the stock is against the fixture and I just program the pitch.  The jack under the grip adjusts the cast of the stock so the milled surface is square to the buttstock. Not the barrel.  Using a wiggler I set my X zero. Y zero is the heel of the stock.  I mill it in two passes. First with a rougher and then with a finish mill.  I boiled a pan of water and then set it on low. Dropped the recoil pad in for about 10 minutes.  After pre drilling the holes and tapping them I screw the hot pad down the the concave surface.  Sanded with 60 grit.  I'll buff the pad tomorrow with a hard compound wheel to clean it up. | ||
|
| One of Us |
Very neat! Thanks for posting the pictures. | |||
|
one of us |
I like that, right color too Terry -------------------------------------------- Well, other than that Mrs. Lincoln, how was the play? | |||
|
| One of Us |
I would think the stock material would chip or flake with that end mill. I often cut the end of a stock but have had it chip at the end of begining of the cut depending on whether or not I was climb milling. Curious as to how you did and if it chipped on you. Oh, and by the way, Nice job! Jim Jim Kobe 10841 Oxborough Ave So Bloomington MN 55437 952.884.6031 Professional member American Custom Gunmakers Guild | |||
|
| One of Us |
Jim I conventional milled it starting with a roughing mill. Then one pass with the finish mill. The finish pass was around .020" deep. This stock was kind of brashy and pushed a bunch of wood out the heel. Lucky none chipped. I think the smaller diameter the cutter the better chance of not chipping. Climb milling leaves a better finish on metal and conventional milling leaves a better finish on wood. At least in my world | |||
|
| One of Us |
screw the pad - that is a fine looking piece of wood - I'll trade you 3 plastics for it | |||
|
| One of Us |
Now that's some "high tech" cutting edge gunmaking right there. Looks great, and really nice wood. Wish I had a prototrak Shane Thompson | |||
|
| one of us |
Yeah, who doesn't? I wouldn't call it cheating, more like making more time for metal work.  Aut vincere aut mori | |||
|
| Moderator |
Nice looking installation Gunmaker! What pad is that, a 500B or something else? I'll be looking for a nice thinnish pad like that when I redo a M94. for every hour in front of the computer you should have 3 hours outside | |||
|
| One of Us |
That's the one! 1/2" small basket weave. | |||
|
| One of Us |
Always happy to see how others do it...here'e my set up...I made a simple platen with wood and sheet metal, place it under the sanding belt and hand hold the butt to the belt to get a concave contour...no chipping..takes no more than about a 30 seconds...Oh yes! Hang on to the stock!  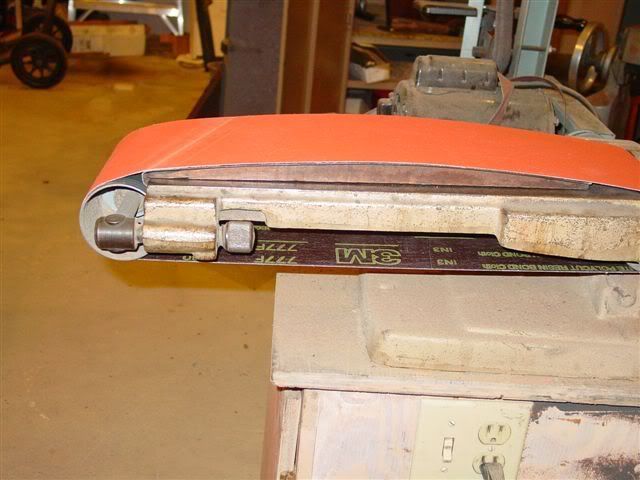 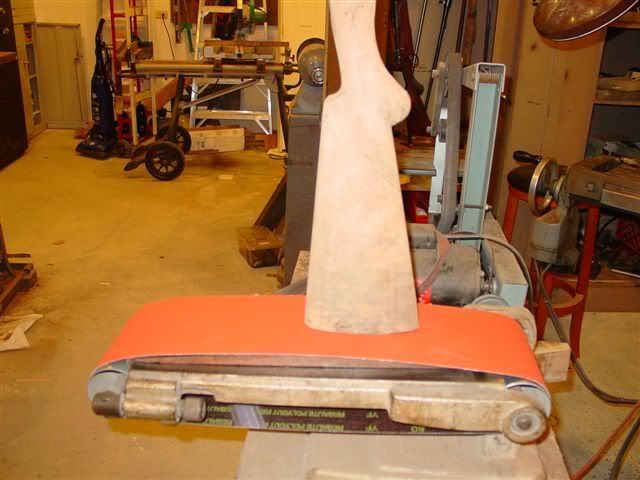 | |||
|
| one of us |
Yeah, but Duane, that can't be near as much fun as programming your machine. I remember making a mental note the first time you posted this info to file it away. Thanks for the reminder. Us low-tech guys need these easy solutions. Aut vincere aut mori | |||
|
| One of Us |
Well, I don't remember posting this before...reason enough that I HAVE to go lo-tech | |||
|
| new member |
Does this pad have a metal plate in it? Does heating it allow it to bend? | |||
|
| One of Us |
Good pics Duane. Your setup looks like the same way that Lee Hegeland explained to me how he does them. He's got some contraption above the sander that attaches to the forend with a spring so when he relaxes his grip on the stock against the platen, the spring pulls the stock straight away from the sander.
Most of the Pachmayer pads I've dissected have a skeleton plate about 1/16" thick inside of them. When you heat up the pad the hard rubber base gets pliable and takes a set when it cools. I'm going to pull this one off to finish under the pad. I wonder how much the pad will spring back ? | |||
|
| One of Us |
Lee's method sounds good...never had one get away from me, but could ruin one's whole day | |||
|
| One of Us |
While Gunmakers set-up is as cool as hey, Duanes method seems to be more profitable.... Bent Fossdal Reiso 5685 Uggdal Norway | |||
|
| Powered by Social Strata |
| Please Wait. Your request is being processed... |
Guns, Politics, Gunsmithing & Reloading Gunsmithing

Visit our on-line store for AR Memorabilia