
 Guns, Politics, Gunsmithing & Reloading Gunsmithing
 Go | New | Find | Notify | Tools | Reply |
| Martini Cadet Stock Options | Login/Join |
| One of Us |
I have a Martini Cadet in need of a new stock. I am looking for options for a semi finished butt stock and forend. I am aware of Treebone and Macon stocks. Any other options out there? Anyone with a pattern that would be willing to shape a blank? Looking for a pattern with a cheek piece preferably. Thanks in advance. | ||
|
| One of Us |
Call Pecatonica River; I get stocks for them for regular Martinis and they have cheekpieces; don't know if they make one for the baby..... | |||
|
| One of Us |
Thanks DCPD. Pecatonica River Long Rifle Supply Co. in Rockford IL? I see black powder rifle stocks listed but nothing about a Martini. Just want to make sure we are talking about the same place. | |||
|
| One of Us |
Yes, but you ain't looking at the right page of their web site; they do make the cadet stock with cheek piece. Look at the page; Single shot....Call them; Doug or Dick will answer. And, at least two of the rifles on their web site, I built. | |||
|
| One of Us |
Thanks. The single shot page didn’t show up as a link on my iPad. Got it now! | |||
|
| One of Us |
SHAPED FROM THE BLANK! 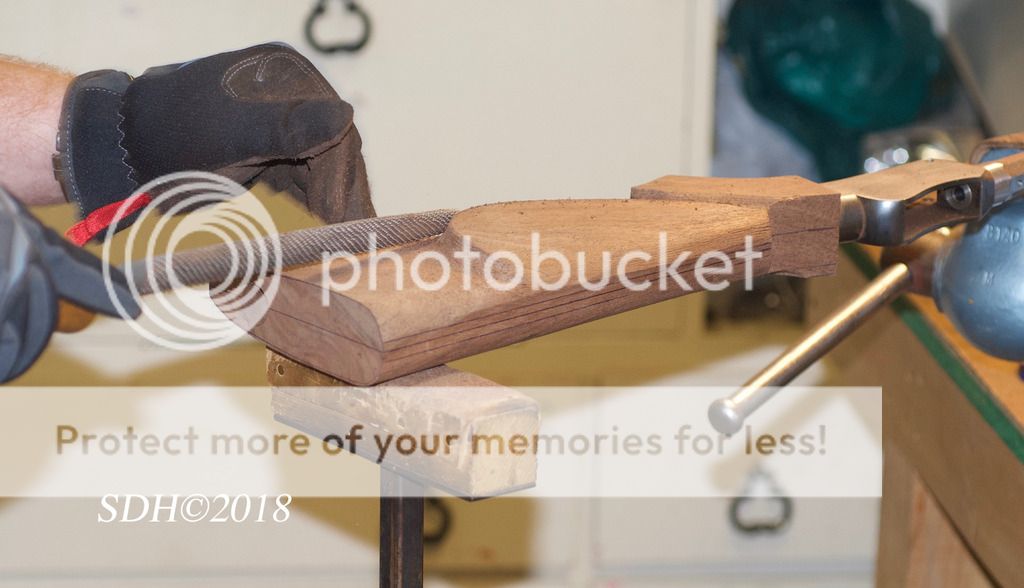 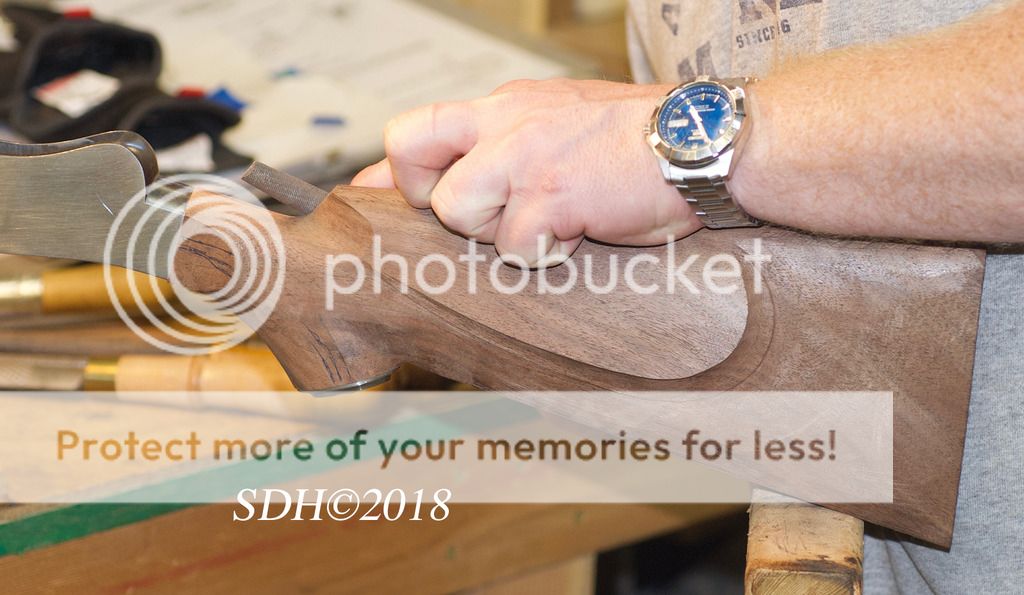 ACGG Life Member, since 1985 | |||
|
| One of Us |
Very nice to both stocks. I realized a long time back I didn’t have the skills to start from the blank. Especially drilling that dang bolt hole accurately! | |||
|
| One of Us |
You drill the hole first and make the stock around it; not the other way round. You would never get it true. And wearing gloves whilst using a rasp? My hands are so tough that the rasp doesn't scratch them. | |||
|
| One of Us |
That may be the way that some/most people choose to do it. But not myself. When duplicating stocks that need a draw bolt I machine first and then drill and counter-bore the stock for it's draw-bolt hole. My personal experience has shown me that if the hole can be drilled accurately in a band-sawn blank it's just as easy to do it in a shaped (machine-duplicated stock). I've done so hundreds of times. By doing this, I can utilise skimpy and damaged blanks to best effect, easier, and reliably. Ditto chasing grain-flow, colour, or figure. Once you know the drill geometry required for the job at hand and can fixture the stocks for drilling it matters not one little bit whether they are an un-shaped blank, or a machining. The accuracy of the hole is not directly influenced by the outside shape of the wood being drilled. I use several different drill geometries depending on the working qualities of the walnut. I drill from either end and meet in the middle. Normally the drills wander by no more than 0.010" or so IF I do my part, don't push it too hard on the feed and keep the bits sharp, and don't crowd the chips. Normally the pilot hole I drill is 3/8", but I've drilled them down to 6mm without problems. | |||
|
| One of Us |
I personally drill them in my lathe with a tool post vise and using a single flute gun drill. Mine always are true. | |||
|
| One of Us |
That's the way I do it and I have a larger piloted drill I use for the counterbore Jim Kobe 10841 Oxborough Ave So Bloomington MN 55437 952.884.6031 Professional member American Custom Gunmakers Guild | |||
|
| One of Us |
I just drill the big hole first! | |||
|
| One of Us |
The lathe approach is quite interesting. I think I visualize the setup. If someone has a pic or two of the setup they would be willing to post I would like to see it to confirm. I’ve had the drill bit wander more than what I would prefer when using the drill press for this operation. Does the lathe setup help prevent this? | |||
|
| One of Us |
It is as much the drill type as the setup; regular drills will walk and follow the grain; single flute drills will go straight which is why they are used in rifle barrels. | |||
|
| One of Us |
| |||
|
| one of us |
The second rifle I ever barreled was a Martini Cadet I did in 17 Ackley Bee. After I barreled it, I asked around about a stock blank and ended up calling Ed Shulin. He sold me a very nice piece of walnut 95% shaped and with the hole drilled for a very reasonable amount. His pattern was excellent IMO...I don't know where his stockmaking equipment and patterns went to after he passed though. Shoot straight, shoot often. Matt | |||
|
| One of Us |
Yes, just like in the video. BUT, holding the wood in your hands is very scary; if it grabs it won't be fun. Which is why I hold the stock in a tool post vise. Or at least a clamp; not with hands. I can see in the video that guy has arms of iron. | |||
|
| One of Us |
I have a threaded brass stub I screw into the receiver, with the proper angle drilled through it as a guide. Then drill my pilot hole from the receiver to the butt. Bubba promised me it would work!!! | |||
|
| One of Us |
I value my knuckles too much to attempt the video method. DPCD when you use the tool post vise method, do you continue to keep the tail stock center in contact with the blank when drilling? Or do you only use the tail stock for the initial stock location in the vise? | |||
|
| One of Us |
Use the tailstock to locate the stock, or blank, but once it is secured in the vise there is no need to keep it in contact. But if you have a less than secure hold in the vise, like on a finished stock, then yes, I keep it in the center at the other end. Depending on which end you are drilling from. Sometimes I drill from both ends. Don't really need the vise; you could use a big wood clamp just a successfully. | |||
|
| One of Us |
When drilling un-shaped blanks I've removed the compound slide entirely, shim the blank to height and clamp onto the cross slide. Two dead centres in head/tail stocks for setup when clamping. A milling slide is the go for irregular shapes like machined stocks to be drilled (clamp up stock between wood pillow blocks), but they are hard to find stout enough to be truly rigid. At the end of the day, I have an aversion to wood chips on the ways of a quality lathe that cost me a bomb. It takes time to not get way oil on hands/blanks and to cover up the ways to keep them clean and then tear everything down yet again once done. For small numbers of jobs it's fine, but for regular drilling work with numbers of stocks, it had too many disadvantages for me. For the duplicator guys Early Don Allen Inc duplicators could be specified with one or more hollow headstock spindles for drilling blanks or stocks. Several duplicator owners I've met were stumped by drilling holes. The solution on machines that allow it might well be to gun drill and ream that spindle to size. Easy, cheap. This really is a no-brainer for drilling band-sawed blanks, when machining stocks around the hole. Works well for shaped stocks too but mounting them in the machine for drilling can sometimes be tedious. My own final progression with drilling these holes came about because the duplicator is not the best for some machined (shaped) stocks without soaking up precious time. I built up a machine that for me is much better/quicker for multiple jobs, and just as accurate. It's only disadvantage to me is the real estate it takes up, and the time and cash it took over the last few years to build the bugger up. I figure if I drill at least as many stocks as I already have, then it will be a wise investment in the long run. People finding the need to drill these holes have varied priorities, so the most practical solution is going to vary according to their circumstances and workshop capability. Lots of ways to skin the cat best for different makers. | |||
|
| one of us |
My last Martini in 20 cal. special from 2007 and I will tell how to drill the stock bolt hole without all the tools of a large shop. I use a flat plyboard surface about 3 ft long and mark a line thru the middle of the board length wise. Mark the blank where the hole needs to be drilled on the length of the blank, than clamp the blank to the base board and line up the marks to drill with a D type rifle barrel drill. Make up about three guide blocks with holes size of the drill bit. Line up blocks to hold the drill inline with the marked lines on base plate. I make up a drill of water harden steel rod of about 2 1/2 ft. I use a slow speed 1/2 hp hand drill to drive the D drill slowly into the wood. Make up a small U joint to use so the rod and drill motor are not in a bind. Make up a guide screw to fit the hole drilled. I drill 1/2 way from the forward end first and then the rear end , then make a counter bore with a guide to drill the rear hole. Make up butt plates with the hole in the middle to access the stock bolt without take off the complete butt plate.   | |||
|
one of us |
Les, I love the elegant simplicity of your method. One morning I shot an elephant in my pajamas. How he got into my pajamas I'll never know. - Groucho Marx | |||
|
| One of Us |
You clearly don't have any quality rasps.I guarantee my #3 Liogier will draw your blood if used bare handed. [IMG:left]  [/IMG] [/IMG]ACGG Life Member, since 1985 | |||
|
| new member |
Here is my interpretation.  | |||
|
| One of Us |
Thanks to everyone for their posts and pics. Les - I greatly appreciate your approach and description. I ordered a machine inletted stock from Pecatonica River. Should be here in a few weeks. I would would love to see some more custom Martinis if any would care to post some pics. They will give me something to shoot for! Anyone have advice on how to reshape the lever to match the grip? | |||
|
| new member |
My approach to the lever: Cut the lever off at the line formed by the rear of the action and the lever. I used D2 steel to form a lever shape to my desired profile. I made a 1018 steel hollow cylinder. These parts were sent to Peter Nagel and he welded them up. There is a lot of hand shaping that is then required to get the lever to its final profile. Two buttons were then made to cap each end of the cylinder. These are held in place with a through screw. The Turnbull color case hardening gave me confidence that the lever could withstand whatever tensions it might undergo. An alternative is to heat the existing lever to a cherry red and then bend it to a pleasing curve. Might be wise then to have it rehardened and tempered. | |||
|
| One of Us |
This is my approach to the Cadet, I used the original lever and made a form of the shape I wanted and used a heat sink on the receiver end and used a soft flame to heat bottom portion to the desired shape If you can locate a copy of Frank De Haas "Mr Single Shot's Gunsmithing -idea book it has a lot of information on working the Cadet. The wood is NOS Fajen Aristocrat I found here on the site. I wanted a 70's style rifle. It'a 7-30 Waters.  Never rode a bull, but have shot some. NRA life member NRA LEO firearms instructor (retired) NRA Golden Eagles member | |||
|
| one of us |
Here is a scope mount made for a grooved barrel. Make sure that the chamber is completed and test fired. Use a barrel with extra metal so you can machine the grooved section. Next place the receiver and barrel together into a milling vise to cut the top flat on the barrel section. Line up bore center to the milling base.  | |||
|
| One of Us |
SDH; that was a joke; I see I will have to resort to putting a disclaimer on all my posts again. Not a joke. Like that. | |||
|
| One of Us |
Looking great as always Dennis(prewar 47). Steve | |||
|
| one of us |
I didn't mention that I used Conetrol Rings and made the base without drilling the location holes of the attachment of the rings until after I have the scope mounted with the rings and bore site to see how close to bore center. Then machine the top off of the base to line correctly. Now drill and thread to hold rings in place. Conetrol rings are hard to work with, but I like them on custom rifles. | |||
|
| Powered by Social Strata |
| Please Wait. Your request is being processed... |

Visit our on-line store for AR Memorabilia