
 Guns, Politics, Gunsmithing & Reloading Gunsmithing
 Go | New | Find | Notify | Tools | Reply |
| Relief cut on a 700 barrel? | Login/Join |
| One of Us |
Do I need to cut a relief cut to stop the thread cutting on a 700 barrel? If not how do I exit with single point cutting? Will a relief cut cause any problem? All my experience has been with a relief cut. Thanks and God Bless, Louis | ||
|
| One of Us |
I've seen it done a few different ways. You can use a thread relief, just stop the thread under the recoil lug, flip the cutter and cut the threads the other way and exit off the part, etc. If the barrel will thread in far enough and everything fits ok, I don't think it makes much difference. I like to put a bit of a corner relief where the recoil lug sits to make sure the clamping load goes through the flat of the lug. | |||
|
| one of us |
A relief cut should not be necessary on a Rem 700. The lug is .190" thick and if you can't stop a thread with that much lee-way you shouldn't be threading a barrel. But, there is nothing wrong with making a relief, if you have to. It does complicate setting the barrel back if you decide to re-chamber but that's the only drawback I see. Reversing the tool and cutting on the back-side is one way to skin the cat but you probably run more risk of screwing something up that way. JMHO Ray Arizona Mountains | |||
|
| One of Us |
The recoil lug I will be using is .300 thick so stopping before I hit the barrel lug face is definitely not a problem. All I worry about is chipping the cutter trying to stop the cut. Do you back out the cutter or how do you guys do it without a relief cut? My lathe does not have a foot brake. Thanks and God Bless, Louis | |||
|
| one of us |
You just have to coordinate stopping the half nut feed and back out the tool at the same time. It is easy with practice. I would practice on a piece of junk stock before ruining a barrel blank if you are not used to doing it. Do it right the first time. | |||
|
| one of us |
I back the tool out which should result in the end of the cut being tapered. If you are working at a slow enough RPM you should be able to back out at the same place each time. Or, you can make a big black reference mark on the barrel with a magic marker and back out when the line comes around. Day dreaming or admiring your work before you're done is a sure way to screw something up. Ray Arizona Mountains | |||
|
| One of Us |
Thanks guys. Louis | |||
|
One of Us |
First, with the machine off, move the carriage and place the tip of the threading tool right on the spot you wish to end the thread. Set up a dial indicator like the one in the photo. Set it up so that the needle has to make 1 complete revolution to zero and then lock it to the bed. Engage the half nut and then watch the dial. When the needle begins to move, let it go until it comes around to zero at which point you will disengage the half nut and withdraw the tool. With a little practice it will become second nature and you will be able to hit the zero mark repeatedly. It's the only way to single point internal threads like when re-threading a receiver. It's also great for those times when you have no other point of reference due to the presence of heavy cutting oil and/or chips. 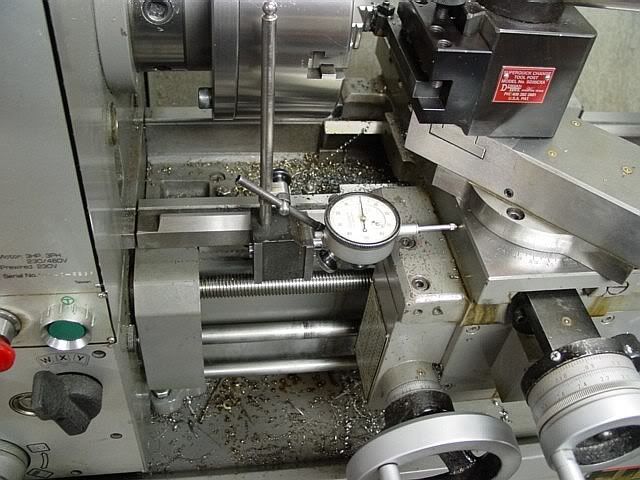 _______________________________________________________________________________ This is my rifle, there are many like it but this one is mine. My rifle is my best friend, it is my life. | |||
|
| One of Us |
That looks like a pretty good way there! Thanks Westpac! Louis | |||
|
| One of Us |
I learned to single point on a Pratt & Whitney tool room lathe. They were made with a second cross slide inside the normal cross slide. The interior cross slide would had a bronze nut with about 1/2" travel per 180°. Between this and a slow threading RPM you could back out the tool easily. With a little practice you could do it at higher RPMs. Go to sleep and you have a train wreck though. | |||
|
| One of Us |
It is hard to use an indicator on my lathe. I installed a Trav A Dial next to my half nut lever. Works great and a thread relief is not necessary. I do not think a thread relief hurts the barrel though. Butch | |||
|
| One of Us |
I just disengage half nuts with right hand and back out crosslide about 1 revolution at the same time. Pretty easy to end at the same spot at 50 rpm. I also cut a relief at the end of the threads. Typically when I cut the tenon, I firt cut the major diameter to fit the lug. Then cut a very small relief up against the shoulder so that the lug sits flat. Then cut the rest of the tenon to Major diameter less a couple thou. Cut a relif at the end of the lug about .100 wide. Then thread away. Oh I also taper or relive the start of the threads too. There is nothing worse than tightening up a barrel and right when you think its going to tighten it gives a litte because that starting thread hit the last thread in the reciever. When done machining the barrel will come up tight right when contact is made. Blagg Rifles, Eastern OR | |||
|
| One of Us |
Intelligent minds think alike, that's how I do it; no relief necessary. I can usually stop within .005" of zero on the indicator. Jim Kobe 10841 Oxborough Ave So Bloomington MN 55437 952.884.6031 Former Professional member American Custom Gunmakers Guild | |||
|
| one of us |
Back when I started gunsmithing (1977)I used a dial guage as shown to end the thread. Later, I decided it wasn't worth the time to mess with and just quit using it. I now use a nicely radiused relif cut on all barrels. On a Remington, there is a relif cut at the end of the thread and another, shallower, relief at the shoulder. There is a short "land" which supports the recoil lug laterally. I thread at 240 RPM with carbide or 90 rpm with HSS tools. There is nothing wrong with a relif cut but it should not be sharp cornered but radiused. That's just proper practice. For internal threads, I usually do not cut a relief but will if threading up to a shoulder (as in a mauser or a MRC action or a retaining ring for a hydraulic cylinder gland). I just mark the bar for a stopping point. Regards, Bill | |||
|
| One of Us |
Yeah, sticking an indicator to the lathe bed and setting the dial to zero has got to be one of the most time consuming operations of the whole threading process. Right up there with changing from a relief tool to a threading tool. _______________________________________________________________________________ This is my rifle, there are many like it but this one is mine. My rifle is my best friend, it is my life. | |||
|
| one of us |
It's just a step that doesn't have to be taken. That's all. Qick change toolposts have made tool changes, well, quick! I don't disagree with the use of a dial by any means. I just mentioned that I quit doing it because it was, to me, time wasted. I consider a properly configured relief to be good practice. It is certainly better to have a relif than to have interference at the end of the thread ( I understand that this is not likely to be a problem in this case). The use of a dial is a fine system and can add to the 'smith's comfort level. Nothin' wrong with that at all. I certainly meant no disrespect by my comment. Regards, Bill. | |||
|
| One of Us |
Nothing comfort about it. Knowing precicely when to retract the tool makes for a less cluttered, more visually appealing Rem 700 thread tenon. In case someone looks. 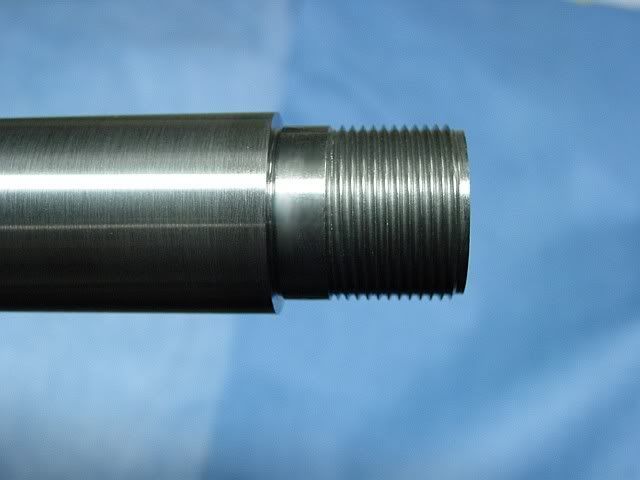 _______________________________________________________________________________ This is my rifle, there are many like it but this one is mine. My rifle is my best friend, it is my life. | |||
|
| One of Us |
Looks like you stop in the same spot and let the threading tool "idle". Seems like a relief to me. I withdraw the tool and disengage the half nut at the same time. Just another way to do it. Jim Kobe 10841 Oxborough Ave So Bloomington MN 55437 952.884.6031 Former Professional member American Custom Gunmakers Guild | |||
|
| one of us |
I have just come to believe that a 1/32 radius relief cut looks better and, from a structural standpoint IS better than a "V" groove ending to the thread. Even if I thread without a relief, I cut the relief afterward. Now, a barrel thread is actually a pretty low stress connection in the scheme of things. A "V" groove isn't going to make the barrel break off! In situations where parts do fail at the end of the thread, the cutting of a relief with a generous radius would usually cure the problem. As a bonus, I think it gives a finished appearance to the thread. Of all the aspects of rifle building one about which one can obsess, this has to be one of the most inconsequential! In looking back over the thread I think, "For cryin' out loud, Leeper, how did you ever get sucked into THIS discussion?"! Regards, Bill. | |||
|
| one of us |
Bill My thoughts exactly. Relief cut or no relief cut is not going to change the strength of anything. It's not going to provide for any better alignment of barrel and action. It's not even going to be seen by anyone. So, what's the big deal? Do it or don't. There are more important things to worry about. JMHO Ray Arizona Mountains | |||
|
| One of Us |
To clean this thread up (no pun) and get back on topic. Q: Do I need to cut a relief cut to stop the thread cutting on a 700 barrel? Not if you don't want to. Q: If not how do I exit with single point cutting? Dial indicator Q: Will a relief cut cause any problem? No, provided it isn't wide enough to swallow the lug. _______________________________________________________________________________ This is my rifle, there are many like it but this one is mine. My rifle is my best friend, it is my life. | |||
|
| One of Us |
Thanks for all the input guys. I used a small relief cut on the barrel I just finished yesterday. Figured it was easier for me and unseen. Good looking job there Westpac! God Bless, Louis | |||
|
| One of Us |
I never did a Rem700 until two weeks ago. I made a drawing of the barrel and a drawing of the receiver and bolt head. I had lots of Rem700 take off barrels, but only one action to measure. I decided I could cut the barrel fit better to the bolt head and bolt lugs than most of the factory barrels. I gave the recoil lug .0005" radial clearance on the barrel tennon [tighter than factory], but did not see any reason for there not to be a relief cut on the threads. The recoil lug is ~.185" long and does not need anything like .185" of tight fitting barrel to locate the lug axially before the barrel is tightened. What is needed is something to locate the lug rotationally. Next action wrench I make will be see-thru. After a trip to the range and measuring the brass headspace, I decided I wanted a couple thou less headspace in the barrel. I cut the shoulder and the breech back .006". Then the bolt head interfered with the inner breech I had to re face the inner breech .006" with a boring bar and re chamfer the chamber orifice. If I had made it all factory barrel sloppy, that would have been easier. It was not all that hard to do, I was wearing an Optivisor, putting Dikem blue mark up on the barrel, and the lathe has DRO. | |||
|
| Powered by Social Strata |
| Please Wait. Your request is being processed... |

Visit our on-line store for AR Memorabilia