
 Guns, Politics, Gunsmithing & Reloading Gunsmithing
 Go | New | Find | Notify | Tools | Reply |
| "Work in progress" from the shop of James Anderson. UPDATE: 2-16-09 FINISHED | Login/Join |
one of us |
Here are some photo's James Anderson sent me the other day from a job he's doing. The whole thing started a few years ago when I contacted Shane Thompson to do a Mini Mauser for me. At first the job was going to be nice but simple and I had planned on stocking the rifle myself. I ordered a Mini Mauser stock from GAG and sent the parts on to Shane. Well, time passed and the extras kept adding up and before I knew it I had a full custom metal job in the works. When I got it back there was no way I was going to stick this barreled action in a GAG stock so I talked James Anderson into stocking it for me. But there was a small problem. I still had the GAG stock that wasn't cheap by any stretch of the imagination. By luck I found a guy that had a Mini Mauser for sale on GunBroker that wanted a .44mag pistol I owned so we worked out a trade. I now had a barreled action to put in my stock but wanted just a little work done to it. Funny how these things work out. You add one nice thing, then you need to add another and before I knew it, I had two barreled actions that are too nice for this stock! Oh well, I'm going to have to use this one. Here some very nice "work in progress" photo's from James Anderson. When finished the barreled action will have custom bases, a new bolt handle, a new trigger and a 3-position safety. I just got an email from James saying he was working on the safety now. I'll post some pics when I get them. I'm not a gunsmith but I love threads like this. Something about watching a gun go together I find amazing. The 1st ones are of the new bolt handle. This is a huge improvement over the original. 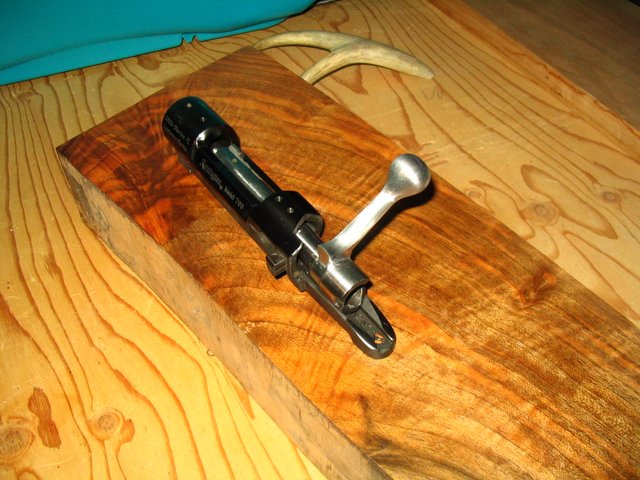 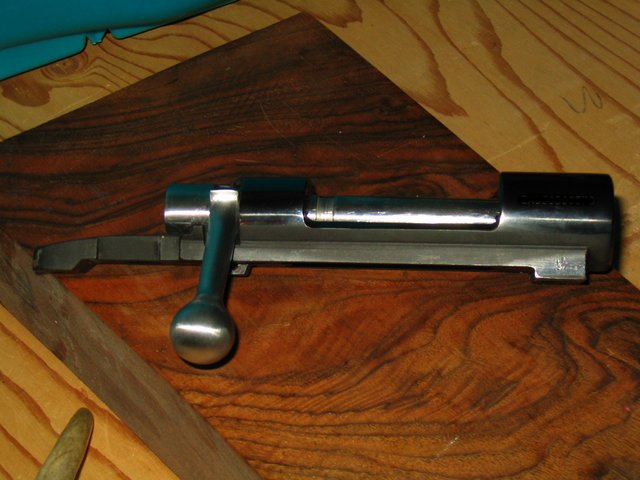 The next set are of the custom bases being built. 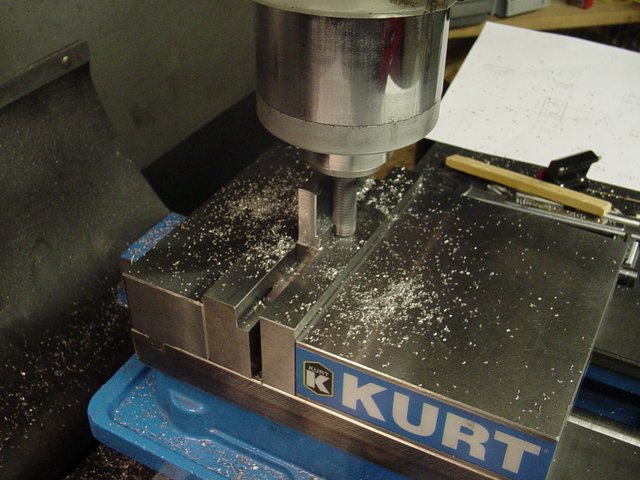 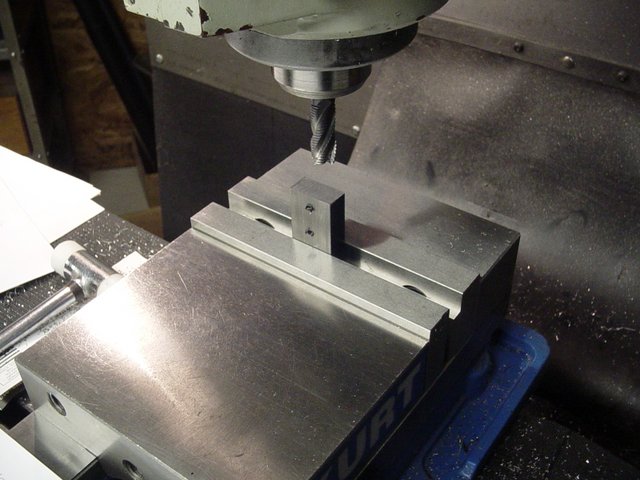 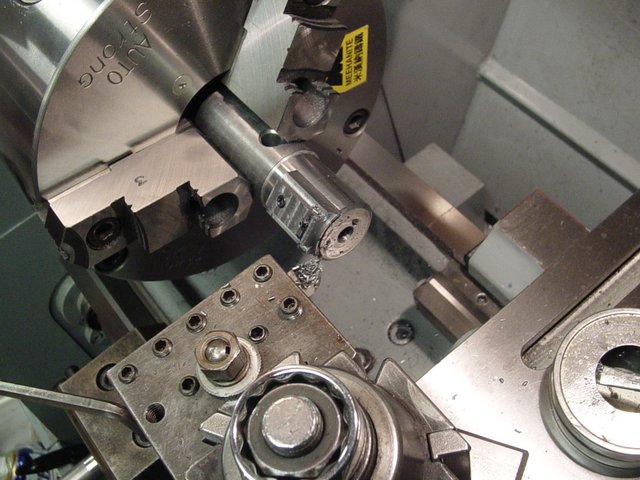 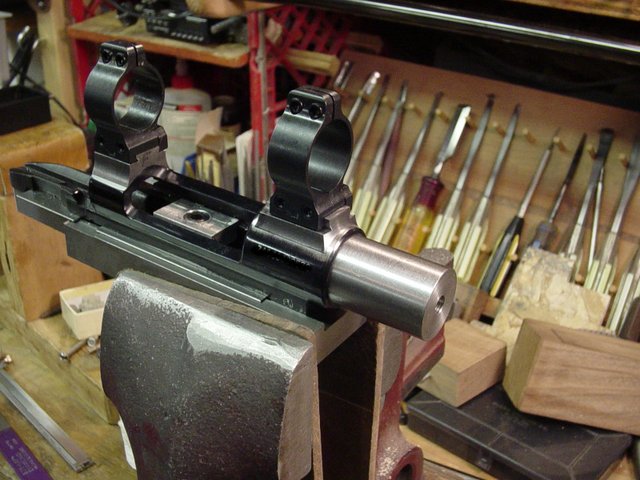 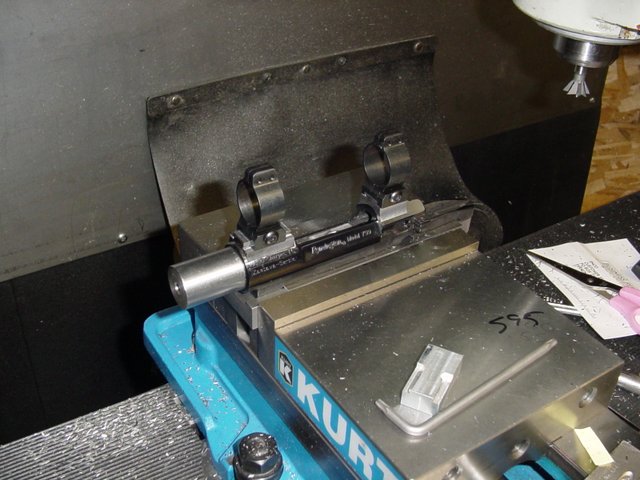 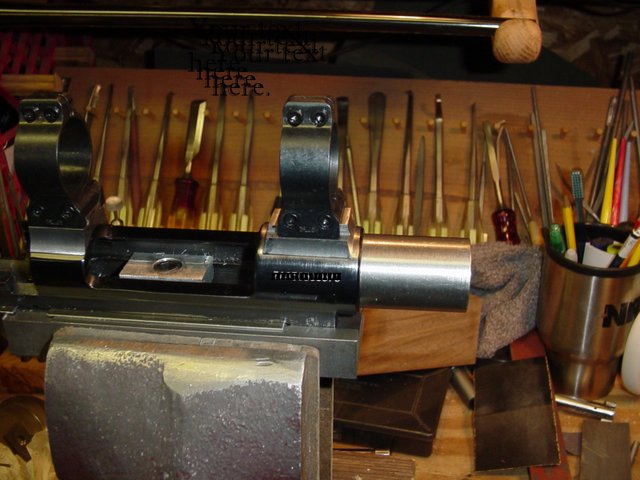 Soon I should have some more of the safety install. James is going to re contour it to fit the action. After that all the metal work should be complete and I'll go back to work on the stock. A big thank you goes out to James for providing these pictures and allowing me to post them. James is a top flight gunsmith and a all around good guy. Terry -------------------------------------------- Well, other than that Mrs. Lincoln, how was the play? | ||
|
| one of us |
Terry, Not one beautiful mini Mauser, but two! Fantastic. Mine is still just a bunch of parts waiting their turn at the 'smiths. I missed what cartridge this one is going to take? Love seeing James' photos. Hope he'll chip in with a few comments about the job if he's not already off to Reno. cheers, - stu | |||
|
| one of us |
This one is a 7.62X39. The other is a .223 I bet James will chime in before long. Terry -------------------------------------------- Well, other than that Mrs. Lincoln, how was the play? | |||
|
| One of Us |
Looking great Terry! I have a 270X39IMP reamer if you want to do a 270. I am about ready to send my metal work to James inorder that he can do a stock for me. Butch | |||
|
| one of us |
The .270X39 sounds like a neat idea! I may have to take you up on that one day. Thanks for the offer, now my brain will be spinning the rest of the day Terry -------------------------------------------- Well, other than that Mrs. Lincoln, how was the play? | |||
|
| One of Us |
Terry, Just neck it down and fireform. It is a very accurate cartridge and makes a real good young kids deer rifle. Butch | |||
|
| one of us |
Butch- what are the ballistics for the 7x39 IMP? I am working up a project in my mind and am considering a wildcat for the first time in my life. | |||
|
| One of Us |
Marc, It is a 270X39IMP, not a 7mmX39IMP. You could also call it a 270PPC and make it from 220 Russian brass as we do our 6PPC. I think you could get a 110grn. 270 bullet to around 3000FPS. I know the 30PPC with 112s are running that fast. Butch | |||
|
| one of us |
I got this email from James this morning telling about the safety install. James Anderson: Sorry I didn't send any more pics your way yesterday. I was in the shop kind of late. Wife & kids were at church (AWANA program) The new safety shroud stops the cocking piece in a different place causing timing problems. I knew this going into the project and am NOT asking for more $. Just giving you a little inside info. The nose of the cocking piece needed to be shortened. The problem with shortening this part is to do it correctly, it should be cut with a helix. Cutting a helix is easily done on a lathe, but the long lead of the cocking cam is way outside the capability of a lathe. Most lathes cut as steep as 4 threads per inch or .250 per revolution. The lead on the minix bolt is 1.375" per rev. In today's machine shop world, most long lead helix are generated with a 4th axis on a CNC machining center using a dirt simple one line program. The poor mans way to do this is using 100+ year old high tech. I'll send you some pictures and hopefully a small video to help explain this. I've got a Hardinge mill with a spiral milling attachment. A few years back I made a pile of change gears that change the lead of the spiral/helix being machined. The problem I had yesterday was the amount of lead "distance per revolution" I measured on your bolt was not listed on the table of change gears. I had to dig into my Machinery's Handbook for the formula to determine the right gears to install in the gearbox. This was an exercise in fractions. I was feeling a little rusty in my ability to deal with fractions while trying to figure the correct ratio for gearing the spiral head. I guess I should have payed more attention in school. Eventually I came up with the right combination and machined the end of your cocking piece off. I could have just ground it off at an angle and faked it, but I FINALLY had a reason to use my spiral milling attachment and the gearing that I spent many hours making. Kind of a fun project. Not sure most gunsmiths would agree with me, but I really enjoy the process as much if not more than the results. Maybe that's why I'll never be a millionaire gunmaker. :-) He added a few video's to the email too. YouTube: Hardinge Spiral Milling Cool stuff. Terry -------------------------------------------- Well, other than that Mrs. Lincoln, how was the play? | |||
|
| one of us |
A few more of the threads coming off getting ready for the install. 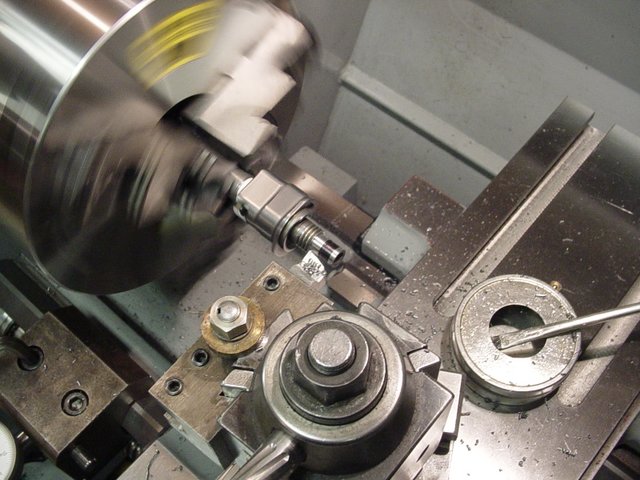 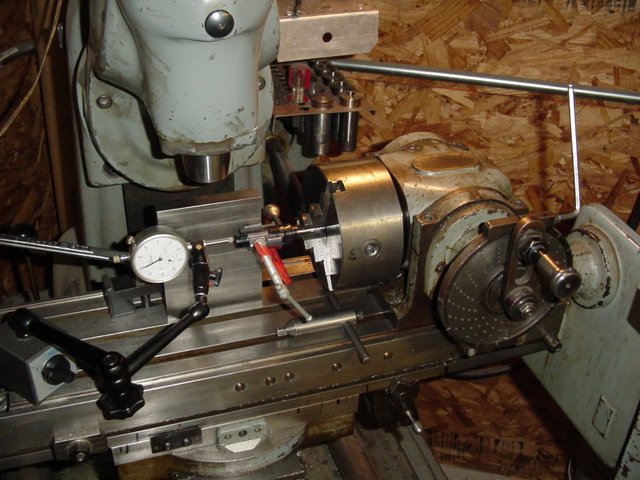 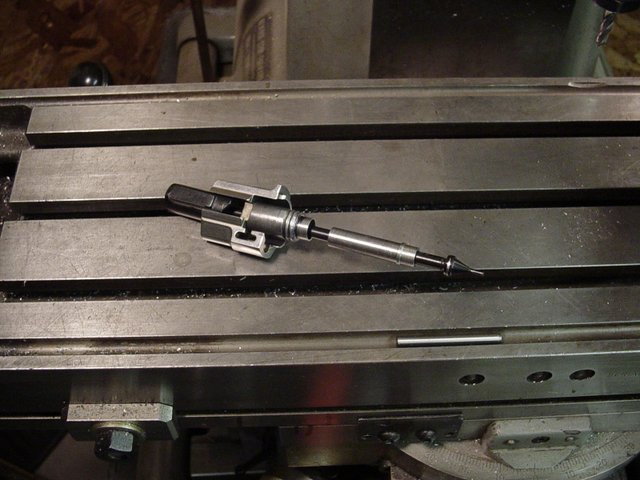 Terry -------------------------------------------- Well, other than that Mrs. Lincoln, how was the play? | |||
|
| One of Us |
Thanks Terry Installing a 3 position on a miniX is quite a bit of work. When all is said & done, it's well worth it. I know fitting & lapping the cocking piece by hand would have worked fine. I did this on my personal gun 10,000 rounds ago. I just wanted a reason to use all the gears and hardware I built that you see in the video inside the gear box on my little Hardinge. | |||
|
| one of us |
Thank you James, It's been a real treat. I have really enjoyed watching this one come together and sharing it's progress on this forum. Here are the last ones received. It's coming together very nicely. Terry 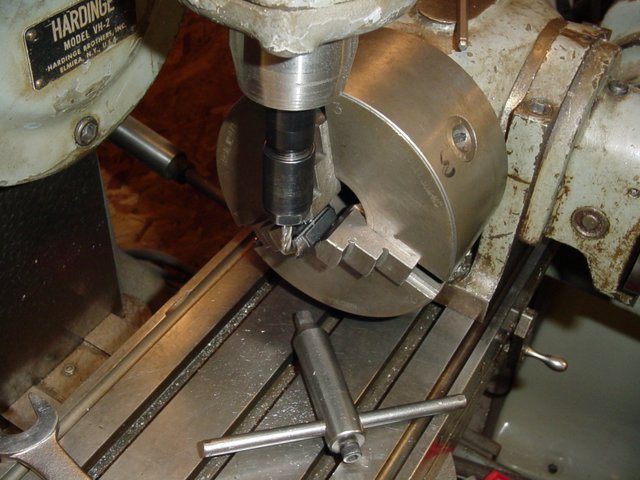 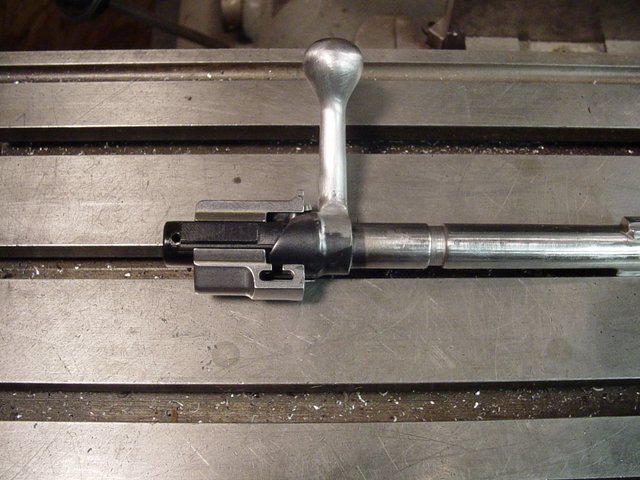 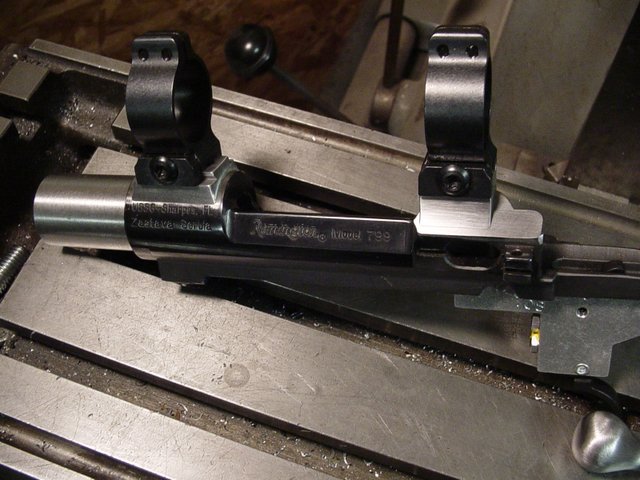 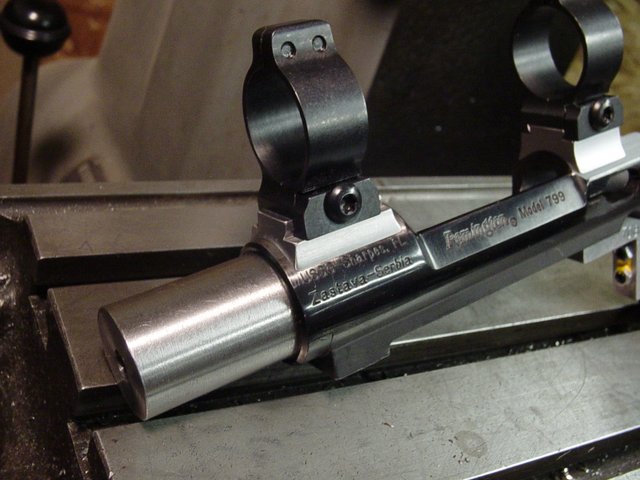 -------------------------------------------- Well, other than that Mrs. Lincoln, how was the play? | |||
|
| One of Us |
James, I like your way of thinking. Doing that exercise keeps the blood flowing to the brain. You might not do that again for a while, but you will remember it when a similar problem arise. It is all looking good. Terry, I didn't know that it was a Remington. Butch | |||
|
| One of Us |
Terry, Thanks for posting. I was fortunate enough to look at that project a couple of weeks ago while at his shop. I believe I interrupted James with a phone call the other day while he was working on some spiral thing he was doing. Now I understand. I promise to not bug him anymore so he can get it finished. | |||
|
| one of us |
Very nice looking metal work, as usual! Butch- the round sounds like a 6.5 Grendel with a .277 bullet. What advantage over the Grendel factory round are you looking for? | |||
|
| one of us |
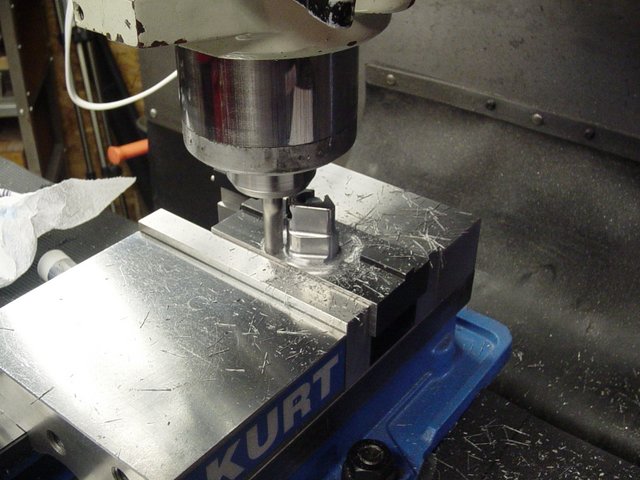
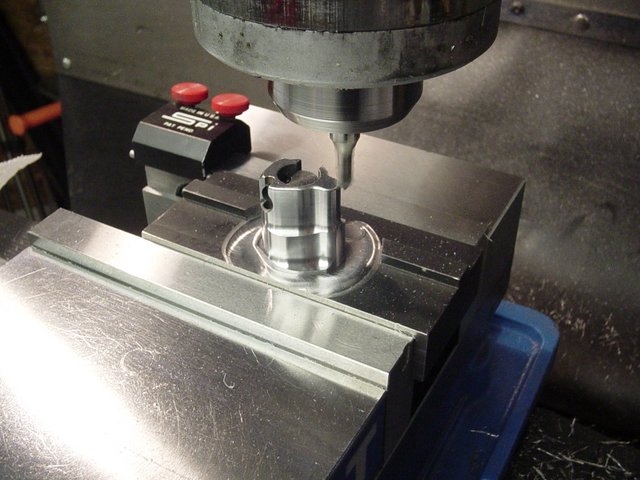
Hey Butch, yes this one is a Remington 799. The one Shane Thompson did is a Charles Daly. He did the G33/40 treatment on it though and now you can't tell. I got one last email today. Here's a few more pics First is grinding the cocking piece sear mating surface back so the hand off when closing the bolt isn't so notchy feeling. Second is milling the 25 deg angle on the cocking piece where the safety engages. I mill it close then assemble it into the bolt and measure how much the cocking piece falls when the safety is clicked off. Then I can put it back into the vise against the vise stop, change my zero and finish mill it. Next I mill a tiny flat on the camming surface of the safety lever that mates with the 25 deg milled portion of the cocking piece so the middle position has a detent even without the detent plunger installed. I'll try and contour it tomorrow! James 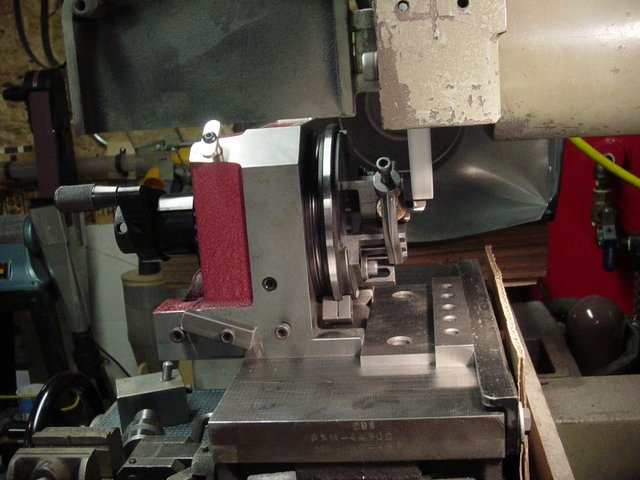 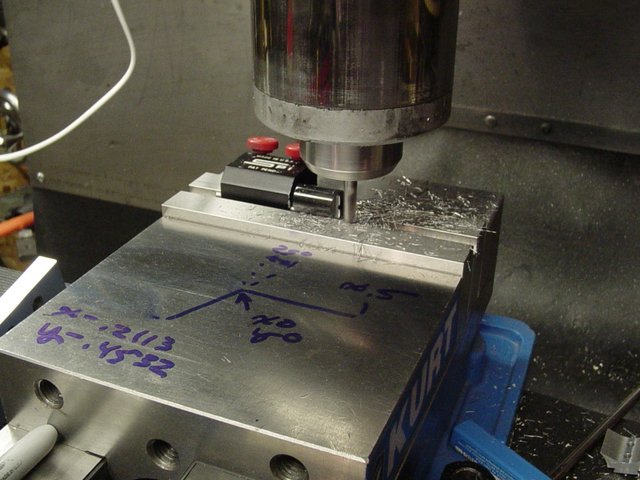 Great stuff James! -------------------------------------------- Well, other than that Mrs. Lincoln, how was the play? | |||
|
| One of Us |
I had to laugh at that last picture, when i'm doing a project on the mill, I have marker numbers all over the place! Terry, think you are going to start a short action fad and pull this nation out of its crisis... Are some of the lettering on this action going to be ground off. Seems to be a lot scratched in the metal on this action? _____________________ Steve Traxson | |||
|
| one of us |
Thanks srtrax, it's been fun watching it come together. These will be the last untill the parts are polished. This set is VERY interesting. It's of the full size Dakota safety body being resized to fit the mini mauser action. This is some very cool stuff. James Anserson writes:
   Last but not least is the finished product next to the original. It's quite a change. The big bullet on wheels is a SoapBox Derby car. Very cool 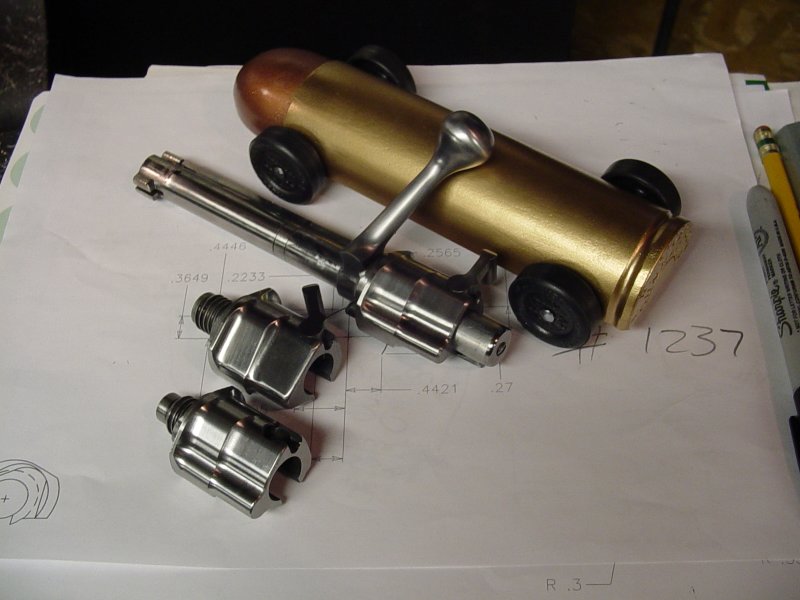 Terry -------------------------------------------- Well, other than that Mrs. Lincoln, how was the play? | |||
|
| One of Us |
Terry Way too cool! Really interesting are those drawings of that safety!! Gorgeous work by James. | |||
|
| one of us |
My guess would be yes they are. James? The safety profile is pretty cool isn't it. Terry -------------------------------------------- Well, other than that Mrs. Lincoln, how was the play? | |||
|
| One of Us |
The doodle in the left corner is from Pete Grisel's original prints that were done in Bend Oregon. I assume that the current production available from Sturgis is very similar. I can't make them with my limited machinery for the prices that they are sold today. I can however whittle on them a enough to create something you can't just buy "off the shelf". Adding the extra flat for the middle position really makes them function through all 3 positions as they should. | |||
|
| one of us |
On an earlier thread about this project, I expressed some concern about the size of a three position safety on this rifle. Needless to say, I shouldn't have been worried in the least. James, you have extraordinary talent and a great eye for style. Thanks to you and Terry for taking the time to share your photos with us. ______________________________ "Truth is the daughter of time." Francis Bacon | |||
|
| One of Us |
Also interesting is that "custom" set of parrellels for milling safeties. I am curious what that tool is that has those two red knobs on it. | |||
|
| One of Us |
That looks to be a standard off the shelf vise stop, aka work stop from Swisse Precision (SPI). James, that is very impressive work and top shelf photography. This is evidence of a skilled creative well trained mind. Congratulations | |||
|
| One of Us |
Like Roger said the black, white and red all over widget is a vise stop. I use this so I can machine something, take it out to check the fit and replace in the vise without having to pick up my zero again. In this project I used it to save my X zero for the drilling and counterboring operation as well as milling the front & rear bases. The cocking piece pic above shows it is well. Makes it much easier to fit the safety without guessing how much more to remove. It's one tool that I would recommend to anyone that uses a milling machine. Wish they taught me this trick in school. The fixture holding the shroud is one I made at Trinidad for installing 2 pos swing safeties on original Mauser shrouds. The hole that the threaded portion of the shroud goes through has a counterbore in it to fit the shroud extension. The school had an interesting K&T vertical mill that you could offset a small end mill and rotary mill under power feed a larger pocket than the size of the end mill. Since this thread has some machining using old high tech and newer high tech I thought some here might be interested in another old high tech machining method. Here's a few pics I found of a similar machine on a machining forum. Very solid machine, but I wouldn't trade it for my 2 axis Prototrak. 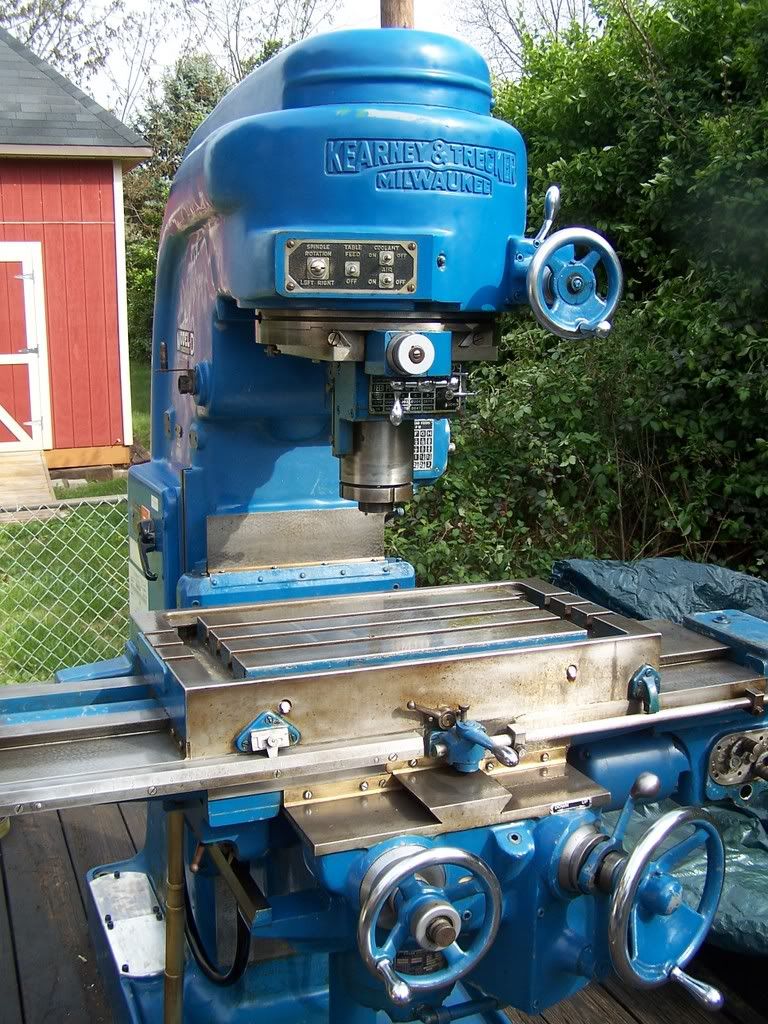 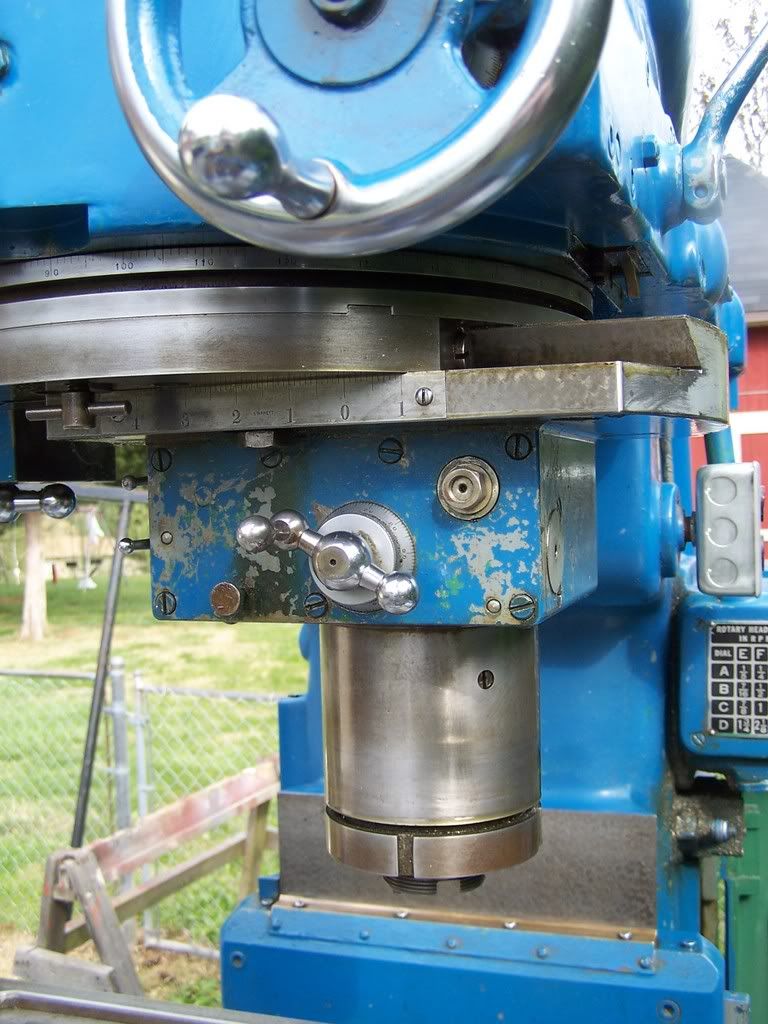 | |||
|
| One of Us |
A Boeing seafoam green monster horizontal/vertical rotary table like mine. I take the chuck off before carrying it around the shop. | |||
|
| One of Us |
I really think this is a neat project, Thanks for sharing and keep em comming... For a little highjacking, I too had gag special build me a stock. Use to be there British Stalker was made in short action only untill now. I had them make me one in a large ring mauser, so anyone wanting such, they should have the copy there. Shouldnt be a set up fee now. I like the form but not sure i like the wood I picked for it...   This is a neat project, could we get a peek at the GAG rifle you bought, and is the blank that the action is setting on going to be used for that rifle? _____________________ Steve Traxson | |||
|
| one of us |
Here ya go. The first one is still in the rough in this picture. The schnabel tip has been removed and I have a few other things in mind. I just hope it turns out.  Here is the blank James will be using for the other one.   This one will be a full fledged English stalker with the distinctively ebony forend tip and a lot of drop in the back. I also want the stock stained English red. James keeps trying to steer me away from this but I'm holding firm! Here is an original W.J. Jeffery rifle I want him to pretty much copy and add a cheek piece to.   Terry -------------------------------------------- Well, other than that Mrs. Lincoln, how was the play? | |||
|
| one of us |
Yes. It's a beautiful piece of wood, it's only flaw is it lacks color. Terry -------------------------------------------- Well, other than that Mrs. Lincoln, how was the play? | |||
|
| One of Us |
I'd love some more detail on that. Beautiful work James. Don | |||
|
| One of Us |
There is some nice work here but that old KT mill gave me some flash backs that had me smelling sulfurised cutting oil. Maybe I need to speed up the refresh rate of my monitor. | |||
|
| one of us |
Finished  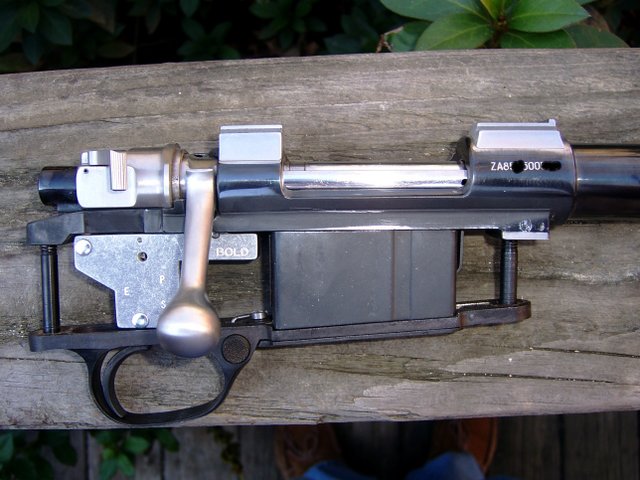 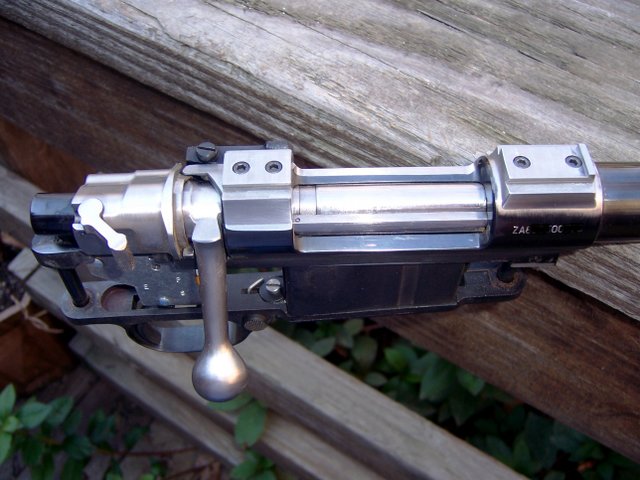 Now my part begins  Terry -------------------------------------------- Well, other than that Mrs. Lincoln, how was the play? | |||
|
one of us |
Very neat. Great thread. ______________________ Always remember you're unique, just like everyone else. | |||
|
| One of Us |
Terry, That is going to be a hell of a rifle. How long will it take you to finish it? I'm sure glad you're posting photos. Butch | |||
|
| one of us |
Not really sure about the time. My life is a three ring circus right now. I would guess sometime this summer though. It's been a lot of fun so far. James is about to start on the "high end" one. Terry -------------------------------------------- Well, other than that Mrs. Lincoln, how was the play? | |||
|
| One of Us |
Mine is supposed to go to him for stocking when he gets back in town. Butch | |||
|
| One of Us |
Terry, I am really looking forward to seeing the "high end one" come to life....I wondering how that wood will turn out | |||
|
| One of Us |
Very, very nice, indeed! | |||
|
| One of Us |
Terry, Wow! The rings you sold me are now fixed and on a ZG with a ground bolt - pity they don't make rings like that anymore! This project looks great. Will the high end one have an obendorf style release in guard bow? That would be really cool. To me the wrist could be a little slimmer but then I have small hands | |||
|
| one of us |
Well, now my part begins. Terry 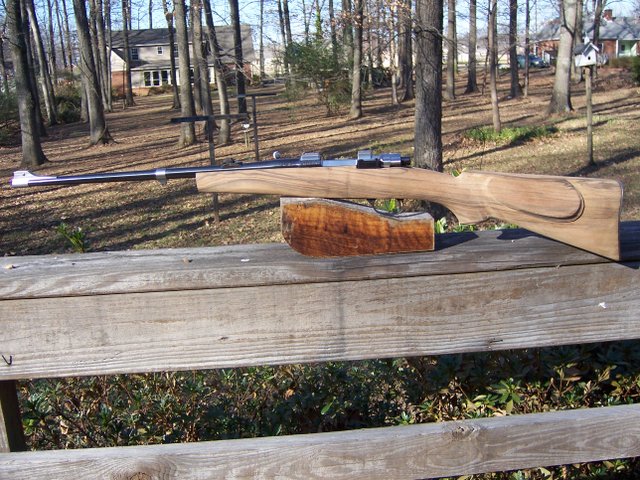 -------------------------------------------- Well, other than that Mrs. Lincoln, how was the play? | |||
|
| Powered by Social Strata | Page 1 2 |
| Please Wait. Your request is being processed... |
Guns, Politics, Gunsmithing & Reloading Gunsmithing

Visit our on-line store for AR Memorabilia