
 The Accurate Reloading Forums
  THE ACCURATE RELOADING.COM FORUMS
  Guns, Politics, Gunsmithing & Reloading
  Gunsmithing
  Knurling/Stippling question
Go  | New  | Find  | Notify  | Tools  | Reply  |  |
| new member |
On the older sporting rifles the action ring, ribs, sight ramps are stippled/knurled. Some looks like it is turned on a lathe. Other examples look like the background treatment that engravers use. How was this done? What is the best way to replicate this look? | ||
|
| One of Us |
Stippling was done, usually on the front receiver ring on an ex-military Mauser to "disguise" and pre-existing crest. This was carried out with a rounded end centre-punch held and tapped with a hammer and allow to bounce randomly before being tapped again. It sounds simple and easy...but actually there is a lot of skill in getting the same strike consistently again and again! | |||
|
| One of Us |
What enfieldspares said. In addition, you'll occasionally see a more regularly-spaced treatment that was rolled on with a special knurling tool. Also I have seen a coarser cross-hatch that I presume was done by engraving parallel lines. There are fifty ways.... Regards, Joe __________________________ You can lead a human to logic but you can't make him think. NRA Life since 1976. God bless America! | |||
|
| One of Us |
http://archives.gunsandammo.co...our-guns-appearance- Punch Up Your Gun's Appearance .  From December 2000: Stippling is Fast, Easy and Has Many Applications. By Larry LyonsPosted: 2009-02 Decorating and texturing metal is an age old problem for us gun hacks. Engraving is a career unto itself and takes more practice than all but the most insane of us are willing to invest. Checkering is a little easier, but it’s still no stroll in the park and its applications are limited. A very simple but largely overlooked alternative to these is stippling. Stippling is merely roughing up the metal surface with a punch. It can be made very course, finely textured or somewhere in between. Best of all, it is easy, fast and, when properly done, looks very nice. Today, stippling is used almost exclusively as a means of providing a better grip, typically on the front strap of semi-auto pistol frames. However, our predecessors often used stippling for decorative purposes as well. Various shaped panels were stippled onto rifle actions and grip caps were routinely dressed up with stippling. It’s also the bee’s knees for texturing sight ramps or even entire barrel ribs to eliminate glare. The key to stippling lies in the punch. Perfectly round dimples as left by a standard center punch will not create the proper appearance. To blend together the dimples must have an irregular shape. To achieve this, the point of the stippling punch is formed by a number of flats. I think five flats provide the most pleasing affect. The steeper the angle of the tip the more pronounced the dimple will be. The stippling tool can be made from most any steel that is harder than the gun metal. A common center punch works for very course stippling. Simply stone in the flats at the same angle as the existing conical tip, which is usually about 30 to 35 degrees to the work surface. One problem encountered in stippling is seeing what you’re doing. A large tool like a standard center punch hampers your vision, especially when working close to a border. For more precise work the slender tip of a small nail set punch is advantageous. Stone the tip to a sharp point with flats, just as we did the center punch. Though it takes a bit more work, a shortened round file makes the ultimate stippling punch. The tang is formed into the tip and the file portion becomes the body of the punch. The extreme hardness of the file ensures its durability and the teeth provide a comfortable texture for gripping. A 1/4-inch file is about right for fine to medium stippling and a 5/16-inch or larger file is great for course work. To make a punch from a file, use a cut-off wheel in a hand grinder to shorten the file to about 4 1⁄2-inches or perhaps a bit longer if you’re the club fisted sort. Square up the cut off end and shape the tang to a long, slender taper on a bench grinder. The tip should not quite come to a point yet. Quench often while grinding, so you don’t destroy the temper. Finish up by stoning in the flats to bring the tip to a sharp point The size of the stippling hammer depends on the type of stippling desired. For whacking in big craters—as would be appropriate on a pistol grip strap—a twelve ounce hammer isn’t too big. Finer texturing work calls for a lighter one. Experiment to find a weight you can easily handle yet still have enough authority to drive the punch to the desired depth with just a light tap. The best results are obtained with short, rapid taps. The metal surface should be polished and ready for bluing as the slightest contact with sand paper creates little shiny ridges. The first step is to lay out the pattern. Semi-auto frames pose no problems because the entire front strap is typically covered, and one has no worries about forming borders. In other applications, however, borders are usually necessary. It is very difficult to form a clean, straight border with the stippling alone. Without some kind of defined border, it most often looks like you just got bored along the way and quit. The pros cut their border lines with a square graver. This is not easy and few hobbyists have gravers. Curved borders can only be cut with a graver, but if the border lines are straight, a respectable job can be done with a stock checkering tool. Scribe the line as deep as you can and then very carefully deepen it with the checkering tool. At first, the tool will try to wander, so tip it up so that only the front teeth are cutting. This allows you to see precisely what it’s doing. Miscut lines are nearly impossible to straighten, so give it your best shot from the beginning. As the groove becomes more defined, control of the tool gets easier. Cut the borders to about three quarters of their final depth. The stippling is done by holding the punch just a few thousandths of an inch above the work surface and tapping it with light, rapid hammer taps. Each tap should form a full depth dimple. The punch is moved randomly around the work surface as the hammer happily taps away, forming a jillion little overlapping dimples. The most common sin is moving the punch in a straight line, which is a natural tendency. The tool must wander about randomly to avoid geometric patterns from forming. Stipple right up to the border but try to stay out of the groove. Stippling work hardens the metal, and recutting a buggered up groove is much easier said than done. This is where a fine tipped punch earns its keep. Once the entire area is done, finish cutting the border lines to full depth with the checkering tool. The next time you need some texture for a better grip, or would like to add interest to a boring expanse of metal, give stippling a try. Von Gruff. | |||
|
| One of Us |
I love a nice stippling job myself I will cheat a bit and tell you what I did. I used an engraver the one used to put your name in tools and such, and it looks good BUT You need a vice which I dont have and existing borders to do this. So I held it in my lap while doing it and had it wander a few times. Even at that it still took a long time to make it look good. If done by hand you will be at it for 10 times as long but you will be in full control of it the whole time. I was lucky and did it to a rifle that I mout a scope on sometimes and was not a very expensive rifle to begin with. Now I need to figure out how to hide the several lines that got away fron me VonGroff Has given very sound advice on the subject. So if you want it done right do it his way for sure. Cal30 If it cant be Grown it has to be Mined! Devoted member of Newmont mining company Underground Mine rescue team. Carlin East,Deep Star ,Leeville,Deep Post ,Chukar and now Exodus Where next? Pete Bajo to train newbies on long hole stoping and proper blasting techniques. Back to Exodus mine again learning teaching and operating autonomous loaders in the underground. Bringing everyday life to most individuals 8' at a time! | |||
|
| One of Us |
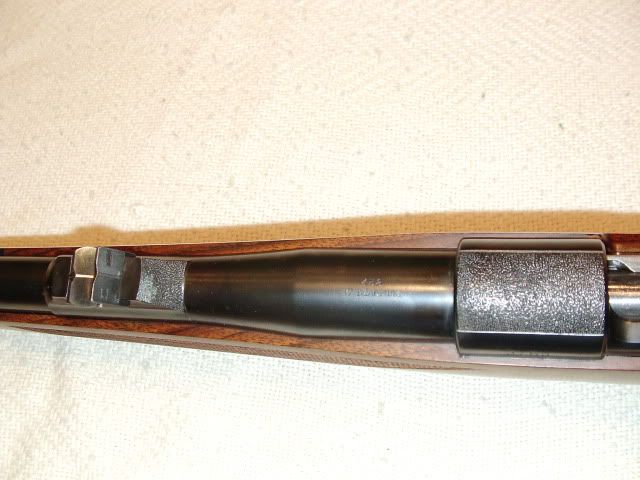
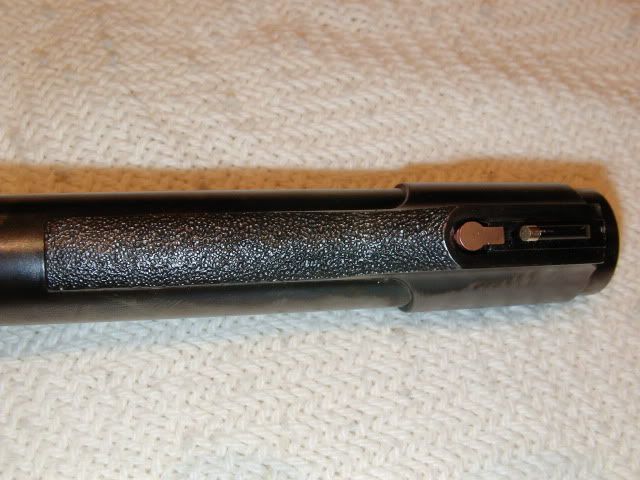
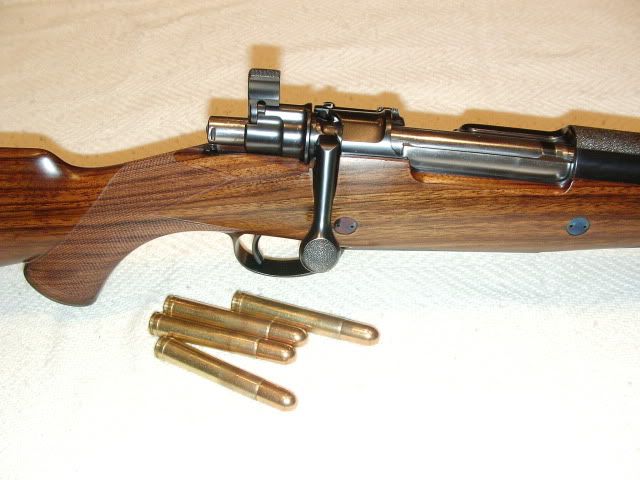
Some examples of Stippling;    | |||
|
| One of Us |
That is really beautiful stippling. For a flat surface like a rib i have used a large coarse round file. You just roll it like a rolling pin and it produces a very nice anti glare surface. I even made a special roller by cutting a portion of file and grinding the ends round and putting bearings on and then making a holder so I could mount it on my milling machine and press down on the work and move the table. Used it on a lot of pistol ribs. SCI Life Member NRA Patron Life Member DRSS | |||
|
| one of us |
I LOVE stippling and it is something that some day I must have a single square bridge mauser with a stippled ring. mmmm.....sweet! I have heard of doing it with the round file. regardless of how its executed when done well it is one of the best touches on a fine rifle in my opinion. OZ, that rifle is beautiful, the checkering pattern, the touches on the action, everything perfect. Red My rule of life prescribed as an absolutely sacred rite smoking cigars and also the drinking of alcohol before, after and if need be during all meals and in the intervals between them. -Winston Churchill | |||
|
| Powered by Social Strata |
| Please Wait. Your request is being processed... |
|

Visit our on-line store for AR Memorabilia

