

 The Accurate Reloading Forums
  THE ACCURATE RELOADING.COM FORUMS
  Guns, Politics, Gunsmithing & Reloading
  Gunsmithing
  shop-made chisels
Go  | New  | Find  | Notify  | Tools  | Reply  |  |
| One of Us |
A while back we discussed the gunsmithing schools' seeming abandonment of teaching the fabbing of chisels among other things. Someone suggested a tutorial on the subject, so here goes one lame attempt. This is the procedure taught me at Trinidad in the '60s and is nothing more than fairly crude backyard blacksmithing, easy and straightforward enough for almost anyone to be able to do a creditable job. Please feel free to disgree and suggest improvements, I already know of a few myself but want to show how it was taught 45 years ago. Years ago I had traded for the beginnings of a chisel-making project, basically 2 large steel blocks welded together at the ends. These gouge-forging blocks were available commercially at one time but that was long long ago. The previous owner had begun drilling holes for the various-size scoop/gouge chisels but had lost interest. Here's what I started with, the large blocks and some scrap tool steel accumulated over the years. 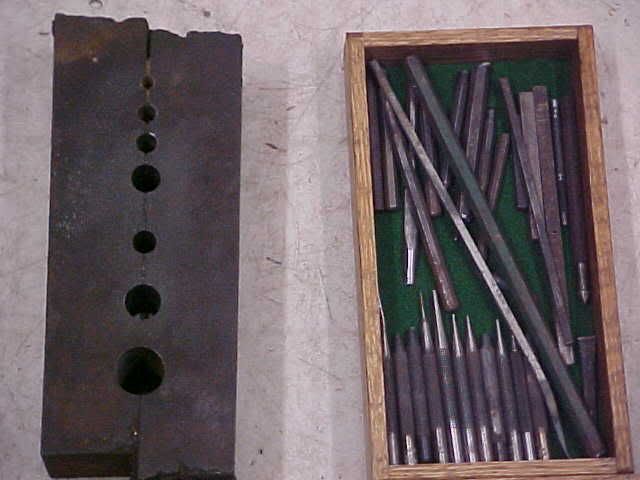 I completed drilling the holes and please don't get me started on their placement OUT OF ORDER, the previous owner was obviously challenged...Anyway here are the blocks after sawing out the one I'll be using, along with the Porta-Band. I would certainly HATE to saw this with a hand saw! 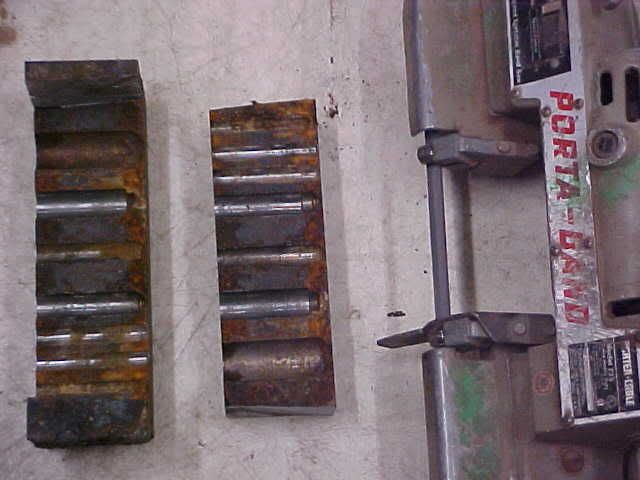 I found that the forging block also made a handy anvil for rough-forging the various shapes. I used a 3-lb hammer 'cause that's what I have but a 4-lb one would be even better IMO. When forging, be sure to bring the steel to a fully-red heat, tending toward the lighter-color red but not yet yellow. Let the weight of the hammer do most of the work and DO NOT continue to hammer after the steel has cooled to a dark red. I repeat, DO NOT CONTINUE after the steel has darkened even a little, you will create cracks! As soon as you see the darkening, put the piece back in the flame to reheat! Things will go very slowly at first when the steel is still thick, but as the forged end becomes thinner things will speed up. I used my OA torch for heat, with the handpiece held in the bench vise. Here's a photo of some of the chisels as rough-forged. 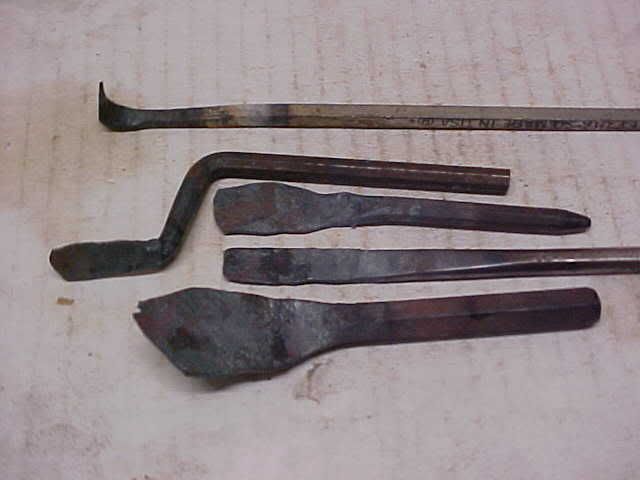 After the rough-forging I ground and filed the forged ends to shape. I'll warn you ahead of time that I had to reheat and bend them repeatedly in order to get exactly the shape needed, but this is the time to do it the way you want it to end up. Don't worry about losing too much carbon, the steel will still harden nicely. I need to go take some more photos now but I'll leave you this pic of some of the chisels I've made in the past. 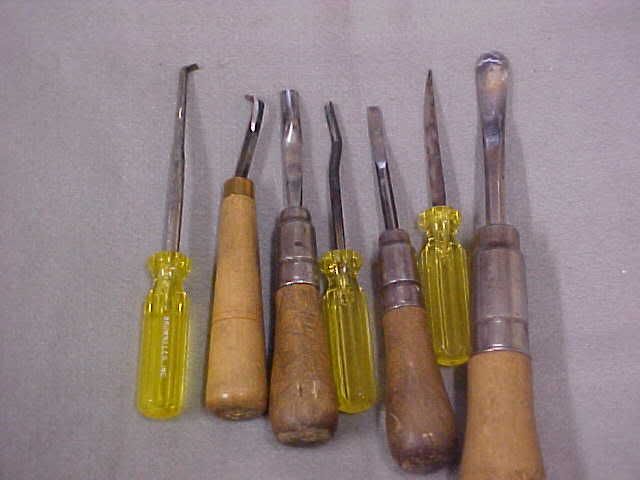 Not a pretty sight, I'll agree, but eminently practical and usable nevertheless. If I was trying to impress or sell you my services then I'd make sure they were polished a lot smoother and more aesthetically, but..... I'll be back in a few more days with an update and photos, meanwhile have fun critiqueing! Regards, Joe __________________________ You can lead a human to logic but you can't make him think. NRA Life since 1976. God bless America! | ||
|
| One of Us |
That would be the use of a swage block- http://www.swageblocks.com/
Happily, still available: http://www.swageblocks.com/available_today.htm http://www.google.com/custom?q...A1d2a7495eeed915b%3B
I would disagree | |||
|
| One of Us |
J.D., The real beauty of a tool is in the way it works. The wood cares not if the handles are matched or the shanks are polished. Mike Ryan - Gunsmith | |||
|
| One of Us |
I agree about the function being of FAR more importance than the form.....er, oh, I see, you were talking about TOOLS! (grin) Actually I find things go a lot faster if all the handles are a little different from one another, that way I know which one to pick up/pull out without having to check the front edge. This handle differentiation also works even better for engraving/scrimshanding tools, their edge forms are smaller and far more difficult to ID at a glance. At my age I need all the visual aids I can get! Regards, Joe __________________________ You can lead a human to logic but you can't make him think. NRA Life since 1976. God bless America! | |||
|
| One of Us |
Let's talk about shape, chisel shape that is. Here's a pic of the Jerry Fisher scrapers along with some of mine. As you can see, I prefer the hook type although the straight type is MUCH easier to sharpen; the Fisher ones are growing on me although my own are somewhat smaller and therefor more usable in some applications. 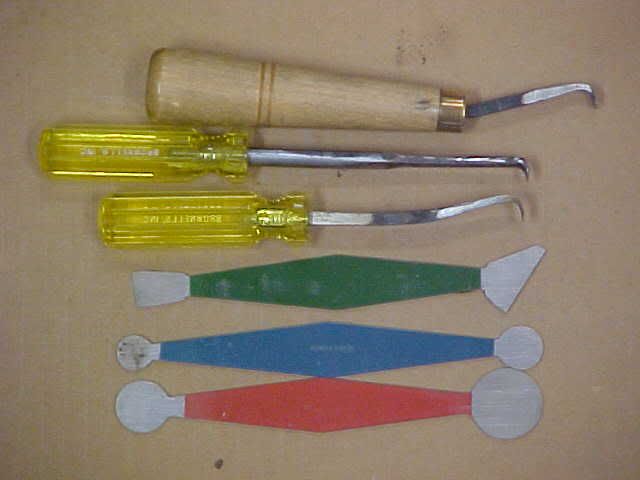 Here's another pic showing the difference between the straight shaft of many commercial chisels and the curved shaft that I prefer. The curved shaft along with the short straight section allows me to follow the bottom of a trough (barrel channel etc) or flat floor much better. 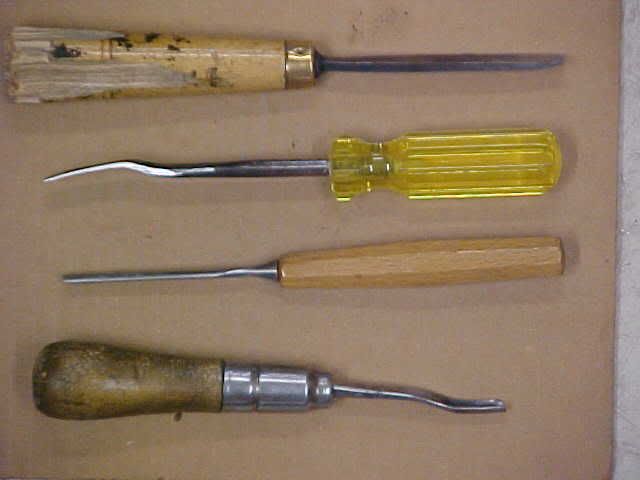 Here's another pic showing the side of my new round-end chisel sized for cutting the end floors of tang inlets. The thickness is 0.035", thinner than usual and therefor more fragile but I don't often use my chisels for pry bars (grin). 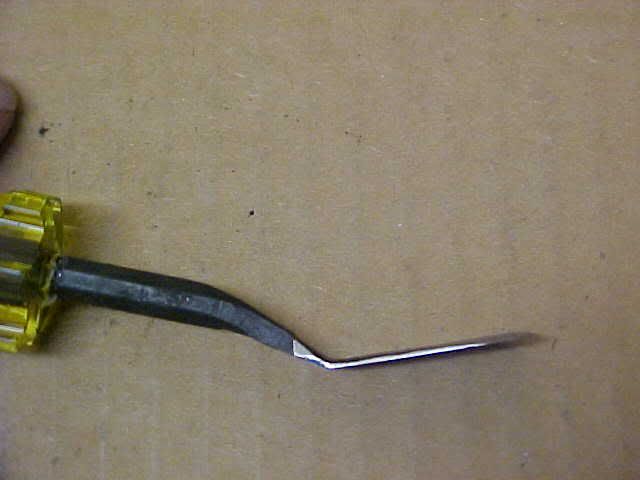 And another photo of the face of a flat chisel showing the color progession of the tempering process. The final straw color at the cutting edge has been removed by the sharpening but you can see the different bands of color and get an idea of how their width should look. 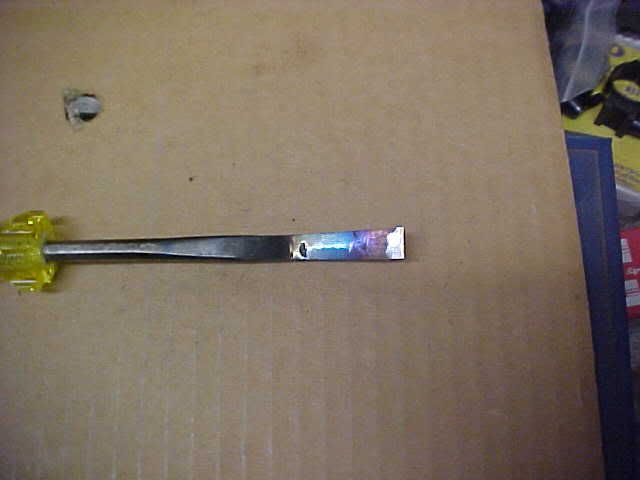 And finally a shot of some of my scrap pile, this lot rides on a small furniture dolly and can be rolled under the workbench out of the way. My new shop helper is guarding it, he said I could have it for a biscuit. 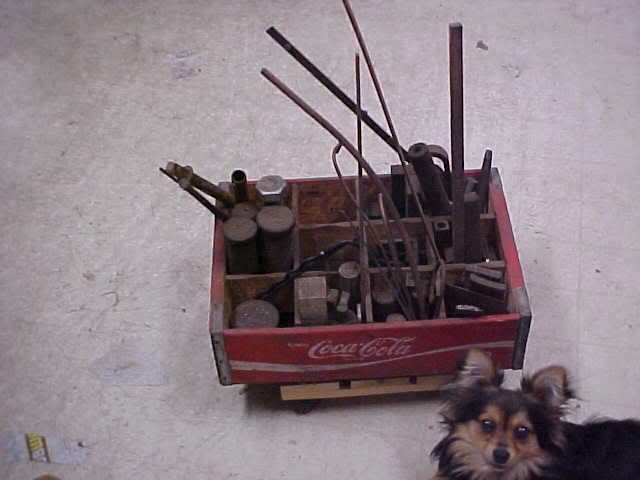 Any shop worker should have a scrap pile, actually several are even better. Many fabrication job shops routinely throw away their scrap but we small workers can't afford to go buy new material for every small job. I have drawers and boxes with pieces of steel, brass, aluminum, ebony, ivory, German silver, real silver, gold, various kinds of walnut, etc and it comes in handy all the time. Regards, Joe __________________________ You can lead a human to logic but you can't make him think. NRA Life since 1976. God bless America! | |||
|
| One of Us |
Thanks Joe. Jerry Liles | |||
|
| one of us |
I started at Trinidad in 1969 and I was lucky enough to have made a set of chisels. Every time I see a new set of tools I will buy them, but whenever I'm doing any stock carving I still prefer the set I made back in school. | |||
|
| One of Us |
So very true- on the job I always have a crate with end cuts, etc of shapes, flat stock, the like. Especially if it already has a hole drilled in it When I go to new locations I always scout around for any useful, or potentially so, items. I throw away thousands of dollars worth of metal yearly; the nature of the film business. | |||
|
| one of us |
From someone that has been around in this field, I will post what I have observed as an instructor in stock making at TSJC 1993-94. I talked to Ed Shulen and Louie Mrace which were past instructors at the school. Here is what we discussed. People taking pride in their tool making were the best in doing all types of gunsmithing. The chisels were an indicator of their ability as a first project. Only about 5 percent of the students had an interest in becoming a pro stockmaker. All liked to do metal work on machines. This is a learning school not only for wood work, but also for metals. The chisels were made to understand how to forge steel, turn handles on the lathe, shape out the metal to be the best shape for stockmaking, and how to heat treat these for the best cutting edge. Sharpening the tools by hand stones require a skill which some have trouble getting it right. Here is my OWN IDEA of how to keep your chisels in order work quickly. You need to be organized if you are working general gunsmithing and need to find a chisel to make an adjustment. Here is my set up that I made soon after I completed the school. I learned to keep things in a place. I kept all my work bench tools organized. Screw drivers, punches, hammers, stockmaking tools, files, and pliers had a place in peg board racks. Old newspapers was used to cover the bench top. When they became dirty just remove the top layer of paper. After each job I would place the tools back in the racks so you would be ready for the next job. You learn where a tool can be found without fumbling around in a pile of junk on the bench. I had more than 10 students come to work for us and had to be shown how to speed up the work. Most of the time we had 4 fulltime gunsmiths. You may not understand the volume of work coming through a shop this large.  From right side to the left side: 5 flat chisels with the 1/8 in. to 7/8 in. The tops in the base were showing a small mark as to the dimensions. Next were the 5 gouges in the same order as the flats Next the 6 scrapers, again small to large The last on the left were for bottom chisels, misc. shaped chisels, and barrel rasps. The shape of the gouges made a difference in cutting in a barrel channel. I show how mine were shaped with a side view. | |||
|
| one of us |
This work bench is solid oak which I made in 1961. It was bolted together in order to hual it to TSJC. Some of these chisels can be seen on the top. I sold this bench and wish I could find the person who bought it from me in 1963. Has anyone seen this bench in a shop? | |||
|
| One of Us |
Thanks for chiming in, Les, I was hoping that you would. Your words on workbench organization are golden and your chisels are splendid! I'm afraid that I was one of the 95% who had no interest in professional stockmaking as a career. Didn't really care all that much about the machines either, except as a way to move metal. Still care a lot more about the small benchwork and 'making do' with what's available in my small shop. The last time I spoke with Ed and Lee was around 2000 and he told me that for a long time before he retired the students had seemed a lot more interested in the various synthetic stocks than in fine wood. Of course I'm sure that he meant the 95% majority, I can't imagine that EVERYONE felt that way! Regards, Joe __________________________ You can lead a human to logic but you can't make him think. NRA Life since 1976. God bless America! | |||
|
| one of us |
Joe, I didn't push synthetic stocks when I was there. The reason was that anyone could go to a gun show and buy a plastic stock, get some epoxy bedding compound, and become an instant gunsmith pro and charge just enough to cover the cost of the stock. I left these job for the average gun nut!! I was caught up in a deal once and had to do a synthetic stock. I didn't want to do the work, but a customer that had been with me for years brought the action to me for a friend. I couldn't say no this time as this old customer was a well known Winchester historian and helped write some of the books on Winchester. I always had something in the works for him. He told what the man wanted to rebarrel the mod. 70 Win. to a 7mm Rem. Mag. He then said OH HE WANTS A CERTAIN SYNTHETIC STOCK. The man called a couple of days later and asked if I needed a little money. I always liked to get enough money down to cover the parts which I ordered before I start the work. The check arraived in couple of days and here is the kick. This man was a Dr. and he said I will be by my next day off. By then I had most of the work done on the first one. He liked what I had made up and went back to the truck and brought in 3 more Mod. 70's pre 64's actions. I had a supply of English walnut blanks and had picked out 3 blanks. Next I had to list the caliber for each action to be barreled. He kept me busy for quite some time with over $10,000 in labor alone. This was over 20 years ago. NEVER SAY NEVER!! I worked as a general gunsmith and had only time to make a couple of custom jobs a year. | |||
|
| One of Us |
Thanks Joe (and Mark, and tin can, and Les) for the insights and the pictures. I've done a fair bit of backyard smithing and I found Alex Weygers' books The Modern Blacksmith; The Making of Tools; and The Recycling, Use, and Repair of Tools to be very helpful. These three books have also been put together into one book titled The Complete Modern Blacksmith. If you are going to use a torch to heat the metal, stack some fire bricks up to form a little oven to direct the flame into. The metal will heat faster with a smaller flame. If you can keep your swage block (or anvil) warm, the metal won't cool as quickly - especially when working with a thin section. | |||
|
| One of Us |
Detouring off the chisels a bit, but related. I think a lot alike with Joe and Les on bench and organization and steel. Pegboard your bench tools, make the top solid and easy to work on. (mine is 3 inches thick) Light it well. Rack chisels and screwdrivers where you can get them easily:  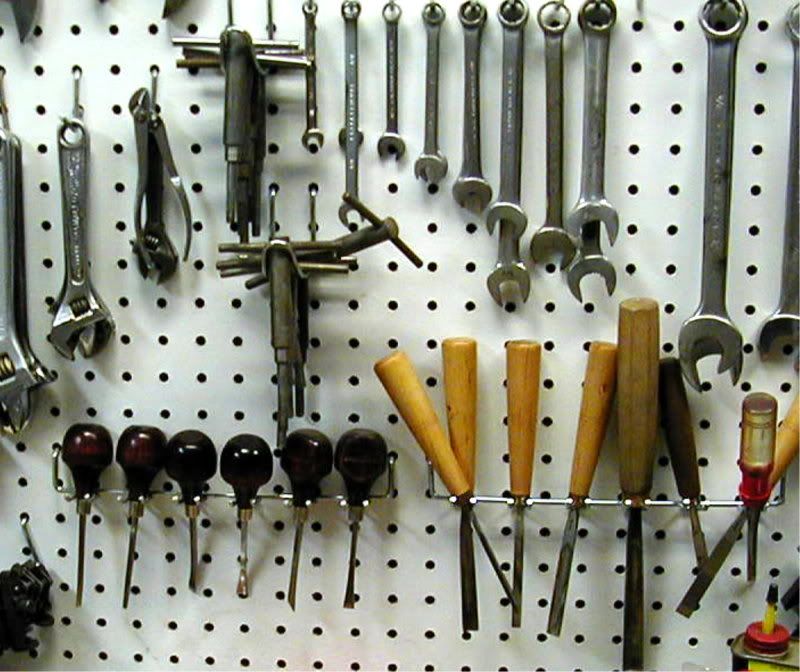 Good vises to hold stuff; a good solid surface to pound on. The steel block weights close to 200 lbs; the old U.S. made vise about 30 lbs:  I keep steel on hand to make stuff from; mark it with a sharpie with type of alloy:  Dave | |||
|
| One of Us |
I envy you guys' benchtop space, my shop is very small and benchtop space is so limited that I hafta store all my tools in separate roll-around or pull-out bins. Here are a couple of my usual tool-roll setups, I have several of these for different edged hand tools such as chisels, scrapers, files and rasps. 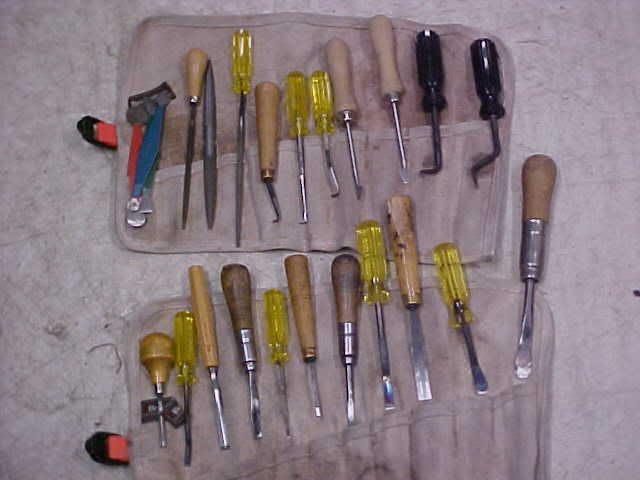 My benchtop wears multiple hats since it must serve for all handloading of cartridges in addition to all smithing hand work except scrimshanding and welding. Here's a pic of the completed forging block and my preferred quenching oil. You can see that I've provided suitably-sized steel dowels for each size gouge, and then drilled snugly-fitting storage cavities for each dowel directly underneath its particular trough. All except for the smallest one, still need to find some good tool steel in the proper size for that one. 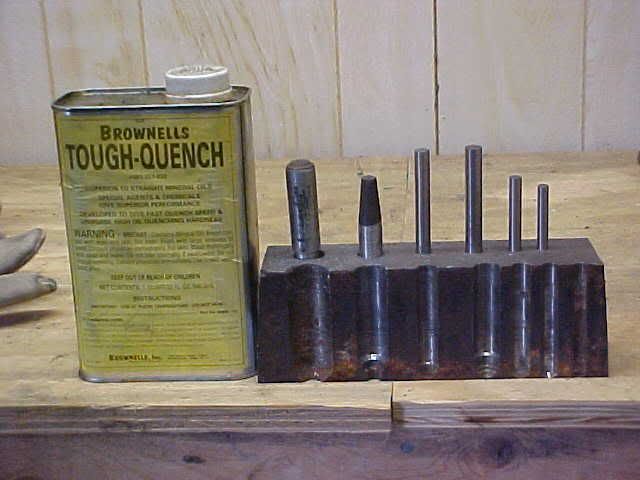 The SOP for forging the gouges is to first enlist a trusted accomplice since nobody has enough hands for this. One person operates the torch and the gouge while the other person operates the dowel and the hammer. #1 heats the gouge's blade red and aligns it on the trough, #2 aligns the dowel on the blade and hits it with the hammer, heat it again, hit it again, etc, takes 2-3 times or more to get it right and fully formed. As soon as I can enlist a trusted accomplice I'll show more pics. Regards, Joe __________________________ You can lead a human to logic but you can't make him think. NRA Life since 1976. God bless America! | |||
|
| One of Us |
How do you sharpen Jerry Fishers scrapers?? Kiwi | |||
|
| one of us |
With a belt grinder. Lay the scraper flat on the table, touch it lightly to the belt and rotate the scraper. Doesn't take much to get it cutting again. John Farner If you haven't, please join the NRA! | |||
|
| One of Us |
Thanks, John, I've got an old scraper of that type lying around, came to me with some miscellaneous used tools. It's totally rounded over and I've been too lazy to file it. Of course, your way will take care of it quick. Should have thought of it myself. Instead, I've been contemplating a jig for the wet grinder..... dave
| |||
|
| One of Us |
That's a good one, I think I was 21 years old the first time I picked it up. | |||
|
| One of Us |
After buying the round scrapers pictured above, I started making them out of scrap tool steel. I have some intersting and very functional ones and some that were better left unmaid. I'll have to take some pictures and post them. I also see some chisels I just have to make for myself now. Thanks alot J.D. and Les. DW | |||
|
| One of Us |
One of the other best things about the Fisher scrapers (other than the ease of belt-sharpening) is the fact that they don't need hardening if you don't mind touching-up the edge a little more frequently. The edge of an unhardened Fisher-type scraper can be restored by using a burnisher to curl the edges very slightly back toward the center of the tool, it's suprising how effective this can be. Won't work on hardened steel or thin blades though. Regards, Joe __________________________ You can lead a human to logic but you can't make him think. NRA Life since 1976. God bless America! | |||
|
| Powered by Social Strata |
| Please Wait. Your request is being processed... |
|

Visit our on-line store for AR Memorabilia

