
 Guns, Politics, Gunsmithing & Reloading Gunsmithing
 Go | New | Find | Notify | Tools | Reply |
| Ruger#1 Hanger Question | Login/Join |
| One of Us |
 Drug this project back out and I have made an intergal octogon bbl. for it. Lots of work to do to get to the finished stages yet. Trying to think ahead... Got a question...Should one keep the Ruger forend atachment as is, (not real crazy about it) or should one make a hanger and add to barrel and use a 90* screw for the atachment point and leave the hanger...hanging. It is a 24" somewhat lightweight barrel and wandering if adding a block to the barrel might keep for haveing to dick with accuracy problems later? May shoot fine with original set up, just trying to get a feel how others messing with the #1 went about doing this! _____________________ Steve Traxson | ||
|
| One of Us |
No Ruger #1 builders here or is this a dumb question no one wants to touch? _____________________ Steve Traxson | |||
|
| One of Us |
Steve; You all did some amazing work on thoes rifles. But I dont think I'll be cutting the hanger off. I need to reread this chapter anyway, its been a while, oh I look at the pictures all the time but I'll get time and do some reading, Thanks for pointing me in this direction. P.S. Have a good show! (Reno) _____________________ Steve Traxson | |||
|
| One of Us |
The hanger also houses the ejector mechanism, without looking at mine I would say that you might have more problems than you want if you remove it. "I ask, sir, what is the Militia? It is the whole people. To disarm the people is the best and most effective way to enslave them" - George Mason, co-author of the Second Amendment during the Virginia convention to ratify the Constitution | |||
|
| One of Us |
You may find this of interest: http://www.assra.com/cgi-bin/y...BB.pl?num=1230764046 | |||
|
| One of Us |
Some of these ASSRA guys know what they're doing, but if I wuz you, I'd also look at Frank de Haas' treatment of the Ruger in his articles. Try his Mr Single Shot's Gunsmithing Idea Book for some insightful thoughts about and tests of the Ruger and the Browning, and some good photos of his forend hanger and bedding block experiments. I expect his actual shooting results will put some new colors in your paint box! Some of these ASSRA folks seem obsessed with the bag jump when the hammer falls but IMO that means little until actually compared when shooting; it's the shooting accuracy that counts, and to me the only definitive criterion is the group size on the target. Now if the actual group size does in fact vary along with the bag jump with this rifle, THEN the shooter can logically pursue things like reducing the vibration; otherwise IMO it may be time & money wasted. Of course armchair theorizing is lots easier and less hassle than testing by actually shooting, but any armchair theory proves exactly nothing until it's actually tested & proven on the target. Frank de Haas has actually done this and we are fortunate to have his results. I recommend his books highly. Regards, Joe __________________________ You can lead a human to logic but you can't make him think. NRA Life since 1976. God bless America! | |||
|
| One of Us |
I am not going to remove the hanger. In SDH's book Custom Rifle's in Black and White, John Madole done up some nice side leaver #1's (a neat concept) but I also like the under leaver. I may be getting a cart before the horse as I have never messed with or shot a Ruger #1 before. Some say they shoot great right out of the box, while others play with them until their blue in the face, trying to get them to shoot right. I forgot about there being an article on Ruger #1's in Mr. Single Shot last time I read it, I was after high and low wall Winchester reading. I will have to go back and re-read this. I've got time to kick it around a little bit before I get to that point. I do appreciate the info from all above and if anybody has anything else feel free to add it here. Thanks: Enjoy _____________________ Steve Traxson | |||
|
| One of Us |
srtrax, I'd definitely shoot the No.1 first, before worrying too much about accuracy. Some of DeHaas' ideas are pretty interesting, and well worth reading. The idea of drilling and tapping a set screw up through the tip of the hanger, is probably the simplest way to "tune" a No.1. Basically the concept behind today's Hicks Accurizer product, except a lot fewer moving parts, and no wood need be removed from the forearm. One alternative way of attaching the forearm to the hanger, that I've thought about, is to take the dowel that the forearm screw threads into, and drill and tap it axially, and fix it in place using the angled hole that was the original attachment point.(does that rambling make any sense at all?!) Then attach the forearm via two opposing screws on either side of the forearm, each threading into the ends of that dowell. Then you could leave a diamond around them when checkered, or perhaps inlet some color cased steel diamonds, and use taper head screws. I've hacksawed the hanger off of one of my No.1's, but have yet to make up a alternative mainspring. It will have to be something ala Madole's work, in SDH's book. Either a high wall type flatspring, or perhaps a mousetrap made of springwire? As for the ejector. I cut off my forearm just forward of the pivot arm, that the ejector spring/plunger acts against(this leaves about 1/2" root of the hanger, on the front of the action). This, in effect changes the function from ejector to extractor, as there is no longer an ejector spring. The rifle functions just fine this way, and if you open the action briskly, it will still "eject". To get a feel for whether or not you like this, just yank the ejector spring/plunger out of your action. I prefer it, as it completely eliminates that loud CLICK that a No.1 makes, every time you open and close the action. Sorry for running on so. I really like No.1's....there are so many things to do with them! Jeff | |||
|
| one of us |
When I build a Ruger Number One I always remove the factory forearm screw. I machine a Block of steel that will mount on the bottom of the barrel to except a 8-40 screw to attach the forearm. The block is held onto the barrel with 2 6-48 screws. Make the mating surface of the block mate with the barrel. You can also mill a draft angle on this block on the surface that faces the receiver so the forearm can be wedged between this block and the receiver. I've found that by free floating the front hanger, the rifle seems to shoot MOA groups. If you are just using the factory wood, place the forearm mounting screw in the same position as the factory screw and machine an oval echion to fill the factory screw channel. This gives the screw a solid and larger grip on the forearm as well as covering the factory screw hole. | |||
|
| one of us |
By the way, The Number One I converted to .22 rim fire was done for akjeff, he has a posting 2 positions above this one. Jeff will find that if he uses a standard volocity ammo, the sound of the spring work and fall of the hammer is louder than the cartridge discharging. This is not a .22 that you want to dry fire and the firing pin leaves quite a dent in the base of the .22 cartridge case. I will have a few fired cases at the Guild show. Interesting project.. | |||
|
| One of Us |
Mark, you've touched on one of my soapboxes. No flames intended but I'm curious as to why you caution against dry-firing the Ruger RF conversion. It's my understanding that dry-firing the CF version is OK, and in fact I've repeatedly dry-fired dozens of them and even one Ruger RF conversion with no problems. If the firing pin nose is hitting the chamber edge then the rifle needs adjustment for correction of this simple problem in any of several different but still effective ways. The CPA Stevens is the only reputable RF rifle I've seen that sometimes suffers damage when dry-fired, and IMO that is simply carelessness on the part of the makers. Inquiring minds...regards, Joe __________________________ You can lead a human to logic but you can't make him think. NRA Life since 1976. God bless America! | |||
|
| One of Us |
Mark, Thanks for your imput, that would be pretty much the way I was thinking about doing it. Like the idea of putting an angle on the block. Do you let the forend wood touch the reciever? I've read where a lot of people leave about .01 gap between forend and reciever. Akjeff: I like the idea of putting the screws in the side of the forend, that would be different, and could be dressed up to look nice. Good info and more to think about, Thanks again! Enjoy _____________________ Steve Traxson | |||
|
| one of us |
Hi Joe, This is the first Ruger Number One I've converted and I have no experiance with dry firing it. But I look at the figuration of the breech block and barrel and dry firing is something I might want to avoid. Plus the spring work is made for a center fire. I have no experiance with dry firing a rim fire Number One, nothing to back up my statement. Just a trap I don't want to fall into... srtrax, In my business a wood to metal gap is one of the deadly sins. So I bed the firearm right to the receiver. You know you could install a second barrel block and draft both blocks 90 degree to one another and wedge the forearm between the two. Then free float the forearm against the receiver if you want some clearance. But for me, this clearance isn't anything that will effect accuracy. I have built a lot of Number One's over the years and never had a problem with accuracy as long as it's a receiver that I have rebarreled. | |||
|
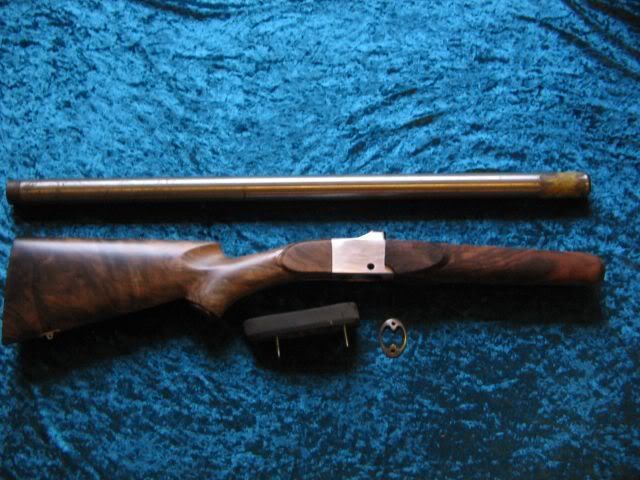
| One of Us |
This is a reciever I have barreled myself. Worked the reciever face to square and barrel squared up fine also. I heard so much talk and read where such and such black magic needs to be done to make them shoot. _____________________ Steve Traxson | |||
|
| one of us |
srtrax, You know, I think Bill was a businessman who designed firearms to be produced on a large scale. With the Number One, the receiver is a casting and the important surfaces have be machined. The factory barrels have changed over the years. Everything from a buttoned rifle tubes to a hammer forged. I bet the bean counters got into the production of there product line, from time to time trying increase profit margins. I bet Bill would turn in his grave if he knew some of the things the company has done. You know as a custom gunmaker I taken action produced by someone else and do the best I can to turn it into something special. | |||
|
| Powered by Social Strata |
| Please Wait. Your request is being processed... |

Visit our on-line store for AR Memorabilia