
 Guns, Politics, Gunsmithing & Reloading Gunsmithing
 Go | New | Find | Notify | Tools | Reply |
| Removal of M70 cocking piece | Login/Join |
| One of Us |
Amateur here. Trying to remove broken cocking piece from post-64 M70 firing pin. I've soaked the retainer pin with Kroil, but having difficulty driving it out. Any suggestions? I do have a manual. Brice | ||
|
| one of us |
Are you trying to drive the pin out from left to right facing the rear of the FP? Observe if one end of the pin is smaller than the other and drive from that side. Failing that, you will need to get a short tapered starter punch and try. Next, try a hydraulic press and punch. Failing that, you will need to drill it out. | |||
|
| One of Us |
Bobster...I'll bet you're thinking of the bolt sleeve? Even if you succeed in disassembly, I'd bet these are restricted parts. At least check with a Winchester warranty gunsmith. | |||
|
| One of Us |
Thanks, guys. I said I'm an amateur, not an idiot. Yes, I'm driving it out from the small end. Brownells lists the part and refers to it as the cocking piece. My manual calls it a bolt sleeve. At least I think so. The schematic is very small. Thanks for the hydraulic press suggestion. A friend has a machine shop, so I can turn to him for assistance. I continue to be impressed with the generous help I get when I throw a questin out here. Brice | |||
|
One of Us |
The piece that Brownell's lists IS a cocking piece. The toughest thing about removing a pin from that piece is holding the assembly so you can get a good solid hit on it. This should provide just about the right amount of hold for pin removal. Use a jaw protector between the cocking piece and the edge of the jaw. Driving the pin towards you allows for some good solid hits. Also, it wouldn't hurt to heat the area first. A propane torch should be sufficient. The setup is slightly exaggerated for ease of viewing. 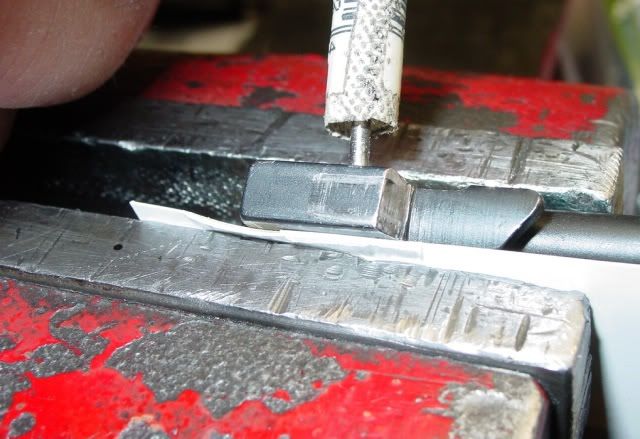 _______________________________________________________________________________ This is my rifle, there are many like it but this one is mine. My rifle is my best friend, it is my life. | |||
|
| One of Us |
I am rather curious how such a piece could become broken? | |||
|
| One of Us |
Silvertip, I've no idea. This happened in a friend's Post 64 M70 30-06. He shot a deer a couple of weeks ago, at our deer camp. No problems. He later came to me and explained that the bolt wouldn't open. I checked with a cleaning rod to make sure the chamber was empty. Also checked the position of the safety (Off safe). I then tapped the bolt handle up with a small piece of 2 x 4. It didn't require much persuasion. The bolt would not withdraw. I brought the rifle home to my shop and removed the trigger ass'y. I could then withdraw the bolt ass'y. The tab with the beveled edge (See Westpac's photo)was broken off. I suspect that this might be a fairly common problem because Brownell's has the part listed in the main part of the catalog, not just in the parts section in the back. Perhaps one of the smiths here can elucidate. I am curious, too. My machinist friend suggested heating the parts (firing pin and cocking piece)in the oven. If that doesn't work, I may cut it off with a Dremel and a cut-off wheel. The part is broken anyway. I don't have a bench block to support the part. I will try Westpac's photo suggestion. Again, thanks to all. Brice | |||
|
| One of Us |
By the way, I tried drilling. Man, that is some tough steel. All I have are ordinary high speed bits, and they would barely scratch it. I might try to find the best available and give that a shot. Brice | |||
|
| One of Us |
The whole purpose of heating the immediate area to begin with is to allow that small portion to expand a little so as to aid in removing the pin. If you heat everything uniformly then everything expands uniformly. Take a propane torch and aim the flame at the area where the pin is located. When it becomes too hot to touch, shut down the flame and drive the pin out. It shouldn't involve much drama. If it needs to be drilled out "think" carbide, as in endmill. _______________________________________________________________________________ This is my rifle, there are many like it but this one is mine. My rifle is my best friend, it is my life. | |||
|
| One of Us |
It's off. Dremel with cut-off wheel. Not elegant, but it worked. Now I have to determine what the firing pin extension length should be. It appears that how far you screw the cocking piece on makes a difference. However, it looks like it is made to screw down so the shoulders touch (cocking piece/firing pin). No wonder good gunsmiths usually aren't real young. Brice | |||
|
| One of Us |
I think i'm not the only guy who wouldn't mind seeing exactly what happened by posting pics. If you can take them that'd be great...if you don't have an account to host them I can do it. Let me know, and good job thus far! | |||
|
| One of Us |
Westpac's pic above is far better than anything I could produce. There are two parts in the vice, the firing pin, which is the cylindrical piece seen bottom-right, and the cocking piece, which is held in the vice. In my case, the tab which extends to the right and is part of the cocking piece broke off. That's the portion that has the beveled end. I have not yet studied the parts as they function in the action to determine the function of the bevel. No doubt any gunsmith here could explain. As I wrote previously, Brownell's sells the part. I'm not sure if the part they sell is intended to be an improvement, or just because a lot of them break. I have three LH M70's in my Africa battery, and have had the following problems: 375 H & H, Winchester thought the Mauser had insufficient gas blocks so added one on the bolt opposite the extractor. It broke off and locked up the action. Fortunately this was at the range. My gunsmith, Ed Lapour, replaced the entire extractor assembly with a forged one which did not have the extra block. Might have been from Wisner. The same rifle required total rebuild of the safety due to sloppy tolerances. Again, Lapour to the rescue. The other two rifles, a 458 and an '06, are customs by Ed and he fixed everything before handing them over. He explained that Winchester/WRAC turned out some pretty sloppy stuff in the last of their years. I should add that Ed builds 3 position safeties which are a marked improvement over the originals. Having a great gunsmith is like having a good cardiologist, but more fun. (Not necessarily less expensive.) | |||
|
| Powered by Social Strata |
| Please Wait. Your request is being processed... |

Visit our on-line store for AR Memorabilia