I'd sure like to see what you stockmakers have done with the Zastava stocks on the left hand guns we just received. I ordered two M70s in 9.2X62 and 6.5 X55 and an M85 in 7.62X39. The wood figure on two of my three stocks is really good, but the stocks are considerably too large in practically every dimension. So I grabbed a rasp and a random orbit sander and began to grind and scrape away on the M85 stock. I took off the rollover and the monte carlo and cut comb nose flutes to match my hand. I still can't see the iron sights but I'm going to install a scope anyway. Below is a shot of the stock as it currently exists, just sanded to 60 grit on the butt area. I have only cut down the left side of the fore end. The right side is still full thickness as I'm still deciding how to shape the stock around the bolt release. The stock originally weighed 2 lb 15 oz. We'll see what it weighs after I'm finished. I may cut off the grip cap and put on a steel cap to go with the checkered buttplate I plan to install. I'm curious about other folks' approach to their stocks and I'm sure others would like to see your approach as well.
Allan
Quick, Cheap, or Good: Pick Two
Posts: 2240 | Location: Tennessee | Registered: 18 February 2007
i got two of the guns also. the wood on my 85, 7.62x39 must have come from the same tree as yours, looks alot alike. the stock on the 375 is staight grained babyshit brown and soft. both stocks are way to big to use unless you are 6'5' with no neck and can palm a basketball. i put them both up to be worked on after the hunting season. my biggest concern is the way the things are shaped for the ejection port, safety, and trigger guard, just sort of smeared gullys. we shall see later on. max
Posts: 990 | Location: Shenandoah Valley VA | Registered: 05 January 2005
I can't see what kind of grain my 458's stock has through the blotchy brown stain that they slopped all over it. The wood around the back of my action sticks up 1/8" above the netal.
Frank
"I don't know what there is about buffalo that frightens me so.....He looks like he hates you personally. He looks like you owe him money." - Robert Ruark, Horn of the Hunter, 1953
NRA Life, SAF Life, CRPA Life, DRSS lite
Posts: 13103 | Location: Kentucky, USA | Registered: 30 December 2002
I got lucky with the grain threw the pistol grip. The only trouble I had was oil seeping out of the grain had to wash with TSP. Just took sander and file until it fit me and felt good. [/IMG]
I did decide to remove the grip cap on my M85. It's just too long for my tastes. Warning! The grip cap is attached with a blind 1/8" steel pin toward the rear of the cap. I ruined a bandsaw blade to find that out. I reversed the stock and cut the cap from the other direction, then pulled the cap off. The pin came with it. Also interesting is that the stock on my M85 has a wooden dowel up through the grip as a reinforcement. The stock looks a lot better with the cap off, but I'm going to have to install a thin cap in its place to cover up the dowel and the steel pin hole. My stock weighs 2 lb 3 oz now, from the 2-15 it weighed originally. I put on a walnut stain to raise the grain and check for sanding flaws. The wood sucks up stain like a straw! I'll need to fix two knot holes and install grip cap and buttplate, then start wet sanding to fill the grain. I'll post photos soon.
Quick, Cheap, or Good: Pick Two
Posts: 2240 | Location: Tennessee | Registered: 18 February 2007
Am now doing the hard part of bedding my 9.3! Waiting for it to cure!!Must not play with it!! Found the safety was rubbing the stock re leaved that. Next cut stock to fit and replace rubber butt plate with a Limbsaver pad and fit some wood into the barrel channel to fill the gap. will re shape, trim and refinsh after season. Clint
Posts: 390 | Location: out side lansing mi | Registered: 28 December 2007
Here is a shot of my stock with the grip cap removed. I think the profile is much better. You can see that I removed a considerable amount of wood in the grip to get it thinner. I'm glad I didn't know that the dowel was in the grip. I wouldn't have been bold enough to thin the grip as I did. The dowel is about 3/4 inch in diameter but if it had not been centered in the grip, I could have cut into it. The black walnut stock stain will mostly be removed in the wet sanding process and I may not restain it after the grain is filled as the stain does obscure the grain.
Quick, Cheap, or Good: Pick Two
Posts: 2240 | Location: Tennessee | Registered: 18 February 2007
Learned something today!! Titebond III will remove Bluing! Yesterday I glued in some filler strips to get rid of the 1/8"" gap in my barrel channel. Was not worried about glue under the barrel and it removed bluing. Lucky it will not show and some cold blue will fix it. Clint
Posts: 390 | Location: out side lansing mi | Registered: 28 December 2007
I forgot to mention that the wood smells like sewer gas after you remove the finish. Maybe the Serbs have a new way of curing walnut in dung! I hope that it isn't human waste!
Quick, Cheap, or Good: Pick Two
Posts: 2240 | Location: Tennessee | Registered: 18 February 2007
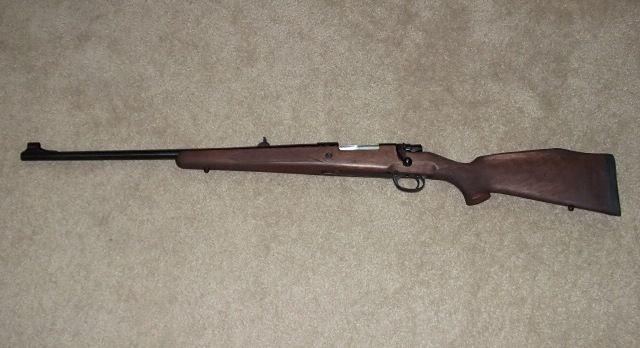
Here are a couple of shots of my stock with one coat of wet-sanded finish to fill the grain and one additional coat using the same finish. I'll add two more coats of finish to build it up a little, but the finish is basically there now. My checkered buttplate wouldn't fit this stock, so I just sliced off a piece of 1/4" American walnut and glued that on for a buttplate and grip cap. I thinned the grip cap to about 5/64" thick. I ultimately decided not to stain the wood as it has a pleasing nutmeg color. You can see how it contrasts with the red hue of American walnut on the grip cap and buttplate. Now the stock weighs 2 lb, 4 oz and the overall rifle weighs 6 lb 4 ounces. That's a nice weight for a light carrying rifle. I'm looking for an aperture sight to mount on the rear bridge. If I find one I'll dispense with a scope. Here are a couple of photos.
Quick, Cheap, or Good: Pick Two
Posts: 2240 | Location: Tennessee | Registered: 18 February 2007
Originally posted by Vol717: Here are a couple of shots of my stock with one coat of wet-sanded finish to fill the grain and one additional coat using the same finish. I'll add two more coats of finish to build it up a little, but the finish is basically there now. My checkered buttplate wouldn't fit this stock, so I just sliced off a piece of 1/4" American walnut and glued that on for a buttplate and grip cap. I thinned the grip cap to about 5/64" thick. I ultimately decided not to stain the wood as it has a pleasing nutmeg color. You can see how it contrasts with the red hue of American walnut on the grip cap and buttplate. Now the stock weighs 2 lb, 4 oz and the overall rifle weighs 6 lb 4 ounces. That's a nice weight for a light carrying rifle. I'm looking for an aperture sight to mount on the rear bridge. If I find one I'll dispense with a scope.
Just to be clear, am I correct that this is your 6.5x55? Thanks.
Norman Solberg International lawyer back in the US after 25 years and, having met a few of the bad guys and governments here and around the world, now focusing on private trusts that protect wealth from them. NRA Life Member for 50 years, NRA Endowment Member from 2014, NRA Patron from 2016.
I ultimately decided not to stain the wood as it has a pleasing nutmeg color.
You made the correct choice, that is a very nice color.
Frank
"I don't know what there is about buffalo that frightens me so.....He looks like he hates you personally. He looks like you owe him money." - Robert Ruark, Horn of the Hunter, 1953
NRA Life, SAF Life, CRPA Life, DRSS lite
Posts: 13103 | Location: Kentucky, USA | Registered: 30 December 2002
Just to be clear, am I correct that this is your 6.5x55? Thanks.
This is a model 85 in 7.62X39. The 6.5X55 is built on the full sized Model 70 action. I just sold one of these guns in 6.5X55. Its stock was more highly figured than this rifle and I was very tempted to treat the 6.5's stock in the same manner, but the new owner will do that now.
By the way, after tinkering with gunstocks for almost 50 years, I have found an in-the-wood gunstock finish that allows me to fill the pores in one wet sanding operation. My photo was taken with a cellphone. It's not the best clarity I know, but those pores were filled in one application with fine sandpaper on a block. Before it fully set I used a coarse rag cross-grain the remove the excess residue. After it dried overnight I took off the top surface with fine steel wool and rubbed in one thin coat by hand. It dries to a matte finish and is very durable.
Quick, Cheap, or Good: Pick Two
Posts: 2240 | Location: Tennessee | Registered: 18 February 2007
could you please post a picture of the other side of the gun. i would like to see how you handled the ejection port cut, bolt cut and safety recess. looking for ideas as both of my rifles these areas are sloppy wallows at best. thanks.
Posts: 990 | Location: Shenandoah Valley VA | Registered: 05 January 2005
I didn't really change the left side of the stock except to thin it out. I too fall into the sloppy wallow stockmaking niche. I know how to make the nice lines around the tang that flow back into the grip, but I don't like the feel of those sharp angles in my hand. So I shape a stock until it feels right to my hand; thin in the front and a little swell of wood in my palm to hold on to. Then I cut a flute in the comb so that my thumb falls right in place. The other side of the comb is just cut to match by eye.
Here is the left side:
Quick, Cheap, or Good: Pick Two
Posts: 2240 | Location: Tennessee | Registered: 18 February 2007
Clint, I've experimented with oils and polyurethane in various ratios. My current brew is an undetermined mix of tung oil and poly with Japan dryer added. The poly was left over from floor finishing and it was a satin finish, so it has some silica in it to cut the shine. I bought two gallons of tung oil at an auction and it was a little thick from age. I add the Japan dryer to accelerate drying. I have about a gallon of the mix right now. It does work better than anything I've ever used. I've thought of marketing it but I would have to develop a detailed formula and then figure out if it would meet HAZMAT muster. The Japan dryer may be classified as an oxidizer and may prevent shipping it. I haven't even looked to see if Japan dryer is still available on the market. My stocks of finishing materials are pretty old and left over from my years as a furniture refinisher.
Quick, Cheap, or Good: Pick Two
Posts: 2240 | Location: Tennessee | Registered: 18 February 2007
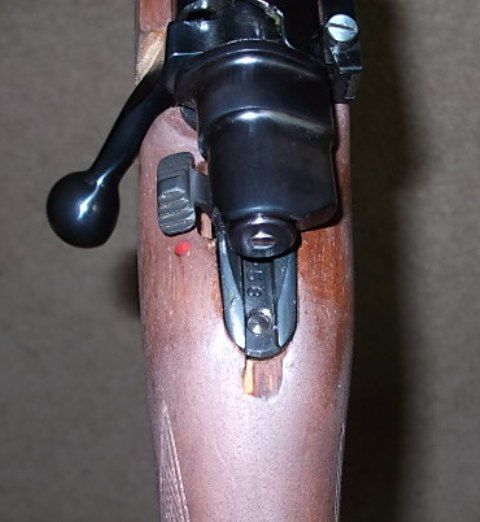
How are you guys dealing with the crossbolt holes? The depth of the crossbolt is about .150" on the head side and about .040" on the nut side. Do you just glue ebony plugs to the cross bolts?
Is the floorplate release normal? I don't have another Mauser and I've never seen this type of release before. Since these are left handed rifles, isn't the push button on the wrong side of the trigger guard? I figure that it's probably due to the use the same parts for the bottom metal as the right handed guns but I would like it on the other side. Is it possible to get it switched?
Frank
"I don't know what there is about buffalo that frightens me so.....He looks like he hates you personally. He looks like you owe him money." - Robert Ruark, Horn of the Hunter, 1953
NRA Life, SAF Life, CRPA Life, DRSS lite
Posts: 13103 | Location: Kentucky, USA | Registered: 30 December 2002
the floorplate release is normal for the rifle. it was the same on the dalys and remingtons. i believe they only make one unit for the right and left handed rifles. seems that the original bow release in the center of the trigger guard of the older interarms rifles would be more ambidexterous but it isn't offered.
my 375 also has uneven cross bolts but i haven't decided if i'm even keeping the stock, the easiest solution would be to degrease the area well and flood the recess with dyed black accraglass or other epoxy. when sanded smooth and finished it will be a black plug and no gaps.
Posts: 990 | Location: Shenandoah Valley VA | Registered: 05 January 2005
"I don't know what there is about buffalo that frightens me so.....He looks like he hates you personally. He looks like you owe him money." - Robert Ruark, Horn of the Hunter, 1953
NRA Life, SAF Life, CRPA Life, DRSS lite
Posts: 13103 | Location: Kentucky, USA | Registered: 30 December 2002

 Shooting
 [/IMG]


