 Rifles Custom Built Rifles
 Go | New | Find | Notify | Tools | Reply |
| Project three... a .222 varminter | Login/Join |
| One of Us |
I did a quick search and found this example: 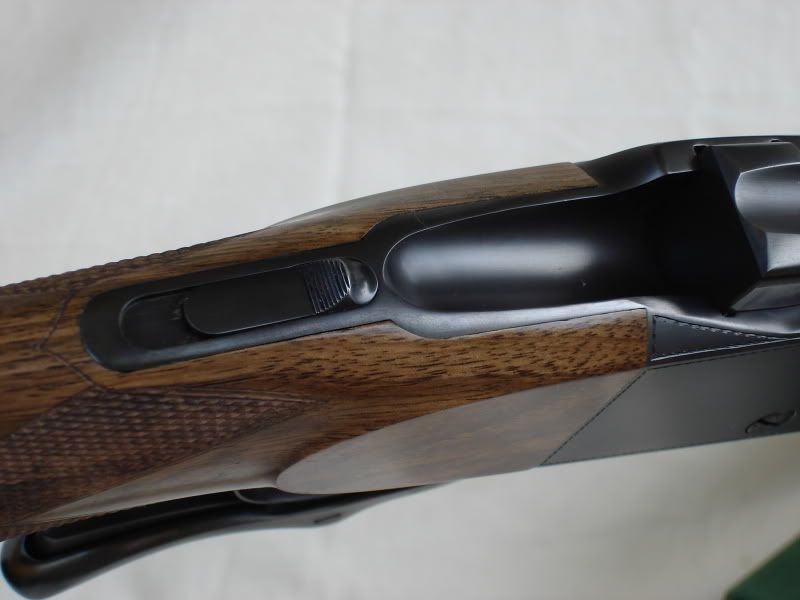 | |||
|
| One of Us |
I can answer that... I had Charlie do it for me. He has a special cutter that he made specially for the widow's peak. I have no way to do that. I don't know what glue he used. I'm pretty much just a hobbyist and the list of things I can't do is long. Charlie has been making guns for all of the forty plus years I've known him. He's a past president of the ACGG. I've been warned not to try recessing the safety into the tang. Very hard to make it work right after you do it. I have an extra one that I'm going to file flat and checker. Looks better and no problem with it working. Dick Wright | |||
|
| One of Us |
 I'm going to wait a day till the mineral spirits are really dry before I touch the stock. I shot this pretty much as a study in lines. If I'm going to change anything, now is the time to do it. Actually I like it... no changes. I definitely have to do something about that safety. Dick Wright | |||
|
| One of Us |
 Same pic, right side up and with the scope. For some screwy reason I usually like it upside down. ?????? Charlie is going to rust blue this and checker it for me. He's gonna kill me when he sees the scrstches on the metal. I'm looking forward to seeing the reaction of the other competitors when I show up next summer with this at a match. Trust me, this is not a typical benchrest rifle. Dick Wright | |||
|
| One of Us |
Dick, That just gets better and better! | |||
|
| One of Us |
 I've been working on this all morning. I wet it down with water yesterday to raise the grain. I've been dry sanding all AM on just the butt stock, 90+ percent of the time working on the cheekpiece and taking lots of breaks. At this stage one slip can be a disaster. Doing this requires just enough coffee (shaking is really bad), no hangover, a steady hand and a clear conscience. Not quite done yet... so far, so good. I took this w/o flash. The shadows tell you how you are doing. Dick Wright | |||
|
| One of Us |
 A few days later... I keep learning things... I have applied the first coat of Behlens to fill the pores. After sanding it down to bare wood, I rubbed on the wood hard with good quality and clean paper towels. I wanted to find pores that weren't filled. I did so but I also found that when I had a good, smooth finish the wood would appear to have been burnished (polished), looking almost like it had finish on it. See the flute on the comb and some other areas that look as though there is actually finish on them. Not so, it's just bare wood properly done. I'm thinking that when I put on the real finish, I will be surprised at how easy it is to get a good finish. I've taken small areas that didn't look burnished, went over them with 320, 400 and 600 grit paper and managed to get the burnished effect after a vigorous rubbing with the clean paper towel. Doing this has also helped me identify areas that need more Behlen's for unfilled pores. I'm going to put a coat of finish on a small area after it's polished/burnished and see what I get. I think I've made more work for myself... I need the complete stocks to look like parts of this this. We'll see what the results are. Dick Wright | |||
|
| One of Us |
 Inspiration... Anytime you think you are good, check this out. The one-off handmade safety took a lot of hours and a good idea of what art looks like. I wish I could make my expensive Kepplinger trigger look like this one. D'Arcy Echols sent me this pic recently of the only No. 1 he ever made. He just told me to go ahead and post it. Eat your heart out No. 1 fans. Dick Wright | |||
|
| new member |
Simply beautiful | |||
|
| One of Us |
Guns like this are for people who can tell the difference, those who recognize art and are willing to spend enough money to get it. If this doesn't make your heart go kinda "pitter-pat", save yourself some money... go to the local gun shop and buy yourself a Remchester in 300 Super-Blaster. Dick Wright | |||
|
| One of Us |
These are very nice, but sad too in a way. They probably don't get used. At least for me, when it's gusting sideways dirt, I grab the cheap gun to head to the local matches. I don't cringe when I run the bolt and it grinds with sand... | |||
|
| new member |
Don't disagree with jpl at all I did want to tell a story I met this wealthy man one time in Dallas and he told me he owned a Freightliner and I asked what do you do with that? He said "I haul my vintage Ferrari race cars around" and I'm like you own more than one? and he said yes and that he and his other pals enjoyed renting racetracks and having charity races with theirs too. I asked him if he was ever scared of wrecking them and he said heck no! He said it would be more of sin not to run them, to do what they were born to do. I admired him for that and I know he's right but it would take me a long time and his cash to feel the same way. | |||
|
| one of us |
I can assure you that this # 1 is still used to this day. It has a few dents, a few dings and whole lot of memories threaded through its DNA A wall flower it is not | |||
|
| One of Us |
I'm kinda middle of the road here... My wife and I hunt with good custom rifles. However, we hunt in MI where we use deer blinds and the guns don't get beat up. Back in the day I owned two Pre-64 M-70 FW .270's that were not pristine but both of which shot very accurately. I used them when I didn't want to take a chance that a horse might roll over on my gun when it was in a saddle scabbard and ruin an expensive stock. I'd love to spend a couple of days at the track running one of that guy's Ferraris but there's no way I could ever afford to fix one. Sorry, I can't make myself beat up a work of art whether it's my old Porsche or a fine gun. That doesn't mean I don't use them a lot. There's a thread here on my wife's deer rifle. I stocked it 35 years ago with the help of Don Klien and Bob Snapp. That gun has been hunted with for over thirty years and is still in 98% condition. Dick Wright | |||
|
| One of Us |
 FWIW this is Glorya's deer rifle. In the early 80's Bob Snapp put on the barrel, I stocked it and Don Klien checkered and rust blued it. It's been hunted with every year since 1986. We have long since lost track of how many whitetails Glorya has shot with it. Our arrangement is... she shoots meat and I shoot horns. Consequently she gets a lot more deer than I do. Works for us. This gun is in excellent shape considering that it been used a lot for thirty years. I took this picture this year and stupidly forgot to wipe off my fingerprints. Dick Wright | |||
|
| One of Us |
 Here are two more pictures that D'Arcy sent me of the Ruger he made. There is definitely a place in my gun cabinet for this rifle. Dick Wright | |||
|
| One of Us |
That is really good to hear! At car shows I have a greater appreciation for the cars with bugs in the grille and a few paint chips. | |||
|
| One of Us |
I agree... I've had the old Porsche for thirteen+ years and have always resisted getting it painted. I'd love a color change; anything but "Look at me red" but it ain't gonna happen... even here in redneck country where everybody drives pickups and the fuzz think that anyone driving a red Porsche must be guilty of sumpin. I drive the car and don't need the paranoia of worrying about the first stone chip. Dick Wright | |||
|
| One of Us |
 I couldn't wait any longer... This is the first coat of McWilliams Alkanet Refinishing Oil hand rubbed into the stock. Per their instructions, I will wait 48 hours and do another. I first took these pics with flash. They were bleached out. This is w/o flash and much closer to the real color. Dick Wright | |||
|
| One of Us |
 I picked up a spare safety a couple of weeks ago. I ground off the bump and got out my files. This is what I have so far. The shape needs a little more refining and will be checkered. I also ground about .080" off the front. I will post a better pic when it's done. Dick Wright | |||
|
| new member |
[QUOTE]Originally posted by Dick Wright: Per their instructions, I will wait 48 hours and do another. Hey Dick you don't need to wait 48 hours I would wait till its dry to the touch for the next coat. I'm reading my instructions and I don't see the 48 hour comment. If that was mentioned on my web site (sorry headed for PA) it would have been me wanting to assure before any steel wool or of 3M pad was used it was set up fairly well. People sometimes forget and treat it like a varnish and assume when its dry to the touch they hit it prematurely. I do mention a 24 hour wait on my London blend varnish. Personally as long as you are hand rubbing it and happy with the surface I would refrain from knocking anything down till you need to and wait as stated. Treat it just like any linseed finish. By the way my website is down I have a new one being constructed but all my stuff is on ebay till then. Thank you for using my Alkanet and I hope this helps and I'm sorry if I confused the issue and will correct. The gun is gorgeous | |||
|
| One of Us |
 After the second coat of the McWilliams Alkanet Refinishing Oil. This wood is getting better with every coat. There's quite a bit of black on the fore end but it's on the bottom. The fiddle back is on the sides but it doesn't show in this pic. Dick Wright | |||
|
| One of Us |
Really looking good Dick. | |||
|
| One of Us |
Butch... doesn't look much like a bench gun, does it? I think the grip area makes or breaks a rifle, as far as artistic value goes. This is the best I have ever done. Looking forward to the next one. I spent a lot of years shooting a deuce. Accuracy wise, we'll see... so far, so good. Dick Wright | |||
|
| One of Us |
When the wind is gusting dirt sideways, it's time to head for the bar. I've seen some expensive bench guns ruined by grinding sand thru the action. Dick Wright | |||
|
| new member |
Glad you are happy Dick its beautiful | |||
|
| One of Us |
SB , Do you have a web site for your finishes? | |||
|
| new member |
They are all on ebay just search on sb McWilliams or feel free to write me at dustybirdshoot@aol.com Dave thank you! Shawn | |||
|
| One of Us |
 Taken immediately after hand rubbing the sixth coat of McWilliams Alkanet Refinishing Oil. It's finally taking a little shine as it drys. This finish really makes the grain pop out. Dick Wright | |||
|
| One of Us |
 The cheek piece side after six coats. Dick Wright | |||
|
| One of Us |
 Sorry, can't resist... another day, another couple of coats of finish. Here is the whole gun, held in my vise whilst yet another coat of finish drys. I'm starting to get quite a bit of gloss. It's screwy but there's almost a sensuous feel to rubbing a bit of finish on this wood by hand... feels good. I don't have the perfectly smooth finish of an Echols or an Anderson rifle. I really need to cut it back with rotten stone and,then, put on a few more coats. I kinda like it like this. Dick Wright | |||
|
| One of Us |
 I finally did something about the safety. I ground and filed down a factory safety and had Kip Wood down at Central Michigan Gunsmithing checker it for me. The edges are a little sharp but I can take care of that easily. This looks much better to my eye. Dick Wright | |||
|
| One of Us |
I need to clean up the metal, use rotten stone on the finish and add a couple more coats... all before 23 Jan. when it's scheduled to be shipped to Charlie. I really need to stick to this time line so I can get it back and get ready for the 2017 competition season. Dick Wright | |||
|
| One of Us |
hi dick, the safety looks good. just an idea since you are using this for a target gun, had you considered getting rid of the safety and welding up the slot? max | |||
|
| One of Us |
Not really... I may do a little woodchuck hunting with it. For years I've shot bench guns which have no safeties. However, if there's the slightest chance it might be taken in the field I'd feel uncomfortable w/o a safety. Dick Wright | |||
|
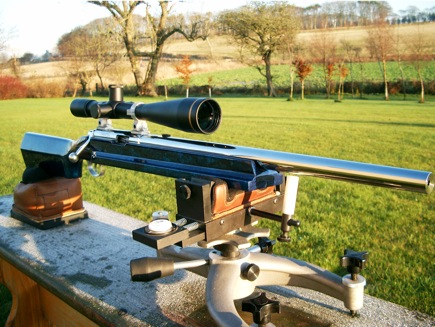
| One of Us |
 My last pic before I pack it up for it's trip to Colorado. The gun will be shot in competition off these rests. I'm probably going to have to turn the front rest around so I can open the lever to cock it. It's best to leave it on the bags whilst so doing. That rear bag is the first Gator Head bag Edgewood ever made. Jack Snyder made it to my drawing. It's now part of his product line. I filled it with heavy sand and it weighs about thirty pounds. I firmly believe in heavy rests for benchrest shooting. Dick Wright | |||
|
| One of Us |
fantastic sir well done | |||
|
| new member |
Beautiful Dick simply beautiful! | |||
|
| One of Us |
 The simple sketch I sent Charlie showing what I wanted re: the checkering. I'm not looking for comments on my art work. Dick Wright | |||
|
| One of Us |
I shipped the gun to Charlie Grace in Colorado Monday. He received it yesterday in good shape and will soon do the checkering and rust bluing. When I get it back I will start shooting it in preparation for matches next summer. Dick Wright | |||
|
| Powered by Social Strata | Page 1 2 3 4 |
| Please Wait. Your request is being processed... |
Rifles Custom Built Rifles

Visit our on-line store for AR Memorabilia