 Rifles Custom Built Rifles
 Go | New | Find | Notify | Tools | Reply |
| Working on my Winchester (updated 11/19) | Login/Join |
| One of Us |
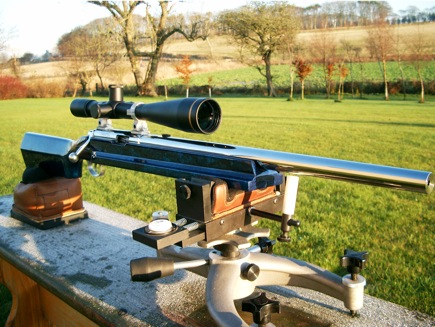
A couple years ago I bought a used Winchester Ranger .270 from my cousin and while the rifle functions and shoots great (killed my first deer with the rifle too), I am sick of looking at the plain birch stock when I know I'm capable of putting something else on it. So! I've got a good looking walnut blank on hand with lovely grain flow and yesterday bottom metal from PTG arrived (Oberndorf-style in the white) so now I can essentially convert the Ranger into a push-feed M70 with the new stock and bottom metal. I'll be adding an original Winchester-style steel buttplate, Brownell's grip cap, and maybe inletted swivel studs. Maybe. I've already stuck an ebony tip on the stock too. 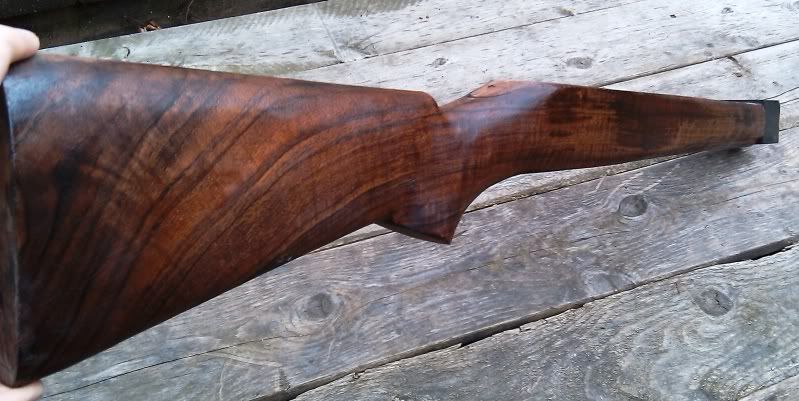 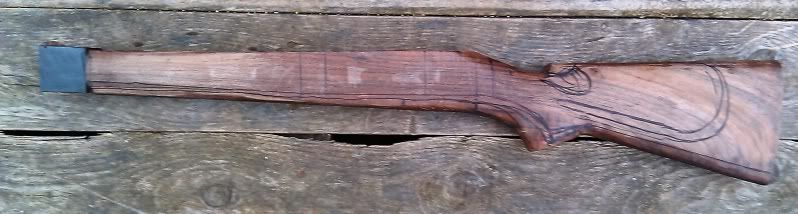 Credit to Les Brooks for the info he provided, which was invaluable for drawing up (what I hope will be) a good pattern. 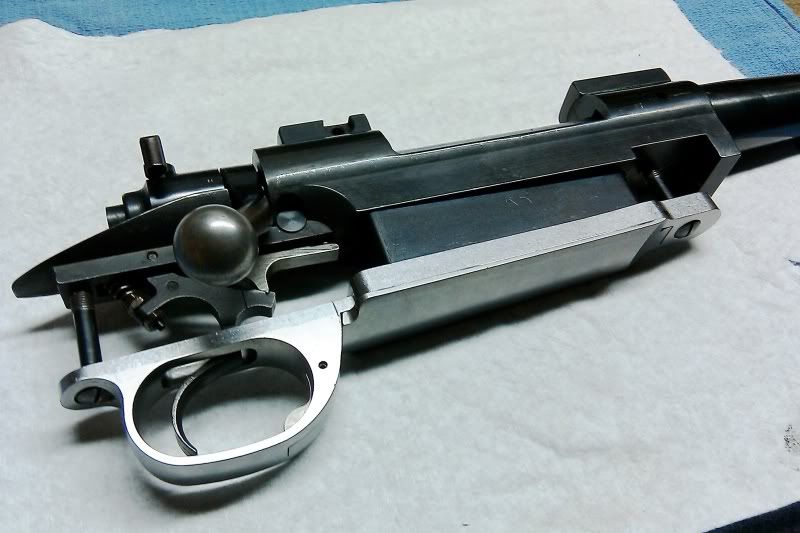 The chips have started to fly. This will be my first centerfire rifle stock starting with a blank and without power tools (except for a hand drill) so I am taking my time inletting.  I am hoping to have it done (or at the least semi-finished) by the time deer season rolls around here. We'll see if I can make it happen. "If the women don't find you handsome, they should at least find you handy." | ||
|
| one of us |
Ah, another gun-build thread to follow! Make, or buy, a set of padded jaws for your bench vise! The "pattern" of the steel yaws will show up in your finished stock if you put to much pressure into the wood. You will be surprised how deep this can go...... Looks like you will have a good looking rifle when the project is finished! /Stefan _____________________________________________ The bitter taste of poor quality stays in the mouth far longer than the sweet taste of the low price! | |||
|
| One of Us |
Thank you for the reminder Stefan... and I can distinctly remember when I taught myself why padded jaws are necessary. The blank is thick and the jaws don't bite too bad, but I suppose it is best to be precautionary. The padded jaws I have now are 1/4" rubber glued to steel, but sometimes, like last night, they will want to slip even when tight (hence why I got frustrated and pulled them off last night). Any better materials out there for padded jaws or specific recommendations? I save small wood blocks for chucking up metal peices, but I'm wondering about leather or plastics. "If the women don't find you handsome, they should at least find you handy." | |||
|
| One of Us |
Leather works great. Try to find some good thick saddle leather, about 1/4" thick get enough to bend it in a U shape, that way when you open the vise it will not fall out, but rest on the vise slide. "We Don't Rent Pigs !" | |||
|
| One of Us |
100% correct! | |||
|
| one of us |
I find the cork hard to beat for padded jaws! I use the "insulation pads" (dont know the correct word in english)you put under your frying pan or similar when putting it on the table They are made of pieces of cork glued together and you will be surprised how much abuse the will stand! Really cheap to! I glue the cork on pieces of plywood that fits over the "beam" (more words I don´t know in English) on the vise. Works really good and grips odd shapes really well due to the "spring" in the cork. I can take a picture of the setup instead of trying to explain this in staggering English Edit!: Yale had the right term for the "beam" SLIDE is the correkt name! Stefan _____________________________________________ The bitter taste of poor quality stays in the mouth far longer than the sweet taste of the low price! | |||
|
| One of Us |
Since I last posted, I picked up some inletting chisels and scrapers and they have been a major help in getting work done. I've got the bulk of the inletting done and can start on the bottom metal soon. 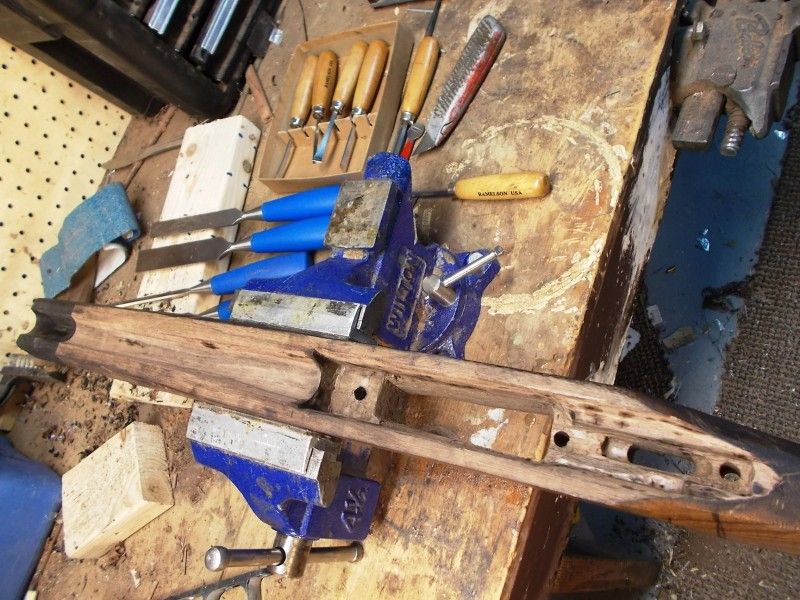 There's a lot more carving to do, but the final proportions are sorta revealed here. Thoughts? 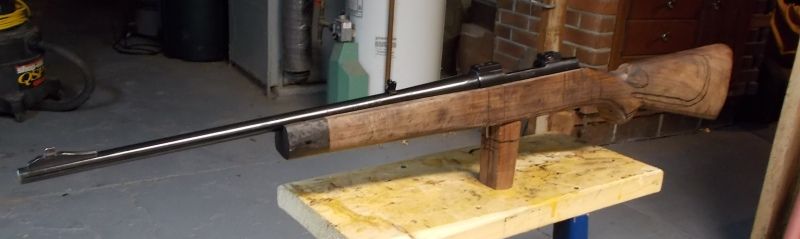 "If the women don't find you handsome, they should at least find you handy." | |||
|
| One of Us |
Looking good, I look forward to following the rest of this thread. For what it is worth I made my soft jaws out of 1/4" hardwood (it was scavenged from the inside of an old drawer) and some leather glued to it. They work really well and stay in place. You can see them in my 7mm-08 thread (in this forum) if you are interested. | |||
|
| One of Us |
Thanks Brad, trust me I've been checking on your 7mm-08 thread (which is great, by the way). I re-glued the rubber pads on my soft jaws and so far they have been holding just fine, at least much better than previously. "If the women don't find you handsome, they should at least find you handy." | |||
|
| One of Us |
Fully inletted... 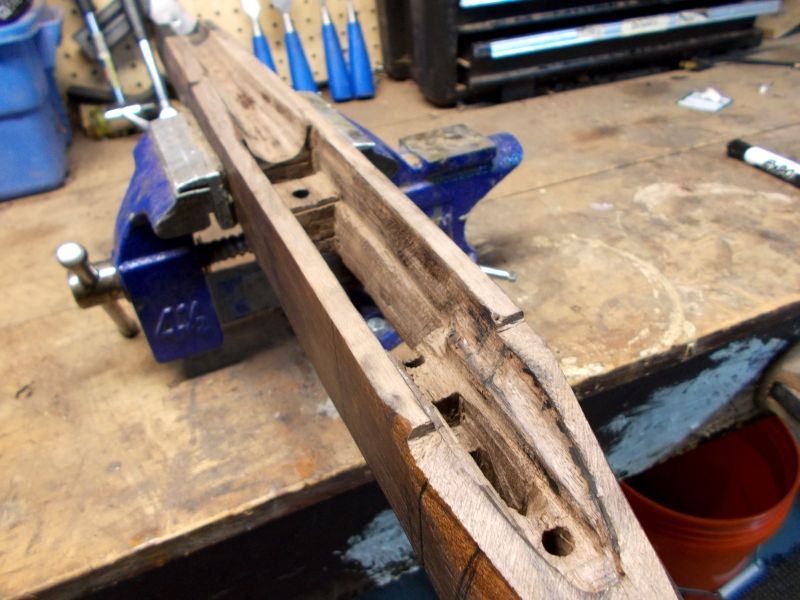 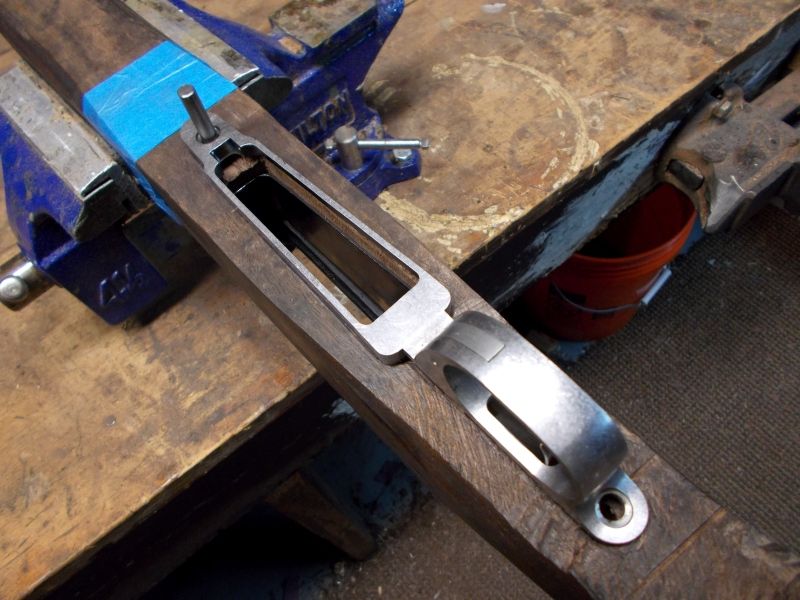  "If the women don't find you handsome, they should at least find you handy." | |||
|
| One of Us |
You can see some of the dimensions start to form. I still have a lot of work to do on the grip area though.  I also decided the fore-end was too long so I cut off the ebony tip, cut 3/4" off the walnut fore-end, re-attached the ebony tip (with a new dowel), and cut a little bit off the ebony too. 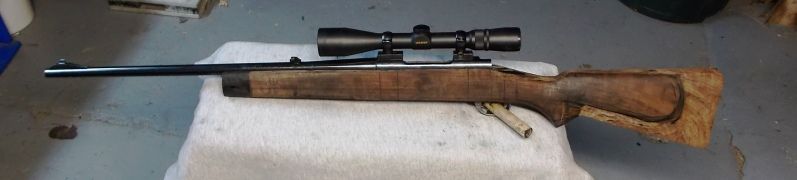 "If the women don't find you handsome, they should at least find you handy." | |||
|
One of Us |
i like the "open" look of the pistol grip...your progress looksgood... go big or go home ........ DSC-- Life Member NRA--Life member DRSS--9.3x74 r Chapuis | |||
|
| One of Us |
Looking good please keep the pictures comming! | |||
|
| One of Us |
Thanks fellas... Here's a couple more photos. I can start inletting the buttplate at this point. It's a pain to do (my opinion) but worth it. 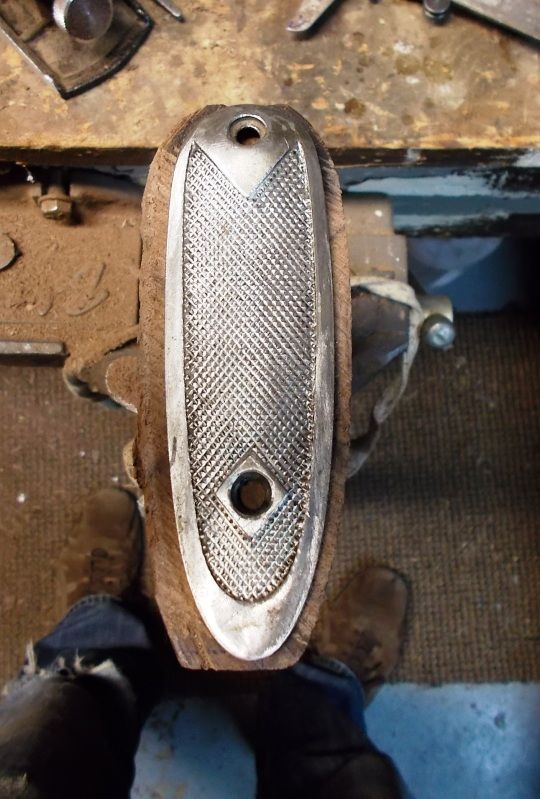 Here's another shot of the rifle so far. The wood is really dark from all of the inletting black I used. 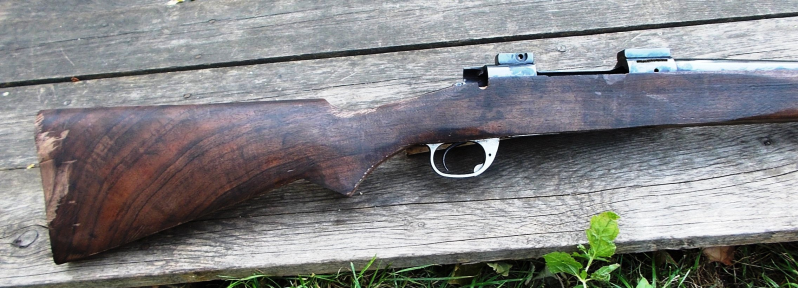 "If the women don't find you handsome, they should at least find you handy." | |||
|
| One of Us |
I've got some hardware attached and shaping done.  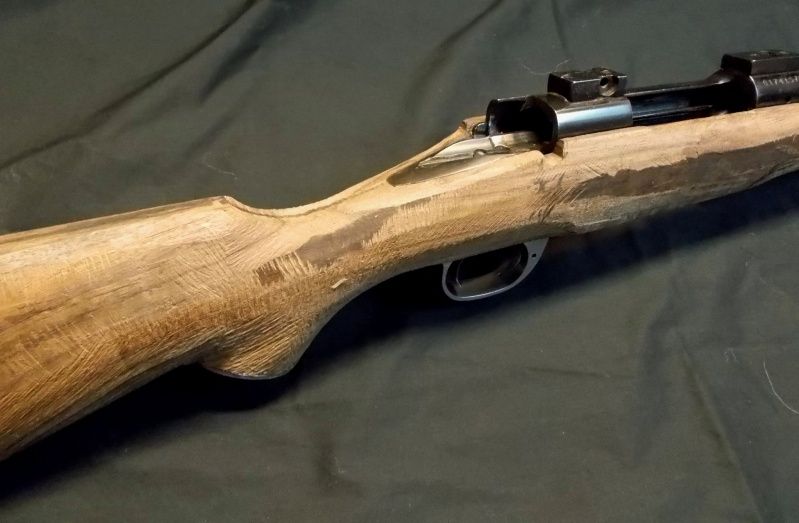   It weighs just over 8 lbs. as photographed above. "If the women don't find you handsome, they should at least find you handy." | |||
|
| One of Us |
More shaping work done... getting closer and closer. I finally rounded off the fore-end tip last night and slimmed down the fore-end a little more too. 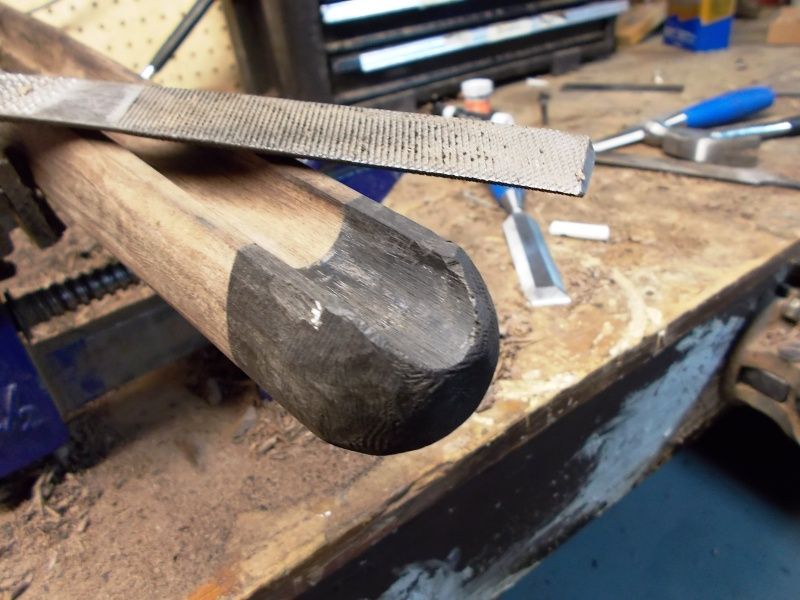 What a chippy PITA piece of ebony... 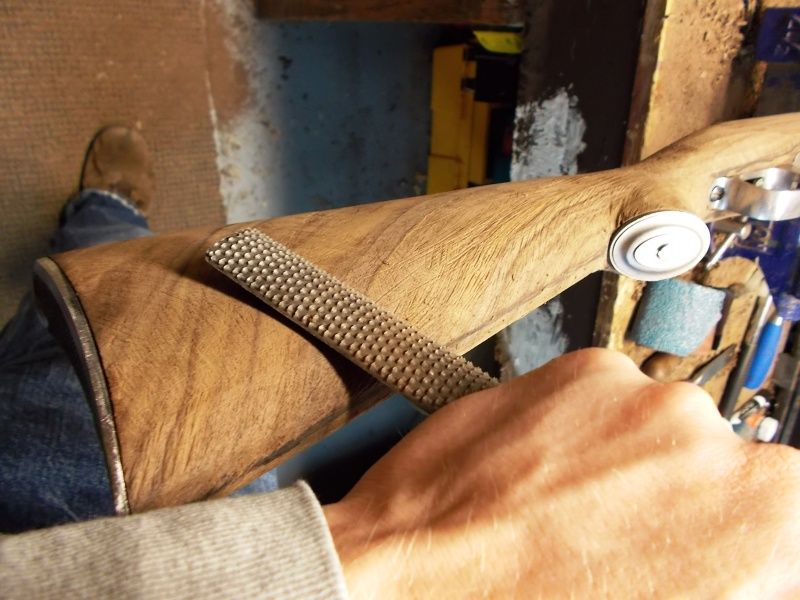   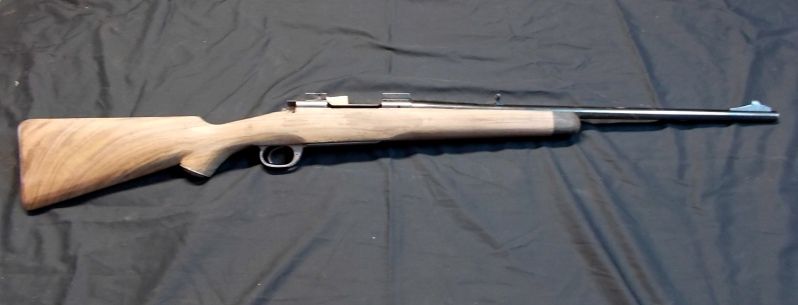 The next big hurdles to cross will be shaping out the cheekpiece and where the grip meets the rest of the butt. "If the women don't find you handsome, they should at least find you handy." | |||
|
| One of Us |
I like the dark color.... the lines are beautiful. | |||
|
| One of Us |
Starting to refine and shape the cheekpiece. I also got the bolt "notch" and ejection port cutout shaped in. 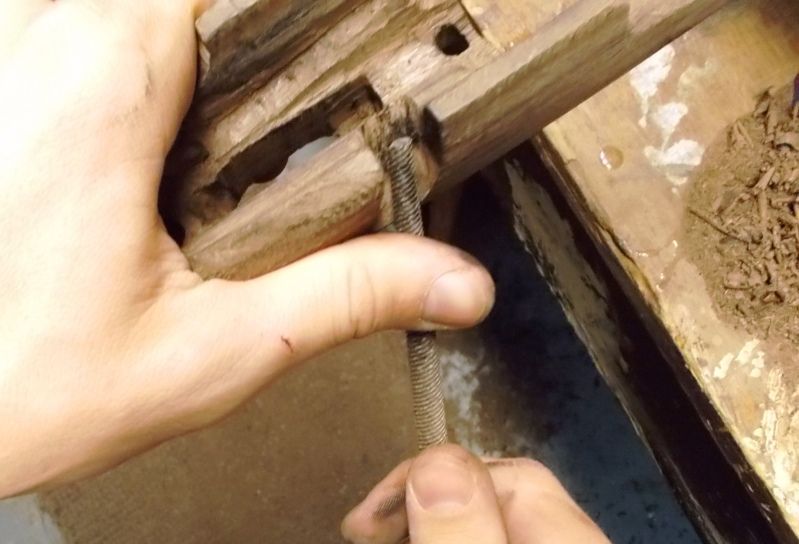  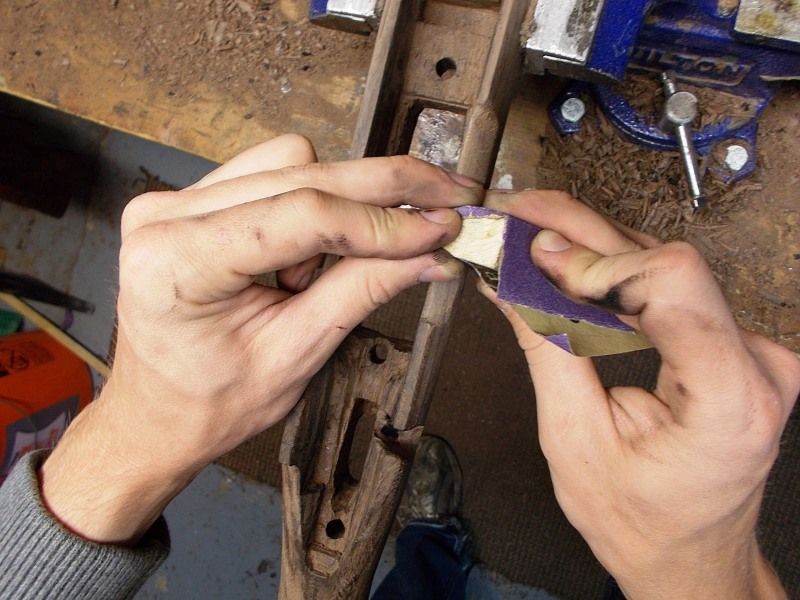 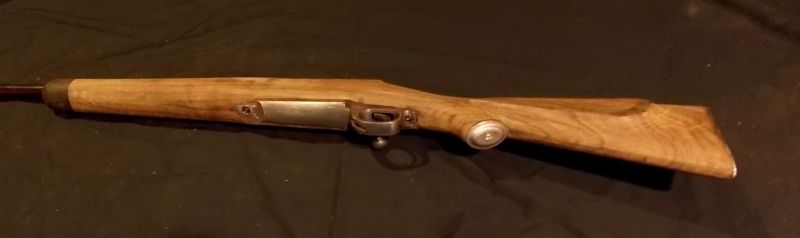 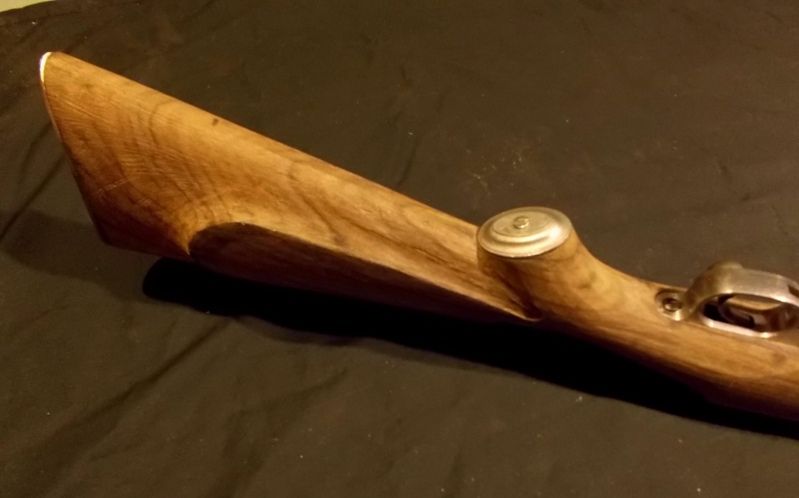 It took many tries for me to set up the lighting to cast the right shadows on the stock for these photos- trying to highlight the shapes and contours while not killing the color. 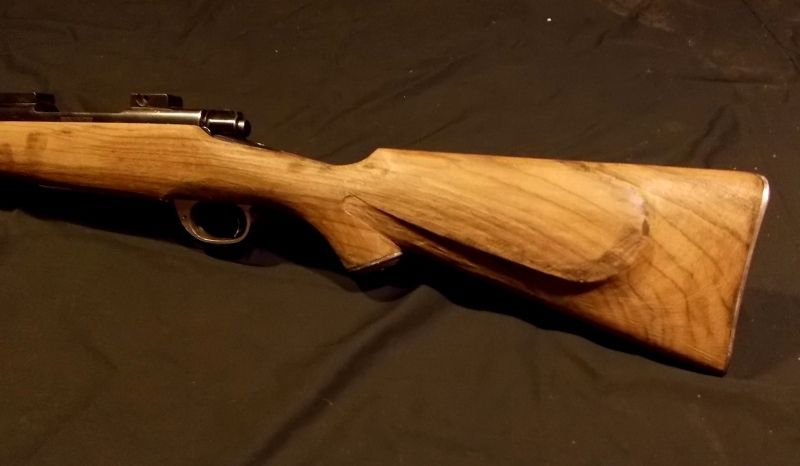 I'm not positive yet how I want to continue shaping the cheekpiece into the grip, but I'll figure it out. I'm not completely satisfied with the carving I have done in that area, but have left enough wood that I can make some changes. So far I am pleased with the dimensions I have put in the stock too... it seems to be fitting me well.  Weighs just over 8 lbs. as photographed above. It may be tough to tell but the fore-end is much slimmer than the last time I posted. "If the women don't find you handsome, they should at least find you handy." | |||
|
| One of Us |
Refining the cheekpiece and shadow line. 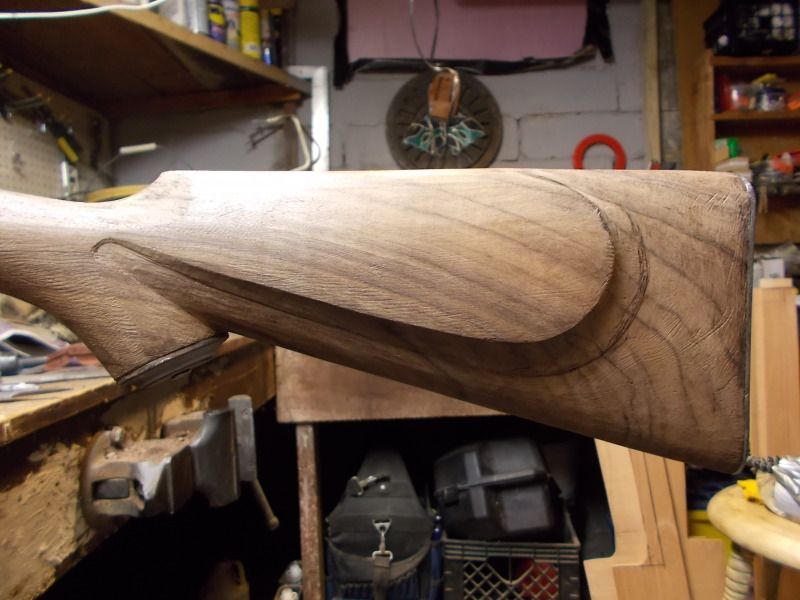 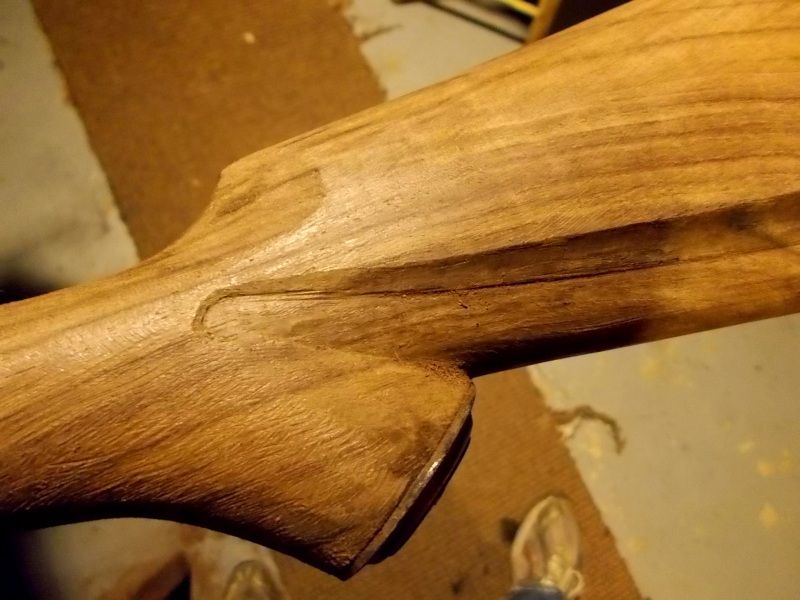 I'm not 100% on the little hook extending into the grip yet but can always just erase it off if I want to (or screw it up). "If the women don't find you handsome, they should at least find you handy." | |||
|
| one of us |
I love to see a man with patience, since this started in April. Great work so far. Larry "Peace is that brief glorious moment in history, when everybody stands around reloading" -- Thomas Jefferson | |||
|
| One of Us |
You might want to look at the way Dale Goens handled this area as shown in Monte Kennedy's book on Checkering and Carving Gunstocks. Not quite as curly as your version but still quite unusually attractive IMO. FWIW AFAIK the first version of this style cheekpiece was done by Harvey Rodgers in the '30s, as discussed by Michael Petrov and others. Great work so far, keep up the pics! Regards, Joe __________________________ You can lead a human to logic but you can't make him think. NRA Life since 1976. God bless America! | |||
|
| One of Us |
Thanks Larry!
The examples on page 271-272? It looks good and I could probably do something like that if this curl thing doesn't work out, but I really like this checkering here.. and the entire thing in general: http://www.hallowellco.com/hen...n%2022%20cheetah.htm It works well with the round cheekpiece that doesn't go into the grip, and I'd like to try and do something like it with the shadow line extending into the grip. We'll see what happens. Thank you for the input and the little history lesson! "If the women don't find you handsome, they should at least find you handy." | |||
|
| One of Us |
This past weekend I spent time fitting the grip cap and buttplate tighter... maybe 90% done with that task here.  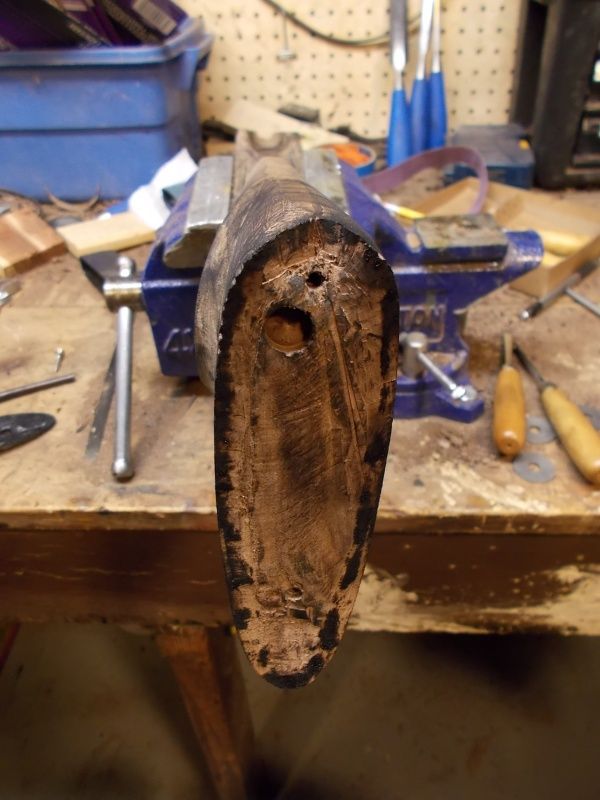 You can tell how much cast-off is in the stock based on the buttplate screw holes and the holes originally drilled into the blank, which were on center. The sling studs (Dakota) are next on the inlet list. I also did some file work with the bottom metal, making it flush with the wood and matching the stock contour fore and aft. 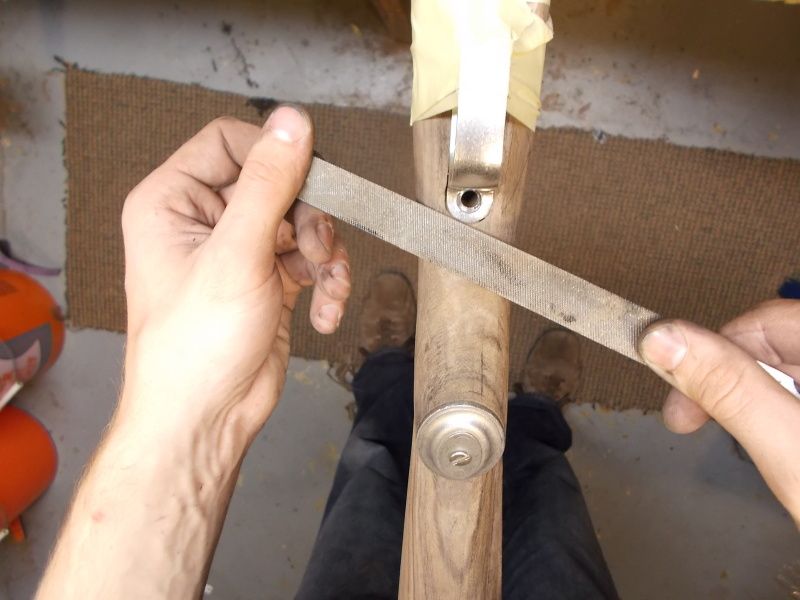 The trigger guard bow was a little bulky, so I did some more filing to thin and contour it a little (and hopefully improve the appearance).  I found out the floorplate latch is made out of a different steel than the rest of the bottom metal, because it is much harder than the other pieces. I wanted to file some grooves into the round portion of the floorplate latch that sticks into the trigger guard to give it some grip... and none of my files could do the job! I had to pull out the Dremel to cut in some grooves. "If the women don't find you handsome, they should at least find you handy." | |||
|
| One of Us |
Lovely indeed. Its always nice to follow the various stages a customrifle goes through. I still do not understand why americans have grown so found of fat forends?. DRSS: HQ Scandinavia. Chapters in Sweden & Norway | |||
|
| One of Us |
Good question, and thanks for the comment. Personal preference? So far I'm not a big fan of really skinny fore-ends that I have to essentially pinch with my fingertips to get a good grip (and square-ish fore-ends too). I want it to fit comfortably in my hand. I'm going to be slimming the sides down some (it does look a little bulky yet) but like the fore-end depth as-is. Last night I got the swivel studs started. I began by marking where I wanted the studs located and then super gluing them to the stock so I could mark around the edge. 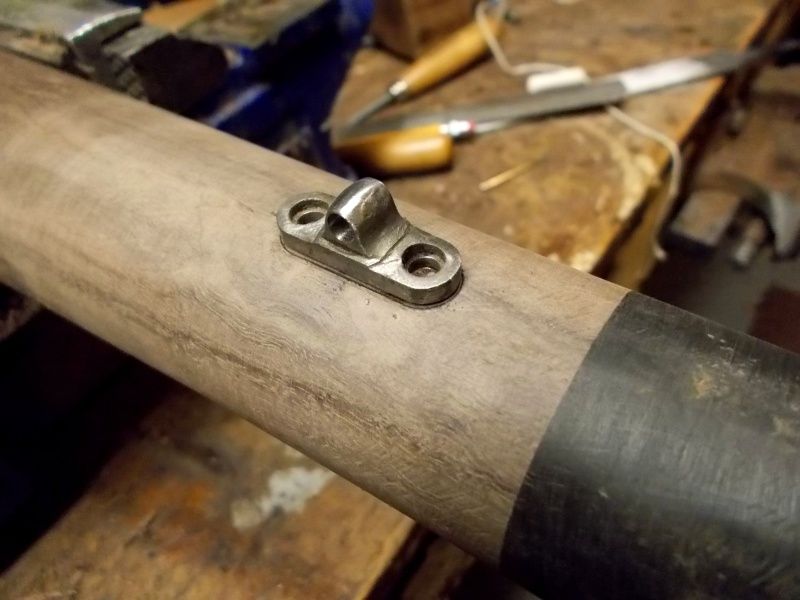 Then I started digging. I used a handful of small chisels but mainly this small gouge to chisel out the inlet. 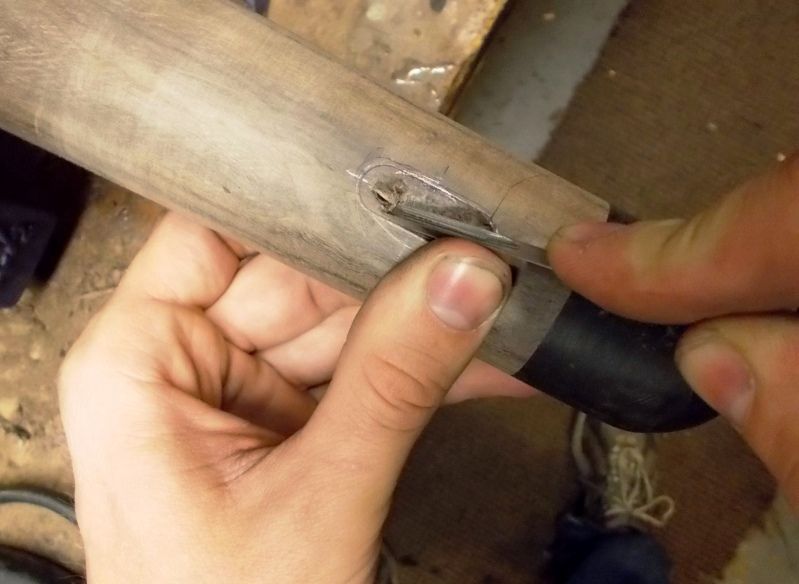 The tried and true inletting black came back out and was a big help in showing where I needed to work. A dremel bit with some electrical tape on it worked well to handle the studs without getting too much inletting black on my fingers. 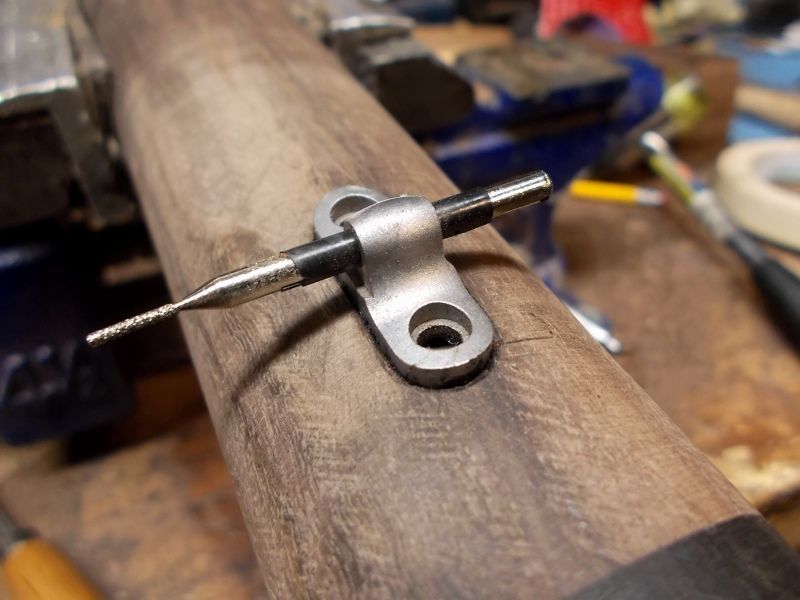 Now both are fitted to the stock and inletted maybe 1/16" deep. A good start. 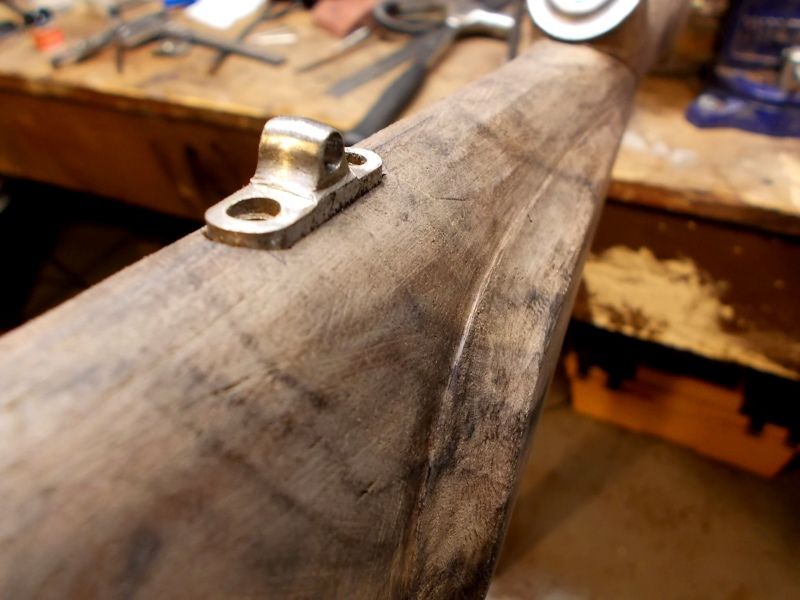 "If the women don't find you handsome, they should at least find you handy." | |||
|
| One of Us |
The swivel studs are in! Can't say I'm really satisfied with inletting job I did, but it could be worse considering this is the first time I've chiseled them in versus using power tools. 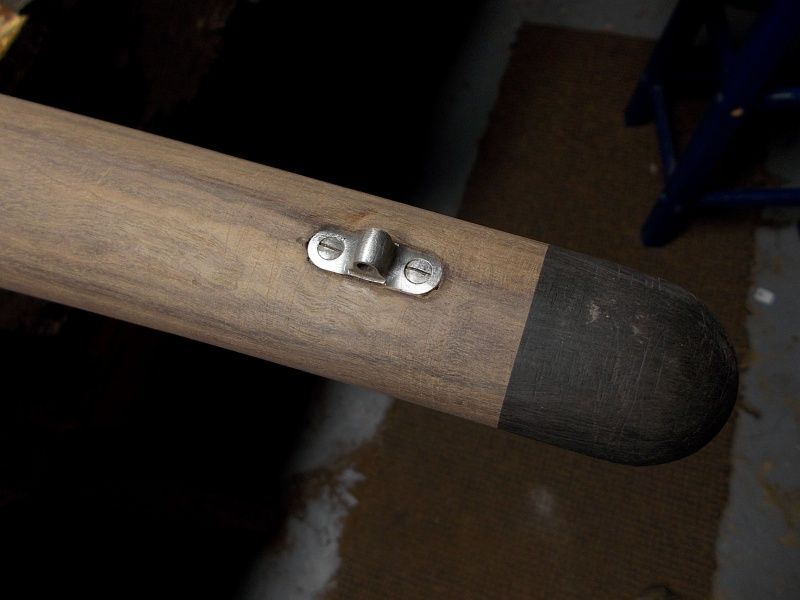  "If the women don't find you handsome, they should at least find you handy." | |||
|
| One of Us |
I wanted to get another look at the entire thing (with all of the hardware installed now) before I start sanding and finishing.   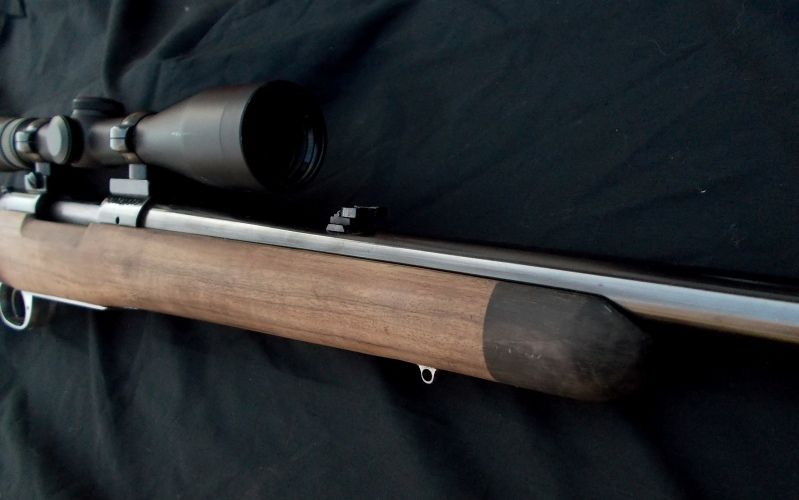  A little color preview (after some sanding): 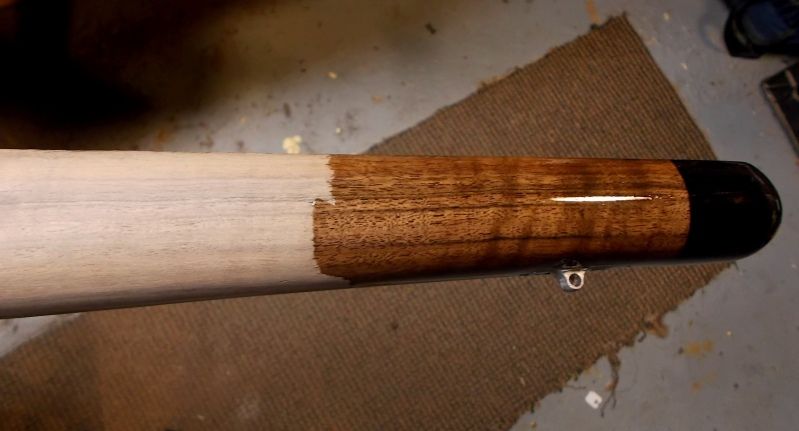  "If the women don't find you handsome, they should at least find you handy." | |||
|
| One of Us |
Time to start sealing the wood... I've had good results with spar urethane cut 1:1 with mineral spirits so that's what I'll do for this stock. 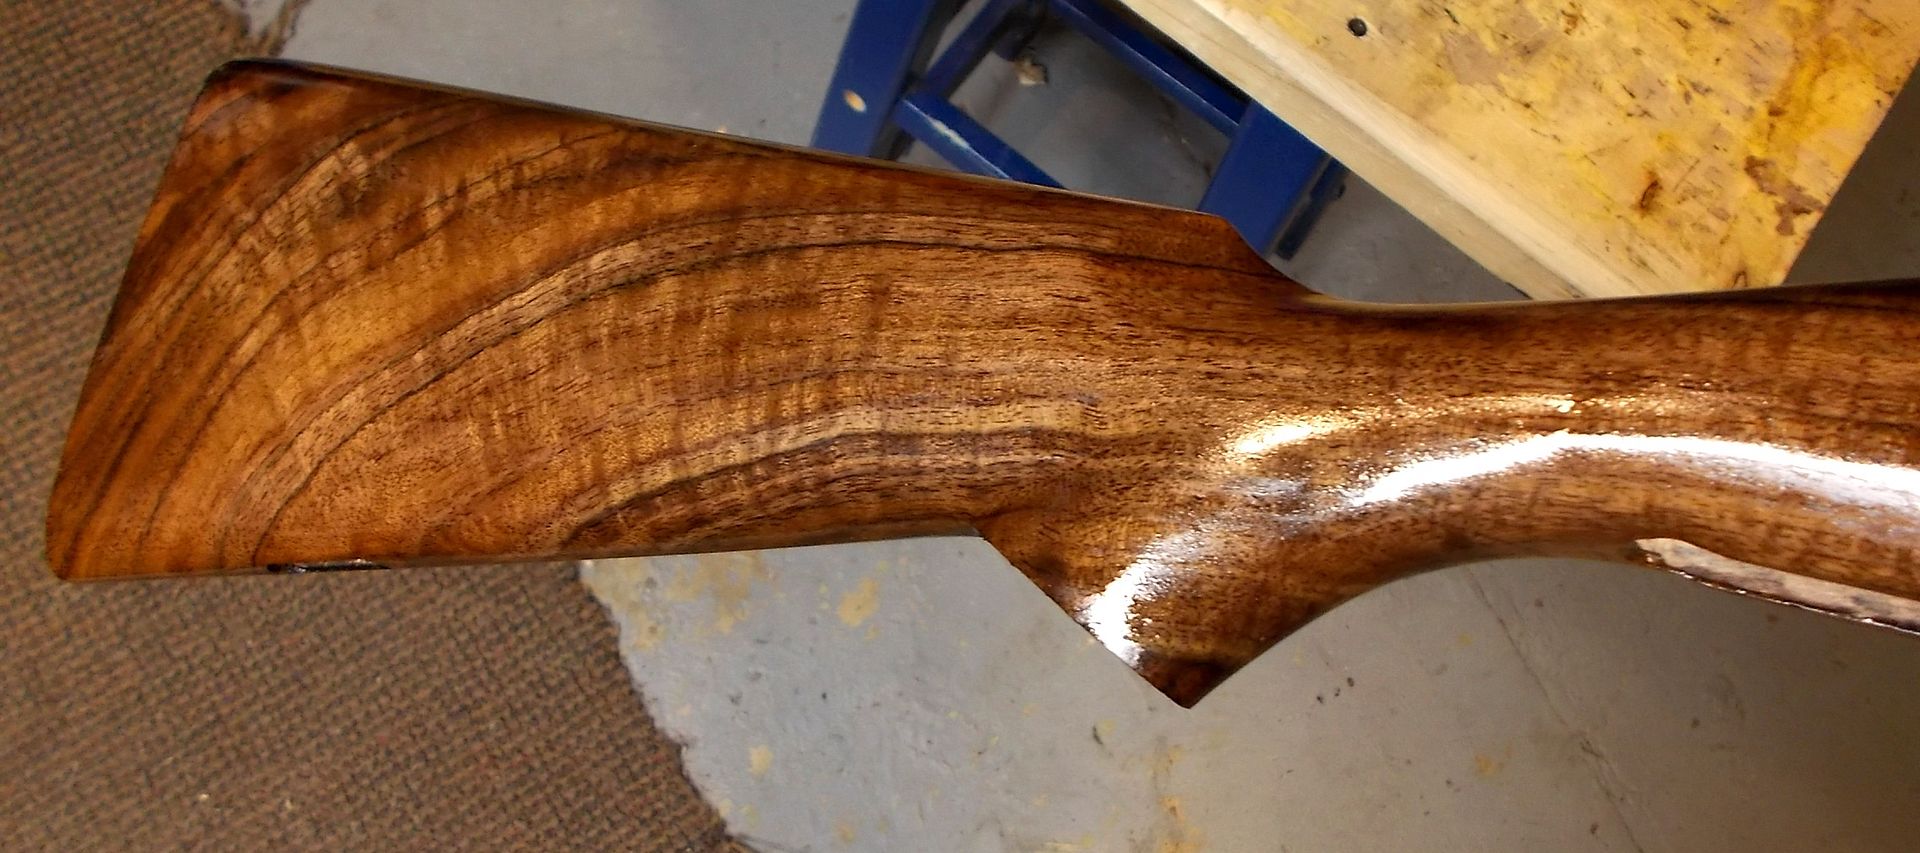 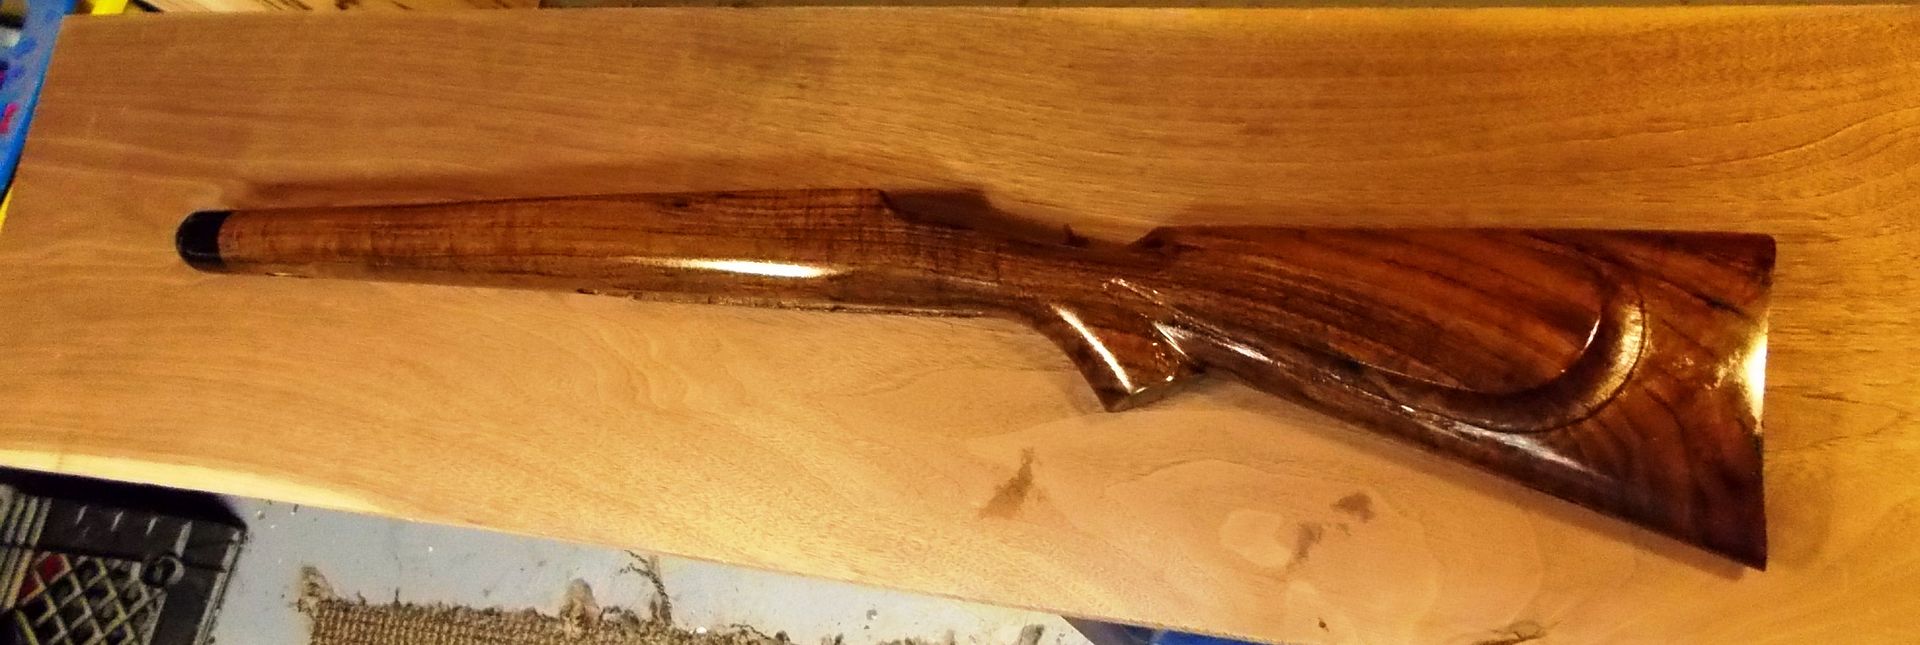 I think I can handle looking at that grain while sitting in a deer stand... The pores are pretty fine for the most part so it didn't take too much to saturate the wood. "If the women don't find you handsome, they should at least find you handy." | |||
|
| one of us |
Looking great! You can borrow money but you can not borrow time. Go hunting with your family. | |||
|
| One of Us |
Thanks Harry! Here's the barreled action prepped and ready to bed. Pillars cut and grooved, and clay, tape, and wax in place. 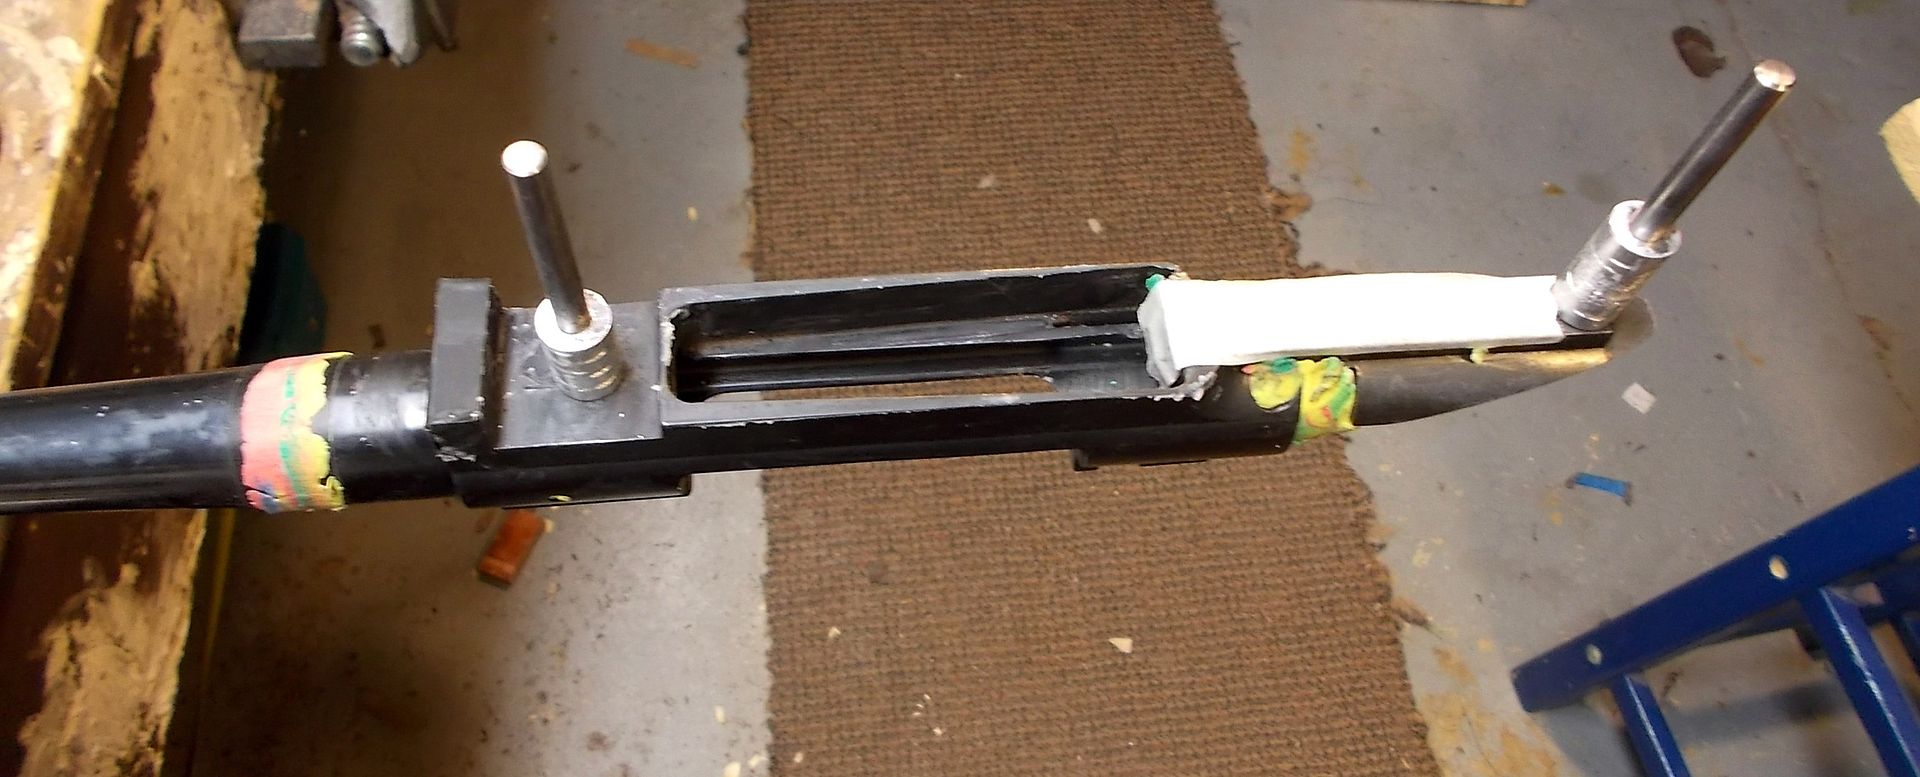 The inletting loaded with Devcon. I essentially did the same thing with the barreled action. 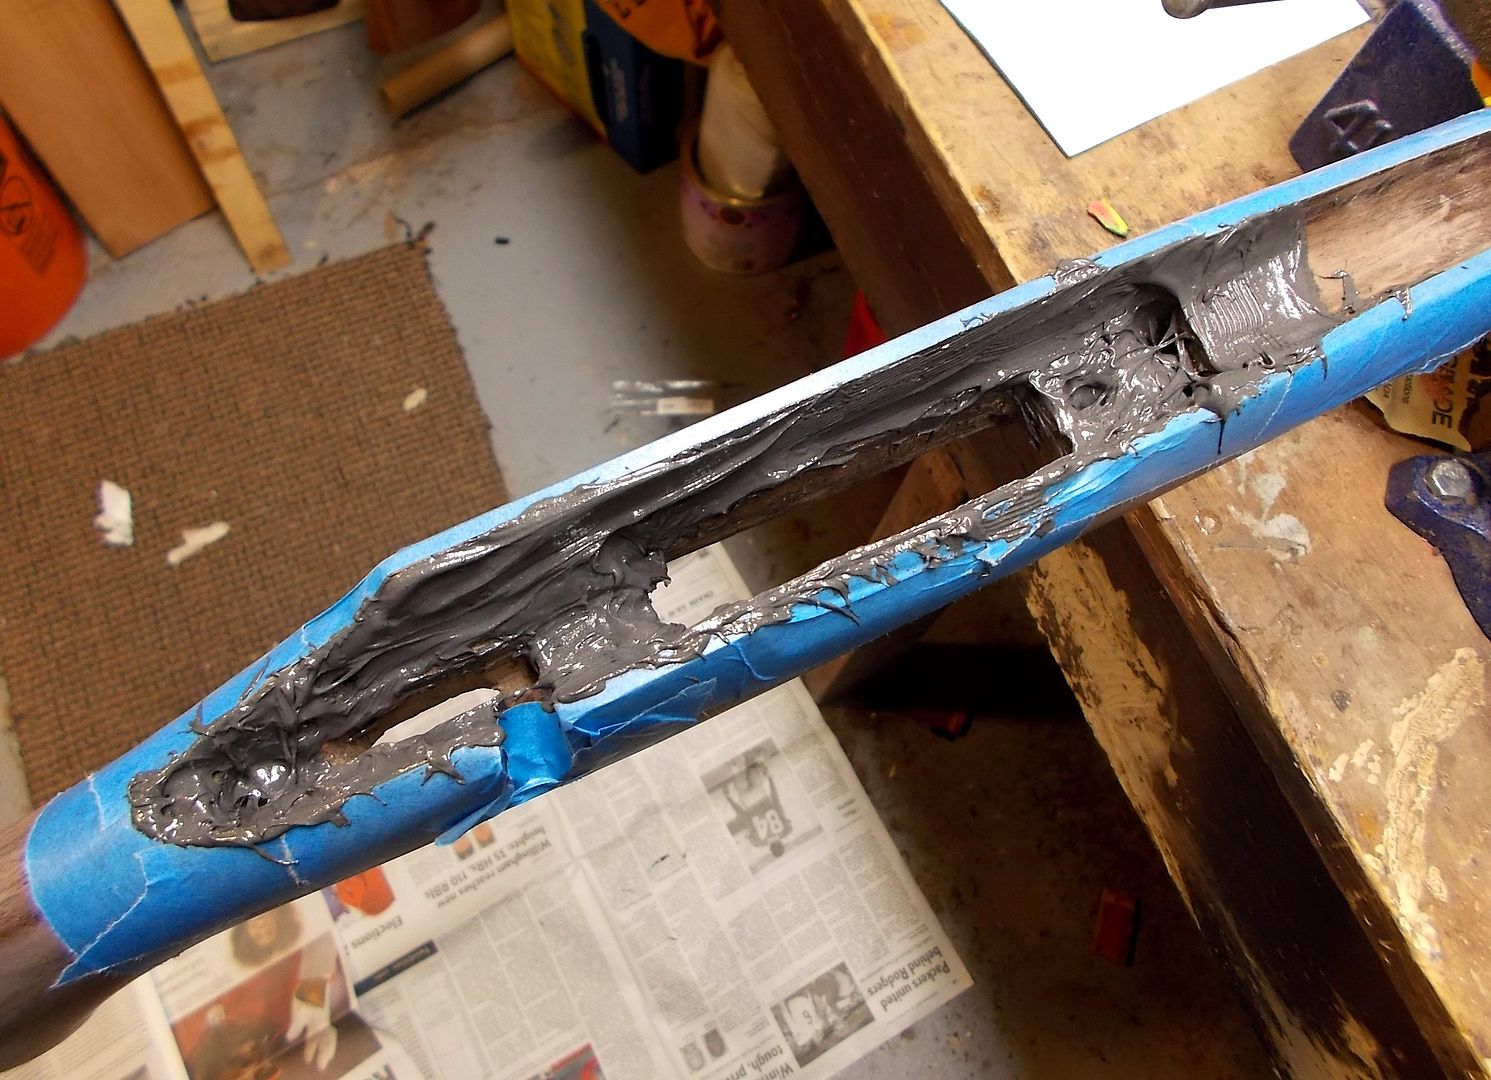 Right after removing the barreled action from the stock, this is what I had (no cleanup yet). Looks pretty good. After cleanup the barrel is free floated up to the first 1". 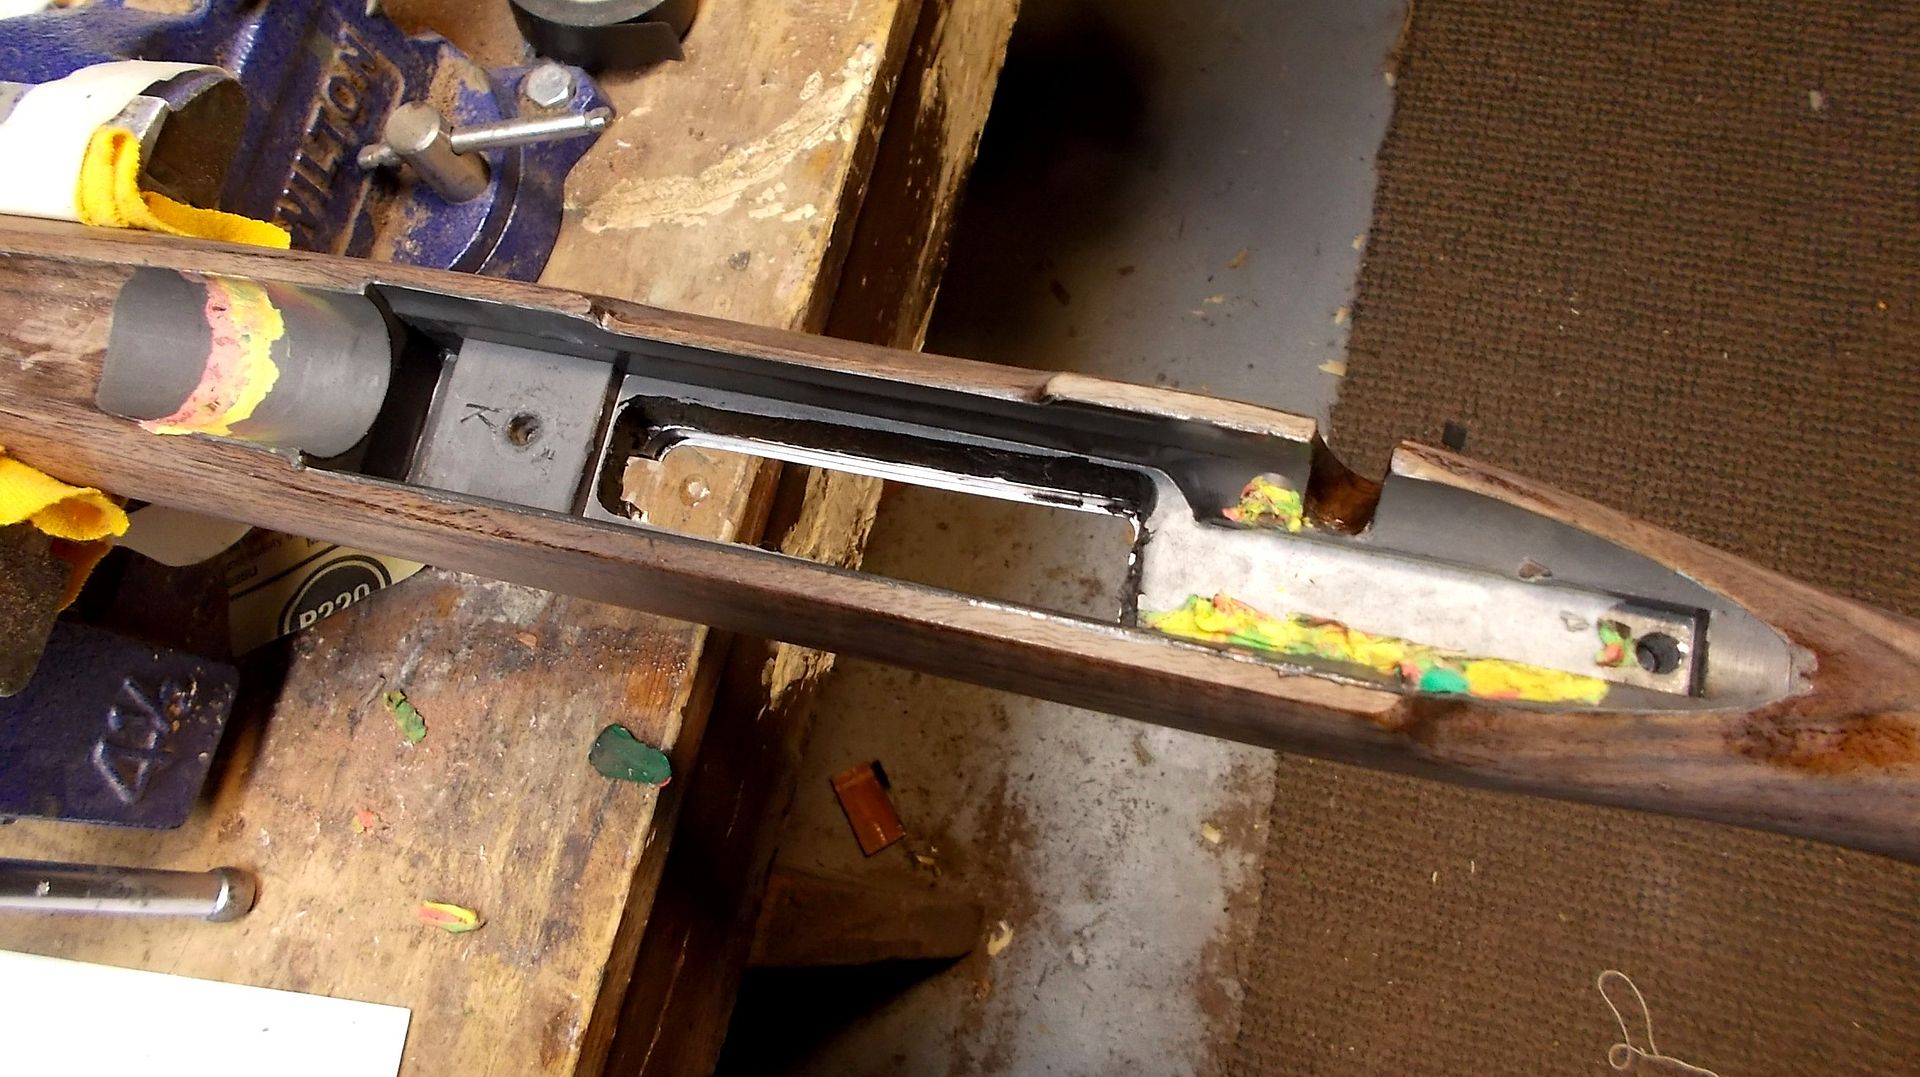 Here's the bottom metal bedding before cleaning. I don't think the void in front of the trigger cutout will affect anything (except for being ugly).  So... overall I'd say I did a good but not great bedding job. A hair-thin layer of epoxy snuck over the tops of the pillars and may/may not chip off, and there's some voids in non-critical spots, but the bedding fits very tight without binding up and the rifle feels rock solid together. The proof will be on paper once I get it to a range for sighting in. "If the women don't find you handsome, they should at least find you handy." | |||
|
| One of Us |
Great work, thanks for sharing! Beautiful piece of wood, as well. Dave | |||
|
| one of us |
I'm jealous, I wish I had your patience. Frank "I don't know what there is about buffalo that frightens me so.....He looks like he hates you personally. He looks like you owe him money." - Robert Ruark, Horn of the Hunter, 1953 NRA Life, SAF Life, CRPA Life, DRSS lite | |||
|
| One of Us |
Thanks fellas!
Interesting. Haven't heard of heating the metal during inletting before, but then again I've got a lot to learn. I think I'll grind out the bad spots and fill them back in with Devcon when I get back to work on the bedding. The real patience will come into play during this weekend's deer opener... sitting in a stand can drive me close to insanity but hopes of fur in the crosshairs motivates me to keep still! I sighted in the rifle last night and it printed a couple of 1" groups at 50 yards (with Remington Premier 130 gr. Sciroccos). Not the best, but I don't need benchrest accuracy for whitetail deer. I'll hunt with it this weekend and then get right back to work. "If the women don't find you handsome, they should at least find you handy." | |||
|
| One of Us |
Same here, I like the profile of the stock and the lines of it. Forend looks right to the rest of the rifle...now that your hooked it'll only get easier everytime now! _____________________ Steve Traxson | |||
|
| One of Us |
Thanks srtrax... I've done some semi-finished rifle stocks before but this was my first to do by hand from a blank so I definitely learned a lot from it. Still more learning left to do, because I'm thinking about rust bluing the hardware and I haven't done that before. I didn't see any bucks this weekend... plenty of does but I didn't get a doe tag in the lottery. At least the rifle was a pleasure to handle for a couple of days and I wouldn't change the dimensions if I were to do it again- and I did reach my goal of having it semi-finished (shootable) in time for deer season. 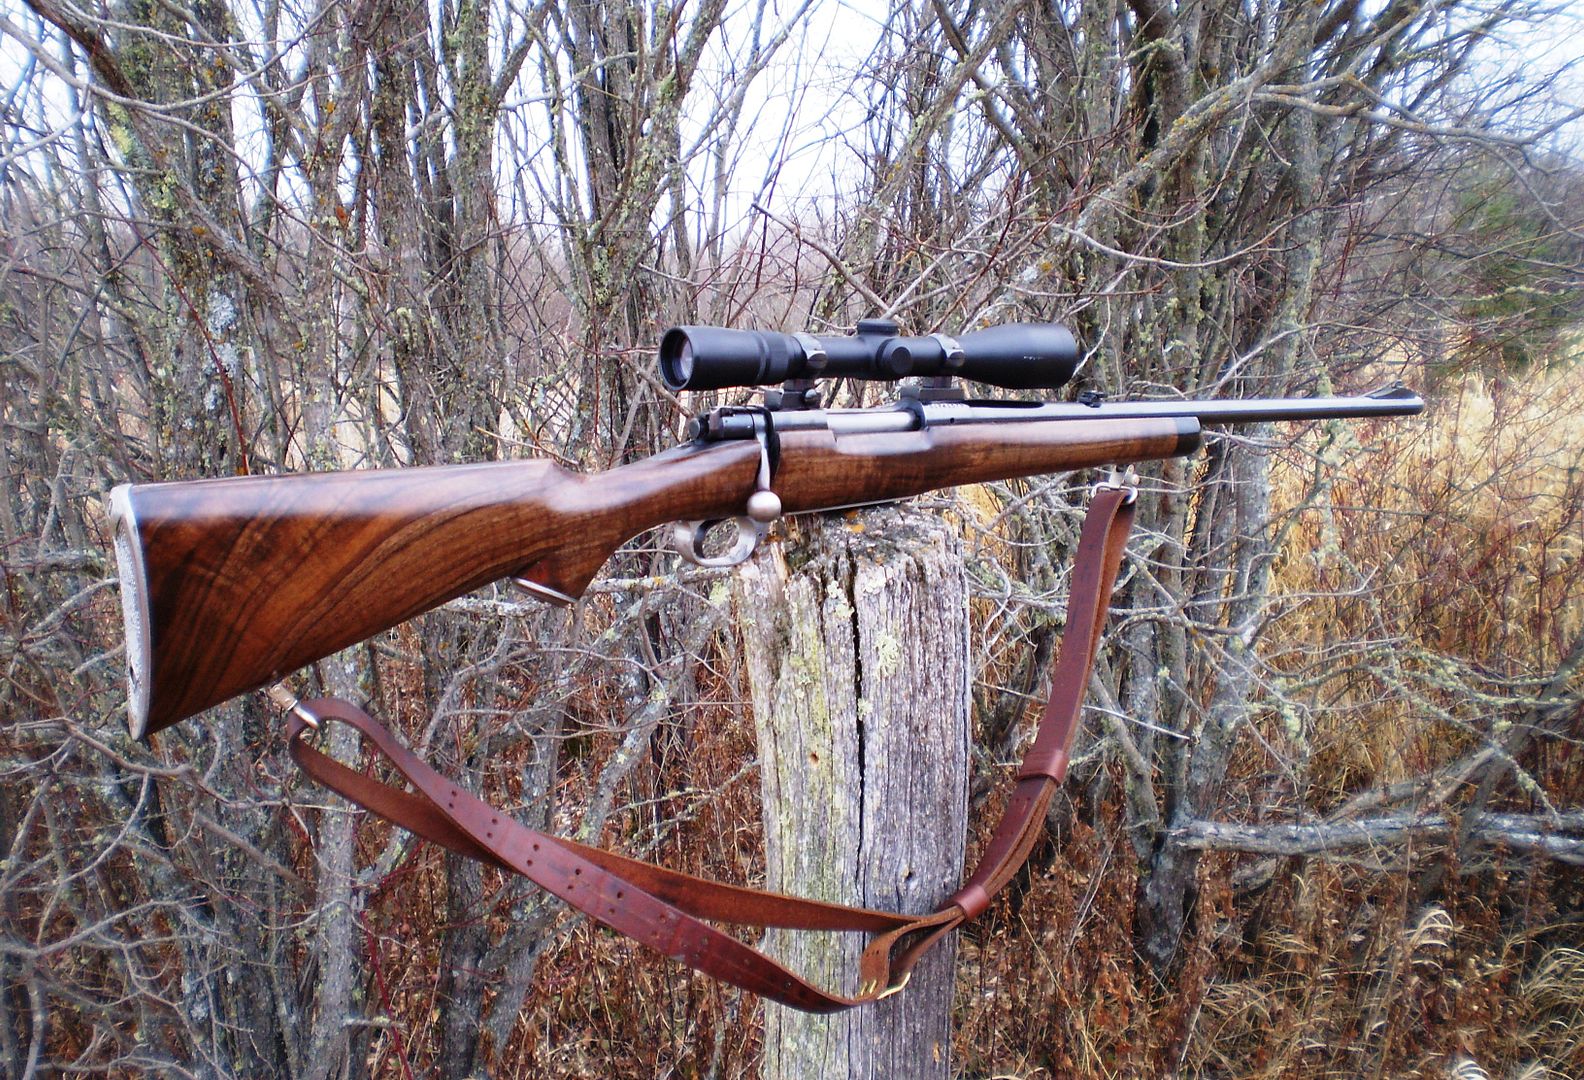 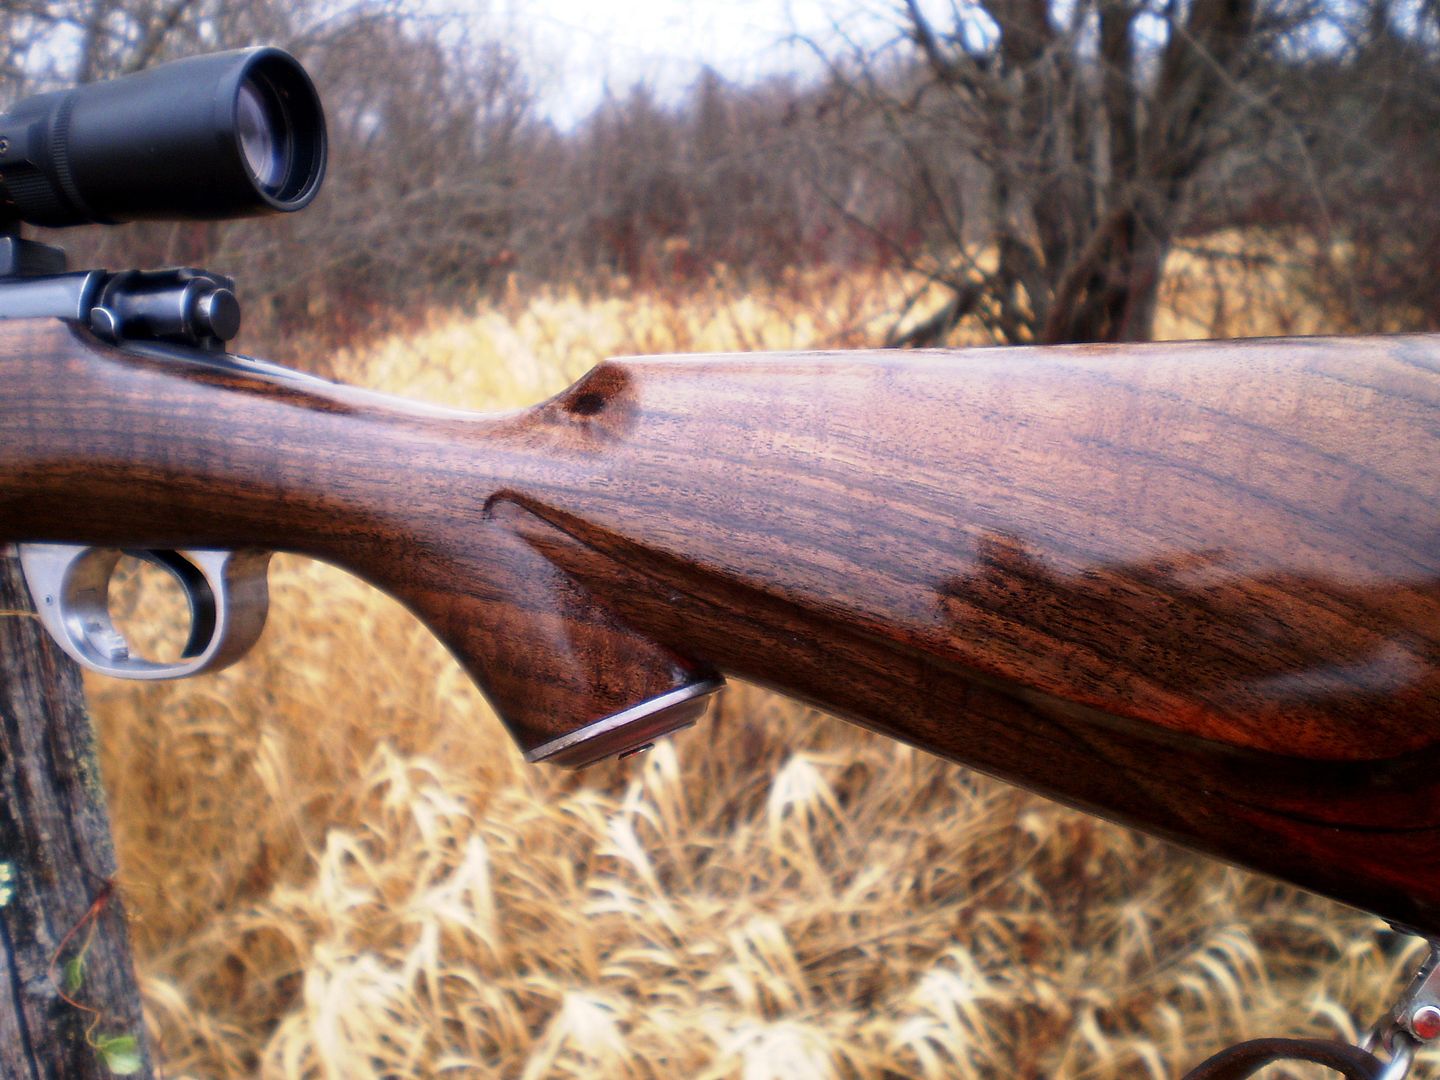 There's plenty more work to do finishing it and doing a nice job instead of a hasty, just functional finish means a lot more time. I still have to polish all of the steel stock hardware too. At least I can start drawing out the checkering pattern now... I'm looking forward to that. "If the women don't find you handsome, they should at least find you handy." | |||
|
| One of Us |
I hunted hard again this past weekend without seeing many deer- five two weekends ago and one on Saturday. Then in the final few minutes of the rifle season yesterday evening, I saw couple of small does in a clearing less than 100 yards from where I parked my car. I made the 50 yard shot to one of them and now it is hanging in my garage. By the time I dragged it to where I wanted to dress it out and had my knife out, it was pitch black already. Sure, no trophy by most standards, but I'm pretty happy with it after hustling to get this stock ready in time. It will be a trophy for the dinner table. Now I can resume working on the stock and hopefully have it checkered and finished by the new year! "If the women don't find you handsome, they should at least find you handy." | |||
|
| One of Us |
Obligatory photos... 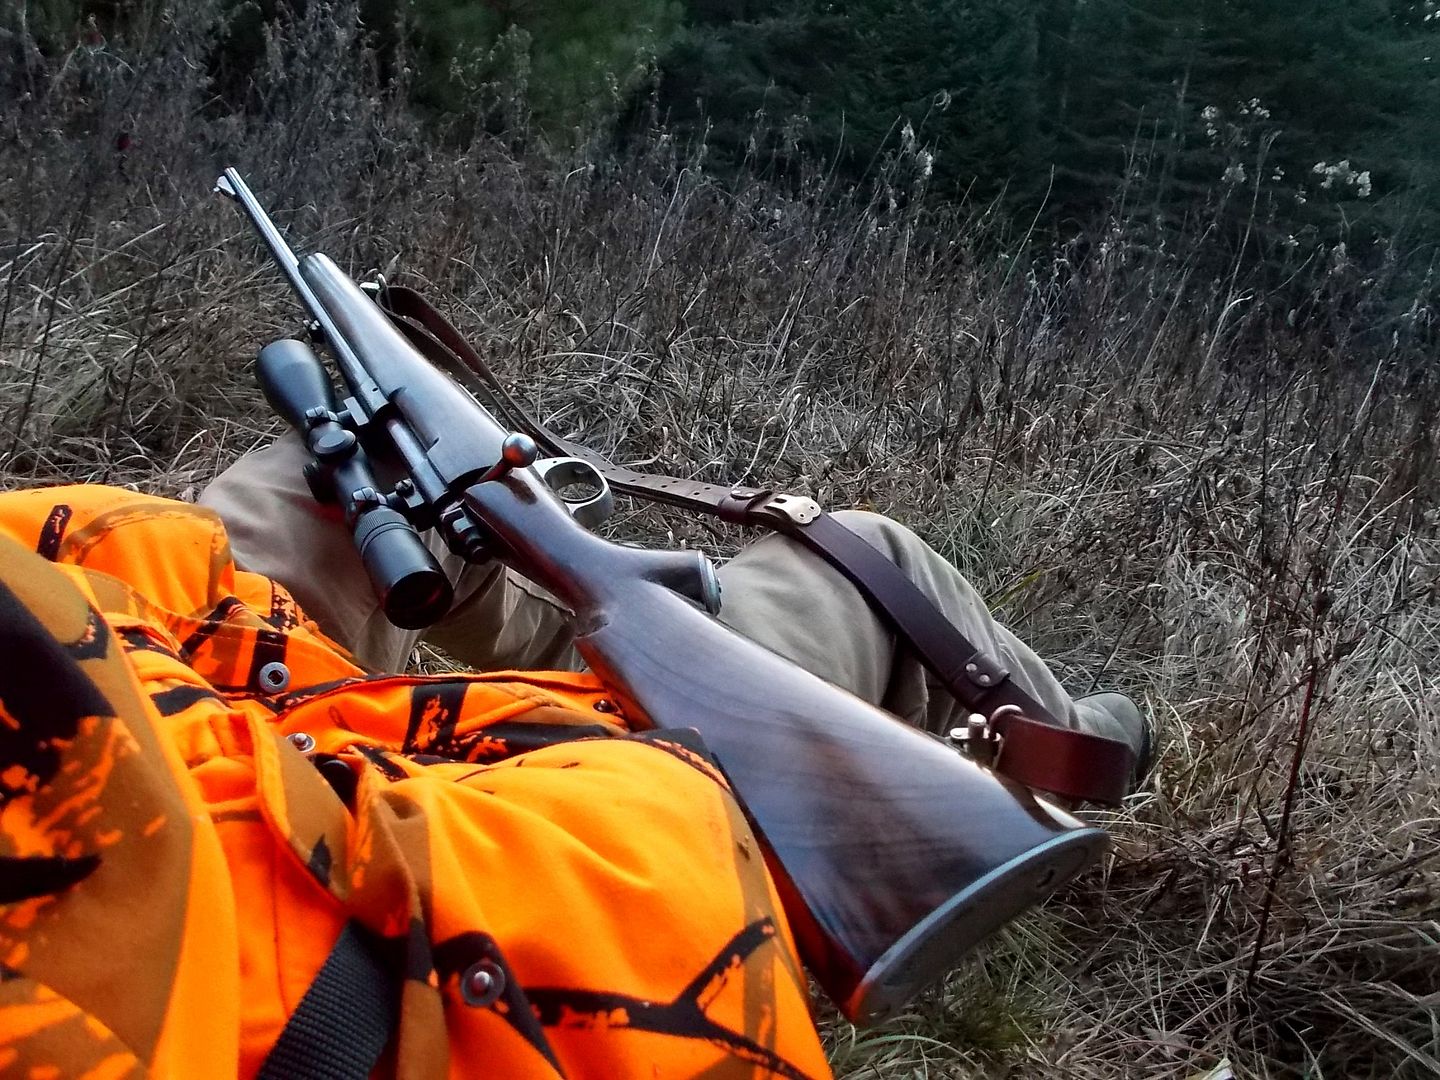  "If the women don't find you handsome, they should at least find you handy." | |||
|
| one of us |
Great work, wish I had your skill set. NRA Life Member, Band of Bubbas Charter Member, PGCA, DRSS. Shoot & hunt with vintage classics. | |||
|
| Powered by Social Strata |
| Please Wait. Your request is being processed... |
Rifles Custom Built Rifles

Visit our on-line store for AR Memorabilia