 Guns, Politics, Gunsmithing & Reloading Bullet Making
 Go | New | Find | Notify | Tools | Reply |
| Re: Start-up costs? | Login/Join |
| one of us |
Thanks guys. It's .358, FYI. I'll check out Richard's site. Sounds like such fun, and right up my alley, but I'd need to approximate an A-Frame or the like in order to make it worth my creative while. | ||
|
| one of us |
Also, Martin, how do you control the rolling of the inside of the jacket, so that it comes out uniform? If I get you, you're just applying force on the jacket from the top, and making it lump inward. How do you do this and still leave the top half of the jacket ready for point forming? I'm very interested. I read that Swift's original A-Frame had a small hole in the partition as well, I guess for the same reason. | |||
|
| one of us |
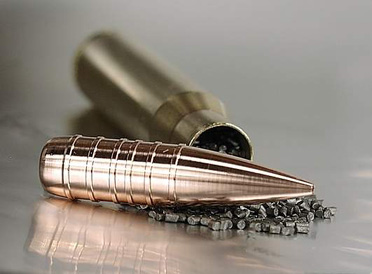
Also, Martin, how do you control the rolling of the inside of the jacket, Bwana-be The amount of copper that is rolled down is determend by the size of the top punch.. ( The jacket is held by a Core seat die .And a top punch od used as i said to roll the inside of the jacket down over the botton core .how it's controled is detemend by the diamator of the top punch. if the jacket has an inside diam of .300 and you want to partion half a jacket inside lenght you would use a top punch of .292 or somthing close the more you roll down from the inside the thiner your remaining wall will be..  I tried to show some of the guys this through pictures but as you can tell i am stuck trying to use a still video capture camera.  (The gray spot is the hole and the lead showing..) Everthing is done using a swage press. once the bottom half of the bullet's been partioned as you can ( kinda make out ) there is a small bleed hole . I then flux it top half of the jacket and place the top core into the jacket and melt it down this melts the two half's together and bond's the jacket to the lead Remmber this is MY way of doing a partioned jacket And the word for rolling the inside's down is best decribed as Drawing the inside of the jacket down remmber the copper is very.! soft and since it goes through reheating over and over again there is no ( lumping of the copper inside walls) so that it comes out uniform? If I get you, you're just applying force on the jacket from the top, and making it lump inward. How do you do this and still leave the top half of the jacket ready for point forming? ---------- Once the two core's have been melted together it looks like any other normaljacketed core ready for point forming it's just lead riding at the top of the jacket I'm very interested. I read that Swift's original A-Frame had a small hole in the partition as well, I guess for the same reason. -------------- Yep and really it's a better way if ya think about it if you ever hit anything with the bullet and it mushrooms back to far ( with todays partioned bullet )you can lose the top part of the core . the old way the two half's are melted together in the jacket through the small hole. I left out a few things.and sorry once again for the really bad pictures . i have caught hell for them before. O and if i did not already mention it the bottom half of the jacket can be threaded to make the bond harder to break . Pottsy | |||
|
| one of us |
Quote: ========================= ROTFLMAO  Ya think there crappy lol how do you think i feel when someone asked to see picture's to prove Ya think there crappy lol how do you think i feel when someone asked to see picture's to proveit i just kinda hunker down and take the butt kicking for not buying a camera of quaility.. Now just plain old tappering a jacket First thing's first your going to have to start with a VERY Heavy walled jacket in the 0.80 range so the tapper works out right but after that it's just using a plain old tappered bit somthing that looks kinda like a long counter sink bit with the nose /end busted off and the jacket is just chucked up into the head stock of your lathe chuck the bit in the tail stock set the quil deapth were you want it to stop and dill the tapper into the jacket once your finished repet when that's all done your going to need to reheat the jacket's up to resoften them the bit looks somthing like these  i really dont care for tappered jacket's there a big pain in the ass to make and the normal jacket works just as well if you need to slow the expantion down on the bullet use heaver jacket walls or change the lead to babit mix both will make the bullet do the same thing as tappering the inside of the jacket ..It really come's down to the bond you wind up with between the lead and the jacket and how thick the walls are and the type or mix of lead your using every thing else is just fluff and for show. I would have posted my own picture of the bit's but once again i would get my butt handed to me for blury picture's | |||
|
| Powered by Social Strata |
| Please Wait. Your request is being processed... |

Visit our on-line store for AR Memorabilia
