It only took one good day to put it together, but depending on the finish, I've got three days it took and evneing to do the stain and then a good 24 hrs to dry and then two coats of polyurethane at 24 hrs each. I had my son help ripping the plywood and the assembly I done myself, as you can see it isn't that bad.
I got the plans from the internet. I asked on a forum for some plans and this was the one that I liked the most. Was very glad that I chose this one. Yes there is a lot of storage under the top bench and under it on the floor. Very well tought of design. Here is the site for the plans. http://www.dennymac.com/bench It was easy to build and the only thing that I might have done different were to cut a foot off of the legs. 6 inches anyway.
Petander, Nice set-up. I really don't think that you can have too much space. The more you give yourself the better. This is a upgrade from an older table that I had from my dad that he built in the mid 50's. Now I can add to it. One thing that I don't have is enough light but that can be corrected easy enough.
Both of these reloading benches look great. Over the years I've used various tables, benches, etc to work on, so I've earned a certificate in make shift and make do. You guys appear to have gotten it right. I've been working on my reloading shed at this new, new to me, house since last fall. First I had to chainsaw a few trees, cut a road down the hill to the chosen spot, level the ground, then bring in the prefab 12*16 shed. Then cut a trench for running power down to the shed, wire the shed, insulate and install a second layer to the floor, insulate and panel the walls, then I could begin to build the loading bench. I took the suggestion of one of the members here for bench top and used 5/8th inch sub flooring for bottom layer then 3/4 inch partical board, then 5/8th A grade ply on top, all glued and screwed together. I suspect I could park a truck on this bench. I used poly porch floor urethane red tint for the bench and battleship grey for the floors. I've got 16 feet of bench top with shelving above and shelves below. I was tired of taking one press down to use another and not having space for my 'stuff'. There's something about reloading that 'stuff' just seems to accumulate and now I've got place for my 'stuff'. Good work guys. Jim
Posts: 6173 | Location: Richmond, Virginia | Registered: 17 September 2000
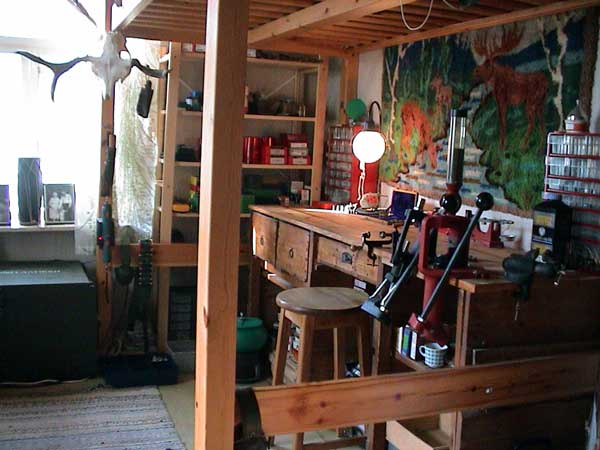
Pecos,the black press is an old CH,the other is Pacific. Not much new here,the table was used as the counter when my granny was keeping a shop here in the -30s.
Refinishing,strengthening,bolting things properly. This house is more than 100 years old, we simply like it here in the woods.
A closeup of an ancient bullet scale,mostly for decoration but can be used to comparing weights. Shows one grain difference,idiotproof.
The item in the front is my home insurance.
Posts: 81 | Location: Finland | Registered: 10 May 2003
I built sometyhing similar to the bottom portion wihtout the top cabinet parts. I have been trying to figure out what I was going to use on the top for a cabinet. I bought a steel locking cabinet from a office supply store and it sits right next to the bench and holds absolutely EVERYTHING I need it to.
I built the bench out of a new SOLID oak front door that I had in the garage and never used. I used 4x4s for the legs, cross braced them all and mounted a lower shelf that takes up half the bottom of the entire bench. Needless to say this thing is sturdy as all get out. I used metal braces for all the joints and conections and screwed it all together. I wasnt even trying to but it came out 100% level somehow lol The garage has a built in grade to it for water run off so when the legs were cut they were cut 1/4 shorter on two of em on accident, I installed these on the end closer to the back of the garage at the higher portion of the floor and this caused the bench to seat perfectly level. I had in no way planned this at all, I just took advantage of the badd cuts that were made by Home Depot lol
It is a damn nice bench if I do say so myself. Not bad for a guy who never builds or makes anything by himself I am in no way a handy man. Hell I call a buddy over if the toilet backs up

 Guns, Politics, Gunsmithing & Reloading