 Guns, Politics, Gunsmithing & Reloading Cast Bullets
 Go | New | Find | Notify | Tools | Reply |
| Sprue plates | Login/Join |
| one of us |
I have lapped sprue plates for years and years with so-so results. Some good, some not so good. Now that I am making my own molds and cutting 1/4" stainless to 3/16" for sprue plates I am having trouble again because I polish them on glass. In some cases I see a little light between the plate and mold top. I have lapped with everything from wet or dry glued to glass to lapping compound on glass. I even tried new oilstones. I have tried every lapping motion. It is not possible to get them flat. The edges always cut more then the center. I even tried putting a stick in the sprue hole and put all the pressure in the center. Lay a straight edge on the plate and it rocks. I wind up putting the plate back on the mill and just skinning it with a 3/4" end mill. I make sure that one cut is centered over the sprue hole. I de-burr and just touch it on sandpaper on glass and there is no more light between it and the block. My conclusion is that trying to lap a plate and keep it or make it flat is a waste of time. Short of a surface grinder, the end mill is the only way to fix them. It is a pain to take a poor fitting plate and work on it for hours and not improve it in any way. Sometimes it is worse. What have you fellas found with this?  | ||
|
| one of us |
Perfection is a wonderful thing. Not always needed, but sure nice to achieve. Do your sprue plates cut the sprue cleanly, without smearing? If so, good enuff, sez I. Lee intentionally "bows" the plate-to-moldface interface to allow for better venting. Either that, or it's just an excuse since they can't cut 'em flat either. <GGG> "Measure with a micrometer and cut with and ax;" that's my motto! <GGG> | |||
|
| one of us |
Quote: In the case of a somewhat porous material used for plates I give both the plate and the top a couple coats of Rapine mold prep [which is just isophrol alcohol and graphite suspension] which seems to work well. Both surfaces haven't worn the metal yet. This with an LBT aluminum mold and a custom plate from Bob Grennel. With Lee's I do it a couple ways. After rounding/filing off the sharp edges on the mold overline where the plate passes, I rub the plate on a FLAT steel surface using only toothpaste or any very mild polish to in effect 'seal' or burnish those aluminum mold tops. After removing the obvious burrs from the plate with a very small file, I mount it and work the two together with again a toothpaste like lap. I have done same with one Lyman which I've in effect rebuilt. Then I mount a hold down finger ala LBT and adjust the tension on the pivot screw till I get nice, flat bases. Hope some of this helps... Be interested to hear of your mold makin' experiences BTW. | |||
|
| one of us |
Aside from the question of NEED to have the sprue plate perfectly flat and ultra smooth consider two options to do so: a. Use pre-ground steel - available in sheets or strips in a variety of standard thicknesses. b. Use diamond tooling to 'surface grind' on the milling machine. c. Outsource your surface grinding needs. Just my tuppence worth. | |||
|
| one of us |
bfrshooter, if the 3/4" end mill is doing an adequate job then don't waste your time lapping. A flycutter will work even better. A single-bit flycutter can be found for $30-$40. You want one about 2 1/2" so it can do the whole plate in one pass. The multi-bit cutters give a smoother finish but cost more. I made a poor man's surface grinder for my vertical mill by attaching a 3 1/2" cupped grinding wheel to a 3/4" arbor. As long as I take very light cuts and use plenty of coolant it works fine. I use this method to finish my hardened tool steel sprue plates. I don't see the attraction to SS plates. Stainless has a high coefficient of thermal expansion. I'm currently using oil hardening ground plate but it is a royal pain to machine and is probably overkill (and the ground plate still has to be re-ground as a final step because the drilling and countersinking operations will often bow the plate slightly, not to mention the heat treatment step). Mild steel is plenty good for most applications and is what I would use if I were making molds for myself. | |||
|
| one of us |
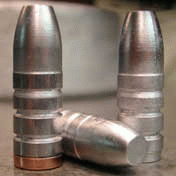
I use mold prep and get no marks on the mold tops. I use stainless because I got a pile free. It is just the right width for a plate. Hard to cut but they work great. Thats why I don't use the flycutter because of the hardness and the problem of holding the steel down. I made a cast iron vise with a left hand and right hand screw to tighten the jaws. Took me 2 weeks. I remove the top table from my milling table and this vice slides on the dovetails and I use the gib to take out play. I clamp the blocks in and use a cherry. I use aluminum and cut a perfectly square block the length I need. I then drill the pin holes and saw the block in half. After milling the inside surfaces and cutting vent lines with the flycutter, I pin the blocks. After I clamp the blocks in the vice I take an end mill and cut the top to be square with the milling head, locate the center and open the vice to drop the cherry in. It takes 15 to 20 min. to cut a perfect cavity. I do not remove the blocks from the vice to de-burr but just open the vice and reach in with a bar and fine sandpaper. I cut dry and hold the shop vac nozzle next to the opening. When the cavity is almost done, I spray WD 40 to polish and keep chips flushed. I made boolits for my 45-70 BFR and my .44 mag, with gas checks, LBT style and have shot groups at 75 yds of 1-1/4" I killed three deer with these revolvers and my boolits this season along with 1 with my cap and ball and 2 with the bow. I am happy. It takes me a day to make a cherry because all I have is a Smithy and no tool grinders. I do a lot of hand filing to get the nose cutting edges shaped. I mill 6 flutes and only take 3 to the nose. I had trouble with the drill rod warping so I harden a piece first, then anneal and cut it. Then when I harden again it stays straight. I also made a bunch of molds for BPCR. This has been a continual learning process to reach the process I use. They make nice boolits with out of round only about .0005". I like the idea of a cup wheel and will have to find some. I did quit lapping because it is a waste of time. The plates that I milled to thickness and didn't lap fit flat on the blocks so thats the way I will go from now on. The swirls also provide venting. I have one pair of Rapine handles and just switch from block to block. I drill a small hole all the way through for the handle pins, then enlarge the holes but not all the way through. I tap the bottom for setscrews. I drop the pins in and put in the setscrews. If a pin sticks when I want to remove the handles, I stick something in the small top hole to push them out. Works like a charm. I also modified all my Lee molds like this as I work on all new ones to improve them. Hey, I'm retired, what else is there to do? | |||
|
| one of us |
ATTENTION SUNDOG! bfrshooter: That was a FINE series of posts on cherry- and mould-making and on sprue plates! Could you get together with Sundog and write it all up for posting on CASTPICS? Maybe Dan or another expert could do a similar writeup on lathe-boring moulds. Just in case we somehow lose these sites and their archives. floodgate | |||
|
| one of us |
Quote: Instead of sawing a block into two pieces to make the two halves, I start with 2 pieces (cut from bar stock), line bore the pin hole through both pieces, fit that pin, then line bore the other pin hole and fit that pin (be nice to have a gang drill that would drill both pin holes at once). Then the outside of the block is milled to final dimensions. | |||
|
| Powered by Social Strata |
| Please Wait. Your request is being processed... |

Visit our on-line store for AR Memorabilia