 Hunting African Big Game Hunting
 Go | New | Find | Notify | Tools | Reply |
| Trophy photo techniques | Login/Join |
One of Us |
Some excellent trophy photos have been posted recently. Ladies and Gentlemen, Please tell us about your or maybe your PH's trophy photo techniques, especially any secrets Photos to illustrate the techniques would be great. Also what should one NOT do? But please keep the discussion civil and non-personal. Just like *******s, everyone has an opinion. I know I have seen some absolutely fantastic photos posted by members here who have taken great care in positioning, highlighting, backgrounding their photos and trophies and personally wish I had some of their skills. I can think of several members immediately. | ||
|
| one of us |
our AR friend JJHACK has some great stuff on his site - scroll to "news and articles" - "hunting photography 101 http://www.huntingadventures.net/ | |||
|
| One Of Us |
As mentioned on the "Big Cat" thread, it's usually the PH who takes the trophy pictures, so it's undoubtably they that should pay special attention to this thread, and what some of the pros have to say! | |||
|
| One of Us |
I have one PH with whom I hunt and he was a professional photographer prior to becoming a PH, that should say it all. His photos are fantastic, my trophies always have shipping shrink | |||
|
| one of us |
I've had some PH/Guides that did a great job, and one that did a horrible job with photos. I wonder which got the most repeat business. The one technique I wish everyone would get over is sitting back WAY behind the trophy, or holding the fish so far out in front of you that your head is the size of your thumb nail. My favorite was a Kodiak brown bear years ago in a hunting magazine. The hunter's head was the same size as the nostrils on the bear. He must have been sitting ten-foot behind the bear. The more natural the pose, the better. One of the better tips I received some years ago for antlered game was to have the horizon behind you, about half-way up the rack. Having those tines against the sky really showed them off. The other tip was to not hold the game in front of you if you are wearing camo. The rack gets lost in the camo pattern. | |||
|
| One of Us |
Be careful when a tracker, game scout takes the photo as they have no clue. Pictures are not centered, heads cut off etc. Answer is get a digital camera and have the photographer stand well back so everything gets into the photo, then cropto get the best part. | |||
|
| One of Us |
 I'm not the pro in my family. My brother is. I've learned alot from him. I still have alot to learn but here are some tips that help me. 1. Take off your hat and sunglasses. 2. The sun should be behind the camera and shining on the animal to reduce shadows. 3. Pull the legs under the game animal to hold it upright. Belly and back shots always look poor. 4. Wipe off excess blood. 5. Remove any intermediate vegetation or objects between camera and subject. 6. Force your camera to use a fill flash even in bright sunlight. (I got this tip from Tony, it works) 7. If you have a flip out LCD monitor on your camera, use it so that the photo can be taken with the camera almost on the ground. Get as much sky behind the horns as possible. Those little shorty desktop tripods are great to have in your daypack. That way you can frame the shot yourself and use your timer to take pictures. Many cameras can be set to take several timed shots in a row. 8. Frame the shot so the hunter and entire animal take up as much of the picture as possible. This is crucial many photos are blown because of framing errors. The most common error is overwhelming the shot with the surroundings of the subject. Post cropping can only help so much! 9. Take more than one picture! Try several angles and poses. Digital cameras allow you to review photos right after you take them. Do this and make adjustments as necessary. It may take 12 attempts to get one good picture. You only get a short time to take trophy photos make the most of it! 10. Keep your hands OFF the horns. That's what many folks are looking at and your fat fingers aren't that interesting. If you have to get the animals head up. Grab the back of the neck below the ears or support the jaw with your hand. Sometimes you gotta use props. Use them. If you see a picture you like. Analyze it and identify exactly what it is you like about it. Identifying exactly what you like about it gives you the best chance of duplicating it yourself later. | |||
|
| Moderator |
The BigGuy, Excellent list! To add a couple of thoughts...if you come across a couple of throphy photos you like, print them off and take them with you...Add some notes as to what aspects you particularly like and you then have something to jog your memory in all the post shot excitment. It also gives the PH an idea of what you're trying to achieve. A small travel tripod such as the Ultrapod 11 is a godsend for compact cameras and the smaller DSLRs...As the light fades and longer shutter times mean a real danger of camera shake, one of these one be used strapped a tree to provide a steady support. If you don't have a remote release use the self timer function on the camera to avoid any chance of disturbing it as the pictre is taken... Regards, Pete | |||
|
one of us |
A couple things I've noticed from hanging out with the writers who take a lot of magazine photos: They like a fill flash in a lot of daylight situations to hide shadows. They seem to like the sun at the photographers back while not having their shadow in the picture. If the people must wear hats make sure the brime is up high enough so the eyes aren't shadowed (that's easier said than done when the hunter is looking into the sun). Get ride of the blood all over the animal and the ground. Hide/cut off hanging tongues. It also helps to shoot with several cameras. You never know when one may come out better in a certain situation. Maybe this is common sense to you all but it seems like a lot of people ignor these things. Kyler | |||
|
| Moderator |
I think TheBigGuy pretty much got all the major points. Showing off now....here is what I think is one of the best trophy shots I have clicked a shutter on....Don_G and his great Wildebeeste, taken on the last day of our hunt...(the compression has caused some blur...the full size photo is crisp).... 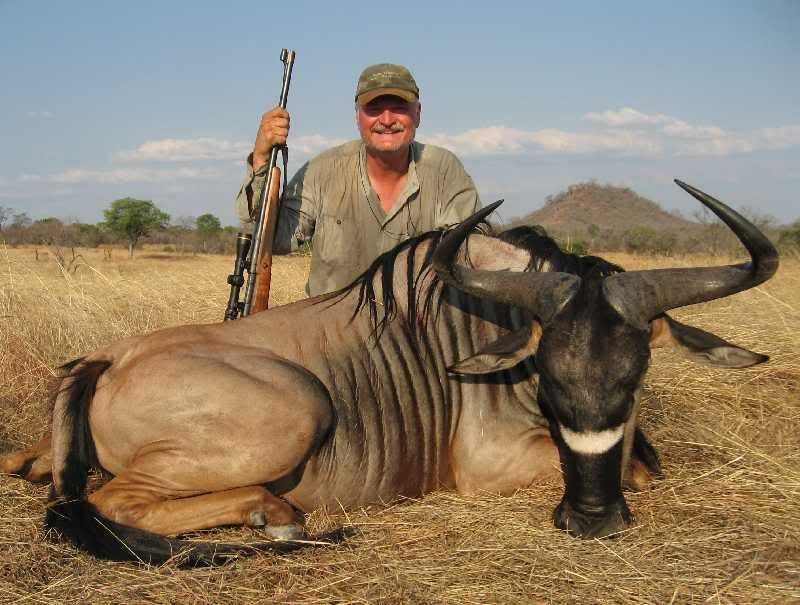 If I'd just gotten Don to lift his hat brim a hair, I would have considered it near perfect. Cheers, Canuck | |||
|
| one of us |
You ain't gonna get me to take off my hat and stare into the sun.... Don_G ...from Texas, by way of Mason, Ohio and Aurora, Colorado! | |||
|
| Moderator |
Yep...the very authentic grin is much better than a squint in my books too! | |||
|
| One of Us |
Thanks Canuck. Very very nice Nyasa Wildebeast Don_G. IMO the very prettiest of all wildebeast period. That's a great photo Canuck. If I was going to armchair quarterback this photo. I would agree the shadow over the eyes is what you want to avoid. Dark shadows definately can mess up a cameras color capture ability. Look at the histogram of the photo. Too much of the graph on the left side (Dark side) of the photo is a pretty good indication your colors aren't exactly right. Did you use a fill flash? Tony's tip is dead on, I've found that really helps colors. Also getting the mane all on the camera side of the animal is desirable. As well as getting any objects off the tail and spreading it out in it's full glory. Tails are cool on many africa animals. I didn't pay as much attention to them as I should have. These are improvements I would like to include in my own photos in the future. | |||
|
| One of Us |
Some PH's have definite ideas on what is best and it's hard to disuade them from those ideas. It's even harder to take a pic of yourself. I don't think there is a perspective problem with this though.  SCI Life Member NRA Patron Life Member DRSS | |||
|
| One of Us |
The Big Guy's list is very good. I wholeheartedly agree with the hat issues and the fill flash issues. And, the idea that your photographer takes many different pictures from many different angles and poses is important too. After all, a professional takes hundreds if not thousands of pics to find the right one. You can't have too many, but you can have too little, and once the trophy is skinned and processed it's all over, forever. | |||
|
| One of Us |
Hats ar OK, as long as you have the light right and use the fill-flash. I prefer taking trophy shots in the clothes (including hat) that I actually wore. One tip I would like to add is to always shave. In deer camp it's not uncommon to grow a beard. I purposely made sure that I shaved well every day on safari because I knew that a picture of a lifetime might be taken.  I also enjoy photos that have the character of the staff included. This is just a shot of my plain old warthog, but it's perhaps my favorite because it reminds me of the guys that were with me at the time. Non-hunters enjoy this as well. 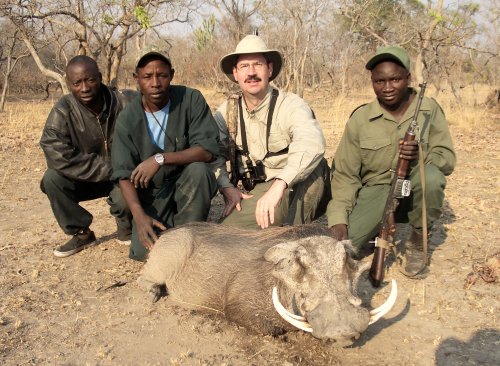 "I envy not him that eats better meat than I do; nor him that is richer, or that wears better clothes than I do; I envy him, and him only, that kills bigger deer than I do." Izaak Walton (modified) | |||
|
| One of Us |
NitroX, great thread. And TheBigGuy, great post. TBG has pretty much nailed the key points, IMHO. I would add or emphasize a few points. I would strongly emphasize TBG's point about placing the camera down low. Really do try to get as low as you can for the shot. Really down on the ground, on your belly, prone, even, if the terrain permits. You will be surprised at how much better the shots are. Be aware of your background. It can be critical. Shifting the animal around 90 or 180 degrees can really improve things (or ruin them!) sometimes. Take some shots of the animal by itself, or with your rifle only. Take more shots with you and the animal, with you and your PH or guide, or with the entire crew, should there be one. Not all will be keepers, but the odds for a real winner go way up if you take more than just a few. Also one minor disagreement. I don't agree that hands must always stay off of horns, although it's a pretty good general rule. Sometimes shots in which the hunter is framed by horns, or is holding them up with one hand, can be quite good. Just watch out for shadows. And I cannot get myself too worked up by the tactic of positioning the hunter a foot or three behind the animal. I like the emphasis it places on the animal in some shots, although I do agree that if this tactic is carried to an extreme it can get ridiculous. Mike Wilderness is my cathedral, and hunting is my prayer. | |||
|
| One of Us |
I don't shave on safari and it helps yrs later if your memory slips you can tell by the growth how far into the safari the photo was made.  | |||
|
| One of Us |
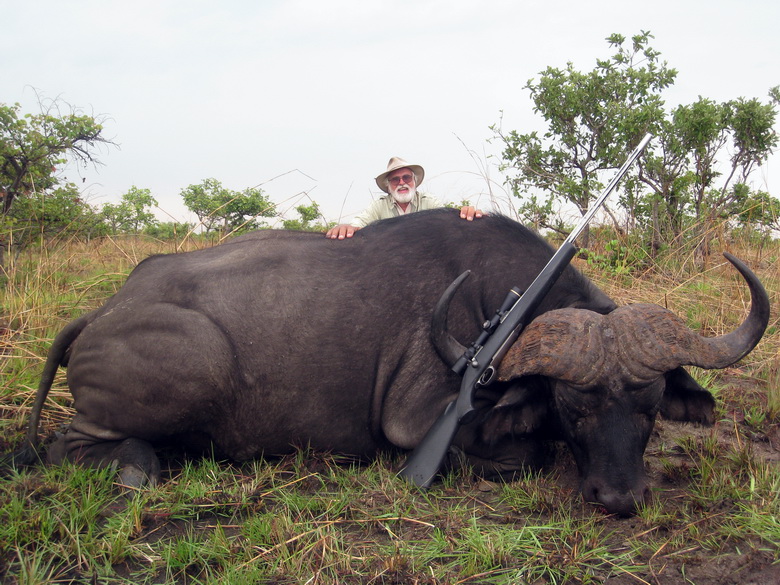
Some people think it is disrespectful to sit on the animal, but my personal opinion in a photo like this is it doesn't bother me at all. I actually like that photo. The size perspective of the elephant and its tusks are hown well especially considering the ele is on its side. The hunter is fully shown and is not peering over the top, a funny head just sticking up above. He is just sitting on it in a casual position and not doing anything silly. Just my opinion and others would certainly think different. Hell I don't care if people have a picnic on my grave oneday! what about Bell (and others) using downed elephants as shooting 'platforms' in high grass? (I didn't take any photos like that myself however.) Now if you want controversary I have about two hundred photos of an elephant being skinned, and then soon after being torn apart by 'nyama' hungry local villagers. They certainly had fun and enjoyed it too. We actually videoed the whole thing too. | |||
|
| one of us |
The Big Guy's tips are dead-on for good "hero" pix. For me, the fill-flash in ANY light is the most important in regards to the photo quality. BUT...you need to be real careful if your hunter is wearing glasses because they will often yield terrible reflections from the flash. I'll add a couple of other items: Watch the background clutter as well as the foreground. IOW, try to avoid having a tree growing from the top of a guy's head. If you can get the animal posed on a bit of a rise, it's a lot easier to get low and use more sky for your background. One thing to always avoid is shooting with the camera pointed too much upward or downward, which provides some distortion. Best to hold the camera straight up & down at the same level as your subject. If the camera lets you adjust the lens to a semi-WA, use it because it provides a much better Depth of Field -- the area that will be in focus from the front to the rear. In 35mm speak, a 28mm to 35mm lens or a similar setting on a zoom lens is about right. The equivalent in digital is 18mm-24mm. For the same reason -- good DoF -- it also helps if you know how to set the exposure where it will use a higher f-stop # such as f-8 or f-11. Lastly, if you include any firearms, watch where the muzzle is pointed. Even if it's empty, some dude on AR will nitpick it to death, just as they do other minor crap such as sitting more than 3 inches back from your critter. Tony Mandile - Author "How To Hunt Coues Deer" | |||
|
| One of Us |
Thanks Tony for the comments. I had asked Tony for permission to post some of his excellent photos. Which I will do so shortly in another post. *** But first I also asked "T's" permission to post some of his photos. I remembered some good leopard photos posted a while ago. "T"'s website http://www.texaslso.com I like this photo as it really highlights the leopard with most of the gentlemen in good perspective, except for the one guy partly obscured. Yes the leopard looks large (probably because it is!) as its head is towards the camera, but for me the main subject is the leopard and it makes an interesting and different photo. 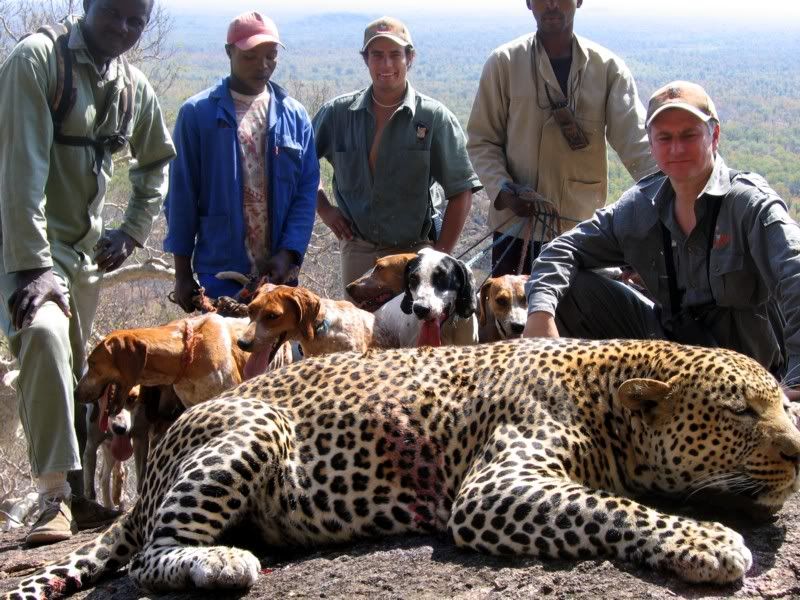 I like this one too, except for the nose of the leopard being cut off. The dogs also look good, and add "movement" to the photo. Everyone is back again, again emphasizing the leopard. Also their poses do not look too staged or posed, mostly slightly relaxed. Several persons are looking at the leopard, not the camera lens. Even the cut off tops of heads look in place, as it makes the photo look well "filled" (BTW I am not an expert JMO). 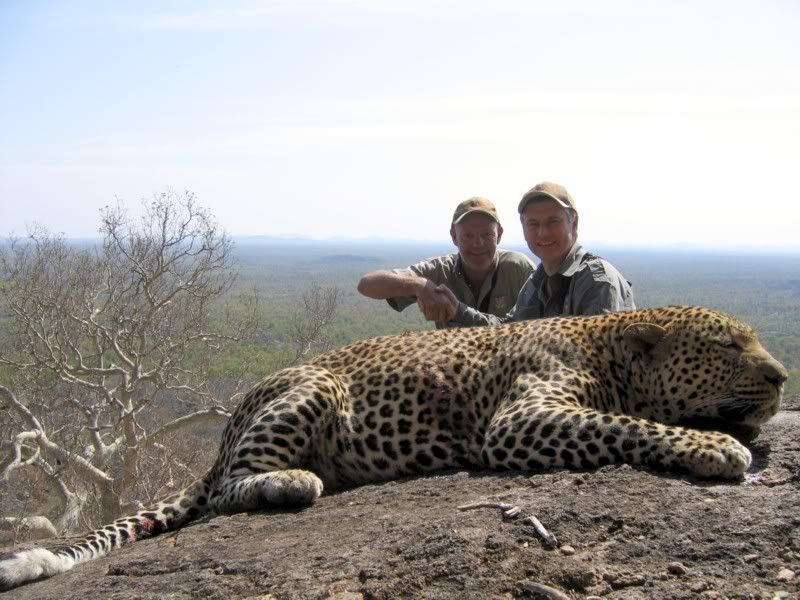 I like the use of the scenic background in this photo and clever positioning of the leopard. Again the gentlemen being back a little emphasizes the leopard.   Compare the steenbok photo to the jackal photo. Lying down next to the steenbok makes the photo so much better and also highlighting the steenboks horns against a patch of sky using an upward angle vs a downward angle. Both work however.  Similar for this klipspringer. I guess it is easier for the small critters, moving them to favourable locations, just if one thinks about it at the time.  Clever use of a branch! | |||
|
| one of us |
John, I imagine these are a some of the NZ photos you meant shown below. One thing I didn't mention in my earlier reply is what I normally do with folks who will be taking a photo of ME rather than the other way around. First thing is to obviously get the critter posed properly and police the area to get rid of any unwanted clutter etc. Then I have someone pose where I would be so I can move about and get the proper lens setting and distance. Once I determine the angle and distance, I'll often mark it in some way -- a scratch mark in the dirt, twig, rock, etc. Naturally I also set the camera for the proper exposure and make sure the fill-flash is set to go. Of course, I often take a couple of pix, too, just like the one of Tim Buma below with my tahr. Also note that it's a vertical; don't be afraid to turn the camera! Once that's all done, it's a simple matter to have the other person take the photos with minimal verbal instruction in regards to how to frame it -- i.e. make sure no heads are missing the tops, etc. IOW, act like a movie director. Lastly, take LOTS of pix. That way you should get several good ones. Guide Tim Buma  Move around for different perspectives. There is NO requirement that the main subject always needs to be centered. In fact, off-center is sometimes more desireable. Also, note that I have my hat on but there's no shadow over my eyes. The miracle of fill-flash.    Tony Mandile - Author "How To Hunt Coues Deer" | |||
|
| one of us |
Tony I really like that first photo. Shows off the mane of that bull tahr. How do you get such vibrant colors in your photos? Here is one I took recently that came out nice.  | |||
|
| one of us |
That's a well-done photo, T! One thing I do to get good color saturation is to underexpose a bit. I shoot KR64 slides with my 35mm, but the ISO is always set to 80, which is about 1/3 stop of underexposure. Of course, if you're shooting print film, the setting almost becomes meaningless because the automated printing machines will attempt to correct the exposure to what it thinks it should be for EACH print and not the entire roll as a whole. For digital, you can also set most cameras to give you 1/3 or 1/2 stop of underexposure, but it's unnecessary because most of it can be done in post-processing with Photoshop or a similar program. It's a simple matter to bump up the color saturation or simply use the brightness/contrast controls to darken the whole image a bit. Or you can use the dodge/burn tools to lighten or darken parts of it. Here's what a bit of post-processing can do. It took me all of about five minutes. Some of the differences are quite subtle, but you'll get the idea. -TONY  Tony Mandile - Author "How To Hunt Coues Deer" | |||
|
| one of us |
| |||
|
| One of Us |
I'm glad you brought up using software for post-processing digital photos Tony. IMO understanding this is crucial to getting the most out of your photos. I'm still learning but I like the results so far. Bumping the saturation seems to help colors. Dropping Gamma just a hair sometimes works better than a sharpness mask. Couple key points. 1. Don't save over your original. Make a copy to play with. Some edits are irreversible. 2. Keep your JPG quality set to max when working on a photo. If you are trying to improve the photo, compression does not help. 3. If you are working with JPGs. Don't finish doing half of your edits save your file and reopen it and finish it later. JPG compression is progressive and everytime you reopen, change it and resave it you are recompressing the file. Eventually the photo looks crummy not necessarily because of your edits but because it has been overcompressed. You can work in a losseless format like .BMP and then convert afterwards but your files will be quite large until you convert. | |||
|
| one of us |
T, Another of yours with a bit of PS massaging.  Tony Mandile - Author "How To Hunt Coues Deer" | |||
|
| one of us |
Samples of variety just by changing position and camera orientation. -TONY    Tony Mandile - Author "How To Hunt Coues Deer" | |||
|
| one of us |
Hey Tony, Can you work some magic on this one? I know. You are going to have to start charging for this. Thanks, T  | |||
|
| one of us |
T, That was a tough one because of the contrasty situation that results in blown-out highlights. It definitely needed fill-flash! This is about the best I can do with it without having to charge by the hour.  Tony Mandile - Author "How To Hunt Coues Deer" | |||
|
| one of us |
| |||
|
| one of us |
T, You're welcome. Did you note the wisps of grass and blob of blood are gone from the buff's nose? -TONY Tony Mandile - Author "How To Hunt Coues Deer" | |||
|
| one of us |
My PH this summer (Jochen Hein, Okatjuru Safaris) carried a pickaxe in the truck for clearing grass and weeds out of the foreground of photos. This becomes very important when you get down low for the best angle on the photos. In partial defense of the "tiny hunter with giant steenbok" photos, most inexpensive cameras have slightly wide-angle lenses around 35-38mm. These will always create some foreground enlargement when you get close enough to fill the frame with the subject. My other "big" tip is to keep your lenses clean, constantly. I had most of two rolls of 35mm (mostly scenic shots) marred by a dog hair on the lens). Crud on the lens becomes really noticeable when you're forced to shoot into the sun, or want to get a good sunset picture. Here's an example: 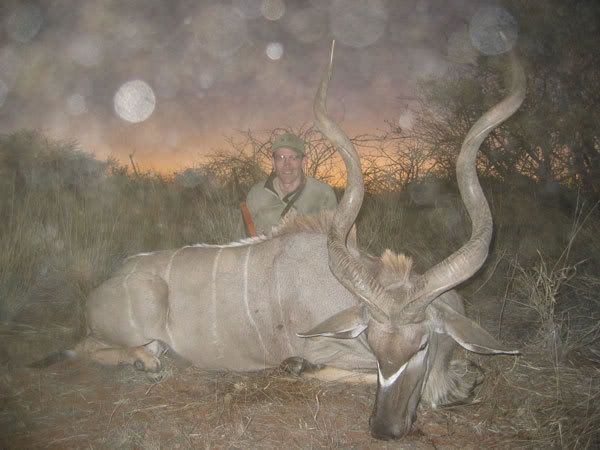 In terms of lighting and composition, this would have been the best shot of that animal, but instead I have to use this one, scanned from ISO 400 color negatives--but at least the lens was clean: 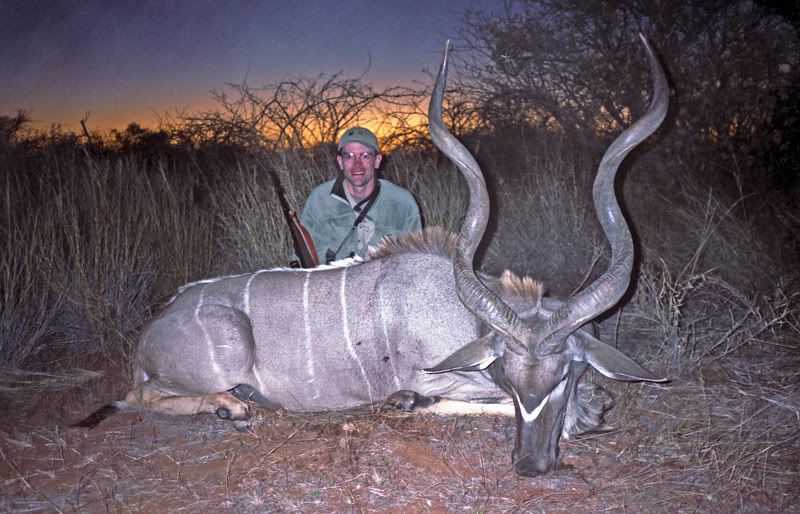 | |||
|
| one of us |
John, Too bad about that image. That must have been an incredibly grungy lens to get that look. Here's one taken at near dusk with the fill flash balanced with the ambient light. -TONY  Tony Mandile - Author "How To Hunt Coues Deer" | |||
|
| Moderator |
John, That looks like a flash on dust in the air to me. I have it happen quite a few times taking trophy shots just at last light. If you wait a couple minutes for the dust to settle it comes out much better. Cheers, Canuck | |||
|
| one of us |
Canuck, That's an interesting thought, but I don't think it's what happened here. It was a fairly still night, as I recall, so the only thing that could have kicked up dust would have been Jochen moving around taking pictures. But I don't even think that was it, since all the pictures of that scene with the digital camera were pretty bad, and all the ones on film were fine. (Also, I cleaned the lens on the digital when we got back to camp, and yes it was really cruddy.) This leads to my other big photo tip, which is to bring and carry extra cameras. We brought three, and by the end of the hunt the front slide on my Canon Powershot S45 had jumped its tracks. My Yashica 35mm point and shoot soldiered on, as did my Olympus e500 digital SLR. We had much the same happen on our honeymoon--that time, my old Pentax K1000 got a stuck mirror and we finished the trip with the Yashica and Powershot. That stuck mirror probably won't get unstuck any time soon since I've discovered the digital SLR, though! Last tip--bring lots of memory cards. I shot RAW images for best quality and you can only get 70 or so on a 1GB card. Even deleting bad shots like crazy every night, I was hurting for space on the 3-4 cards I brought. John | |||
|
| Moderator |
It really takes next to nothing to stir up enough dust to wreck a photo like that. Its usually someone walking by, or pulling out a clump of grass, or knocking one over, etc, etc. And it only takes a few seconds to settle. I'll put up dollars against donuts that is what happened in your photo. The only light on the scene was your flash. It can only illuminate things in front of the camera. In most cameras, dust on the lens would lead to black spots at night, not grey ones. Cheers, Canuck | |||
|
| Moderator |
Tony...is it possible to do that with a good quality point and shoot? I am a believer in a fill flash but it often washes out the photo (ie. overpowers the ambient light). Cheers, Canuck | |||
|
| One of Us |
One thing not, so far, mentioned is the use of a polarising filter. these will darken the sky with the maximum effect when the sun is at a 90 degree angle to the shot. I used to be disappointed that the sky in my photos was "washed out" when compared to my memories of the scene. Then I realised that I always wear polarised sun glasses. mike | |||
|
| one of us |
Canuck, It all depends on the camera, i.e. which program modes it has or what level of user settings are available. All the African and NZ photos I've posted on this site were shot with a measley 2.1 megapixel Olympus 2100 Ultra Zoom. BUT...in addition to a 10X IS lens, it has many setable options, including the ability to limit the flash output for FILL flash. If your flash is washing out the photo, I'm guessing something is amiss with the settings. In regards to John's dirty lens, it almost looks more like a coating of dried water droplets from a fine mist on the glass. That might account for the circular highlights and overall softness. Mike, I rarely use any filters with a digital camera, but if I do, it is a polarizer. That said, about the only time I use one is if I need to cut down reflections from something metallic, glass or water. I don't use one to beef up the color saturation, which can be done using software. Different story with a film-based camera, however. -TONY Tony Mandile - Author "How To Hunt Coues Deer" | |||
|
| Powered by Social Strata | Page 1 2 |
| Please Wait. Your request is being processed... |

Visit our on-line store for AR Memorabilia
 ..
..
