 Other Topics Recipes for Hunters
 Go | New | Find | Notify | Tools | Reply |
| Black Forest Maple Bacon | Login/Join |
| one of us |
Black Forest Maple Bacon 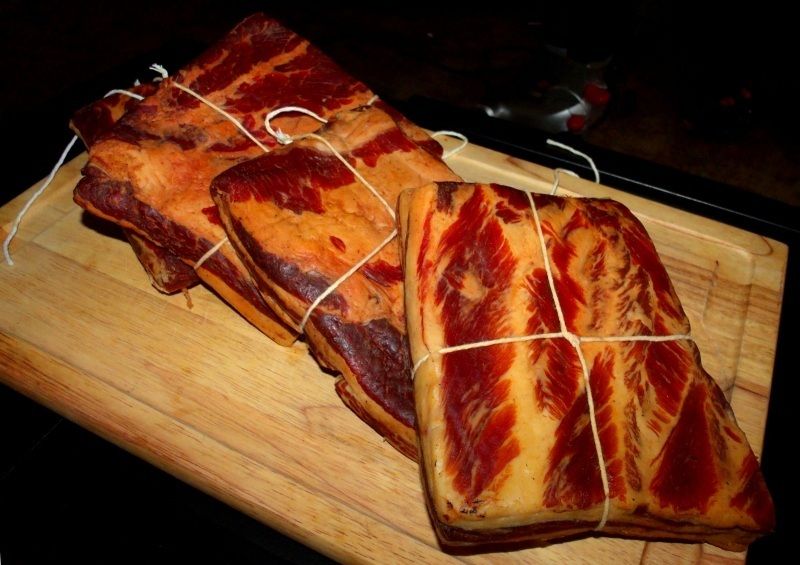 I love bacon. I’ve always loved bacon. It is inconceivable to me that there are people out there who do not think much of bacon; in fact, to me, hating bacon is almost as big a sin as hating America. - but that’s just me. If you are reading this, then I will assume that you feel somewhat the same, and invite you to consider that there is a whole new world open to you: What if I told you that you can cure and smoke your own bacon at home? One truth that is nearly universal is that once you cure and smoke your own bacon, you will never be satisfied with “store-bought” bacon again. I found this to be very true recently as I set out to learn this art, and was amazed at how little effort it took to produce such wonderful end product. All that is needed is the patience to “do things right;” by using that phrase, I mean that if you want bacon that has that wonderful, deep-smoked, olde-tyme aroma and flavour, then you need to use a method that will achieve the desired result. This will necessitate a little extra time and attention to detail, but the results are very much worth it. This method will teach you to produce a maple-cured, cold-smoked, dry-aged bacon that will be rich, deep and savory, without the cloying sweetness of the “maple bacon” that is found in the grocery stores. Maple sugar is the perfect medium by which to achieve this goal in that it provides just enough sweetness to balance the salt that is in the bacon, without overpowering the entire profile. It also imparts a tantalising, caramelised depth that is hard to describe, yet easily appreciated for its subtlety. This ingredient was completely out of my reach just a few short years ago, but thanks to online sources such as Amazon, I was able to obtain this wonderful product with little trouble, and highly recommend that you do the same. Since this was my first time making bacon of any kind from pork belly, I naturally sought assistance and guidance from several trusted friends and acquaintances here and elsewhere, and they all have my sincere appreciation. Darko (AK1), whom I’ve known for years, was particularly inspiring with the description of his eastern-European method, which couples a long, cold smoke with dry-aging of the salt-cured bacon for amazing aroma and flavour. Rich (RichTee) has been very generous in passing along his substantial knowledge of curing meats and the ways that the various components interact and relate to each other. John (BearCarver) was also very helpful where bacon itself is concerned, especially with his easy-to-follow method for determining the curing time. Marty (MossyMO) provided the best way for me to get wonderful cold smoke onto my cured meats. The final, critical piece of the puzzle presented itself when BriCan presented his method for making bacon, which was very much in-line with my goals regarding the maple profile. He also introduced me to his “Black Forest spice mixture” and quite generously shared the recipe with me. Together, the spice mixture and maple sugar work together to produce exactly the flavour profile I was hoping to achieve. The following step-by-step method comes directly from him, and is only slightly modified to accommodate my equipment and circumstances. If you go with it and stick to the fundamentals, you will produce top-quality bacon that is only slightly short of a religious experience.These friends - and a few others - were a huge help and inspiration with this project - thanks to you all! This pictorial represents the “finished” product, and outlines the ingredients, steps and method that I used in a detailed fashion. As such, it might be a bit tedious, but it will teach a complete beginner about making bacon and will follow my journey as I learned to make it, including a few lessons learned. I always do my best to include all pertinent information about the process from beginning to end; having said that, it is a distillation and summary of a project that had a lot of input. For further details, discussion and comments about the evolution of this project, you can follow this link: http://foodsoftheworld.activeb...oject_topic4181.html Note - The art of curing and smoking meats is easy to learn, and a worthwhile skill to have. The curing agent that I used for this project was TennerQuack, which is available from www.madhunkymeats.com: http://madhunkymeats.com/openc...roduct&product_id=56 It is a clone of Morton’s Tender Quick and either product is highly recommended by me. Both of these products (abbreviated TQ) contain the necessary amount of curing agent per pound of meat, along with the salt needed per pound of meat; in other words, when you use TQ, you have your curing agent and your salt for your project together in one product. There are many different curing agents out there that work just as well, but all have their own unique and often proprietary formula. If you use any curing agent other than TQ, follow the directions on that package of cure, and add the amount of salt (if any) appropriate for the cure you are using and the meat you are curing. Not following the specific directions on your specific package of cure can leave you with an inferior (from a quality perspective) or dangerous (from a food safety perspective) end product. Here is all that you need to produce this wonderful bacon at home: A slab of pork belly Salt and cure in an amount appropriate for your type of cure and weight of meat Maple sugar BriCan’s Black Forest spice mixture (recipe below) Here’s how to make enough of BriCan’s Black Forest spice mixture to fill a pint-sized jar:
That’s pretty easy to make, wouldn’t you say? But it certainly pays huge dividends, to be sure; when BriCan told me about it, I immediately saw the possibilities; on a leap of faith, I mixed some up, using freshly-ground spices, and immediately fell in love with it. I came up about 30 grams short on the white pepper, but made up for it with ground black pepper, and it seemed to turn out just fine.It has an essence that was precisely what I was looking for. It was almost as if someone put southwestern Germany in a jar, and I could immediately detect a compatibility with my ideas regarding the maple. The best part is that I now have a nice supply of it in my cupboard, waiting for any number of projects. That’s about all there is to this bacon, except for the cold-smoking and dry-aging, which we will discuss later on, so let’s get started! For my first bacon, I used a 6-pound slab of area-grown pork belly that I acquired from our local butcher: 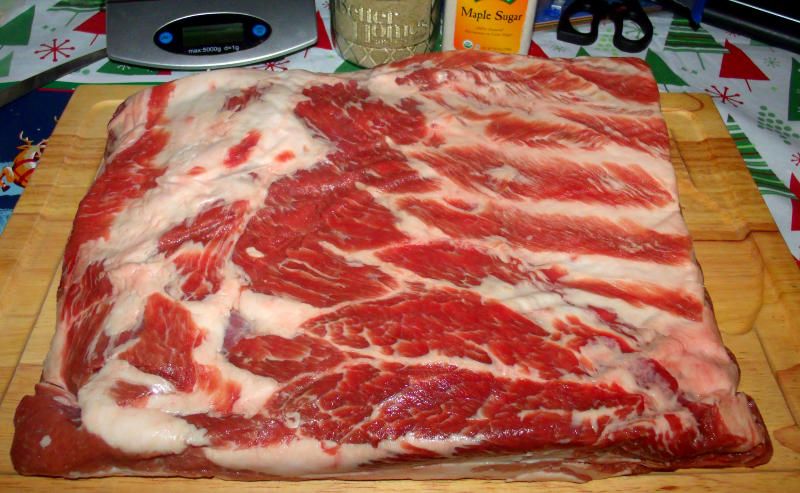 My meat lady did a great job - this slab was exactly 6 pounds, according to my digital kitchen scale! This particular slab had had the skin removed, and that’s alright with me as it increases my yield. There are pluses and minuses to having the skin on or off, and it is not my purpose here to debate them; it suffices to say that you can make very successful bacon either way. The slab can be cured and smoked whole, but for my purposes, it seemed better to divide it into four equally-sized 1.5-pound smaller slabs: 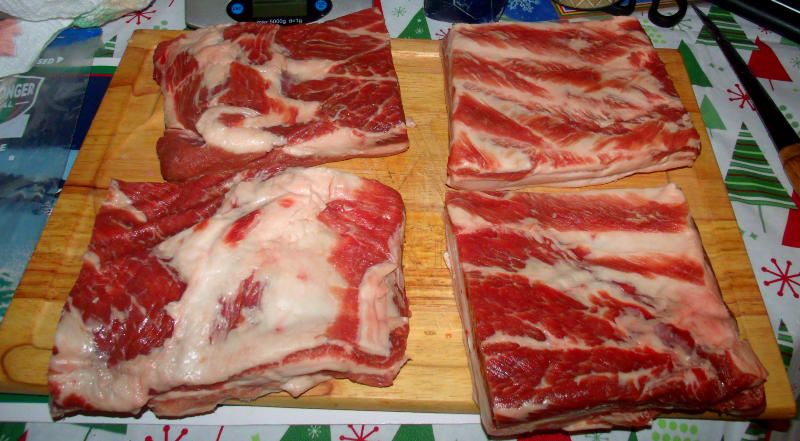 This worked very well for me, but it is not the only way to do it. As I said, the slab could have been left whole, or it could have been three 2-pound slabs; or two 3-pound slabs, or whatever. I liked the way these 1.5-pound slabs turned out, and will probably continue to do them this way. The first thing you want to do is to apply your salt and curing agent to your bacon; as stated before, I use TQ, which combines the salt needed with the appropriate amount of cure into one product. It is user-friendly and fool-proof, and I’ve never found a reason not to use it. For dry-brining whole cuts of meat, the amount of TQ needed is 1 tablespoon per pound. Since each of the four slabs were hovering within an ounce or two of 1.5 pounds, I rounded my measurements slightly upward and used 1 tablespoon plus 2 teaspoons (1.667 tablespoons) of TQ per slab, taking care to place each slab into it’s own zip-lock-type bag first, then adding the cure fairly evenly to each side. Doing it this way ensures that all of the cure remains with the meat, which will be rotated each day for even curing. Note that due to my rounding up, I added slightly more TQ than was actually needed; this is not too big a concern as you cannot over-cure meat, and it is better to have a little too much than not enough, keeping in mind that you still want to be as close as possible with your measurements in order to keep your finished product from being too salty. This bacon turned out just right to my taste, but The Beautiful Mrs. Tas found it to be just slightly too salty, so I will be more precise with my measurements next time. Thanks to BriCan, I also have the amounts of salt and cure to be used if you are using Cure #1: you want to apply salt at 2% and Cure #1 at 0.25% of the total weight of meat. Important Note: These measurements from BriCan are for Cure #1, and my measurements above are for TQ. If you are using any other type of cure, be sure to use the appropriate amount of cure and salt according to the directions on the package of cure that you have. Each type or "brand" of cure has its own instructions that must be followed specifically, as they are not interchangeable with others; any cure will work fine, but each must be used according to its own instructions. If you have any questions at all about using any cure, please ask, and someone here on the forum will be able to help you. If you cannot get an answer, please send a private message to me, and I will bring the question to the attention of someone who can get an answer for you. After applying the salt/cure, I gave each side of each slab a dusting of BriCan's Black Forest spice mixture (recipe/formula above), followed by a similar dusting of maple sugar. For this first attempt, I used 1 tablespoon of each (Black Forest spice mixture and maple sugar) for each 1.5-pound slab; results were good, and the flavours came through fairly well, but I do intend to use more of each (probably double) next time, in order to enhance the wonderful qualities that were imparted to the bacon. Here are the bagged slabs of pork belly, with cure, spice mixture and maple sugar applied: 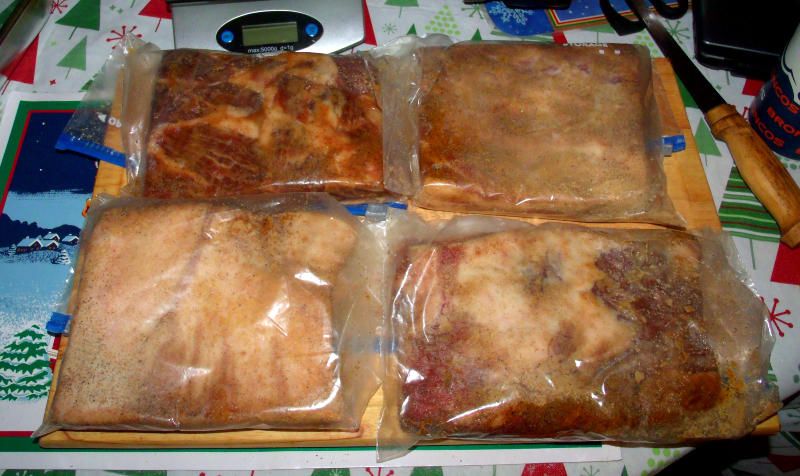 A note on the maple sugar: I had a bit of trouble finding this product locally, so I ordered some through Amazon.com. When I ordered it, it seemed a little pricey at 78¢ per ounce for a 25-ounce container; however, once it arrived and I sampled it, I quickly judged that it was worth every penny. I found the maple sugar to have a deep, earthy, caramelised flavour; something that is unique and wonderful without being overly-sweet, and I immediately perceived a difference between the flavour this product versus the flavour of other “maple-flavoured” meats. It is something that really must be experienced in order to appreciate it, and I highly recommend making the effort to use true maple sugar. Some folks have reported very good results using genuine maple syrup as a substitute, and I am sure that it works well; however, I can say without reservation that the maple sugar is outstanding, and will be using maple sugar exclusively on any appropriate future charcuterie project. Moving along, I placed the bagged slabs of pork belly into a glass baking dish, to contain any leakage that might occur: 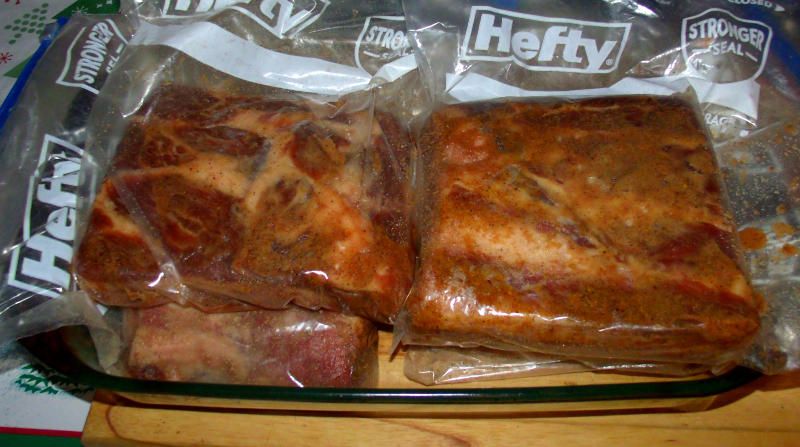 As it turned out, there was no leakage, but there’s nothing wrong with taking precautions right? I then placed the baking dish in the refrigerator for the duration of the curing time, rotating the slabs top-to-bottom as well as flipping them each day, for even curing and flavour distribution. When curing with TQ, there is a lot of information out there about curing times, with several different methods that all pretty much add up to a similar result. Morton’s own curing guide is a little vague and has changed a bit over the years; the current recommendation for curing bacon is for 7 days with a 2-day period tacked on for equalisation of salt, and I am sure that this advice is reliable. Another noted expert recommends a curing time of 1 day per quarter-inch of thickness, as measured from the center-out. This might be the most precise advice of all, but it is rather complicated and can lead to confusion. After reading through a lot of knowledgeable material on the subject, I have settled on using the method employed by my friend John (BearCarver), because it is easy to remember and easy to follow:
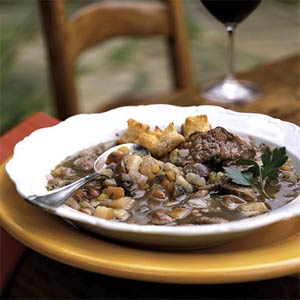
John has cured a lot of meats over the years, including a great deal of bacon, so I trust his method as his results have always been exemplary. At its thickest point, my pork belly was a little over 1.5 inches, so I decided to cure as if the slabs were all 2 inches thick. which would give a total of 8 days by John’s calculations. When curing with Cure # 1, BriCan reports that the curing time should be 1 week for bacon. Due to some scheduling issues, my bacon ended up curing for a total of 14 days. This is longer than necessary, but it is not a significant issue due the the fact that meat cannot be over-cured. Once the curing time has passed, you want to rinse off your slab(s) of bacon with cold water in order to remove excess cure, salt etc. Do not worry about “washing off” any flavour - it’s in there, so no worries! Once your bacon is rinsed, hang it or place it on a rack of some sort and pat it dry with paper towels. Here’s how my bacon looked after rinsing: 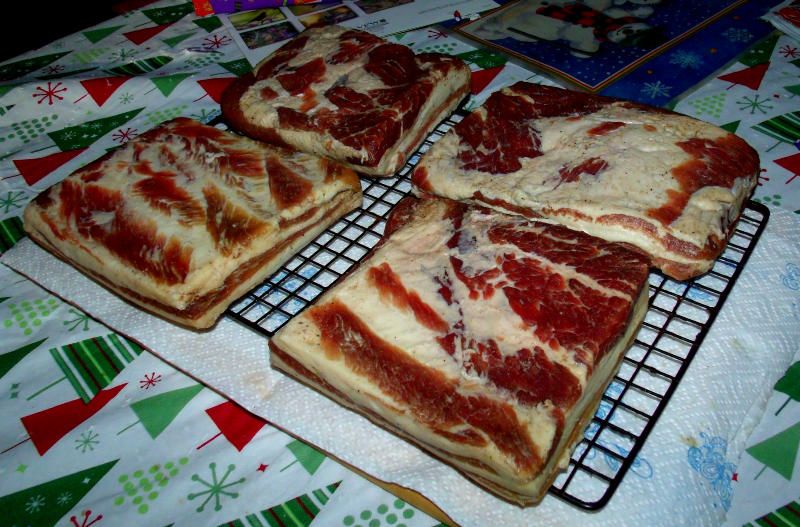 As you can see, there is some pretty good colour here, and things are proceeding very well. The slabs of bacon retained the clean, fresh aroma of the Black Forest spice mixture that I made, giving them a nice, Old-World quality. The earthy, subtle tone of the maple sugar was indeed present without being overbearing, which was exactly what I was hoping for. At this point, it is desirable to give your bacon a few days for the salt content to equalise throughout the thickness of the meat and fat; you also want to give your maple sugar some time for the flavour to really infuse into the soul of the finished product. To do this, let the bacon dry a couple of hours, then apply a dusting with the maple sugar on the meat side (no need to add the Black Forest seasoning this time, just the maple sugar). Here, you can see that I started with the bottom-right slab, then worked my way clock-wise to the top-right slab: 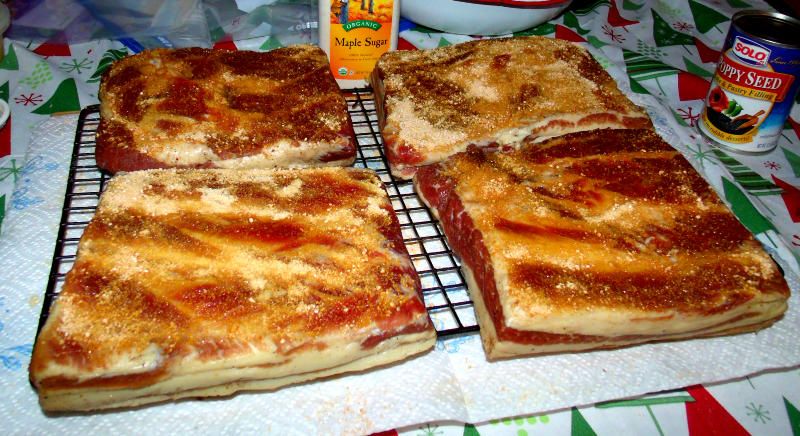 Once again, I used a tablespoon of maple sugar for each slab; and once again, it was good - however, I will most likely double this amount the next time I make this, and then compare the results. Once I applied the maple sugar, I bagged the slabs again and returned them to the refrigerator: 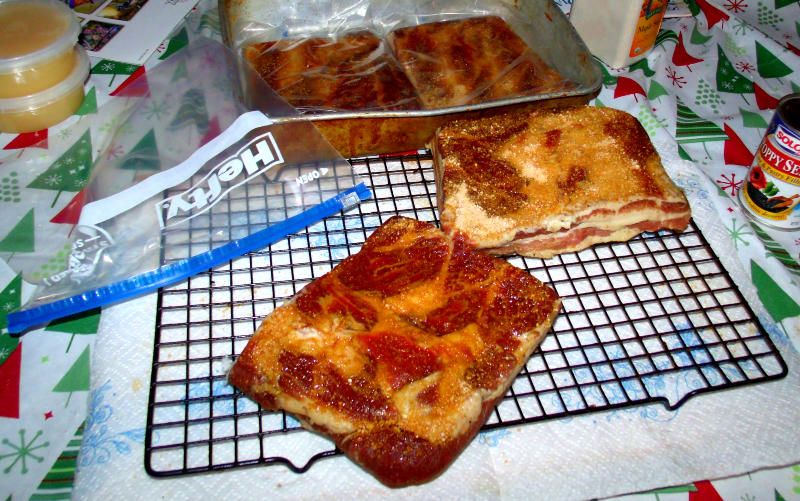 You want to leave the bacon in the refrigerator for another week, in order to achieve the salt and flavour equalisation mentioned above. When the equalisation period has passed, you are ready to proceed to the smoking stage of the project. Without rinsing, remove your bacon from the refrigerator and hang it over-night so that it can dry a bit and form a pellicle, which allows it to accept the smoke in wonderful fashion. At the time, I had no practical way to hang it, so I set it on a rack over-night, flipping and rotating the slabs periodically for even drying. At this point, you are ready to smoke your bacon. When it comes to the smoking wood to be used, There are many, many choices out there, and it is not my purpose to debate the merits of each. My advice is to choose one that you like, and go with it. For this project, I used a blend of apple, maple and oak as that was what I had at the time. Next time, it will probably be just oak, or maybe just maple - or maybe beech. I might also try a blend that BriCan uses, which is maple, beech and birch, with occasional softwoods or juniper berries added in the Black Forest tradition. My main point is that while each wood probably does has its unique and subtle characteristics, the main thing about smoking meats is that the hardwood that was available is primarily the wood that was used, and you can’t really go wrong. With that in mind, I’ll leave it to you to decide what wood you want to use; if you have any questions, please feel free to ask. For products such as bacon, cold-smoking is a fundamental point that results in a far better end product with a deeper, more enticing aroma and flavour. There are also advantages - in my opinion - where appearance and colour are concerned. Dry-aging the bacon during and after smoking allows the bacon to mature and fully develop its properties in ways that are hard - for me at least - to describe, except to say that a level of sophistication is reached that goes beyond mere deliciousness. Cold-smoking, when coupled with dry-aging, will play right into the flavour profile that is provided by this method and give your bacon so many wonderful layers and dimensions that you will probably never buy bacon at the supermarket again. Cold smoking is nothing mysterious or magical - it is simply subjecting your cured meat to a moderate amount of smoke - with good air-flow - at temperatures below 100 degrees Fahrenheit. It is a process that takes a goodly amount of time - days, weeks or longer in some cases. In other words, it really is smoking in the old sense of the word; part of the process of preserving meats and “laying food over” for winter, which were the lean months where food was concerned. In modern times, too many people confuse the term with smoke-cooking meat, which is a whole other story, and not within the scope of this project. In order to engage in this activity, a smokehouse was used in the days of yore, and is still used today in many cases; our past is littered with examples, both in history and in literature, of “the old smokehouse” where many wondrous things were created, and the connotations are indeed quite nostalgic. Perhaps one day, I’ll be able to build a proper smokehouse and be able to capture some of that olde-tyme, comfortable nostalgia. But in the meantime, it’s 2015, and I need to make do with what I have at this stage of my life. Luckily, there are many, many modern-day alternatives that work very well; it is not my intention to discuss them all, but rather to tell you what I used, which is a product called the “A-MAZE-N” Pellet Smoker (also known as the AMNPS), which is available from Marty and Tanya Owens at www.OwensBBQ.com: http://owensbbq.com/smokers-and-pellets.html This wonderful little unit uses pellet or sawdust to produce sweet, aromatic smoke for a variety of purposes, and is especially suited for cold-smoking; all that is needed is an enclosure to perform the dual purpose of containing the meat and providing airflow. There is literally an endless supply of options for this, but I chose to use the shell of my Big Chief smoker: 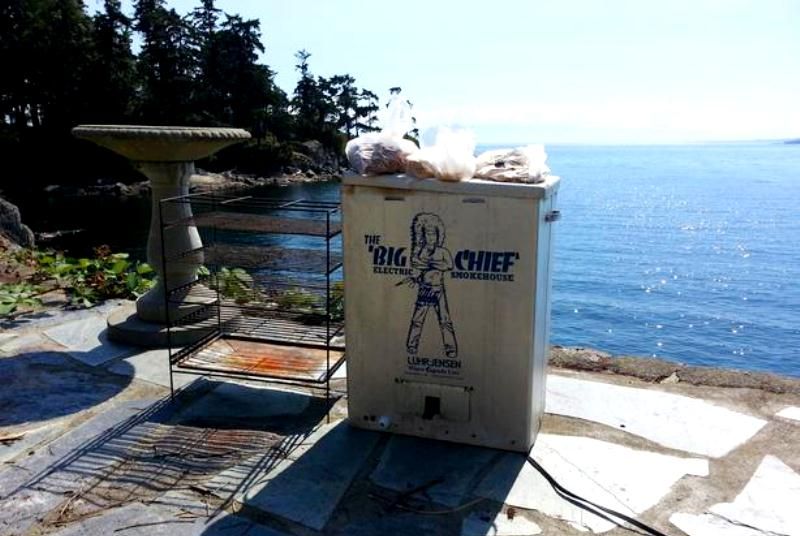 Two notes regarding the photo above: 1. The photo above is obviously not of my own personal Big Chief Smoker, and I am not claiming that it is; I “borrowed” it off the internet somewhere and will replace it sometime in the future. 2. Please disregard the electrical cord that is snaking out from the back of the smoker above - for this cold smoke, I did not use the heating element that the Big Chief is equipped with. For the actual smoking, there was no reason to tie/hang the slabs as they were able to simply lie flat on the top rack of the Big Chief Smokehouse that I waS using as an enclosure for my AMNPS. I gave the bacon two smoking sessions of about 11 hours (give or take), for a total of 22 hours over this cold smoke; I could probably have gone another 12 or 14 hours, but I was concerned that the (very) sub-zero temperatures we were experiencing might have some affect on the humidity, airflow and other factors going on in the small-ish enclosure that I was using, and figured that the concentration of smoke in the relatively small Big Chief would be adequate. As it turned out, it seems to me that there was plenty of smoke coverage, but I do intend to experiment with a longer smoking time and look for ways to ensure better airflow for my next attempt. Sooner or later, I'll try doing the cold smoking in a much larger area (such as the smoking chamber of my offset smoker, with the AMNPS sitting in the firebox), and will compare results. Once the smoking was completed, I allowed the bacon to hang and dry-age in our front porch, which was sealed off for the winter and still quite cold and dry. This step allows the bacon to mature and develop flavours that simply will not happen otherwise, and is well worth the time invested for top-quality results. I didn’t know the exact temperature on the porch, but it doesn't matter too much; as I did know that it was quite cool as it would be if the slabs would hang in any larder at a country home during the winter. The timeframe involved for dry-aging bacon largely depends on temperature humidity, air-flow and other factors, just as when smoking. I left my bacon to hang and dry-age for three days, and to be honest, I probably could have gone at least couple of days longer, if not several days longer. This is another area where I definitely intend to experiment with my next bacon; while I certainly noticed benefits from this relatively short dry-aging period, I am more than willing to bet that a longer aging time will result in even deeper maturity of the finished bacon next time. Somewhere between the smoking and dry-aging, it occurred to me that, rather than improvise some kind of hooks in order to hang the bacon, I could simply tie them with a simple vertical/horizontal wrap of kitchen twine, so that’s what I did. Once the bacon was hanging and aging, I deliberately avoided any contact with the bacon during the hanging and aging, so that I could see the results in an un-biased manner; three days later, I took a peek and fell in love with what I saw: 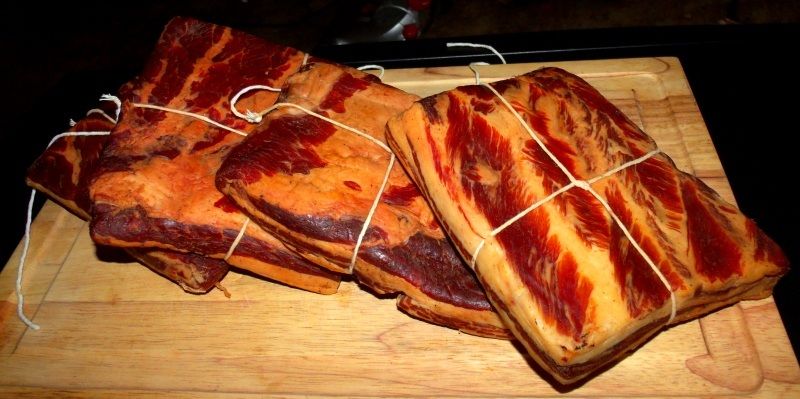 It sure looks great to me - what do you think? 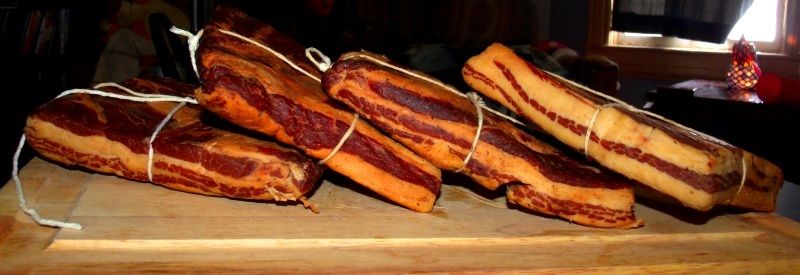 The cold smoking and dry aging resulted in some real depth of colour, as well as a very enticing aroma that had me wanting to dig right in. I chose a slab at random and sliced off an end: 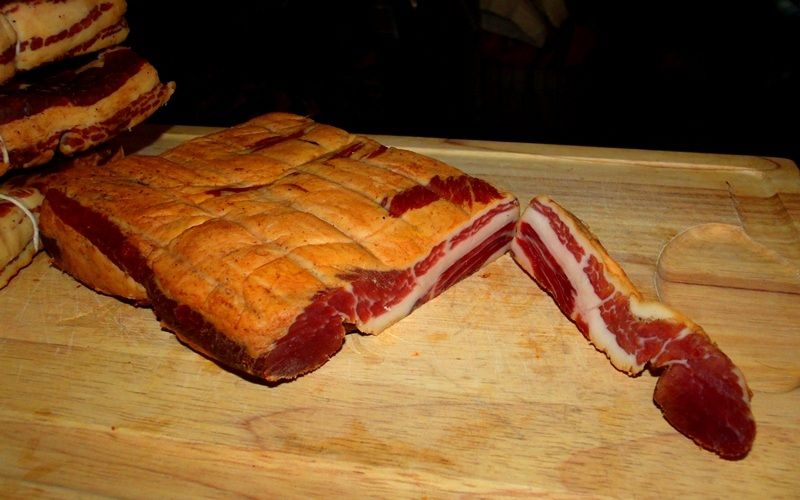 This was my first project, so I'm not sure how the bacon was "supposed" to look inside, but to my amateur eye, it looked incredible - much better than I should have been able to hope for. But I wanted to taste this bacon - not just look at it, so I sliced the opposite end off and diced both of them into "bacon bits" for the pan: 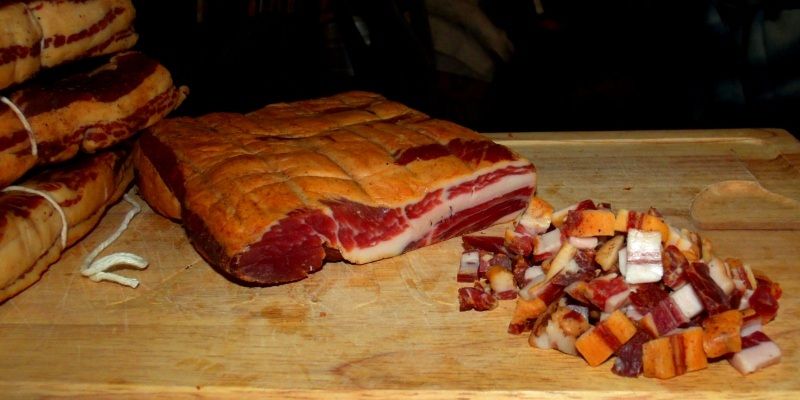 Then - in the name of experimentation, of course - I collected a few samples in sliced format for the family and me to try: 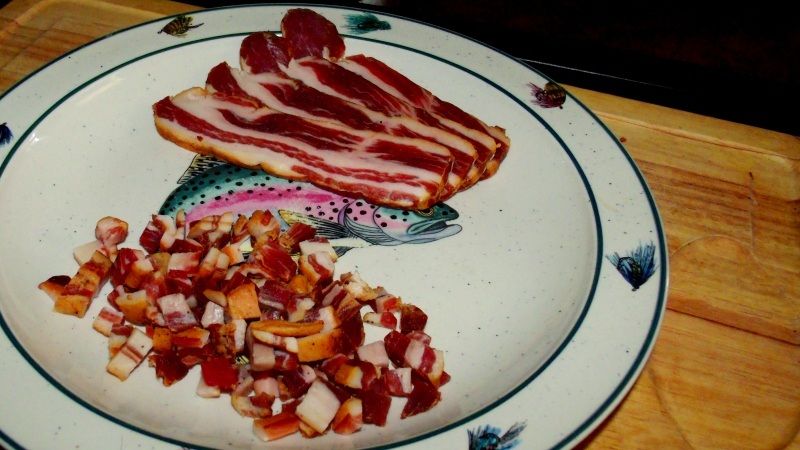 One thing about dry-cured-and-aged bacon - especially if it is on the thick side - is that you want to cook it at lower temperatures, so that the fat has a chance to render as the bacon crisps a bit before the heat scorches or burns it. This is no big deal, if you are aware of it. Also, note the way that the bacon quickly went from a deep, dark red to the lighter, more-familiar pink as it heated up: 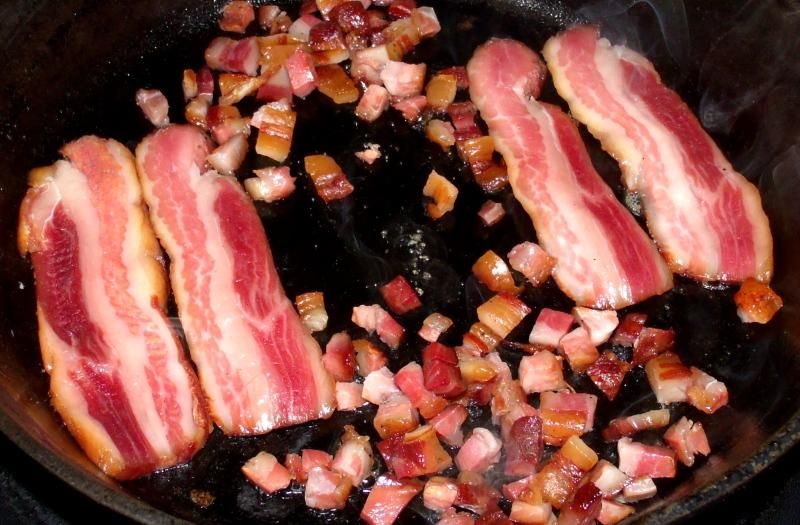 Another option is to cook it in the oven, which I've found to work very well. Results were extremely good - almost perfect, in my opinion! The bacon had a very nice, very deep smoke tang and wonderful texture - even the fat was a joy, with that slightly-crisp exterior and rich, melty interior. The bacon might have been just a bit salty - at least according to The Beautiful Mrs. Tas - but if it was, it wasn’t by very much. Also, the smoke seemed to be mostly on the exterior, and a bit stronger than expected. More on both of those points in a moment. Those issues aside, it was excellent for a first try - and was definitely much, much better than any bacon I've ever paid money for. After the family and I enjoyed those sample bits and slices, I packed the rest away in the refrigerator, along with the other three slabs. I could have hung the bacon back up on the porch to continue dry-aging, but this didn’t occur to me at the time. In any case, a week later, we tried a few more slices from the original slab and I noticed that the flavour seemed mellower and deeper this second time, as if both the salt and smoke had had a chance to penetrate the bacon and equalise throughout. It seemed to me that the bacon had matured very nicely, and I was very encouraged by the results. I put the remainder of that first slab into the refrigerator, along with the rest of the slabs; because it was a busy day, I promptly forgot it as I rushed here and there trying to squeeze a dozen things into the weekend. A week after that, I made breakfast again, and the bacon seemed to be even better than before - more developed - and I was even more impressed with it, as was The Beautiful Mrs. Tas. By now, the first slab was gone, and I decided that I had what I was looking for in terms of flavour, for now. I individually vacuum-sealed the remaining three slabs and put them into the freezer, there to await some time in the future when I could enjoy them again. The passage of time that happened in the refrigerator amounted to a controlled aging, albeit not a dry-aging, because the slabs were in ziplock bags. I am sure that this same effect could have been accomplished by continuing to hang the slabs in the front porch, and will experiment more with this in the future to see the effect of extended dry-aging. It didn’t occur to me to weigh them, but after curing, smoking and aging, it seemed that each of the four slabs - which weighed 1.5 pounds to begin with - ended up weighing just a little over a pound; I’ll say 1.25 pounds for now and keep better track next time. I elected to vacuum-seal and freeze my slabs whole - rather than slicing them first - for several reasons. The first is because much of the reading that I have done on meat storage tells me that whole cuts of meat freeze and keep better while frozen; I am very careful about freezer-burn and the quality of the meat I make, so this seemed to be a natural choice. Another reason for storing the bacon in whole slabs is versatility; with a slab that isn’t pre-sliced, I can cut slices to any desired thickness at any time, or remove chunks and cube them - or cut strips for lardons. The possibilities are many, and considering the various culinary projects that I like to try, the practice simply makes sense. All-in-all, my bacon was as close to perfection as I could reasonably expect for a first time - with plenty of opportunity for improvement. After all, it can never be perfect, because what would come after perfect? Either way, as I said above, it was much better than any bacon that I've ever bought at the store; in fact, I've already put in a new order for another 6-pound slab of pork belly, so that I can make some more. As I mentioned throughout, this was a learning process for me, and as a result I was rather tentative at each step of the process. My bacon turned out very well, and I found it to be absolutely delicious, with every quality that I was looking for; however, the process also taught me that I could take the things I like about this bacon and make them even better. For my next attempt, I plan to build upon what I have learned and jump into the entire process with both feet. I alluded to these plans throughout the process, and will of course report on results. My hope is to apply what I have learned from this experience, and transform delicious bacon into an example of fine craftsmanship in the art of charcuterie. Thanks for taking the time to read through this, and I do hope that it has motivated you to try some of the methods outlined here. As always, if you have any questions or comments, please feel free to post them, in order to develop some constructive discussion about this most wonderous of cured and smoked meats. Enjoy! Ron | ||
|
| One of Us |
Very interesting, thanks for the info. | |||
|
| one of us |
Great report 1 Thank you There is nothing as permanent as a good temporary repair. | |||
|
| One of Us |
Thank you. Well done. | |||
|
| One of Us |
Nice. | |||
|
| One of Us |
Ron- that is beautiful bacon! Great narrative, with great results. Thanks for the post. Doug Wilhelmi NRA Life Member | |||
|
| one of us |
Thank you for the kind words and comments, everyone! I started my second batch tonight, using another 6-pound slab I cut into four sections, just like last time. This slab wasn't as "even" as the last one; I ended up with two 1.5-pound slabs. one 2 pound slab that was on the thick side and a final 1-pound slab that had some thinner spots. This is not too big a deal, but it does go to show that every hunk-o'meat is different.... In some private discussions with Rich, I learned that one can dial back the TQ by 20% when making bacon, adding a couple of extra days on the curing time. I am giving this a try for this second batch, in response to my wife's opinion that my first batch was just a little too salty. Another thing I did differently than last time was to turn up the volume on the Black Forest spice mixture and maple sugar, giving my slabs a heavier "dusting" than last time - by about 50%. I'll cure this bacon for a minimum of 10 days, but will probably add a couple of days in order to stretch it to the weekend. Each night, I'll flip and rotate the bacon, as before, massaging the bags gently and working the cure, spices and maple sugar into the pork. Once the curing is finished, I'll proceed as described in the above pictorial, adding more smoking time and dry-aging time than last time in an effort to develop flavour that is even deeper and richer than last time. I'll post more as it happens, etc. &c.... | |||
|
| One of Us |
Absolutely educational. The colour and the texture of the bacon is absolutely brilliant. Mouthwatering stuff. I do not have access to a smoker at the moment but I will definitely give it a go. I recently cured a few pounds of bacon using only salt and sugar ( a different recipe). I did not smoke it. It turned out OK but a bit too salty. I am going to try your method except for the smoking part for the reason I mentioned. A couple of questions if you don't mind. 1. Do you drain the liquid that oozes out of the meat or allow it to stay in the bag? 2. Do you add salt at any time after the first rub or only once? Thanks again. Best- Locksley,R "Early in the morning, at break of day, in all the freshness and dawn of one's strength, to read a book - I call that vicious!"- Friedrich Nietzsche | |||
|
| One of Us |
| |||
|
| one of us |
Hi, Robin - two quick answers to your questions, and then a recommendation, if you don't mind ~ 1) I do not drain the liquid, because it contains flavour as well as cure. I allow it to stay in the bags, rotating and massaging them each day, and eventually the meat soaks most, if not all of it back in. I do not know the science behind the whole thing, but I suspect it is some sort of osmosis/equalisation process. I've done all of my cured meats this way, with perfect results as far as thorough cure and good flavour. 2) I do not add salt at any time after the first application of cure. My understanding is that with some curing projects using hunks of meat that are thicker than three inches, it is sometimes desireable to divide the total cure/salt in half, then apply one haf for a certain amount of time, then the second half after a certain amount of time. I've never done this, so I don't know too much about it, but I do know that it is for thicker chucnks of meat. As far as a smoker goes, if you have one of those AMNPS units, you don't need an actual, dedicated smoker in the traditional sense of the word; it works in one, but the truth is that all you need is some sort - any sort - of enclosure. A large box with a few holes, an old refrigerator with bottom and top vents - even a Weber Kettle will do the job. This is especially true for cold smoking, which the AMNPS is perfect for. You can take a look here: http://owensbbq.com/smokers-and-pellets.html That's really all you need, for these types of projects - definitely worth the modest price. Hope this helps! Ron | |||
|
| one of us |
I just finished my second batch, making it essentially the same as my first, except for these differences: a) I dialed in the cure/salt amounts more precisely. b) I used a bit more maple sugar and Black Forest spice mix (1 tablespoon of each per pound during curing, and then another tablespoon per pound of maple sugar on the meat side during the week of equalisation). c) I added a few juniper berries to the blend of maple/apple/oak pellets that I used for smoking. d) I smoked for a longer period of time (closer to 30 hours, on and off). e) I dry-aged for a longer period of time (closer to 4 days - high humidity prevented any further dry-aging). I have not sampled the bacon yet, as it is is sitting in the refrigerator a few days until I have some time, but I am expecting really good things. This batch is darker than the first, possibly due to the juniper berries added to the smoke. I smoked this batch in my new MES 30, which required a bit of a learning curve, but I think I got it mostly figured out. I might hang these to air-dry a bt longer as they seem a bit moist still, but that's something I can do over the course of the next couple of evenings, if I choose. The only "glitch" in this attempt was that the smoking temperatures got a little higher than I intended for a few hours - close to 100 degrees. This was probably a result of using the broken-up bits of charcoal in the bottom of the AMNPS; there is little to no noticable effect during the winter months when temperatures are below zero, but during warmer periods it appears to bump the temperatures up a little too high. This is no big deal, as the bacon is perfectly fine - but it is something to be aware of for the future. That's what I have for now - I am thinking that I need one more third batch to have a good store of bacon in the freezer, so I ordered one more pork belly this morning. I will continue to use this method, as it gives me exactly what I am looking for when I think of making my own bacon. The only "tweaks" that I plan to apply for this third batch are: a) A slightly-longer smoking time (closer to 40 hours, if feasible). b) Using a blend of oak and beech, with juniper berries added yet again, for smoking. c) A slightly-longer dry-aging time, if feasible. Ron | |||
|
| one of us |
I started a new project based on this theme last night, and I hope that it goes well. A while ago, I bought a pig; when I had the butcher go to work on it, I asked him to save some parts that would normally be ground into sausage or used for other purposes. One of those cuts was the jowl...well, both jowls, actually. Last night, I began the process of making pork jowl bacon, using this "Black Forest Maple" process, which has become my go-to method.  The two jowls were each just under 0.85 pounds, so I adjusted the amount of cure ("TennerQuack", from Mad Hunky Meats), backing off the amount by 20%, as discussed above for bacon. This will work out well, since the jowls are on the thin side, and I'll be curing for nearly 2 weeks, if not three. Once I applied the cure, I dusted the jowls with a tablespoon each of maple sugar and a Black Forest spice blend, made according to BriCan's authentic family recipe that he generously shared with me. The jowls are curing now, and will be until at least the weekend of 6/7 May, possibly a week longer. Once the curing is complete, I'll continue with the dry-cure, cold-smoking procedure, as described above. I also have a couple of pork bellies from this same pig; when I am able to, I will be giving them the same treatment. I'd like to take a moment and sincerely thank BriCan for sharing what he knows about curing and charcuterie; thanks to him, I am making better bacon than I ever could have made on my own! Ron | |||
|
| one of us |
Warning this will keep you busy a long time !!! The pork jowl is used in Italy in things like pasta sauces. It is not to be confused with bacon as the flavor and texture is not the same .Unfortunately Italian recipes with 'Guanciale' are changed to 'bacon' in English . My family's tastes are for delicate flavors .Less sugar , salt , spices .We've got lots of woods here so more experiments are possible. Try black birch. If you can get a good home grown pig you'd be happier ! Have fun ! | |||
|
| one of us |
tasunkawitko Great looking bacon! | |||
|
| one of us |
Thanks, Jiri, and thank you mete for some good information! I am not sure if I can get my hands on any black birch here in Montana, but I will keep an eye out for it. I love different smoking woods and am always looking for some good combinations. For this jowl project, I considered making bona fide guanicale, but didn't have the spices on hand. I'm hoping this turns out well, and plan to use it mainly as a component in other dishes that I make, such as dicing it up and adding it to carbonara, or perhaps in stuffed cabbage leaves...or with some halusky. | |||
|
| One of Us |
I have to say I am impressed with all of your posts on food. I am 23 year veteran of the restaurant industry and own my own, and your level of skill plus the ability to articulate your thoughts about it are much better than my own. And I have done it all. Keep it up! I think the black Birtch you mentioned might be sweet birtch? If so it occurs in Kentucky, and I might be able to get Mkt hands on it. I don't know if mailing it to you is worth it though. | |||
|
| one of us |
Trying to check - my tree book doesn't list "black birch " but it does list "sweet birch " in my area. I'll have to talk to my wood friend. The book says twigs have a strong wintergreen flavor . TAZ misspelled - Guanciale [ guancia-cheek] , the 'ci' is pronounced 'chi'. One pasta book I have admits changes from guanciale to 'streaky bacon' Going back to the internet -- Betula Lenta [sweet birch, black birch, cherry birch, mahogany birch are all the same ! ] Names can be strange - has anyone heard of a Pepperidge tree ? | |||
|
| Powered by Social Strata |
| Please Wait. Your request is being processed... |
Other Topics Recipes for Hunters

Visit our on-line store for AR Memorabilia