
 Guns, Politics, Gunsmithing & Reloading Gunsmithing
 Go | New | Find | Notify | Tools | Reply |
| Ebony buttplate | Login/Join |
| One of Us |
I'm giving an ebony buttplate a try, on a fingergroove style 10/22 stock in curly cherry by Mike Turner. The stock is a little different from the start and I didn't have any buttpads at the ready, so I decided to keep it different and try putting some ebony on it. Just having fun with the project and maybe learning something along the way. Started by sawing up some blocks of ebony then fitting and epoxying them to the stock. I let the blocks sit for a few days after cutting and before gluing to make sure nothing funny happened (and nothing has). A 1/4" slice for the grip cap and 3/8" for the buttplate. 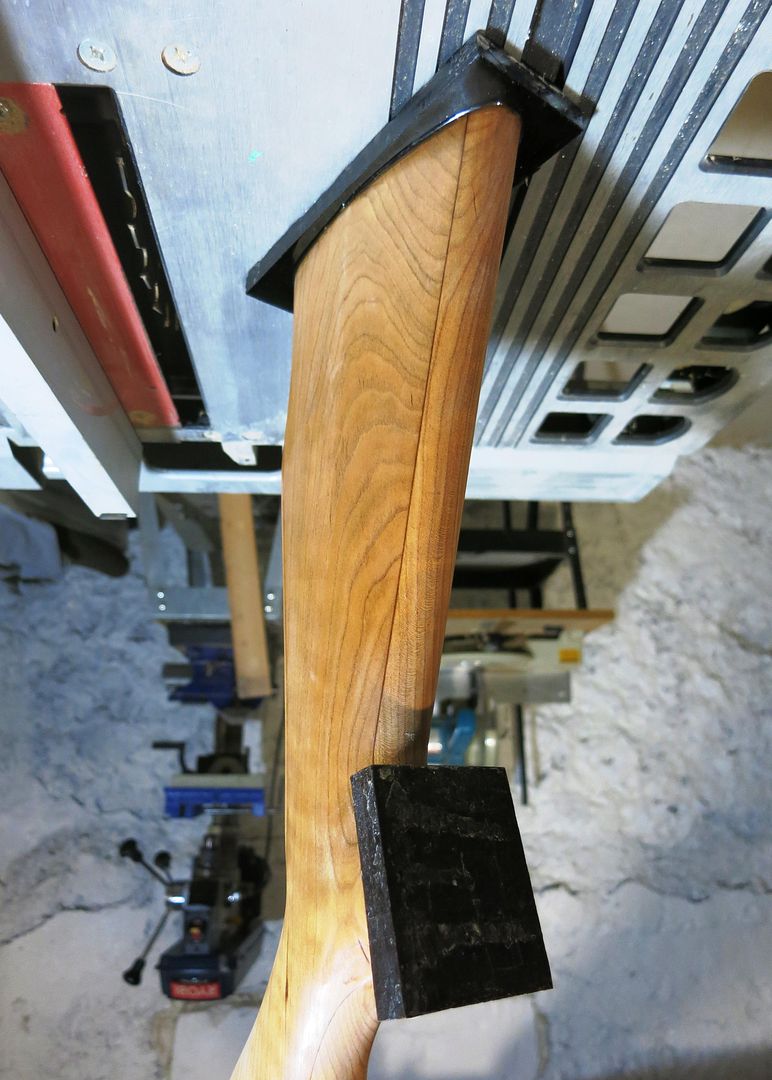 Trimmed and profiled. Not doing this before installing it was STUPID, especially for the grip cap- it was a massive pain in the butt to shape them in place without tearing up the rest of the stock. Lesson learned! 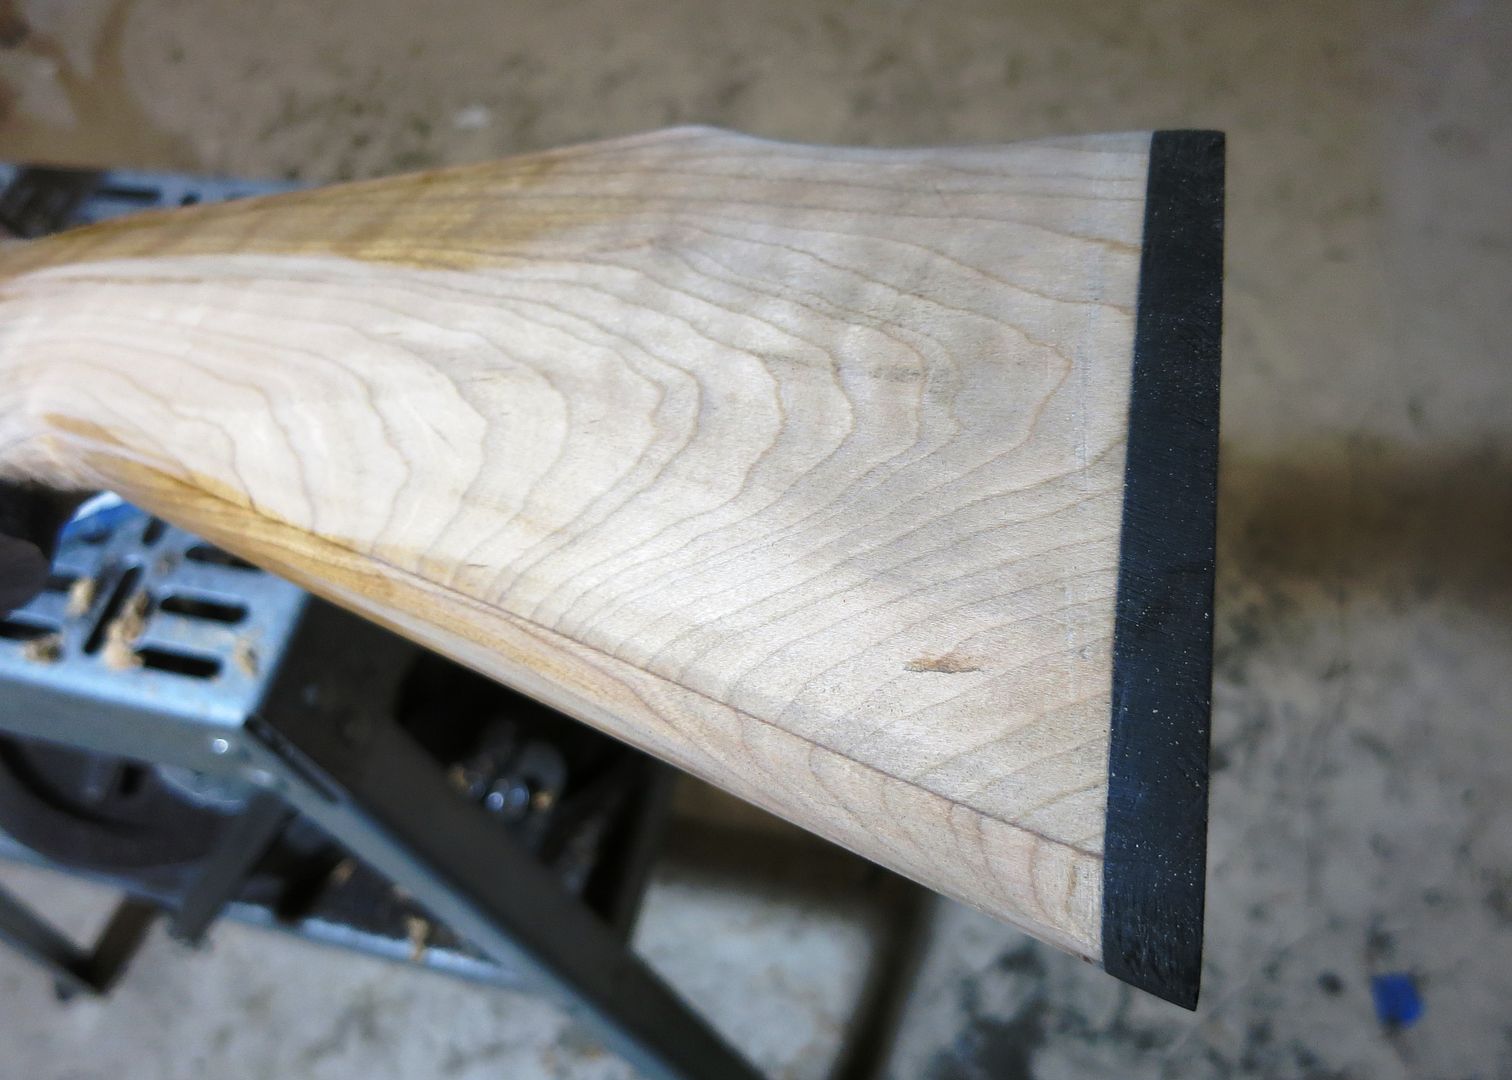 Now shaped. 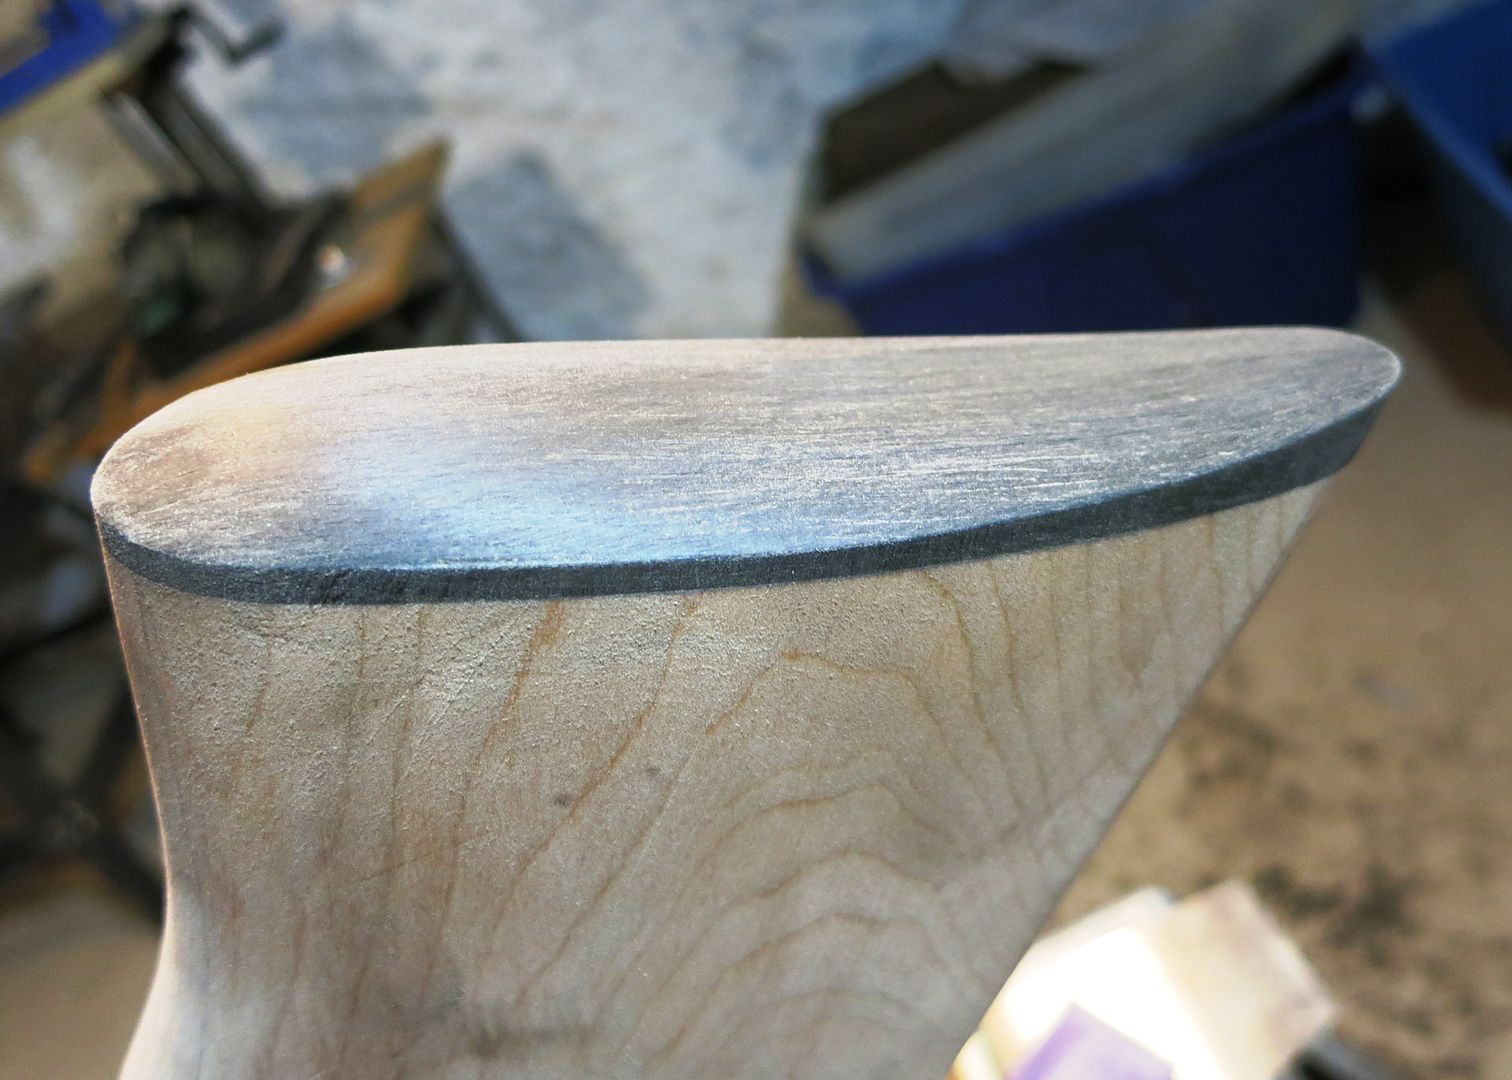 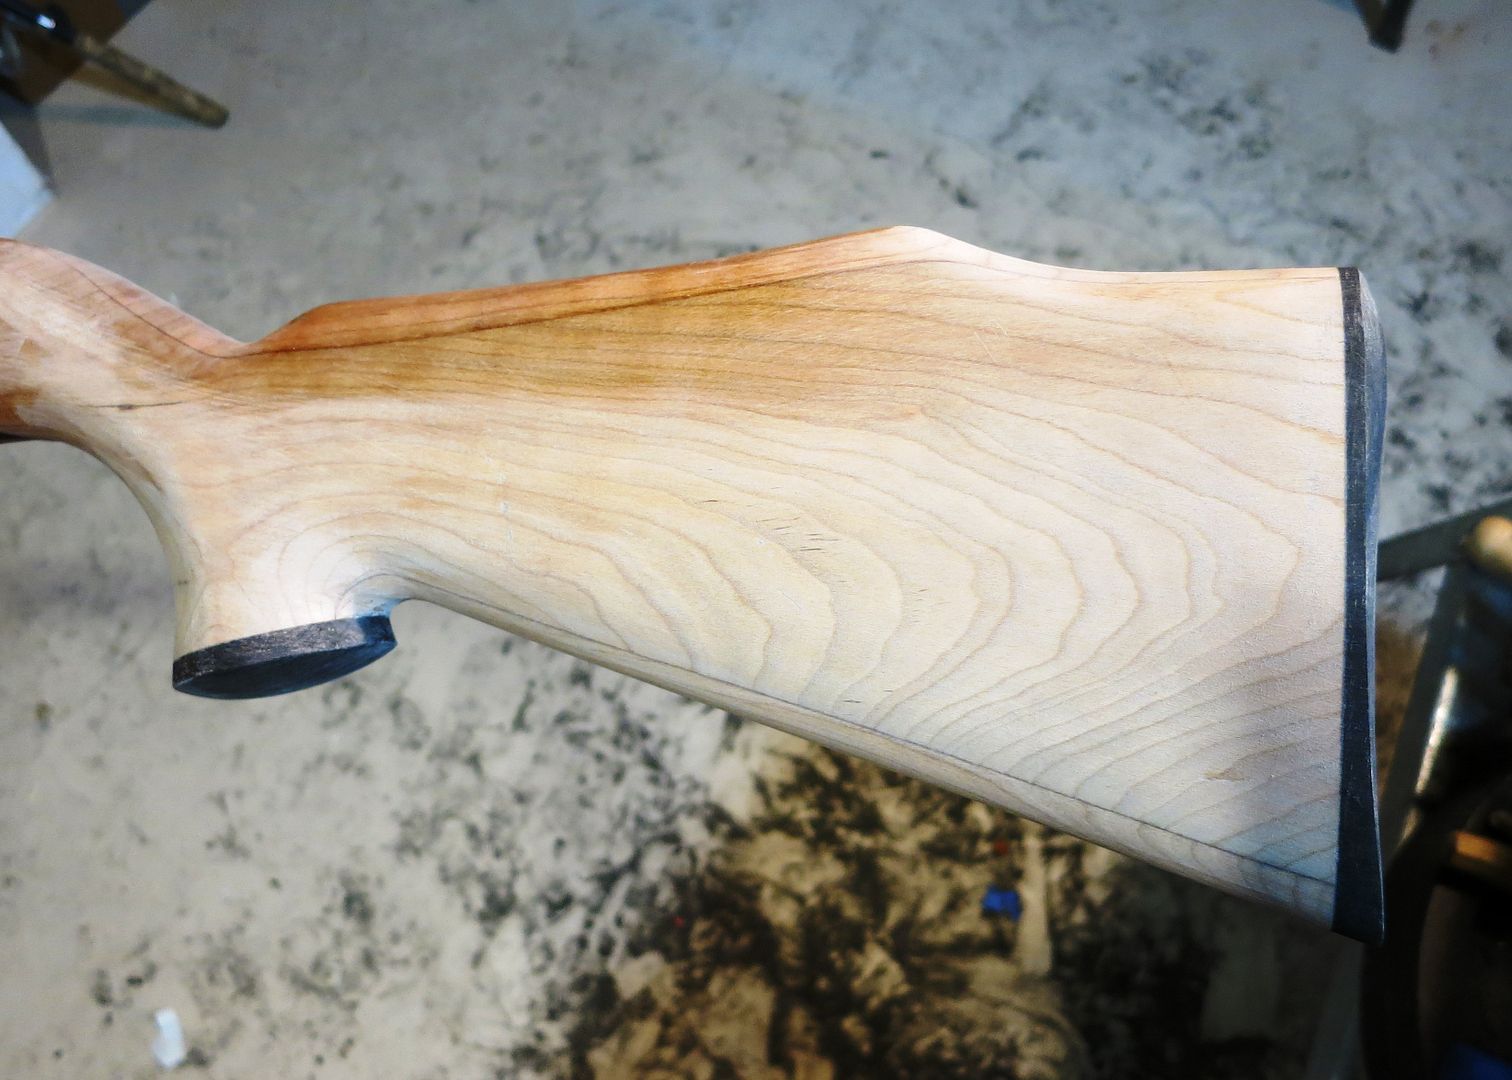 Ready for checkering... part of the reason why I wanted to do this ebony buttplate was to checker it. 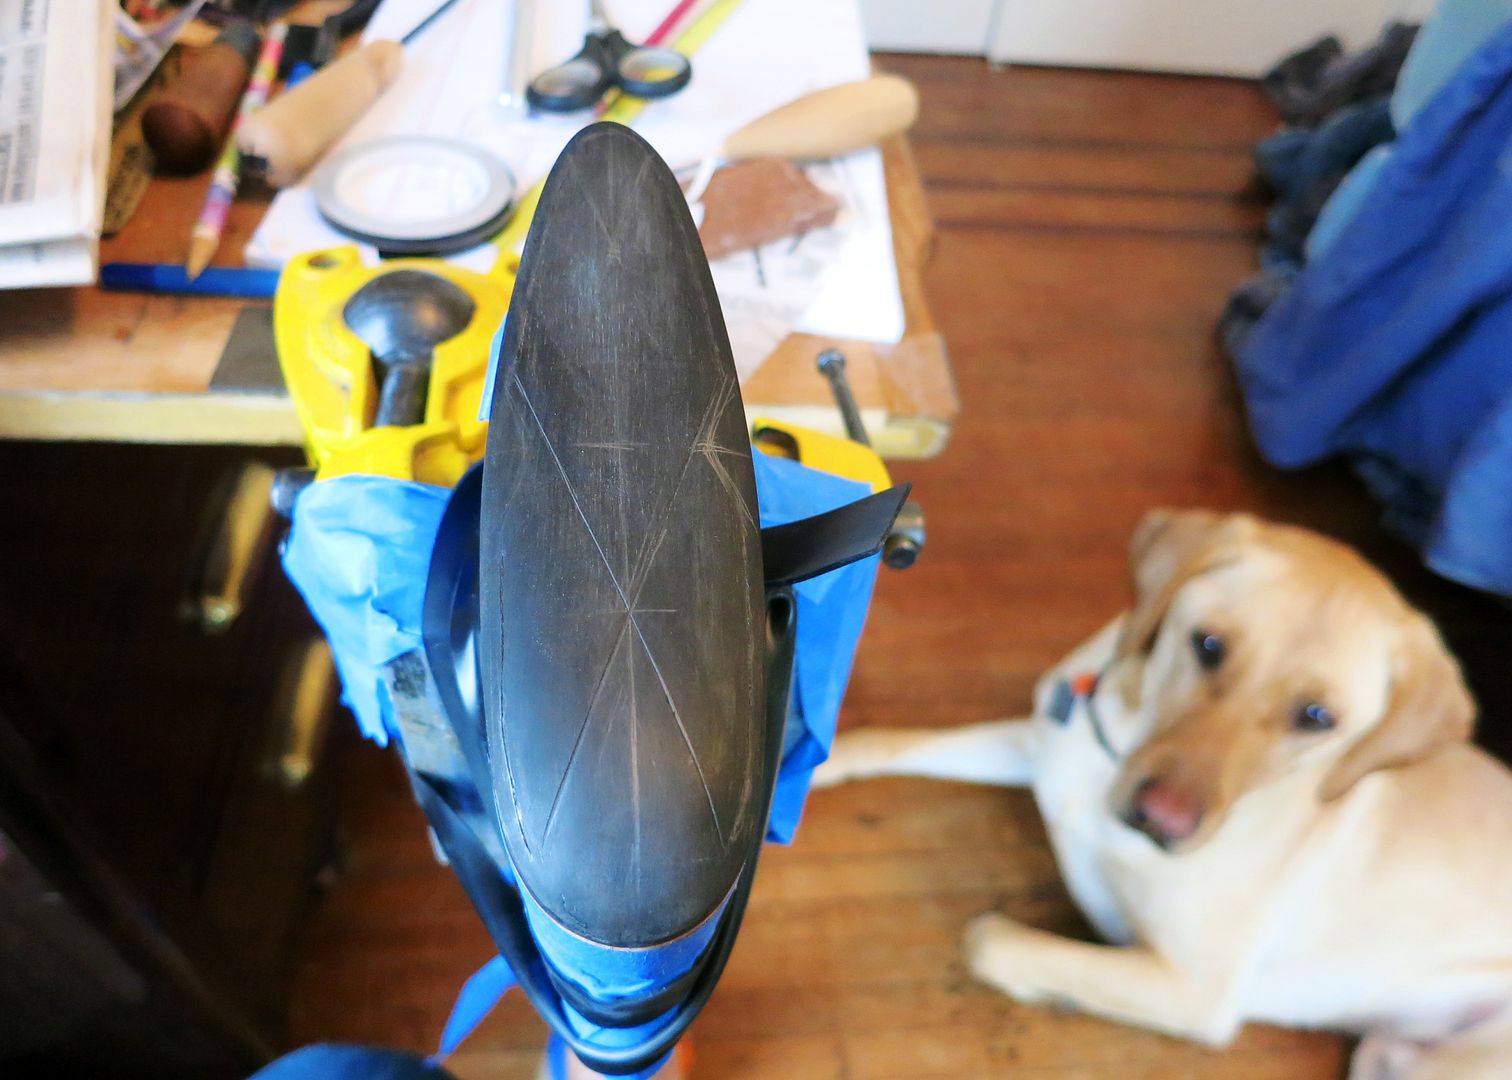 The lighting in my bedroom is worlds better than in the basement, so I set up a vise on my desk and went at it. 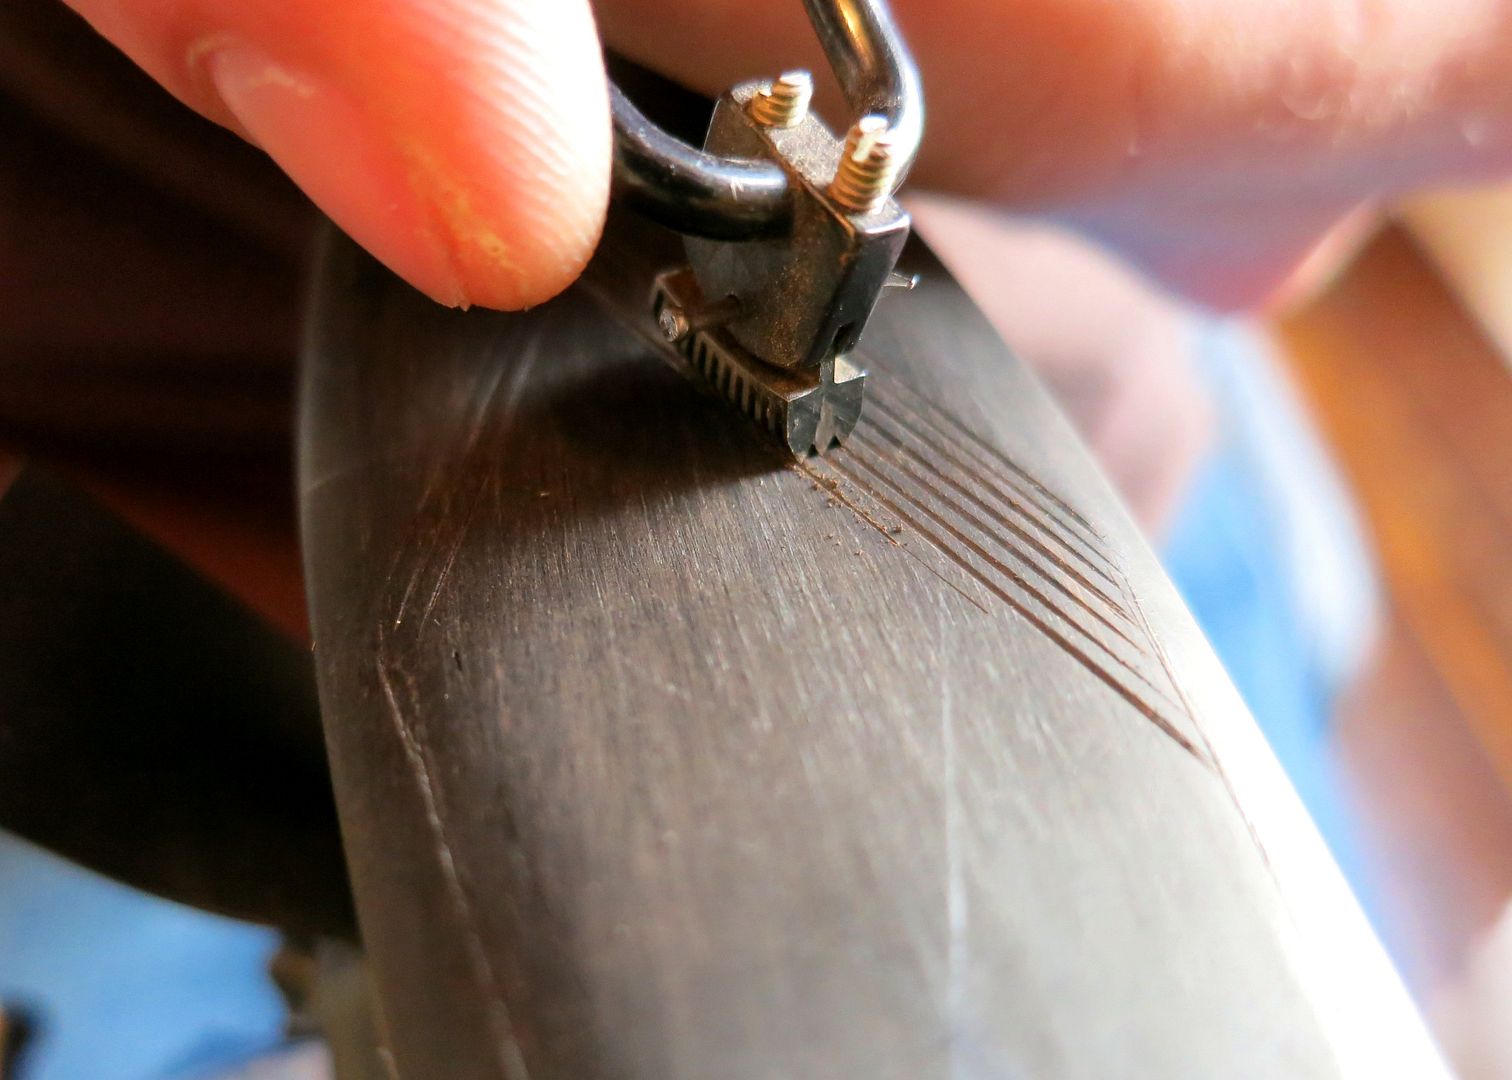 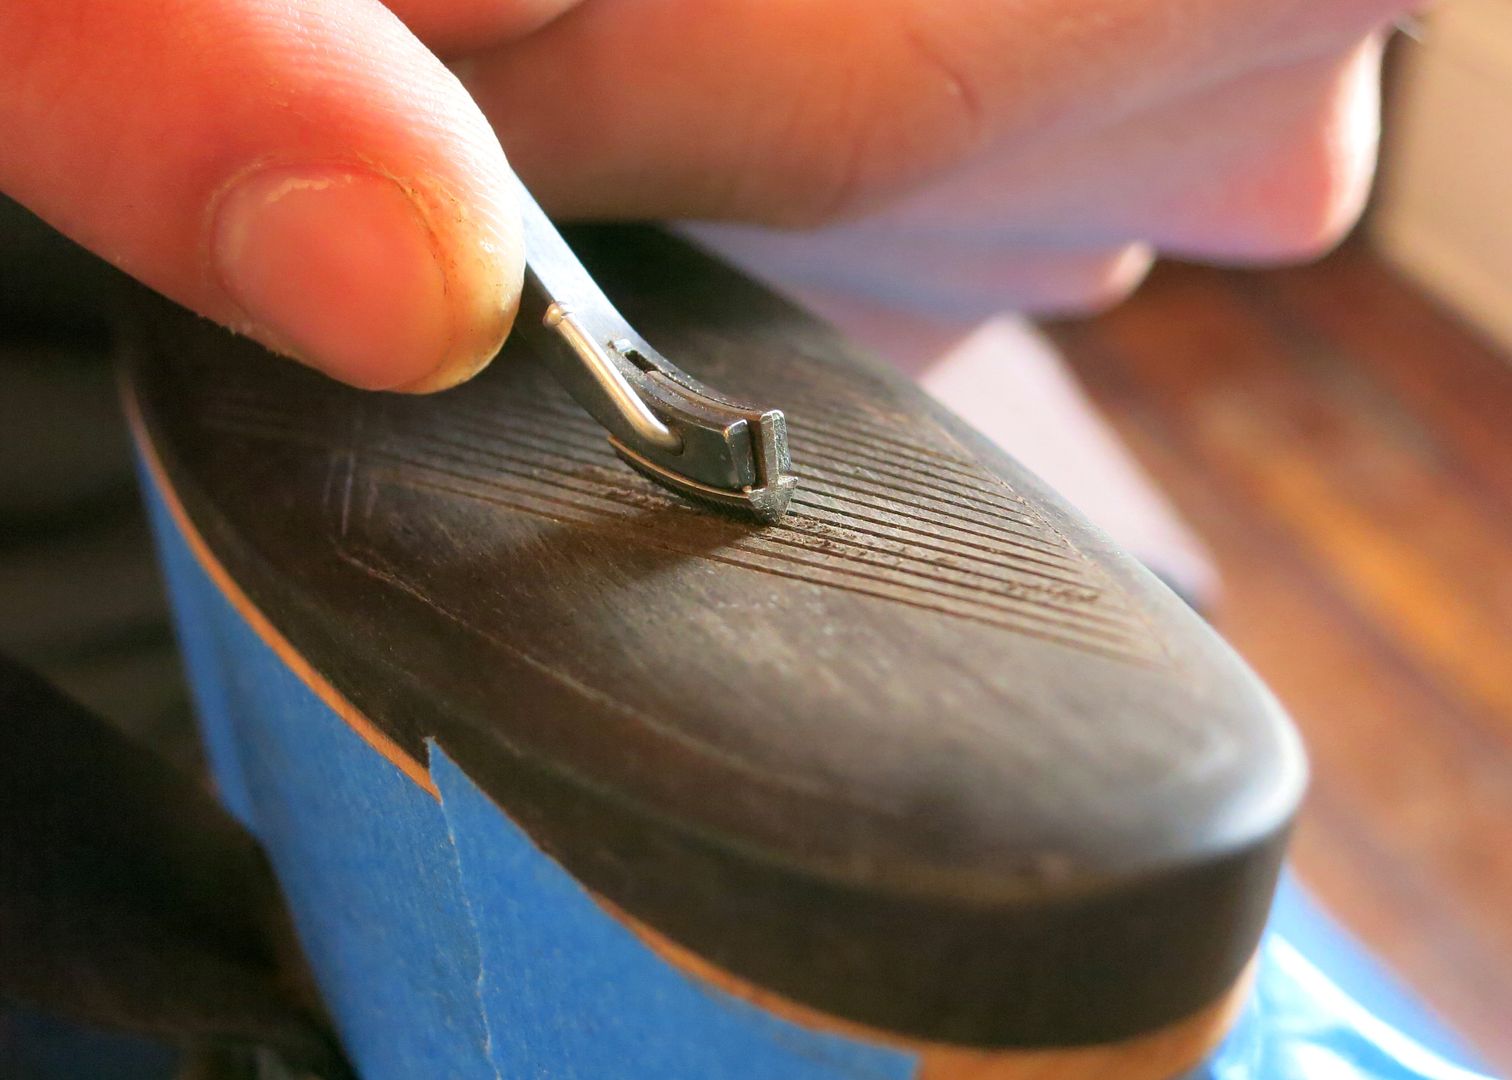 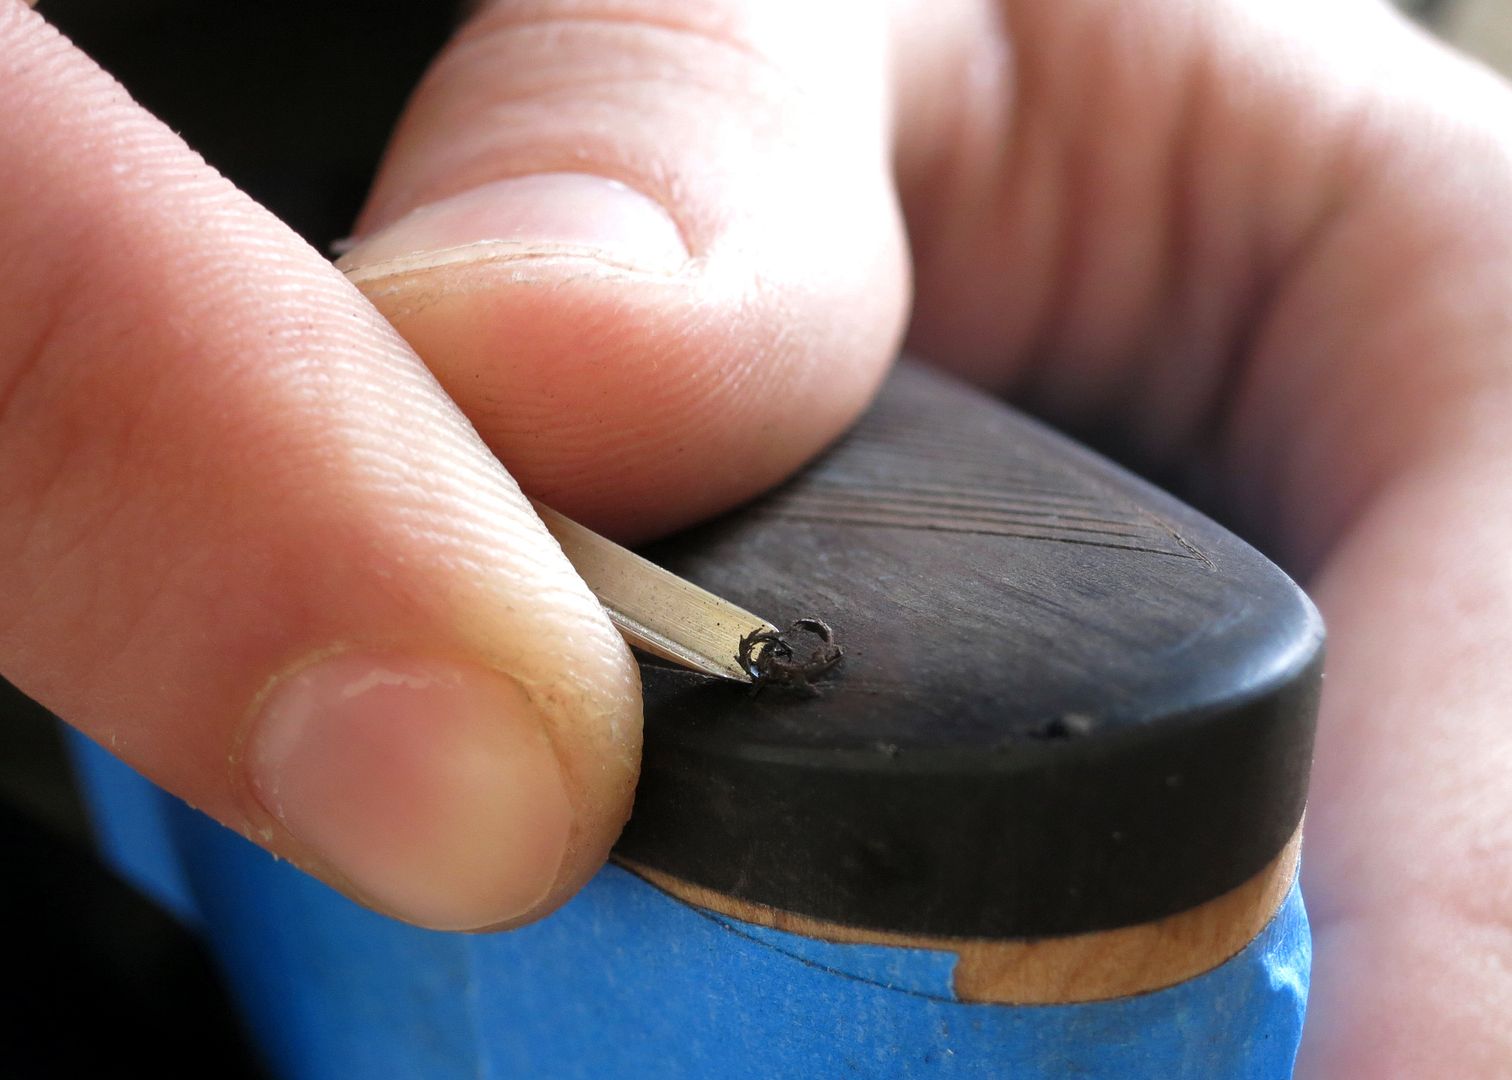 I felt rusty after not having touched my checkering tools for a few months (broke my left hand earlier this summer and it threw me off) and the tools felt dull cutting the hard ebony, so there's my excuses. I still have to point up some diamonds and even out lines but I'm satisfied with it so far. 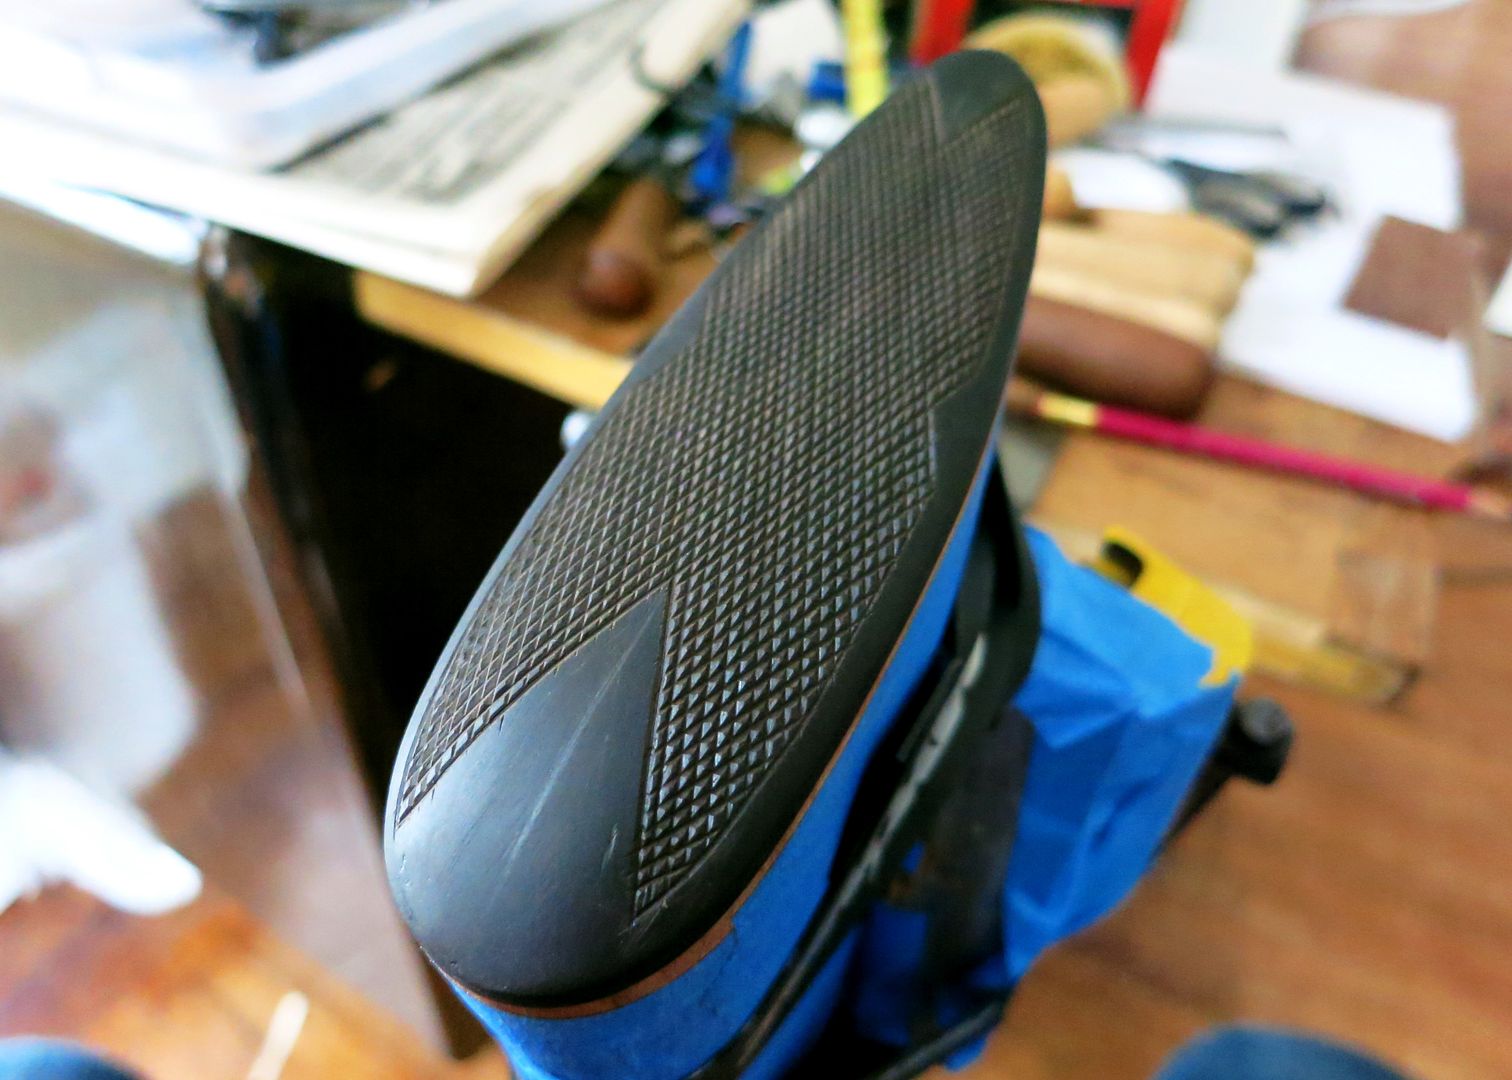 Thanks for looking! "If the women don't find you handsome, they should at least find you handy." | ||
|
| one of us |
Looks nice. As usual just my $.02 Paul K | |||
|
| One of Us |
Neat project. . | |||
|
| one of us |
Evan, your checkering is really improving. I would leave the point top a little flat to keep from breaking off later in use. Use a little sanding dust from the same piece of wood with a little Super Glue as a paste filler if you can't sand run overs out. Motto: It is not how good a craftsman you are, but how well you can cover your mistakes. LB I found that cutting hard wood with a Viener was much easier if you cut like an engraver does in metal. I use a light hammer and drive the chisel instead of pushing the palm chisel. Your hands has to have a lot of stress to push without making an over run. I learned this trick over 40 yrs ago when a customer wanted several pistol grips carved instead of checkering. Just a few tips which might help, Les Brooks | |||
|
| One of Us |
Nicely done! I did a similar trick last summer on a pre-war break action German single shot Guild gun, in 5.6x35R (.22 Hornet). I epoxied the grip cap, about twice as thick as yours, and rounded it over for a quasi-Prince of Wales effect. The butt plate is held on with screws and checkered similarly to yours. So far it has held up well. The only fly in your ointment, so to speak, is that you epoxied the butt plate on, IMO. You created an end grain-to-long grain glue joint that will likely fail at some point, if you indeed glued it flat on the end of the stock. I would have provided a mechanical lock of some kind, or at least utilized a big shallow plug that subtended both the ebony and the walnut stock, to provide some long grain-to-long grain surface area for the epoxy to give a reliable bite. Just a word of advice for the next one. Aside from the end grain glue joint no-no, the expansion/contraction ratios of the two woods are very dissimilar (and they will expand/contract with fluctuations in air moisture no matter how well finished), as well as wanting to move in different directions. That will work incessantly toward the eventual failure of the glue joint also. | |||
|
| One of Us |
There are a lot of laminated stocks that will not fair well either! _____________________ Steve Traxson | |||
|
| One of Us |
If you glued them on end grain-to-end grain, don't be surprised if you hear about some falling off, unless you stuck some dowels or plugs in there too. I'm not making this up. It is a basic tenet of woodworking. Laminations are no problem, they're long grain-to-long grain glue joints, and stronger than the wood that surrounds them. Epoxy is a wonderful bonding agent. I have used, literally, over a 50 gallon drum of the stuff over the last 10 years in my business. But, it isn't a panacea for our problems. Natural laws dealing with proper wood layout can't be abrogated by using epoxy. | |||
|
| one of us |
Really a cool idea and nice work. My only concern would be the tendency for ebony to split, especially when on the butt of a stock, when gun might be set down a bit hard, etc. Whether this is a real concern, I'm not sure. xxxxxxxxxx When considering US based operations of guides/outfitters, check and see if they are NRA members. If not, why support someone who doesn't support us? Consider spending your money elsewhere. NEVER, EVER book a hunt with BLAIR WORLDWIDE HUNTING or JEFF BLAIR. I have come to understand that in hunting, the goal is not the goal but the process. | |||
|
| One of Us |
Thanks fellas! I knew someone would point out the end grain to long grain joint, and I know it isn't ideal. I had to find out for myself how well (or not) this would work. If (when?) it fails, there's space in the checkering pattern to install screws that could be plugged over. I used the same epoxy that I do for making laminated wood blanks (good stuff) and did my best to maximize the strength of that joint, so we'll see what happens. Gato I think that is a potential risk, but you'd have to set it down pretty hard. The ebony is straight grained and tough. That being said, shit happens.
Thanks Les, and I appreciate the checkering tips! "If the women don't find you handsome, they should at least find you handy." | |||
|
| one of us |
All those problems with wood ?? That's why we metallurgists invented steel !! | |||
|
| One of Us |
Finally finished this up, the stock hung out for a long time while I was working on other projects. 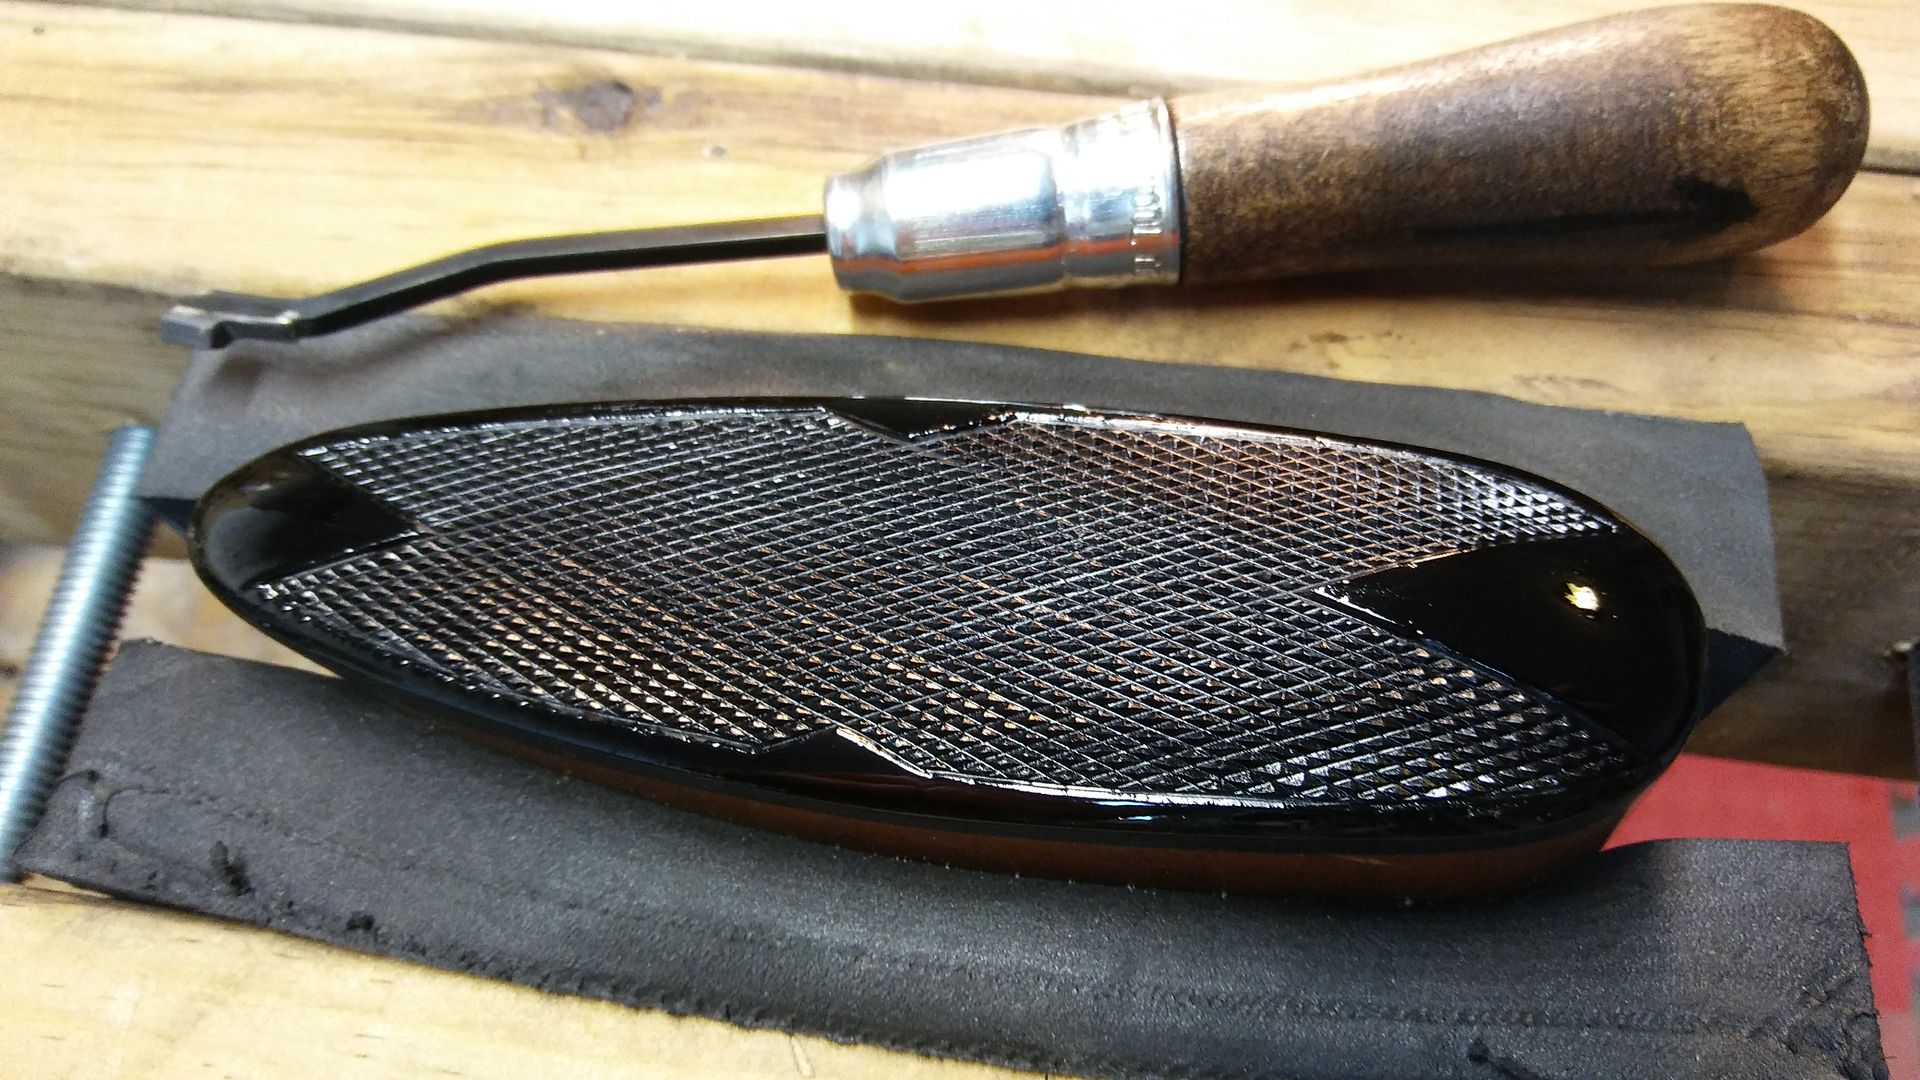 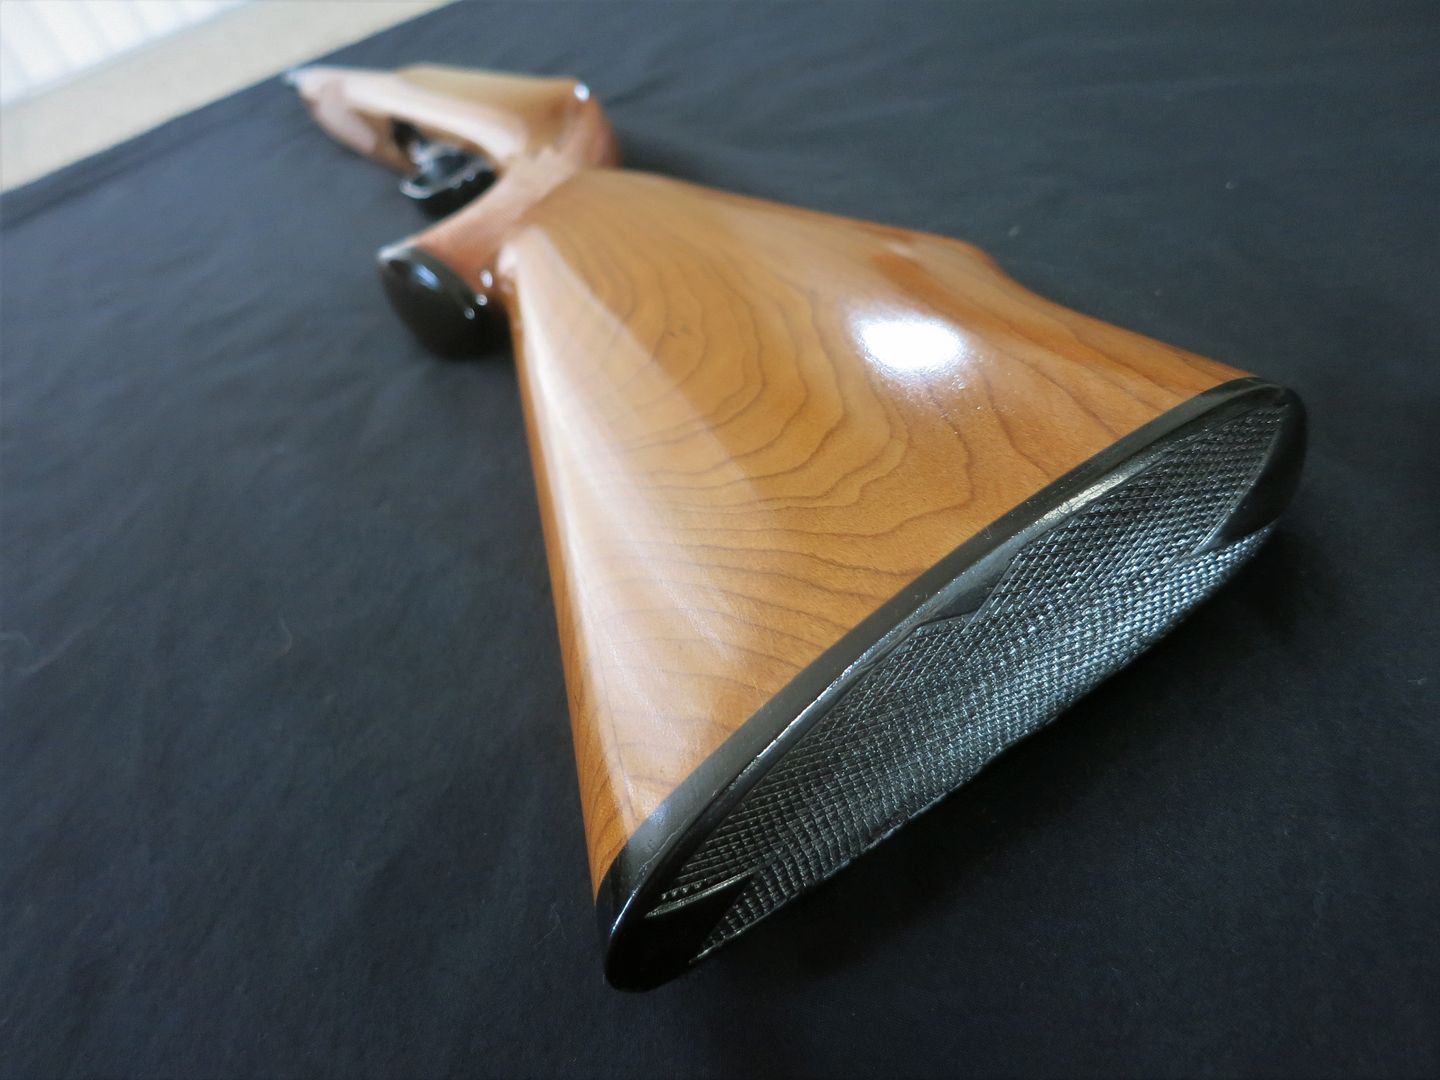 I made a rig out of 2x4s, foam scraps, and a couple long bolts with wing nuts to hold the stock in place while checkering the buttplate. This is wayyy better than how I had it held together a couple years ago. 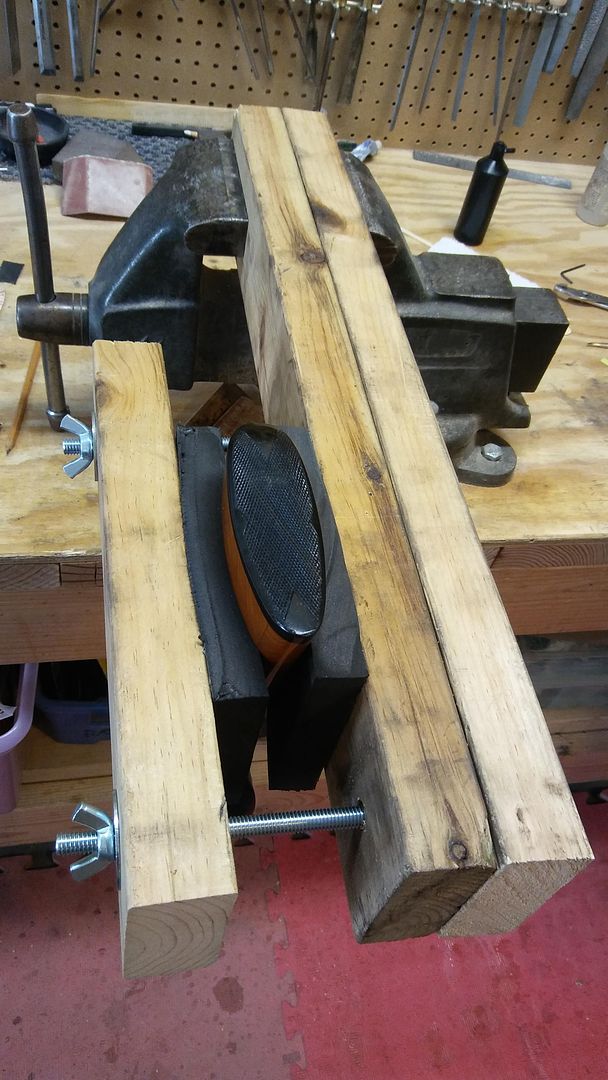 Rest of the rifle here. I tried to replicate the original checkering patterns that were on these Fingergroove style 10/22 stocks. 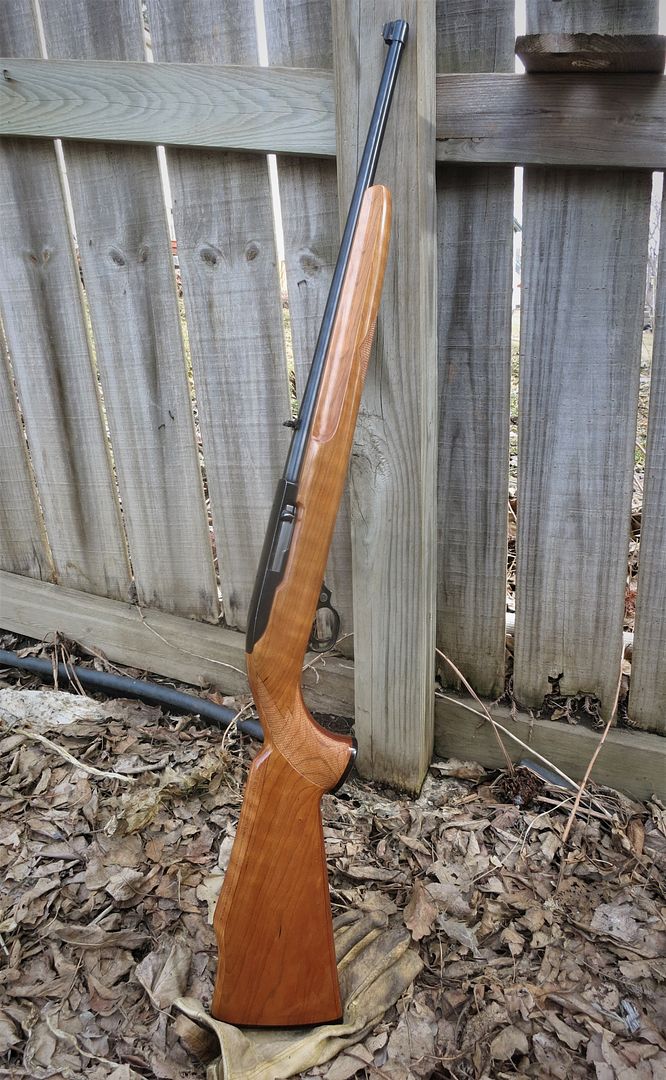  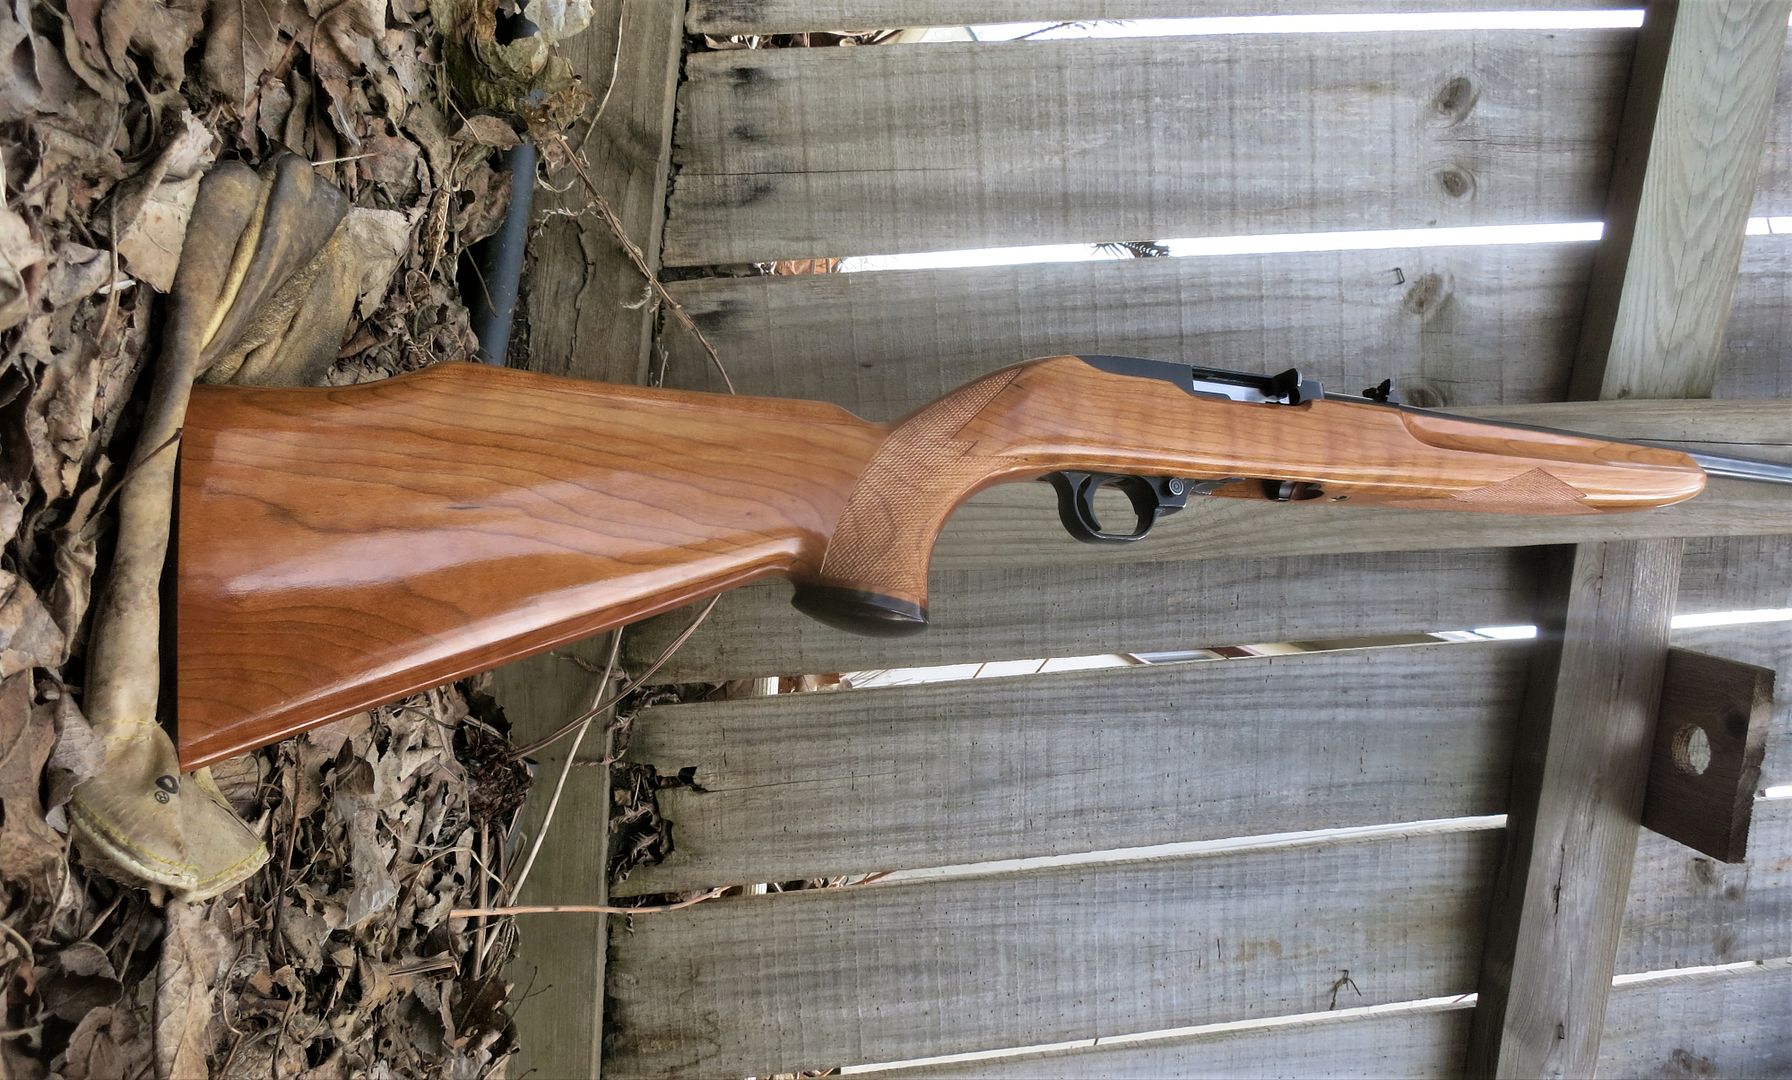 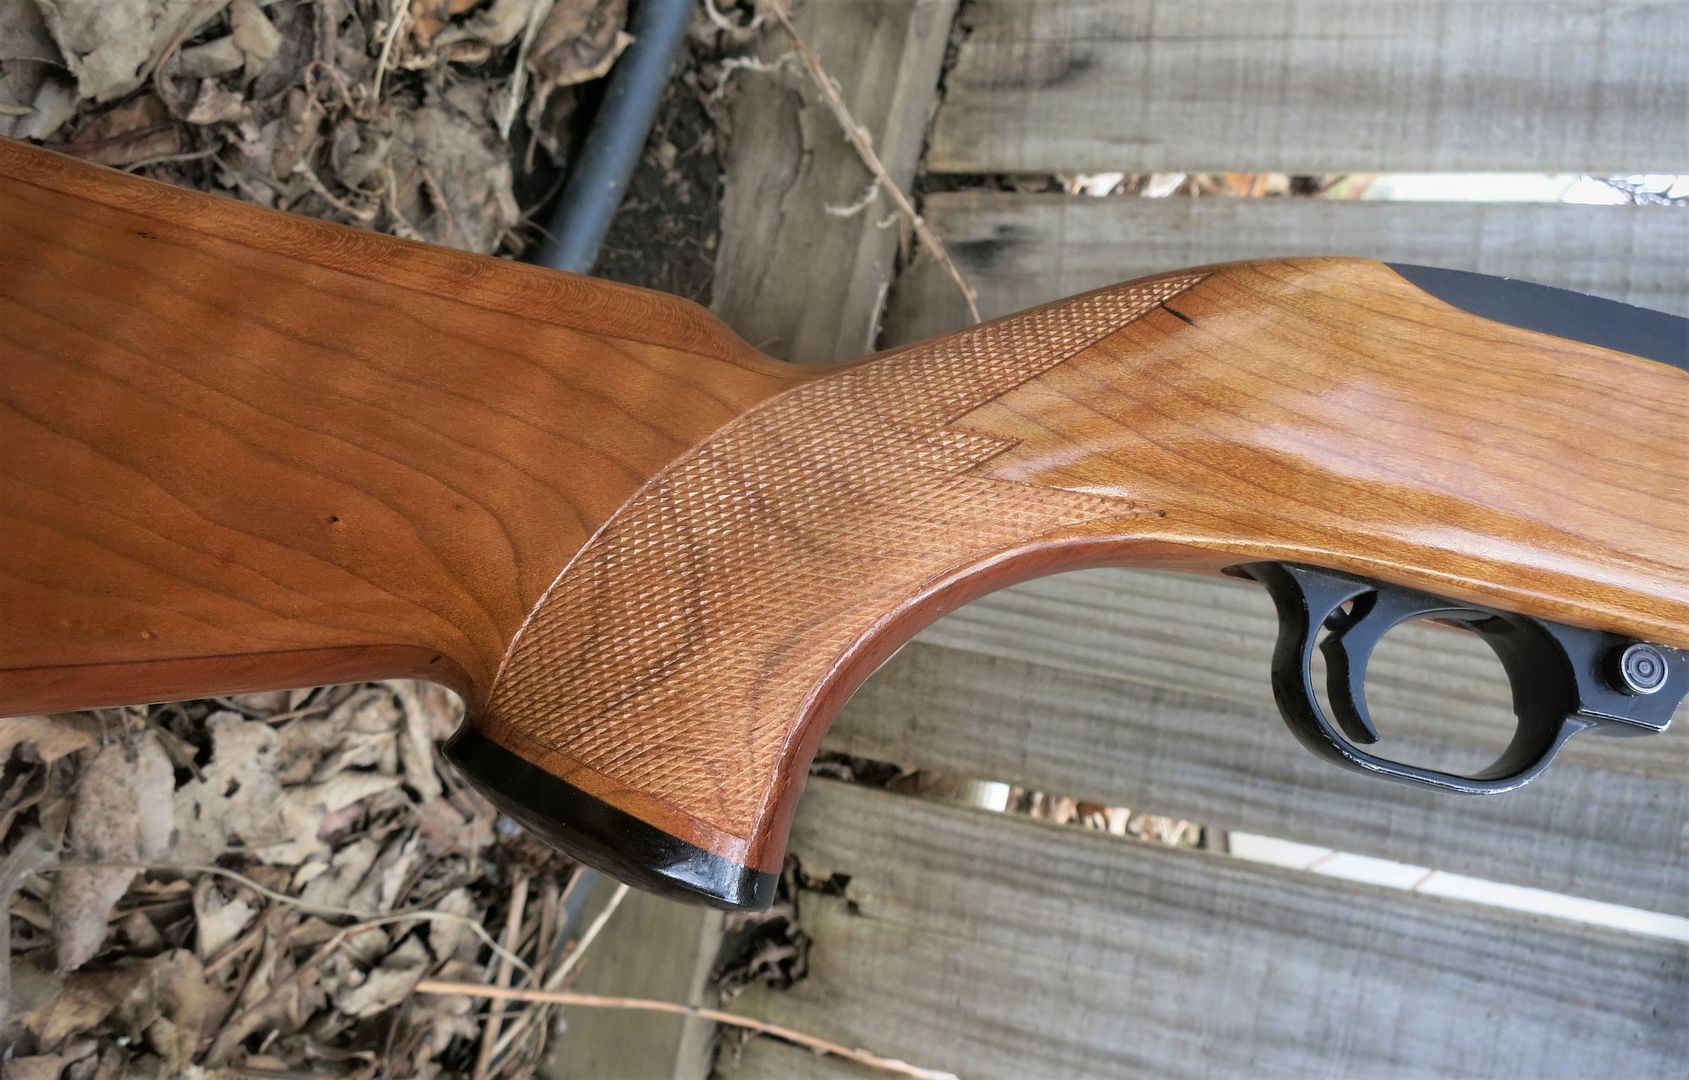 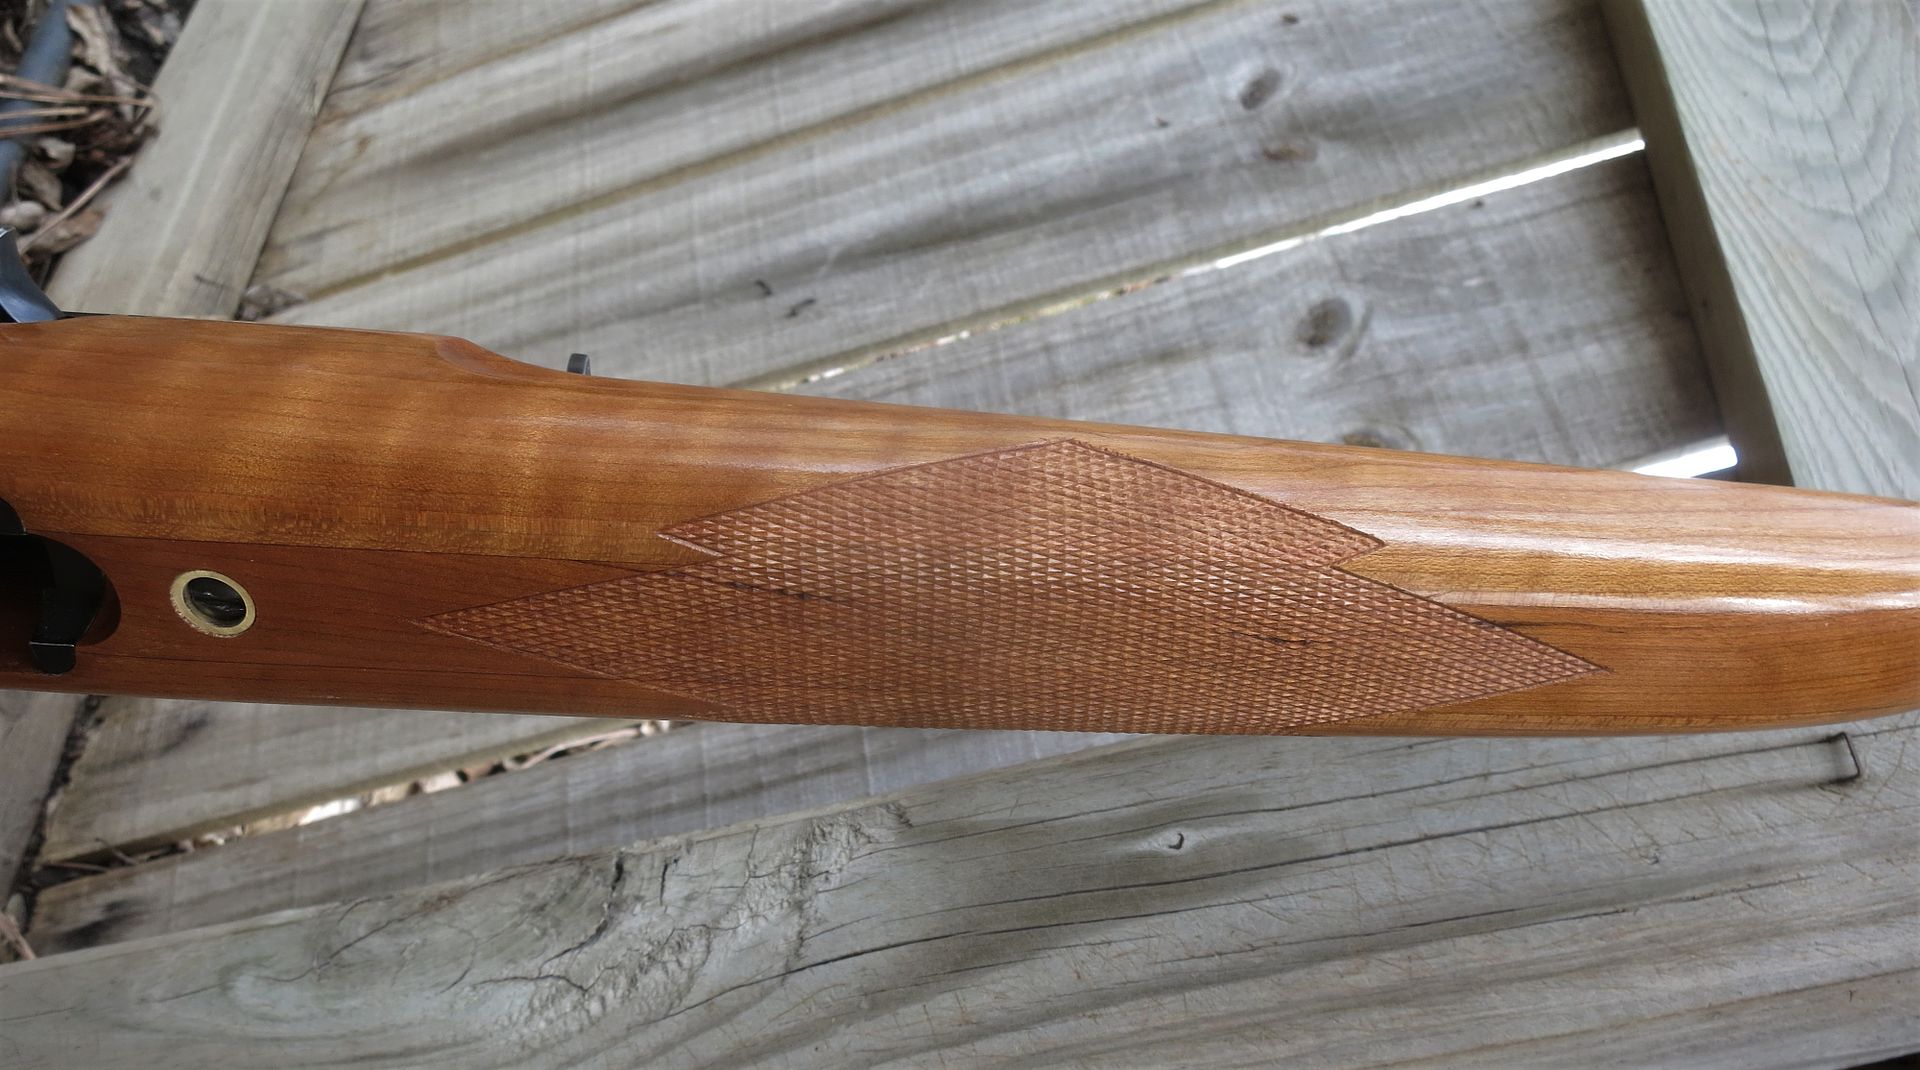 "If the women don't find you handsome, they should at least find you handy." | |||
|
| One of Us |
Pretty good Evan. | |||
|
| One of Us |
Very nice restoration-plus. I think the cherry stock adds a lot to your project. It's difficult to find an attractive and interesting piece of cherry for a stock. You did well. . | |||
|
| One of Us |
I like the whole project, Evan! The first thing I said (out loud) before reading "ebony buttplate" was, "ooo, neat!" The results are very nice and the 10/22 looks a lot more high-end as a result of the new furniture. Brandon _____________________________________________________ No safe queens! | |||
|
| One of Us |
Looks OK. There may be a past indicator to your durability worries. Some years ago there were a bunch of 22 rifles imported into Canada. I could be wrong, but I believe the may have been the Russian TOS rifles. At any rate, the manufacturers used rosewood for the butt plates. They were actually screwed on, not glued. I expect they were worried about the oily wood delaminating if they were epoxied. At any rate, they were grooved back, not checkered with the grain running all differing directions depending on the individual gun. Despite the usual chips and checks, they actually held up quite well and I don't remember them being any worse than their plastic counterparts. When I was a kid. I had the stick. I had the rock. And I had the mud puddle. I am as adept with them today, as I was back then. Lets see today's kids say that about their IPods, IPads and XBoxes in 45 years! Rod Henrickson | |||
|
| One of Us |
One other question - what's the finish on the stock? It's damn glossy and smooth for sure. _____________________________________________________ No safe queens! | |||
|
| One of Us |
Several of the Italian shotgun makers use exotic wood (Rosewood or ebony or cocobolo) buttplates on their high grade o/u's without visible screws. Obviously I don't know if they have some internal mechanical lock, but they seem to hold up. I have glued wood grip caps glued end to side that are 40 years old and have never worked loose. (They were fixed on with acraglass). I figured the end grain saturated with epoxy did not swell with moisture changes. I try to seal the end grain of the butt no matter the buttplate used. | |||
|
| One of Us |
i've done several wood buttplates and always found they held up just fine. some how they always looked better than a piece of rubber | |||
|
| One of Us |
Thanks all! That barreled action is from a 1970 10/22 that I recently bought and cleaned up.
Waterlox gloss applied with foam brushes, no buffing yet in those pics. "If the women don't find you handsome, they should at least find you handy." | |||
|
| One of Us |
Nicely done! All We Know Is All We Are | |||
|
| Powered by Social Strata |
| Please Wait. Your request is being processed... |

Visit our on-line store for AR Memorabilia