
 Rifles Lever Action Rifles
 Go | New | Find | Notify | Tools | Reply |
| The Winchester rebounding hammer conversion...'86/'92 | Login/Join |
| One of Us |
After being quoted $600 plus the $100 shipping bill to convert the Miruko/Winchester's newest rebounding hammer and tang safety to the original Winchester half cock version I thought I'd look around. Turns out it is actually a fairly easy fix with 2 new Browning '86 parts and a few minutes with a hand file. Not back to the original Browning design but close enough for what I wanted. Parts are available from Midwest Gun Supply @ 636 475 7300. Browning 1886 parts: Part #PO70150 Hammer $62.67 Part #PO70290 Trigger $48.30 plus shipping. Cut and pasted..directions and a link: '92 http://home.roadrunner.com/~ji...gs/win1892/index.htm '86 http://reloadingandlevergunnin...rmiroku-86-mods.html Not my writing but thought it worth reposting here. TMC4232 sez: "I would like to share an exciting modification that I came up with for my Miroku 1886 Winchester Take Down 45-70 that goes beyond the rebounding hammer fix. I don't think anyone has done this so far. In searching the internet about this oddity I ran across the excellent articles with photos from "Steveb" at http://reloadingandlevergunning.blog...u-86-mods.html and SAA Jim at http://web.tampabay.rr.com/jimstags/win1892/index.htm. As they suggested, I first removed the long arm of the hammer strut that was causing the rebounding action and was happy to see that the rebound was truly gone, but also discovered that the hammer could still be made to operate from this "half cock" position with a firm pull of the trigger. Not good. After more research I received an email from a gentleman, Mike D in northern California, who told me that I could replace the politically correct Winchester hammer and it's two piece trigger / sear with the correct Browning hammer and one piece Browning trigger / sear. I could not call Midwest Gun Works quick enough. The two parts were about $115 if I remember correctly. The parts arrived and I happily commenced removing the Winchester parts and installed the Browning parts, only to discover that the Winchester tang Safety bar was now preventing the Browning hammer to fully cock. Soooooooo, instead of considering to remove the Safety or to have it welded up and re-stamped with the correct period wording, especially in this economy , I spent about an hour thinking how I could salvage the Safety since it was already there. I removed the Safety bar and realized that the Safety could still work if part of the Safety bar were removed to allow the hammer to pass in it's arc to full cock. So, I placed the Safety bar in my bench vise, and filed it in such a way (at an angle) that when installed and in the "Fire" position the Safety bar does not obstruct the movement of the hammer at all, and when in the "Safe" position, the Safety bar moves over in the path of the hammer and PREVENTS the hammer from moving any further back than the half cock position. Therefore, when the hammer is resting on the inertia firing pin OR when the hammer is in the half cock position, the Safety can be easily engaged. When it is engaged, the hammer will not move back nor can the loading lever be actuated. The gun is essentially LOCKED and SAFE. When the Safety is moved to the "Fire" position, the hammer glides all the way back into full cock without obstruction. The whole job took a couple of hours only because I would file, test fit, file, test fit, etc., plus I like to take my time on my gunsmithing. Once finished I used G96 Cold Blue on the Safety bar so it would blend in with the rest of the parts, then applied some GI surplus M1 Garand grease to all moving parts. My 1886 Winchester now has a true half cock and a Safety which is the best of both worlds. I thought about welding up the tang and having it re-stamped with the "Model 1886", but afterall it is what it is, my design works, and I can put that kind of money towards another rifle. My 1886 Winchester now functions and looks like it is supposed to and I LOVE IT. Here are the "After" photos:" 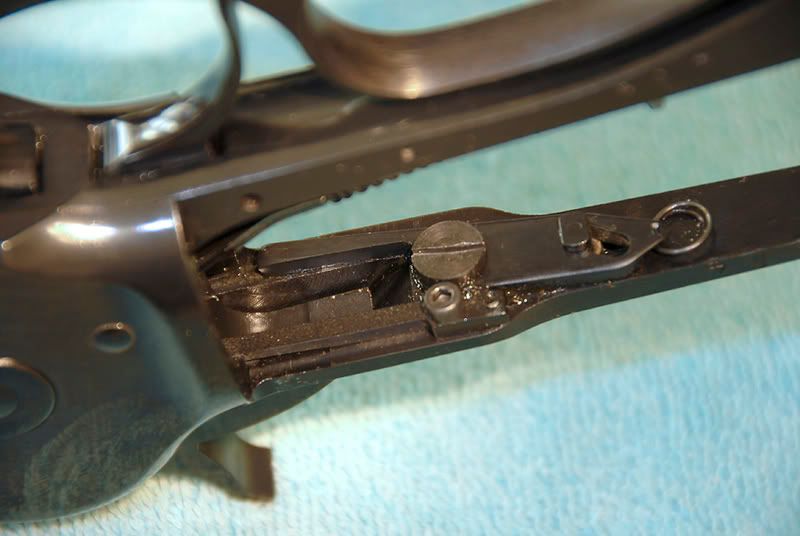 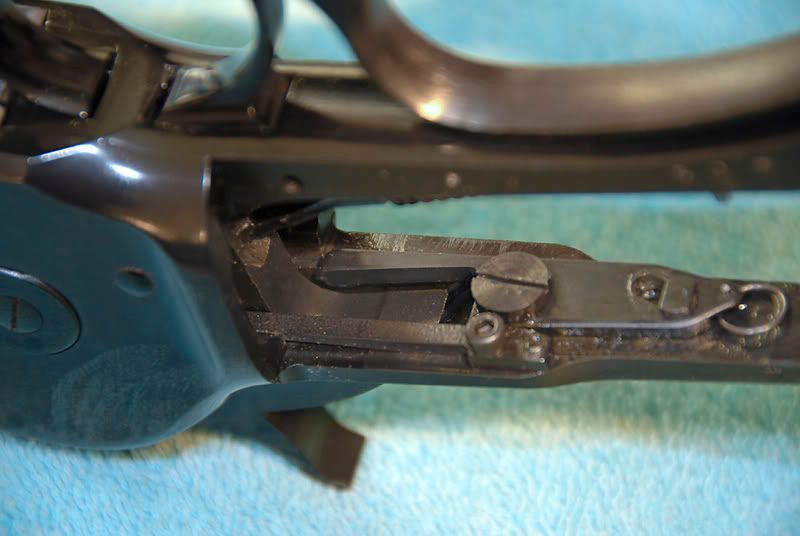 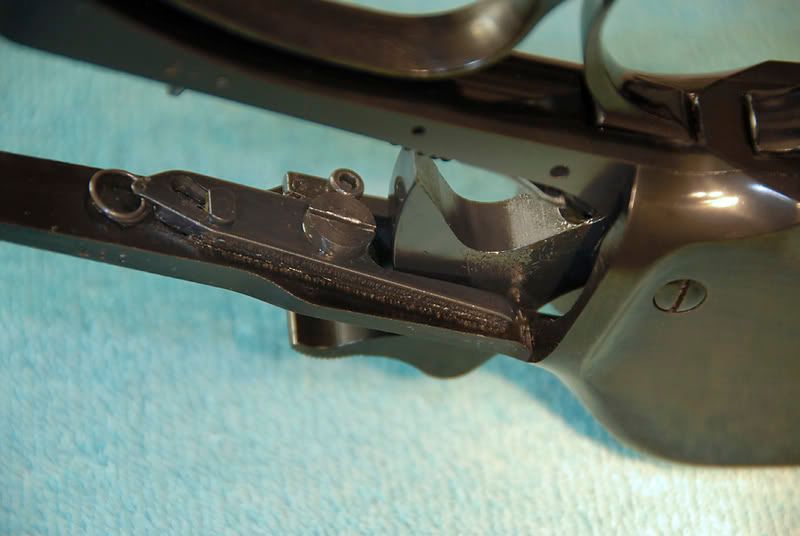 | ||
|
| One of Us |
My dislike of the USRAC/Miroku tang safety and lousy trigger are noted in the thread below - "restoring ....". I'm of the opinion that half-cock and good gun handling practices were safety enough for over 100 years. But the trigger on my USRAC/Miroku 1886EL was terrible. The Turnbull "restored..." trigger is a vast improvement. I considered doing the same home conversion you've done. What to do with the tang safety without welding, etc. was the question. My answer was to remove the safety - redundant now that you have half-cock - and insert/epoxy a carefully fitted piece of silver or stainless with my name engraved on it. Not period correct, but appropriate with the engraving on your high grade model. I think it's a neat solution. Are you happy with the trigger on your modified 1886? | |||
|
one of us |
This is a nice tip, thanks for posting it. | |||
|
| One of Us |
After eliminating the rebounding hammer on my own gun here are a few impressions. Adding a Browning 1886 hammer with a true half cock notch and one piece trigger/sear was very easy. Getting off the stock without damaging it was the hardest part of that. I cleaned up the hammer hooks and sear engagement surface with a felt wheel and got a very crisp 3# trigger. But it took addressing a few additional areas to get it perfect for what I wanted. Trigger pull on these guns is primarily controlled by the leaf spring that is also the mainspring foundation for the strut. All of that is bolted to the lower tang. Not the best idea IMO but very simple in function. I removed a tiny cross pin that stopped upward travel on the leaf spring and then bent the leaf spring up a bit to take some pressure off the trigger. That worked and drastically dropped the original trigger pull weight. A nasty heavy trigger is the biggest single thing everyone seems to hate on the tang safety Winchesters. I also took one of my polishing wheels to the back side of the MIM trigger/sear piece to allow that leaf spring to travel more freely on the engagement surface. Easy to see where you'll want to do that while you are putting the gun back together. Take your time and polish the engagement surfaces of the springs, strut and sear hammer hooks. It will pay big rewards towards a crisp trigger when you are done. I removed two coils from the mainspring but that was a huge mistake! You need more mainspring power if you are using the Browning hammer and original Winchester strut that came with the gun. The strut arm holes in the hammers and the hammer shapes are quite different between Browning and Winchester. The Browning hammer is much lighter in weight and lacks a lot of mass/material compared the the heavier Winchester hammer. Because of that the Winchester strut is short for the Browning hammer. Leave the mainspring stock length if you are using the Winchester strut with a Browning hammer. No need to cut the mainspring anyway once you address the right springs that adds wieght to the trigger pull. The infamous tang safety? Well it now locks the hammer on safe in either the down or half cock position. But remember that you also have the added safety of a spring loaded and shorter than the bolt firing pin which betters the original '86 design. (think a tried and true 1911 firing pin design here) After shooting the gun a bit it is painfully obvious to me that at some point you will unintentionally engage the the tang safety during rapid fire with this gun. And that will lock the gun up solid. Dismal thought at best for what I might use a lever gun for. After that discovery I decided to pull all the internal tang safety parts and glue into the tang the sliding filler until, or if, I ever have it filled more permanently. YMMV..that is mine I had also ordered the complete mainspring/strut set up for the '86 Browning. Another half dozen parts and $60 or so but the best way to correct weak hammer strikes with the Browning hammer installed. Nice gun other than that the tang safety/rebounding hammer issue. But it gets a little more complicated that described on the previous web site links once you add the Browning hammer if my gun is any example. If I were to do it again on a rifle used purely for hunting with no worries for cosmetics I would buy only the Browning sear and remove both the tang safety and the rebounding hammer and live without a fully functioning half cock notch. | |||
|
| new member |
Is there a similar fix for the Winchester 1895 rebounding hammer with safety? Old Sh. The lever-action carbine is an immensely practical shooting system. It is compact, rugged and reliable, and offers quick follow-up shots when needed with just a brief flick of the wrist. | |||
|
| Powered by Social Strata |
| Please Wait. Your request is being processed... |
Rifles Lever Action Rifles

Visit our on-line store for AR Memorabilia