 Rifles Double Rifles
 Go | New | Find | Notify | Tools | Reply |
| SPR22 45-70 | Login/Join |
| One of Us |
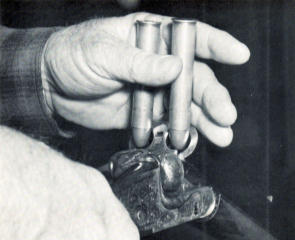
Got my 45-70 a couple of days ago. After having the '06 for awhile I've decided to do some "tuning" before shooting. Now that I've figured out pictures I'll add as needed. There are some differences in the guns. First and most important is that the wood on the 45-70 is stunning.  When I said I've figured out pictures what I meant was posting them, not taking them. This does not do the rifle justice. I had the day off yesterday so spent the entire day working on it. The front sight is the same as what came on the '06 so I knew it had to go, and quickly. I think I was so succesful that I'm going to duplicate what I made, for the '06.  I've tried making so many different sights for the '06 that I'm getting pretty good at it. One thing I noticed is that they started the threads differently so to duplicate one of mine it needs to be made for that paticular rifle.  On the right is what it comes with, on the left is the start of the new one. Next post will be the insides of the gun. Mike | ||
|
| One of Us |
Thanks for sharing the pictures. I am anxious to see the guts of the rifle and what you do to address the horrible trigger pull and long lenghth of trigger pull. I am still waiting for the reply that some one on this forum gets from Remington on how to regulate the barrels. I'd love to hear what you plan to do about the triggers. Also what ammo are you going to use to shoot. I know one can't "cowboy" the ammo but I am still in that dark as to using Cast Boolits in the 45-70. Thanks in advance, good luck R Studen | |||
|
| one of us |
Turning the "jackscrew" back toward the butt moves the impact point of the bullet to the right. With the gun standing up, butt on a bench, moving the screw down with a pin punch moves the bullet right. MrJudgeOC: What is the thread size for the front sight? I'm with you on it needing immediate replacement. .395 Family Member DRSS, po' boy member Political correctness is nothing but liberal enforced censorship | |||
|
| One of Us |
Rojovin, Getting the triggers better is a combination of several things. I'll get into more detail when I post the step by step stuff, with pictures. What you have to do is smooth up all the surfaces and lighten the main springs. The actual trigger springs are very light and I haven't messed with them. As far as the over travel goes, I haven't done that yet, even with my '06. I'll be doing that latter. prof242 is correct, at least on my '06. Moving the jack screw to the rear moved the right bbl impact right. It changed the elevation a little, but not much. You can see the results on my '06 in other post. | |||
|
| One of Us |
prof242, the front sight is 6mm X .5. I've made several front sights using steel, alum and brass. The one pictured on my rifle is brass and is entirely milled. Some of the others I filed, which becomes tedious. It's much higher than it needs to be and will shorten it when I get to working up loads and regulating. I just thought that since I know what needs to be done to the rifle to get it to shoot well, I'd start with that. The sight I used for the '06 to make those groups in the other post was actually quite simple. Just used brass round stock, threaded it and filed a flat blade. Doesn't look bad and works a lot better than that stupid post it comes with. For elevation adjustments I just matched it to my load. I worked up the fastest 220 gr without signs of preassure. I did make a new rear sight too. The one that comes with the '06 was un-workable for me. Much too low. I made several and just finished another that I think I will be happy with. I did fire 6 rounds out of the 45-70. All were some plinking stuff I had for my Browning 1886. 405gr laser cast in front of 16gr Unique. I believe they did about 1275 fps out of the Browning. I didn't chrono them out of the spr yet, but will. Recoil wasn't bad and the cases fell right out with no signs of preassure. I had to fire two rounds as soon as I got the rifle, because of the kid in me. Then I fired 4 more after working on the main springs, to check reliability. I don't really want to get involved with loads until I have everything done on the inside. That way I can concentrate on shooting and reloading without the distraction of-maybe if I cut two coils off, or maybe just stoning this would......... Thats what happened with the '06 and I ended up with too many things going at once. Mike | |||
|
| One of Us |
Here's the start of improving the SPR22. Proceed at your own risk. I am not suggesting that any of this be done and do not take responsibility for your actions. This is just what I have done to two of my SPR22's.  Stock dismounted. Also, the step for this rifle differs from the 30-06. Note the space between receiver and tops of both front and rear of trigger guard. It turned out that the trigger guard was one full turn out. It could not be turned in because it interfered with the front trigger. Either the hole is mis-located, the trigger guard is over size or the front trigger is larger or more forward. On the '06 the trigger guard would just screw in or out without interference.  Here the trigger guard and stock mounting point have been removed.  Next step is to remove the trigger plate. It fits tight but will come with just preassure. Pull from the end of the trigger plate tang up and out. There are two spings that work on the sears that will come out. You can plainly see where they go when it's apart. The next step. removing the triggers, I forgot to photo. Just take out the return springs for each, then drive out the pin that they pivot on. This is one of those areas I "smooth up". I stone the flats of the trigger, remove any burrs and polish the pivot hole.  Next, take out the rear pin which holds the sears in. No metal removal, just clean up any burrs and polish if needed.  Now the front pin which holds the cocking tabs. These will be ground/filed later to make the hammers cock at the same time and near the end of the bbl travel (which will greatly help with the bbl's staying open).   Now the big pin which holds the hammers in. After they are removed, the main springs and guides will come out the front. Now a critical step. On the '06 I took the time to polish the inside of the mainspring holes but didn't really see much improvement. On the 45-70 I did not, and am glad I didn't invest the time. But what will help is shortening/replacing the main springs. I've tried numerous springs from 21 lb 1911 main springs to spring stock with bushings of differing sizes. None of it worked. The only thing that worked for my '06 and ultimately this gun was: shorten the stock springs by 4 coils. I make no guarentee and if you decided to try it, I would start with less and work your way up. When I did the 45-70 I just cut 4 coils (exactly) since that is what worked for my '06. It works fine on this one. That's why I fired those 4 additional rounds with CCI primers, to make sure it would go bang.  Now the lever spring. On both of my guns the lever much to hard to work. This solved that problem. Just take the preassure off the spring and the pin will just push/fall out. I repaced the spring with some stock I had on hand. I did not replace the auto cocking bar on either of them. There are some tricks and methods for putting it all back together. I won't bother with that unless someone has actually done what I did, and now has to put it all back. As far as grinding the cocking tabs, it's easy. It can be done with the rifle put back together. Just take a litte off, keeping the same profile, at a time and try it. I have no idea how many times I did this for the '06, but it was a lot. Remember, you can always take off metal but it's damn hard to put it back. Make sure you use the proper tools. If you don't have some decent screw drivers, get some. A Brownells set will work fine too. I used a blade and ratchet to remove the trigger plate screw for both guns and had no problems and did not mar the screws. A word on punches. This is a metric rifle and you may have trouble with punch size. Get one that fits. I just made what I didn't have. This is way longer than I intended and there is stuff I did thats not mentioned. I elaborate if needed. Mike | |||
|
| one of us |
Mike: I bow to you sir. Thanks for the wonderful photos and step-by-step narrative. No one else comes close on de-mystifying the Baikal doubles. There is hope, even when your brain tells you there isn’t. – John Green, author | |||
|
| one of us |
I've done a few of these things, but not all. I sure wish I'd had your pics when I started. Kudos to you. Question: What did the triggers get down to? .395 Family Member DRSS, po' boy member Political correctness is nothing but liberal enforced censorship | |||
|
| One of Us |
Thank you for the kind words gentlemen. I'm no where near done and since I'm still working on the 30-06 after months, probably never will be. I've got the triggers down to something managable but still too long. I don't know the weight because my scale is at work, but probably around 5 pounds. Before I try to get it right I'm going to work on the hammer/sear engagement to reduce the long pull. Maybe figure some kind of internal stop in the future. I'm quite happy with the '06 and did nothing with the overtravel so maybe just getting the hammer to release earlier will work. But.... I've got to shoot it. I've been waiting a long time and today is my friday so I've got the next two days to play. What have you guys been shooting in it? I've only fired for function. Just looking at some data it looks like AA2495 will give the fastest velocity with the lowest preassure but have never used the stuff. I do have some AA2230 and AA2460 that I use in 223 and 308. Mike | |||
|
| One of Us |
PM sent. Thank you, Jerry Meyers Expeditions 254 Fourth of July Cr. North Fork, ID 83466 (208) 865-2449 hunts4u@centurytel.net | |||
|
| new member |
Mike and all, I could use some help. I have had a 30/06 for a while and just got a 45/70. Last weekend I set about improving the tirgger pull by modifyng the sear engagement. Now the .30/06 wont fire....most of the time. The tigger pull is way too light, but safe. I do beleive I have changed the hammer sear geometry enough that I may need to hake the main spring stronger/longer. I took pix like Mike so I could get her back together. ActuallY I am getting pretty good at that aspect. Can you suggest how I might fix the problem of no ignition? Dan | |||
|
One of Us |
Where did you guys get them? Do you know the distributer? Gpopper | |||
|
| One of Us |
I believe Dangerous Dave has one for sale in our Classifieds as we speak. DRSS | |||
|
| One of Us |
Here's one at a dealer | |||
|
| One of Us |
I think there's one in classified and he is lowering the price! If your parents didn't have any children chances are you won't either. | |||
|
| One of Us |
Dan, I don't understand how your work could have prevented the gun from firing. Unless something was dragging or otherwise preventing the hammer from a smooth fall. I have not found a "ready made" spring that is as heavy or heavier than stock Baikal. It's still an easy fix though. Make a small collar/spacer and put it on one end of the spring. I would probably start with about a 1/4" and adjust from there. I debated whether I should say this or not, but, don't ever change the geometry of sear/trigger/hammer engagement. The best thing to do in these cases is to remove burrs and smooth things. I like to use ceramic and hard stones for this. You might want to check your firing pins. I've had them brake before. Mike | |||
|
| new member |
Mike, take a look at Varget powder for the 45-70 on the Hodgdon web site. It seems to be the lowest pressure powder for the 45-70 with various bullet weights. I load 60gr of Varget with a 350gr Hornady RN for about 2,000fps at reasonable pressure for my Italian double. Bob. | |||
|
| One of Us |
ren3, THanks for the insight. This is actually an old post that got resurrected. In a different thread we got into some detail on loads. I ended last year with Reloader 7 with Remington 405's at 1850fps. I haven't shot yet this year. Hope to soon though. I was having a trial with regulation. Mike | |||
|
| One of Us |
been looking for this thread thanks | |||
|
| Powered by Social Strata |
| Please Wait. Your request is being processed... |

Visit our on-line store for AR Memorabilia