21 December 2007, 08:00
kududeArticle on 10/22 "Build" and results of various mods
A local chain had Ruger 10/22’s on sale, and I looked at getting one. I already had one, but several years ago I put a Midway bull barrel and laminated stock on it, and after fitting the barrel, the rifle jammed at least every other shot. I like the little 10/22 and thought I’d purchase one since the price was right. As luck would have it the chain was out, and I thought about it and decided that I needed to solve the jamming problem and use the rifle. I Googled up some research on jamming 10/22’s and found that this is very common with after market barrels with target chambers and the solution is an after market extractor and filing the extractor cut a little closer to the chamber. While I was search Midway USA’s web site, I found a whole list of goodies for 10/22’s in addition to the extractor, so I ordered an extractor, a Volquartsen hammer kit, bolt buffer and a Bell and Carlson extended magazine release.
I was a little tentative about tearing in to the trigger housing group, but I plowed ahead and had the right number of parts left over when the installation was finished. The trigger group is understandable with a good diagram and is hard to misassemble. However, be ready to spend some time with it the first time. A tip: take out the bolt release and install it as the last item with the ejector. This gives you more room and bolt release will be constantly in your way. Also, if you use the plunger trigger return spring tape in place with a piece of masking tape.
I solved my jamming problem first off. I found that this 10/22 was really very accurate notwithstanding an awful trigger. I wondered what could be done about this, so it was back to the web and more research. I ordered a Volquartsen trigger to go with their hammer and it came in due course. Meanwhile, I found one of the 10/22’s on sale, and following the rule of all gun nuts, bought one because if one is good, two is better. I wondered exactly what could be added to this new rifle and what the cost would be and what the best pieces were to add to the rifle. To answer these questions, I ordered a shim set, spring set, mag release, extractor, bolt release, bolt buffer, Clark Hammer Kit, and Butler Creek barrel and stock kit. I planned to add the parts from those that would have the least potential impact on accuracy to the most.


I began by installing the Volquartsen trigger on my old Ruger 10/22, hereafter Ruger A, and one of two Burris base and ring sets that I had ordered to replace the really poor quality set that was on the old rifle. I installed an old 2.5 to 10 Vari X III that I had taken off one of my hunting rifles with parallax adjustment on this rifle and declared it ready to test. I installed the other base and rings and the old scope from the older rifle on the new Ruger 10/22, Ruger B.
Testing Rugers A and B. Ruger A, fitted with Volquartsen trigger, had an excellent, light trigger pull; however, the most noticeable improvement is the lack of over-travel. This improvement is hard to explain, but its is nice. Zeroed this rifle at 25yds shooting several groups in zeroing process; the smallest was under ½ inch, just a ragged hole.

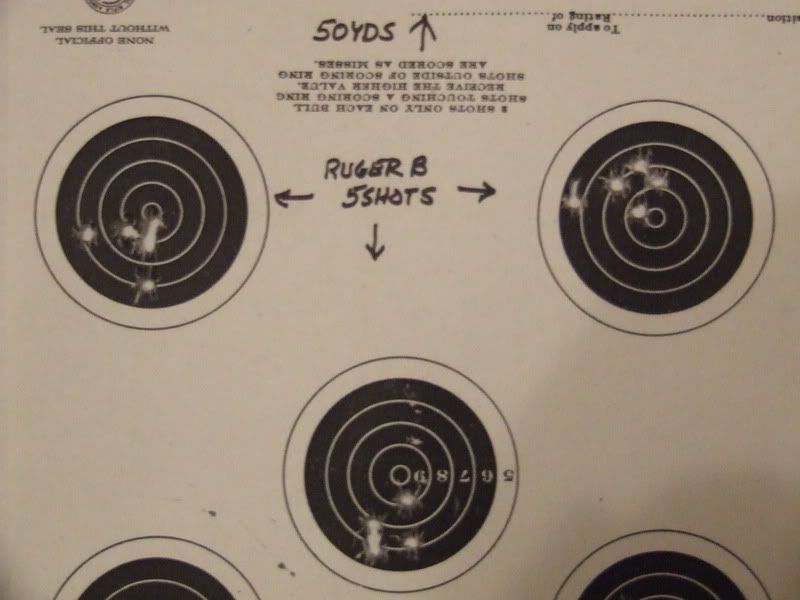
At 50 yards, I fired four groups while re-zeroing. Discounting flyers (I was getting tired, the groups ran just over ½ inch. All but one group was with Wolf match. Fired one group with Federal Champion, and had multiple jams. Changed to Wolf and they stopped.

I don’t remember what I paid for the Midway barrel and stock, but Midway was having a sale several years ago when I bought them. I think they were about $125. The hammer and bolt release came with trigger return spring and hammer spring and were $35. The extractor and buffer were $10 apiece, and the magazine release was $5. The Volquartsen trigger was purchased for $25. The Burris Weaver-style base and rings were $17. Modifying this rifle costs $227 less cost of the scope.
The new Ruger 10/22 (Ruger B), began its modification today. Its list price was $179. I added before I fired it the aforementioned Burris Weaver style bases and rings. I initially fitted the Bushnell 22 scope that had been on Ruger A. I fired it with the scope only while firing about 100 rounds to break it in. I then tested various ammunition to determine its preferred diet.

It liked Federal Champion 40gr lead. This is $18/brick and one of the cheaper bullets around. Oh, Happy Day! It hated Winchester. Federal American Eagle and Champion 36grain hollow-point were a tie; Wolf shot two small five shot groups which were the same as the Eagle and Fed HP’s. Federal Champion 40grain produced a ½- inch group with one flyer.
The trigger pull on the rifle was extremely heavy and I experienced at least one and sometimes two stovepipe jams with every magazine. Rather than making the modifications one at a time, I installed the bolt release, buffer, extended magazine release at one time. These modifications did not have appreciable impact on accuracy, in fact, groups after the mods were larger than before the fix; however, I think that this may have been the result of my failure to properly tighten the action screw when re-assembling the rifle. I fired one group in this mode, and it was just under one inch; however, my shooting was impacted by multiple jams. I disassembled the rifle and installed the extractor after one group of ten. This solved the jamming problem. The group fired after installation of the extractor was about ¾ inch discounting a flyer (operator error again.)

A target was put up at fifty yards, and a series of groups fired with Ruger B at that range. These groups generally were terrible. The combination of four power scope and trigger pull hampered any hope for good shooting. The best group was 2 ¼ inches, but some were twice that.

However, upon completing this, I fired one last group at 25 yards. See lower right target.
This group was 3/4" inches and the best shot after the modifications. I think that this is probably a better representation of this rifle’s ability than the ½†group I lucked into early in the test.
Conclusions: Safety demands installation of an aftermarket extractor. Clearing at least one jam in every mag is dangerous. The bolt release and extended magazine release are also in the category of “got to have.†The good news is that these items are inexpensive. The plastic bolt buffer is nice to have, but it is not like the three other items-must haves in this man’s opinion.
Upon returning home, I installed the shims, trigger, hammer and sear set. I did not install the spring kit because I did not feel I needed it firing standard velocity loads. The Clark trigger, hammer and sear were installed as a unit for safety reasons. I did not want to mix and match original and aftermarket pieces in this critical system. My impression was that resulting trigger pull was over twice as heavy as the Volquartsen trigger which I would put at 1.75 to 2 pounds. I’d guess that the Clark trigger is just over 4 pounds, but crisp and with no over travel.
I took Ruger B to the range to test the addition of the Clark trigger, sear and hammer group. I found that the installation of these pieces did not significantly change the performance of the rifle. I found that my alternative spring did work; however, it requires a modification to keep it from moving forward under recoil or use. The groups fired by the rifle with the original barrel and the Clark kit were not an improvement over the prior groups.

I finally added the barrel (and stock which is the only stock that fit), and it was an improvement.
I was able to come close to reproducing the ¼ inch groups with the old Ruger notwithstanding the trigger. The Butler Creek barrel shot several makes of ammo quite well. These included American Eagle, the cheap Winchester Western Super X hollow points, Federal Champion, and Remington Thunderbolt. The best was probably Wolf, followed by Champion and American Eagle.


Note the difference between the orginal barrel and the Butler Creek Barrel at 50 yards.

Pictures were taken of the rifle at the beginning and after addition of the stock and barrel.


The Clark kit was so disappointing, I eventually stripped the trigger group of the Clark parts, and re-installed the original trigger, sear and hammer. Prior to re-installing the parts they were smoothed with a fine stone and shims installed on the hammer bearings. Nothing was done beyond polishing to the bearing surfaces of the parts. In addition, I made a replacement trigger return from piano string wire. This new trigger return spring runs under the hammer pin on the bolt stop spring side and rests on top of the trigger and the free end loops tightly over the ejector pin the top of the trigger group housing. The loop keeps the spring from riding forward under recoil and use during firing. The installation of this spring and elimination of the coiled spring and plunger in the trigger guard reduced the pull of the original trigger to the equivalent of the Volquartsen trigger and hammer in the older Ruger. The trigger pull is about three pounds and is very crisp. The primary difference between the two rifles now is the over-travel adjustment on the Volquartsen trigger which is a nice feature.
Lastly, with the trigger and barrel installed, it was apparent that for accurate aiming at 50 yards, a better scope was needed. To test the rifle, I mounted the Weaver Grand Slam fixed 4.75X scope that I had. I believe that this will permit a more accurate assessment of the rifle’s potential, but believe that a very high power scope (at least 10x) is necessary for long range accuracy. I think that for silhouette shooting, an adjustable with as high as 18 power would be nice.
Ruger B was tested in this last configuration. The wind increased during testing, and the 100 yards groups were fired in a fresh breeze. The following pictures reflect the groups fired at 25, 50 and 100 yards. At 25 yards, there was one group under .25 inch, one group at .25 inch, and one group at .5 inch. The .5-inch group was the result of a first shot flyer. At 50 yards, there were two groups of .75 inch and one of .5 inch. Finally, at 100 yards, there were two groups at 1.25 inches, one group at 1.5 inches, and one group at 1.75 inches. This rifle is clearly of shooting better than this rifleman can shoot it.


Conclusions: The work that I would recommend for any 10/22 is the installation of the extended magazine release, the modified bolt stop release, bolt buffer and extractor. I’d also install shims on the hammer and sear because of the amount of “slop†generally present in the trigger group. None of these items will improve greatly the accuracy of the rifle, but they will make it more user friendly. The replacement of the trigger
return spring is a “no brainer.†Together with stoning the sides and bearing surfaces of the hammer and sear, this trigger return spring replacement will result in a light, acceptable trigger pull which is the equal of the Volquartsen without the over travel adjustment. At this point you would have about $40 in the project. My tests showed a rifle so equipped could shoot ½ inch groups at 25 yards on a consistent basis.
For ¼-inch groups, you will have to invest in an after market barrel. I have now mounted two: one Midway SS bull barrel and the other a blue, Butler Creek bull barrel. Both rifles are capable of shooting groups with Wolf ammo that are as tight as this rifleman can shoot. USA Midway has the Butler Creek Stock and Barrel Combo for $150. You can get a Green Mountain barrel for around $105-$110. Both these barrels have their supporters, and I must say that I have no complaints with the Butler Creek or Midway barrels. The installation of the barrel is simpler than any of the trigger parts; un-screw two bolts, install the barrel, re-tighten the two bolts.
Having used a typical low end rim fire scope for the initial work with two rifles, I can stated categorically that you will not achieve the accuracy your rifle is capable of without a good scope of 10x or better. Installation of the bases, rings and scope are very easy; however, I would invest in a scope mounting kit that lets you true the rings given the expense of such a scope and the potential for putting ring marks on it without this type of preparation.
Once you get the barrel in, you will have to determine what ammo it likes. I’d suggest testing as many brands and types as you can. I tested the Federal Champion, American Eagle, CCI Stinger, Remington, WW Super-X and Wolf brands. These shot generally well in the bull barrel with Wolf taking best all-around honors.
For $150 and modification of the original stock, or $200 without modifying the original stock, you can change your 10/22 into a tack driver capable of ¼-inch groups at 25 yards, ½-inch groups at 50 yards, and just over 1-inch groups at 100 yards. This is very acceptable accuracy for a semi-automatic rifle at 100 yards.
Good luck and good shooting.
