
 Guns, Politics, Gunsmithing & Reloading Gunsmithing
 Go | New | Find | Notify | Tools | Reply |
| Stockmaker show and tell | Login/Join |
| One of Us |
That was tongue in cheek I hope. Urethane is for wood floors. Butch | |||
|
One of Us |
All I know is that Les has far more experience than I do at this and if he's using it, can't be bad. I have always done it the traditional way and that burns a lot of time. I'm willing to experiment. "Evil is powerless if the good are unafraid" -- Ronald Reagan "Ignorance of The People gives strength to totalitarians." Want to make just about anything work better? Keep the government as far away from it as possible, then step back and behold the wonderment and goodness. | |||
|
| one of us |
Several of the stockmakers use urethane as a filler to speed up the process without having a filler that will damage the checkering tools. Look up MinWax and you will find several types of urethane formulas. I use the Helmsman spar urethane as it will be quicker and does a good job of sealing. Cut it back to the wood with mineral spirits and use TruOil for your final finish. I never use steel wool to cut back the filler. There is so many different types of finish available and everyone has their own idea of what is best. | |||
|
| One of Us |
Okay - so you are using the urethane as a filler? Do you sand most of it off before applying the oil? I've used french's stain/filler in the past and that worked really well. This time I wanted to experiment and tried the Dembart sealer - basically liquid vinyl. What a pain in the butt. never again! "Evil is powerless if the good are unafraid" -- Ronald Reagan "Ignorance of The People gives strength to totalitarians." Want to make just about anything work better? Keep the government as far away from it as possible, then step back and behold the wonderment and goodness. | |||
|
| one of us |
I use urethane as a filler, but you need to cut it back to the wood in order to fill and seal the grain. After you are back to the wood I usually apply one coat of TruOil. Now I am ready to checker the wood. After checkering you can apply more TruOil until you get the build up of finish. Now you can use a cutting compound to remove the gloss. I used Dupont 7 car cutting paste for years. A can will last forever. I never finish out the stock before I checker. You can make a few repairs if you get a nick or two. I use super glue and sanding dust if a repair is needed. Hopefully no nick, but it will happen if you checker until you are too tired. Who said "it is not how good you are ,but how well you can cover your mistakes". | |||
|
| One of Us |
Les, Your posts have been more than helpful and I am putting my money where my mouth is; PM me with an address where I can send you a token of my appreciation and you can buy some cold beverages to enjoy while you are looking for prairie dogs. Every since I bought your information on the flash drive, I have been trying to work up the nerve to try another stock and hope it looks better than the last one I did. This post tips the scales; I am laying it out this week and starting. Many Thanks, Jim | |||
|
| one of us |
I have been trying to checker the stock for a few days. This is the hardest part for me as I am having trouble seeing. 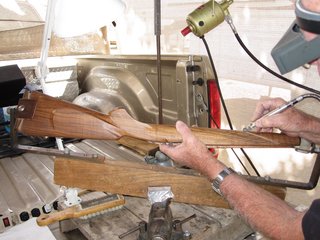 | |||
|
| One of Us |
I admire your perseverance in working from makeshift workbenches to get this done. Checkering would be tough to do in that full daylight. I used to darken the shop 'cept for light about 12" away from the work. This thread has been a great resource for those wanting to start off with little investment in specialty tooling. | |||
|
| one of us |
I have finished the checkering and will post pictures of the results. Like Nomo4me mentioned lighting for checkering is not very good outside. I had to have a light blocking towel on the sun screen and use a 100 watt bulb to have shadows. When I started this project I knew it would be hard using my pickup as a work bench. It can be done in between the rain showers. THE CHECKERING WAS THE HARDEST PART IN MAKING THIS STOCK. I CAN'T SEE WELL AND WITH POOR LIGHTING IT WAS ALMOST IMPOSSIBLE. | |||
|
| one of us |
I went to the range to test fire today. You may notice that the scope is a Simmons 2X10X44 WTC that I bought used at a gun show real cheap. It is working great and you will see the results later. After firing about twenty five rounds of 204 Ruger with Hornady 32 gr bullets it will group well for a rifle and scope weighting in at 8 lbs. 3 shots .368 in  This three shot group was shot at 110 yards with a cross wind of 3-10 mph. I shot these three shots in about 20 seconds to simulate field shooting off a bench in a prairie dog field. | |||
|
one of us |
Thanks for posting this project. The most amazing thing to me is how fast it comes together for you and ending in such a quality piece. I'm SLOW and still have yet to be satisfied in the end. I sincerely appreciate your efforts on this thread. It's how I learn and gives me something to shoot for. ______________________ Always remember you're unique, just like everyone else. | |||
|
| new member |
I have a question regarding inletting. How do you start when using a one piece bottom metal like the original bottom metal on an Argentine 1909? Thanks, I've enjoyed your tutorial. | |||
|
| one of us |
Paddler, I believe that you are referring to a semi inletted stock. If this is the case I would inlett the trigger guard first and then go to the top to inlett the action and barrel. When I start from a blank I inlett the action and barrel first. Now you can make all the other measurements from the bore line. I believe that the most important part to a rifle is to have the action and barrel set in correctly. I do not float the barrel in most of my rifles. Most people don't want a gap large enough to hide your money in or catch crap while hunting in the woods. If I am making a long range target rifle I bed the action in glass and part of the barrel for a couple of inches, then float the barrel. Most of my rifles are 2 point bedded near the end of the barrel channel with about 3 or 4 lbs of up pressure on the barrel. I am going to write up a summation on this project when it is completed and blued. I like to shoot the guns before I blue them just in case there is a few problems. When I get a target like the one in the above posts I am ready to go to the field for some varmint hunting. This one weighs in at 8 lbs even with the scope. A heavy rifle isn't much fun to carry in the field for 4 to 6 hours. I have a bolt handle made longer and will get this welded on soon. I have bent the bolt knob down at the area of the knob. This will allow more space between the scope as it has a very large eye piece. This is my method which has worked for me. Not everyone will agree with my ways. Hope this helps you understand and may you make lots of stocks from blanks. Les | |||
|
| new member |
Thanks very much for the explanation, Les. I'll be starting from a blank, not semi-inletted. I was just wondering if you do anything differently when inletting one piece bottom metal vs a separate floorplate and magazine box. This is all new to me, and it seems like it would be more difficult to inlet original Mauser or Blackburn bottom metal. | |||
|
| one of us |
Paddler, Make sure that you have a plan drawn out before starting. The one piece guards are stiffer than the original one for the mini Mauser. I have used several after market guards and don't find much different in the inletting. Go slow and make sure of your alignment of the inletting guide screws. A slight amount of adjustment can be made before you reach the last 1/3 of the guard being inletted. After that it is getting close for the base of the trigger guard meeting the wood. If there is a problem you can have gaps around the guard when you reach the bottom into the wood. If you have a drill press and can line up the blank and be square in all directions to the top it is easier to drill both holes for the inletting guide screws. This project above was to show how you can make a stock without too many power tools. We all started somewhere and have made some mistakes with the inletting. Just take your time and think before cutting. It in not easy to patch a gap in the inletting. | |||
|
| one of us |
22WRF, For years I could checker a stock without glasses. Now I can't find the pattern without an Optical Visors. About 6 years ago my left eye retina detached. The repairs left scars. Then a couple of years later the right eye went the same way. Now I have problems in seeing small detail work. That is the main reason I retired. I OFTEN THINK ABOUT ALL THE GUYS FIRING THE LARGE CALIBER RIFLES ON THIS FORUM. WHAT WILL HAPPEN WHEN THEY REACH SAY 60 PLUS YEARS OF GETTING KICKED ON THEIR FACE? Just my thoughts. I don't shoot large calibers anymore. Back to checkering: My first checkering was in 1957 when I read "Gunsmithing Simplified, by MacFarland. He tells about making your own tools. So monkey see, can monkey go!! I used old screw drivers to make the tools. An apple box was my first cradle and then the fun began. It was easy for me to learn from reading. This project was one of the hardest for me to checker. The light outside was too bright to allow shadows. The awning on my trailer blocked some light, but I had to use some towels on the sun shade screens to stop more of the light. A 100 watt bulb helped create shadows enough to see the lines. A dark room is much better to use for checkering. A couple of hours a day was all that I could work before tiring out. My cradle is a small simple design and portable. It is a 2X4 oak board at 26 inches long. The pattern used in this project is a simple point design. I used 22 lines for spacing with the MMC power tool and a diamond of 3 1/2 to 1 shape. I have used their tools since the mid '60's for spacing and rough cutting the basic pattern. Carbide cutters are the only way to go if you are a full time stockmaker. I have used the plain carbon cutters, but they dull quick. The carbides are not cheap, but are worth the investment in the long run. I have a box full of the old carbon cutters slightly used for sale if anyone needs them. The point pattern is an open ended pattern which means you can't complete the outside before you get to the area with the spacing. If you cut in the outside lines ahead of the spacing you may find that things don't match up. You can see in the first posting of me checkering where I use a black grease pencil to mark the basic layout lines. My hand tools are made a little larger than the original W E Brownell wood part. I use the Brownell metal parts to hold the carbide cutters which will allow for you to see thru the middle section and watch whats happening. I use a veiner of 90 degrees to help finish the ends up to the outside lines. When I was doing this work regularly I could checker a pointed pattern in 8 to 10 hrs. Now it takes days to complete. This might answer some of the question. One thing to remember is that I only worked on stocks in the off season for a few months each year. I made all styles of stocks and checkered or carved each one myself. General gunsmithing of repairing, warranty work, sales, ordering parts, rust bluing, and regular castic bluing where the main money makers in our shop. | |||
|
| one of us |
CAN YOU BELIEVE THIS;  Take a look at this lathe. Would you use a machine in this condition? You may be surprised about such a machine that had been stored outside. Never say Never!! A piece of junk or a jewel just waiting to be giving a new life. First I tried to find someone in the areas that we travel with a lathe. I went back to the shops that have gunsmiths, but no one could cut the metric threads for my mini Mauser action. I had sold my own machines and didn’t think I would ever make another gun. At the 60 th Anniv. At TJSC my name was drawn out for an award for being there. I got a cap and an envelope with a free Krieger barrel of my choice. I got the 12 twist, #2 , 204 barrel. I bought a blank from Charles Grace and found a rifle a year later. Now who will I get to fit the barrel? Sonny’s RV park in Lexington , Tx was my next stop. I had stayed in this park several times before my mother and dad passed away. The young owners have retired once and then bought the park. He is a hunter and has a great interest in guns of all types. We were talking one day and I told him my story on making a 204 Ruger, but couldn’t find anyone with a lathe. He tells me he will look around town to see if some of his friends can help. One day he called me over to look in his pickup bed. There was this old Atlas lathe that a friend gave him. It had oil all over the bed area. It looked so bad I didn’t think it could be used, but after a few days of cleaning up he asked me to check it out. He didn’t have any experience with lathes. I knew that the old Atlas 1935 yr models could cut metric threads. Gears were missing and several other things, so he contacted his friend and went over to the barn to look around. He found all the change gears along with other parts. Now for a try cut on the 22X1.5 metric to check it out. Checked out Ok on the threads. The alignment of the tailstock to the spindle end was very good. The machine came with a 4 jaw chuck and a steady rest. That was what we needed to do my barrel job. We had to make a barrel vise from scrap steel and cut out some oak blocks to hold the barrel using powdered sugar. We broke about three sets of wooden blocks and the action would not give up. Next we made aluminum blocks to fit the barrel. This was the hardest small barrel that I have ever pulled. It was forced together at the factory that it upset the barrel into the receiver as if it was welded together. Finally when it came off it popped like a 22 LR being fired. At this point I threaded the barrel for a very close fix. That came out fine, but now I had to order the 204 Ruger reamer and go gage from Brownell’s. In about a week I chambered the barrel and as we were going down to his water pond to test fire a round the man who gave him the lathe drove up. He watched as I test fired a factory around. He couldn’t believe that anyone could do what we had done with this old lathe. The chamber was perfectly cut and the case was centered on the bolt without any swelling of the case. My friend watched as I showed him how it can be done with an old lathe. We had several learning times while working on this rifle.  NEVER SAY NEVER!!! The above 3 shots prove that it can be done. Les Brooks | |||
|
| one of us |
Les My main lathe is a Clausing 5900 series and I love it. I still have my first lathe that I bought in 1973 for $375.00. I scrimped and saved for a long time to come up with the money. I was earning meager wages as a lineman and trouble shooter for the local electic utility at the time and gunsmithing at night. It was an Atlas 12X36 inch with 3 differant layers of paint and grease. I comepletely disassembled it, cleaned it, stripped all the old paint, the main bearings had 1946 etched on them. The first lathe I ever ran was that one when I finished restoring it. I rebarreled many rifles and a few revolvers with it through the years. They were all highly accurate. I still have it and use it for small parts. I keep a hollow jacobs chuck on it that is almost collet accurate. Craftsman | |||
|
| one of us |
I am still waiting to get this rifle blued. I may have to wait until I get back into Texas. I am thinking of rust bluing at this time. It rains almost every day in Ruidoso Downs, NM and I I can't get out to try for groups. I have the bolt handle ready to weld on when I return. This is some of my tools used on Mauser bolt handle. The blocks are made from 1 inch square aluminum. These are a must for welding on handles.  | |||
|
| One of Us |
Fantastic post. Thank you for doing this. | |||
|
| one of us |
22WRF, I checked the alignment of the centers first and then used a dog to drive the barrel between centers to thread. Next I turned the shank of the barrel while in the centers also. I used a steady rest to hold the barrel inline for the chambering. I used a three jaw chuck on the headstock end. I tried to show that you can make a good rifle with very few tools and a basic lathe. | |||
|
one of us |
Wow, Les. That's terrific work. Thanks so much for sharing the process and your amazing talent. Kyler | |||
|
| One of Us |
Les, Thank you for an excellent tutorial. The subject matter and timing are excellent. I will be picking up my daughter's Mini-Mauser action tonight that should become a 30BR for deer hunting when she is old enough in a couple of years. I've got a laminated stock to start with, but I plan on letting her pick out a reasonably priced piece of wood and doing a stock from the blank over the winter. I'll even be chambering it on my 12x36 Craftsman because of it's metric capability. Greg | |||
|
| new member |
Les Brooks Don't know if you remember me. It has been a long time. I have your CD you sent me with a bunch of your gun smithing stuff on it. I had it out and installed on my new PC just last week. I really like looking at it. I think we met on the old GO-GO Varment GO web board. I now have a pretty nice home metal shop and really do a lot of work out there in the winter. I am in the process of making a copy of Bill Webb's rifle barrel machine. Glad to see you are still at it. Steve PS my first lathe I got is the same model as the Atlas above. I still have it it does things my big Grizzly doesn't. | |||
|
| one of us |
Buckrun, I don't remember you as Buckrun. Would you send me a PM and I will see if I can find your file. I am waiting to rust blue the project. The tank will be outside under the Oak tree this week if the weather holds for some cooler days here in Texas. I sent out several USB drives starting in Jan. this year. The info has been updates with about 2 1/2 hrs of video showing how I worked. The CD's had some problems with not working on all the different systems. When I switch over to the USB SanDisks it worked very well. | |||
|
| one of us |
It is cool today and the rust bluing has started. Again my only machine is the 3/8 in drill motor for cording off the rust. I ordered the 6 in.X 3/4 in. stainless wire wheel and Brownell's rust blue so we are hard at work under the old oak tree making rust. I found a stainless pan for a couple of dollars at a junk store. I had to degrease with hot soap and used the burner from my gas grill for the heat. I adjusted the speed on the drill motor to about 1700 rpm's. It is working great. The rifle can be blued without a $300 dollar set up. This is a project to show how you can make a hunting rifle yourself and do most of the work at home. It will take a little time for you to read articles on Brownell's site and order your supplies. | |||
|
| One of Us |
Which blue method? | |||
|
| one of us |
"It is cool today and the rust bluing has started" ______________________ Always remember you're unique, just like everyone else. | |||
|
| One of Us |
I shall restate it for you, more properly, as there are a number of options. "Which chemicals from Brownells are you using?" There's more than one option in the Brownell's catalog. | |||
|
| one of us |
Guys I am using the Brownells Classic Rust Blue. I find that it is working best by coating the metal and let it hang over night. The next day I have been firing up the pan with tap water and heating up close to 212 degrees. The conversion to black oxide is about normal for a rust blue application. Some parts are harder to rust so they get a wet paper towel in the bottom of a rust pan with a couple of layers of paper towel for the parts to rest on. I leave these over night and then they go into the boiling water. About 4 coats seem about right for my rifle. There is not an easy way to do rust bluing. It is a way for the person who wants to do some bluing a way with out having a lot of investment in equipment. If you want a perfect job then pay someone a $200-300. This is a crude way to blue, but it works. I sure miss my shop which had all the proper set up for bluing. | |||
|
| one of us |
Les I'm really enjoying this series of posts about doing good gunwork with minimum tools. When you rust blue, what method of protecting the bore do you prefer? Craftsman | |||
|
| one of us |
Craftsman, I grease the barrel inside and use a wooden dowel in both ends. Find a dowel with long grain running through the length and this will allow some of the pressure inside to escape. Plug before you degrease with acetone. I do not blue the end of the barrel crown. This will help keep the rust blue solution away from the inside of barrel. Blowing a plug out can be dangerous. Anyone using my info on rust bluing will be used at their own risks!!! | |||
|
| one of us |
P-Man, yes many different chemicals but generally rust blue as a process is considered generally the same regardless of which brew one uses to create rust whether it store bought or made at home. ______________________ Always remember you're unique, just like everyone else. | |||
|
| one of us |
Les What is your opinion of using laquer or varnish to coat the bore and not plug it? Craftsman | |||
|
| One of Us |
Just was curious. I have a limited shop so I've been mostly using oxpho (somewhat out of laziness). But I figured Les would have gone through all the commercial possibilities, as well as home made, being as he's been at this rather quite a while. | |||
|
| one of us |
The bolt is finally welded on the stub. This is not a 100& weld as some may have read a post on welding bolt knobs sometime back on the forum. I used a small 120 volt welder at 70 amp. and a small rod. This can be done if you watch the weld area and file out the carbon and reweld. It takes a little longer, but it did withstand the hitting test on the bench after I filed it down. It will need to be blued and then I should have the rifle completed. Notice the weld jig which is a couple of 1/4 in plates to line up the handle and I use a plier to hold the knob until it is stuck on one side.   | |||
|
| one of us |
Les, I am in awe of your talent and artistry. Thanks so much for posting this project. It would certainly be a thrill to sit down with you and pick your brain. Have gun- Will travel The value of a trophy is computed directly in terms of personal investment in its acquisition. Robert Ruark | |||
|
| One of Us |
Les thanks for such a great resource, Ive just found it!! Im trying to restock a rifle of mine for the first time, and Id really appreciate a couple of pictures and a more detailed description of how you inlet the barrel channel and action, if this would be possible? I dont get how you can end up with a semi-circular barrel channel using straight chisels and straight scrapers etc?? Thanks! | |||
|
| One of Us |
Les, I would like to thank you for posting this thread! I find myself looking at it and reveiwing it just to see if I've missed anything. It just amazes me how you can build a stock off the tailgate of your pickup! You are truley a master at your craft. | |||
|
| one of us |
Les..... I've been on these gunsmith internet forums since the days of "WebTV".....I try to learn everything I can and use much of it in my hobby of gunsmithing. It is simply amazing, and very humbling, to see what a true master of his hands can do on the tailgate of a pickup truck, with tools he made, and tools he scrounged....using a gas grill for heat, an old bedpan and a hack saw. If I didn't see pictures I couldn't believe this rifle was created under these circumstances. Now .... That said, how do we get one of those USB drives you speak about. I can't imagine the knowledge contained therein. Please email me if you like rvb100@comcast.net Roy B Dartmouth, MA | |||
|
| Powered by Social Strata | Page 1 2 3 4 5 6 |
| Please Wait. Your request is being processed... |

Visit our on-line store for AR Memorabilia