 Rifles Wildcats And Their Development
 Go | New | Find | Notify | Tools | Reply |
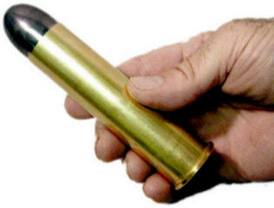
| Odd caliber? | Login/Join |
| One of Us |
Is that mark in the center of the bottom of each bullet from using the cannelure tool? | |||
|
| one of us |
No! That is a manufacturing characteristic of the bullet, thank Barnes for that RNSP-Holy-Base design. This suggests a copper tube that is open at both ends until hammered and swaged and beaten closed at the base, forming a cup that is filled with a piece of lead wire and then beaten about the nose until the RNSP with exposed lead is formed. Not bonded. It is really more of a pinhole with a big round lead smear extruded from it in the forming process. Note the vintage on the box label? 1996. I have some older than that also, .458/600-gr Barnes Original RNSP, and those look more like pinholes in the copper jacket at the base with no lead smeared out of them. I forgot I had been diddling with 50-cals that long ... and it took so long to get a canneluring tool, a recent development for me ... The CH4D cantool is the best little handtool going. | |||
|
| One of Us |
Thanks Rip! I did notice the date on the box of bullets but I didn't want to remind you of your age! I am so close to getting this thing shooting that it's killing me waiting for it to come back from having the front sight base and quarter rib installed and then everything bead blasted and blued. I know it will be here soon enough but it sure will be nice to finally get it all together and shooting. What a heck of a learning experience. I think I am going to get one of those Cantools so that I can load the 400g bullets a little longer, when the time comes, and see if I can hit that magic 2400fps mark, just for the heck of it! | |||
|
| One of Us |
RIP, Thinking ahead, I've been thinking about having a custom mold made for hard cast gas-checked lead bullets (I didn't draw the gas check on my model because I want to wait until I hear from the guy that makes the molds to tell me what the dimensions are). This is a lead bullet I modified from a drawing on the accurate mold site (a 405g 405 Winchester bullet), to get the crimp groove where I need it for this case with a 3.300 OAL  Here sectioned to show case capacity thoughts:  What y'all think? | |||
|
| One of Us |
Well now - I need to figure out what alloy to use for casting hard-hitting hunting bullets that will stay together for this thing??? The mold maker needs to know what alloy I will be using. Any thoughts? | |||
|
| one of us |
That is nice. I settled on Lyman No. 2 alloy. 90% lead, 5% tin, 5% antimony. Drop them from the mould into a bucket of water and they are plenty hard enough for 2100 fps, but not so brittle as to shatter on impact. Lessee where my .396/410-grain recovered bullet pic is ...  Middle boolitt above is Lyman No. 2 alloy, .396/410 (LBT mould) called LFN-GC, custom made to fit my throat, same on all my .395 wildcats. It was shot into water buckets at 25 yards, at 2150 fps MV. The muzzle-loader bullet on the right is a copper-plated lead 50-cal that was shot into same test media (water buckets) at about 1900 fps at 25 yards impact. The only fragments I found of it are shown above. S&H Brass FN (.395/330-grain) on left was shot into alternating boards and water at 2800 fps MV, 25 yards impact.  Fireforming loads for 9.3x74R to "400/.395 NE" ... using both cast bullets and S&H brass SHARRC ...  LBT mould used to make them:   Relaxing with an audio book while casting ...  That is wise of you to get the gas check figured out before making the mould. I was told by LBT that .416 gas checks would work. They did not. I ended up making do with Hornady .375 gas checks flared out with the blunt end of a punch (punch in reverse) until I got the proper size from a gas check maker in Louisiana.   Above is the make-do .375-cal gas check from Hornady used on the .396-cal lead boolitt. I have proper gas checks now. I can look up the contact info on that gas check source if you need it, if it might help. IIRC, same one worked on Rusty McGee's .412 bullets for 400 Whelen. | |||
|
| One of Us |
RIP... I sure wish I was your next door neighbor! I read on Accurate Mold website that the Hornady 416 gas check should work for a .413 bullet. Do you concur with that? Do you have a preference for one mold maker over another? Thank you again, sir. | |||
|
| one of us |
Steve Brooks of Brooks' TRU-BORE Moulds is a favorite. Design your own there, like my ~1400-grain 12 Ga slugs, and ~900-grain 20 Ga slugs, depending on alloy: http://brooksmoulds.com/bullets.php Veral Smith of LBT (Lead Bullets Technology) is great when not in the hoosegow for tax evasion, excellent mould (above), but he did mislead me on the gas check recommendation. http://www.lbtmoulds.com/ Veral will send you a lead slug for slugging your throat and he will make the nose portion of the bullet fit your throat. That is a worthwhile refinement. Fit of gas check depends on the dimensions of the base of the bullet, and with a standard caliber (like yours) they (mould makers) really ought to be able to tell you correctly. Should be purpose built for fitting a certain gas check. My .396 was an oddball, though NEI does make a .396/250-grainer non-gas-check that can be bought off the shelf. .416 gas check on a .413 bullet sounds close enough that mould maker really ought to know what he is talking about. Should not be an afterthought recommendation as the mould is being shipped to you. NEI Handtools: http://www.neihandtools.com/ http://www.neihandtools.com/catalog.html  You will need proper sizing and lubing of bullet, so your mould needs to throw a bullet diameter a few thou larger than you want it sized to. A .415"-diameter would be ideal for sizing to .411" to .413" diameter finished bullet. You want the finished bullet about 0.001" greater diameter than your barrel's groove diameter. As cast with Lyman No. 2 alloy will be bigger diameter and slightly lighter than either Wheel weights or pure lead, and harder but not too brittle. Hint, hint. Lyman. SAECO. Hoch. Lee. Brooks. LBT. NEI. And an obscure British maker of roundball moulds. I have moulds from all of the above. I have not used Accurate Molds (the other way to spell bullet mould) Weight quoted in wheel weight alloy? I would use wheel weights in handguns but Lyman No. 2 for rifle. Hint, hint. http://www.accuratemolds.com/index.php  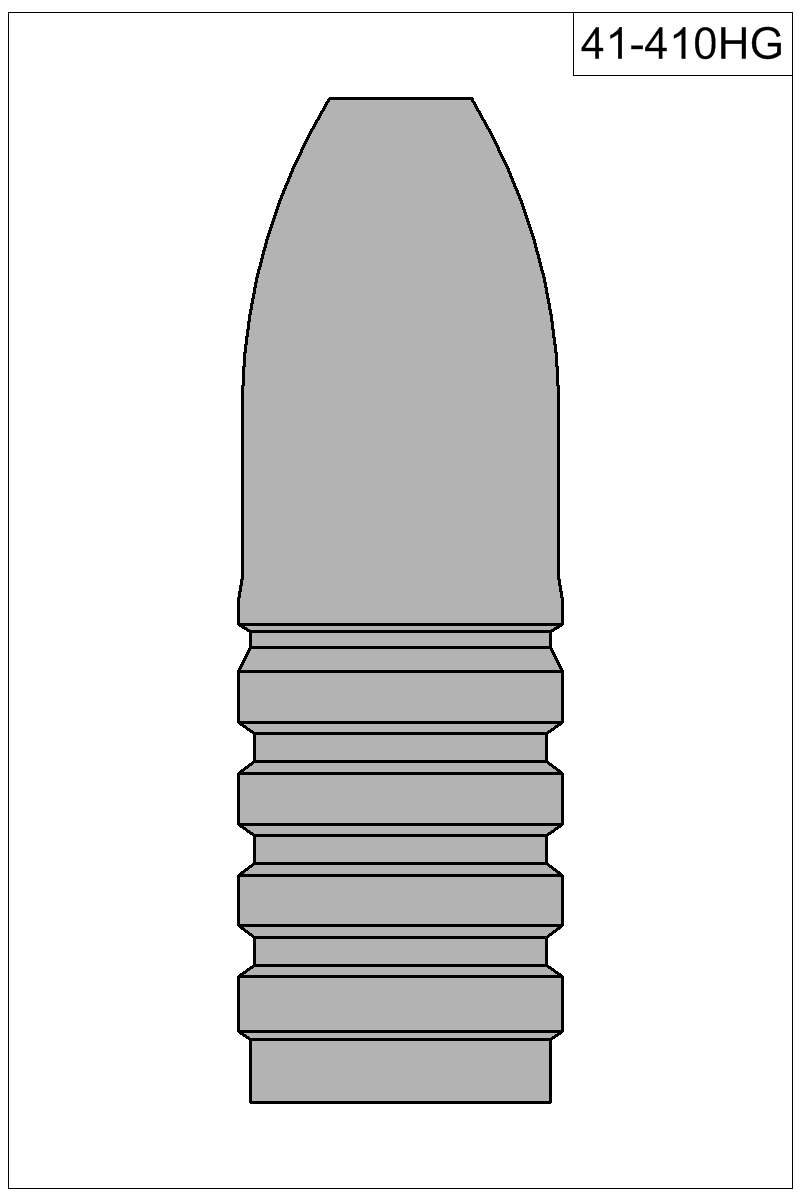 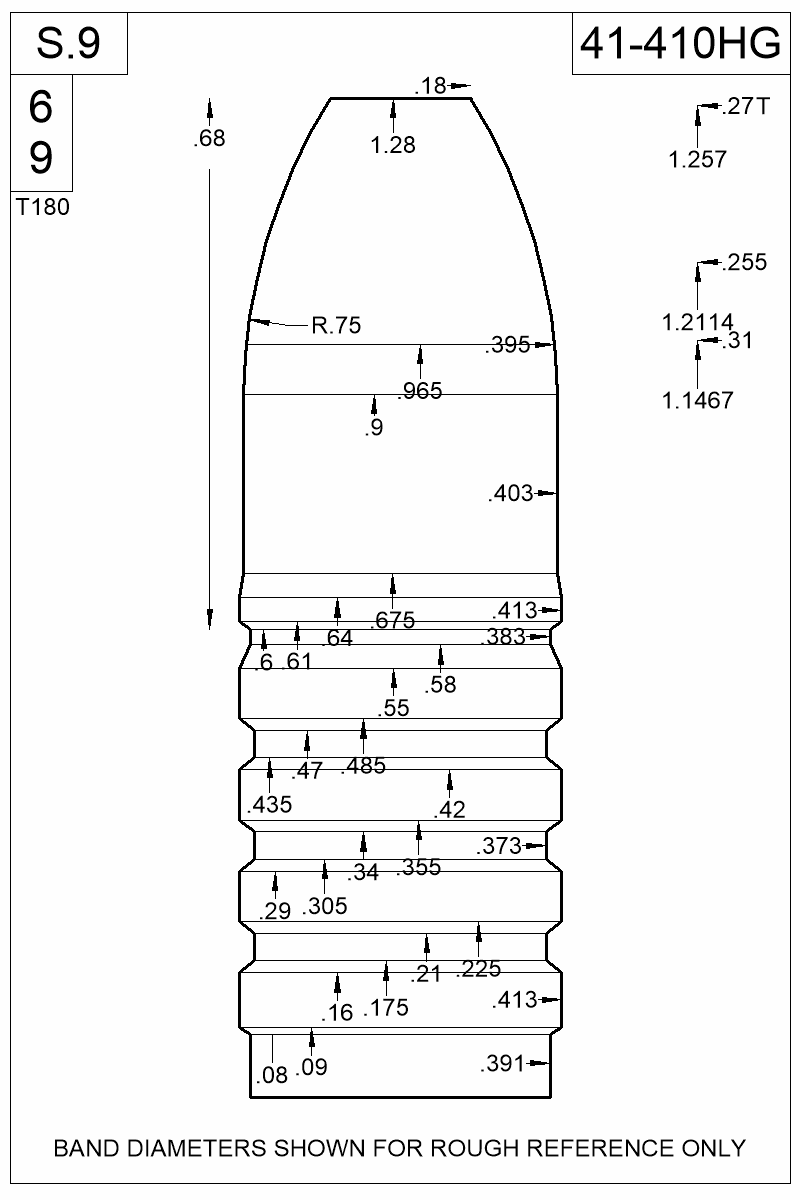 Lessee what mould pictures ... Brooks' TRU-BORE are iron blocks (LBT moulds are aluminum blocks) 12Ga:  Brooks' TRU-BORE 20 Ga:   British Brass mould for .617" lead balls for 20-Ga:  Off-shelf Lyman iron block mould:  | |||
|
| one of us |
Here is a .511-sized/777-grain gas-checked bullet from an off the shelf NEI Handtools mould (aluminum block) that fit a Hornady "50 Cal." gas check perfectly:  But beware, the NEI catalog indicated bullet weight was supposed to be about 680 gains, not about 780 grains!  That is not just an alloy difference. It is a typo! Casting in Lyman No. 2 made it larger diameter enough to be sizable to .511" diameter. | |||
|
| one of us |
Good gas check sizing resource: http://www.lasc.us/CheckShankSize.htm includes this drawing explained there:  Refer to table there to pick out gas check size needed depending on measured diameter of bullet base where the gas check fits. Gator Gas Checks, AKA: Bullet Swaging Supply, Inc. P.O. Box 1056 303 McMillian rd. West Monroe, Louisiana 71291 USA Phone: (318) 387-7257 Fax: (318) 325-7034 I got my .395-cal gas checks there: Size 41BSS (see table) fits a maximum shank diameter of .378" with a "very thick" gas check. Perfect on my LBT LFN-GC of.396" diameter at bearing bands, and rebated base to fit the gas check. | |||
|
| one of us |
The Accurate Molds bullet below has a diameter 0.393" where the gas check goes (max shank diameter). From the gas check table above (Gator Gas Checks), the normal .416 Rifle gas check would be the one to pick. From table: Caliber: .416 Max Shank Diameter: .393" Caliber Description/Dimensions: .416 Rifle Normally I assume the readily available Hornady ".416 Cal." gas check would be the same size as the one from Gator Gas Checks. Trust but verify. | |||
|
| One of Us |
The only bad thing about you, RIP sir, is that you make it impossible to EVER be able to thank you enough for your time and your generosity. Now I have to read all of this a few time until it sinks in, make my drawing, send it to the MOULD maker | |||
|
| one of us |
$67.99 at Midway USA: http://www.midwayusa.com/produ...-lb-furnace-110-volt  From the BPCR forum here:
Last paragraph in the linked article above: "BTW, if you are considering purchasing an expensive pot, you can save a bunch of bucks by going with a Lee pot and using a PID. The result will be a casting setup that provides much better temperature control and more benefits than expensive pots." I have found the 20-pound Lee "Pro 4-20" pot is a best buy. Lyman 20-pound "Mag 20" I have also, over-priced at $340. Both are bottom pour and have the crude thermostats you have to watch with an RCBS "Lead Thermometer" in pot. I have found that using a Lyman "Lead Dipper" to hand pour from pot to mould is best for quality control. I started off with the nifty-keen bottom pour but just found fewer culled castings to be thrown back into the pot by using the dipper. Now if I can figure out where to get a PID and get it in series with the electric supply to the Lee Pro 4-20 pot ... But you can do some excellent casting from a cast iron pot over a Coleman camp stove or the propane side-burner on your backyard grill, with a good thermometer in the pot and adjustable flame to pot. Ladle poured, forget the bottom-of-pot pour stuff. Water drop into a 5-gallon bucket, Lyman No. 2 Alloy. Flux with some Brownells "Marvelux" which I suspect is just boric acid cockroach killer. Get a "Lyman Cast Bullet Handbook" and get inspired. Making your own bullets is satisfying. | |||
|
| one of us |
BTW, my recipe for making Lyman No. 2 if you don't order it from Midway or other supplier: Lawrence brand "Magnum Shot" bought in 25 pound bags: I use #7-1/2 bird shot, "seven and a half," because it is so useful to have on hand for loading my shotshells for squirrels and such. This "Magnum Shot" is 95 % lead and 5 % antimony. For each 10 pound batch of Lyman No. 2: 1. 9.5 pounds of above "Magnum Shot", plus 2. 0.5 pound (8 ounces) of 95/5 (tin /antimony) "Lead Free Solder." Melt above two ingredients in pot, double the recipe for 20 pounds. Mix well, flux with Marvelux while stirring and getting up to temp of about 750 degrees. My BHN test of this alloy after water drop into 5-gallon bucket was BHN 15. Hard enough and not too brittle, for 2100 fps impact on water buckets, and that is a severe test of a cast bullet, more severe initial impact than ordnance gelatin or wet newsprint. That is a trustworthy recipe, about as pure as driven snow. I do not trust Wheel Weights (WW) except as a 50/50 mix for low velocity BPCR bullets, but I prefer 30:1 lead/tin for that. Or just pure WW for plinker bullets, handgun bullets. WW are like a box of chocolates, as Forest Gump would say. Stick with one alloy per pot. I have separate pots for each alloy: Lyman No. 2 30:1 Pb/Sn WW 50/50 WW/Pb Pure lead. Get a new pot for each alloy you use so as not to pollute a batch, and the last batch remnant can be left in the pot, cooled and hardened, ready for mixing with next batch heat-up, if you did not make ingots of all of it. I could use Lyman No. 2 for everything. One alloy, one pot. | |||
|
| One of Us |
I ordered the Lyman book, and one of these: http://jconninv.com/kit.shtml I will order some Lyman #2 once I get a mold! Can't wait to explode some water jugs! | |||
|
| One of Us |
Well, here's my drawing - the mold maker will do the lube grooves per his standards.  With the positive tolerance on the O.D. it should size to .413 nice? This will give me a 400g bullet (actually 404+ grains with gas check but my calculation is for pure lead, not Lyman #2 alloy - but it should be close) that fits the bore with +.001 and a 3.300" OAL cartridge with max case capacity. I have to wait to hear back from Tom at Accurate Molds for any final thoughts, and then should be good to go forward. | |||
|
| One of Us |
Wow Tom at accurate molds is even faster than me http://www.accuratemolds.com/b...bullet=41-400L-D.png  | |||
|
| One of Us |
Mold ordered -- I ordered it with a .414 OD with a +.002 tolerance so it will size to .413 nice and shiny all around! | |||
|
| one of us |
Excellent. | |||
|
| One of Us |
WOW - I just got an email from Accurate Molds -- my mold is on it's way! | |||
|
| One of Us |
Just killin time between work tasks -- I cast a bullet with my chamber casting material just for the heck of it! My custom 400g FN LGC next to a 400g Woodleigh  | |||
|
| one of us |
Cool! Chamber-casted your mould! What is the chemical composition and how much does it weigh in this unusual bullet alloy, and what is the diameter on the driving bands and diameter of the gas check shank? Just checkin'. Always interesting to compare as-cast diameters of different alloys in the same mould. | |||
|
| One of Us |
Rip -- I do not know the material composition, all I know is that is Cerrosafe chamber casting material from Brownell's and the cast bullet from it weighs 365.74 grains. Per the Cerrosafe instructions, the dimensions will change over time, but will be accurate at 1-hr after casting. At that time the casting measured .415 OD -- perfect to size down .002 to .413! Looks kinda cool - rifle should be coming home soon! From the gunsmith on 9/15 - drilling and tapping!  | |||
|
| one of us |
Yep, love it when it all comes together. http://www.amazon.com/Roto-Met...-Alloy/dp/B00B1U540Y Supposed to be identical to Cerrosafe: by Roto Metals Chamber Casting Alloy Product Description Sold By the Ingot Approx 1 pound Rotometals Chamber Alloy (158-190) is the best known material from which to make a casting of the chamber and throat of a firearm to determine caliber or check the dimensions. It melts at a temperature just above M&M's, so all you need is a propane torch and a bullet casting ladle. It can also be used to make a cast of a dovetail slot or any other hard to measure area. Also, it is great for removing the front half of a case from the chamber, in the event of case head separation; and lots of folks cast a small portion of the barrel to determine bore diameter. For best results, measure the casting one hour after casting. Contains, (42.5% Bismuth, 8.5% Cadmium, 37.7% Lead, 11.3% Tin). Technical Information Basic Instructions Plug the bore immediately ahead of the throat of the chamber using a small cleaning patch. Pour the alloy directly into the chamber until full and allow it to cool, it will turn a shiny silver color. As soon as it has cooled enough that it is no longer a liquid (and doesn't present a burn hazard), remove it from the chamber. Take care not to overfill the chamber as the alloy will then run into the locking lug area, making removal extremely difficult. During the first 30 minutes of cooling cerrosafe shrinks. At the end of one hour it should be "exactly" chamber size. Notes Melts between 158 and 190 degrees Fahrenheit Should be melted in a clean iron ladle without direct flame on the product. The chamber being cast should be cleaned thoroughly and a thin coat of oil or graphite applied. Contraction expansion factor versus time, measured in Inch per inch compared to cold mold dimensions. Test Bar x x 10 2 minutes - .0004" 6 minutes -.0007" 30 minutes -.0009" 1 hour + .0000" 2 hours +.0016" 5 hours +.0018" 7 hours +.0019" 10 hours +.0019" 24 hours +.0022" 96 hours +.0025" 200 hours +.0025" 500 hours +.0025" | |||
|
| One of Us |
It's on the way! | |||
|
| One of Us |
OK maybe not the best photograph I've ever taken but, you get the point!    Now on to phase 24-69.32b | |||
|
| one of us |
Nice! Some iron sight inserts and a scout scope in QRW rings and go shooting! What joy! I need to go pack my gear for some shooting tomorrow. Something a little more modern than this, my oldest original antique working rifle, a 50-70 Govt., though it is a lot of fun too.   | |||
|
| One of Us |
RIP, You must have the most understanding wife that ever lived -- you have more cool toys than anyone I've ever met! I am going to try to hit the range next week just to fire-form some more brass! One thing I noticed that seems a little strange -- your brass that had been fire-formed and sized, slides right in (that sounds weird), but the NEW cylindrical brass that I sized with the same die, it real hard closing the bolt -- it will close, but you have to lean on it a lil to get it to. That seem normal to you? [edit] Could be that crimping the sized cylindrical (but not fore-formed) brass, ballooned the case a wee-tiny bit just enough to make the last half of the bolt rotation rather snug? I double checked my trim length and everything looks good. | |||
|
| one of us |
Did you have the die screwed down to contact the shell holder firmly for the initial forming, with the cylindrical brass, in the FL sizing die? Could the neck wall thickness be different with a different batch of cylindrical basic brass having been used? O.D. of necks of both batches same? Belt/rim/head measurements on both batches within tolerances? Then move on to case body and shoulder diameters comparisons ... You could use a blunt-tipped permanent black marker (Sharpie) or "die chem" to paint the entire loaded round and see what is rubbing? | |||
|
| One of Us |
Thanks for the direction!  I Dykem'd a loaded round from the newly FL sized cylindrical brass and (at the very tip of the arrow - I'm not sure how well you will see in this photo but it does circumnavigate the entire shoulder) can see where the brass is snugging up to the chamber! Almost like shooting a factory round in an Ackley chamber? Now to clean all that Dykem off... | |||
|
| one of us |
Dykem If that is all it is, go ahead and fire-form it. Then re-size and see if there is still resistance. Looks like it is only "double-headspacing" on shoulder as well as belt. Safe! Grinding/filing/polishing a few thou off the face of the shell holder will allow you to bump the shoulder back a bit. Some shell holders are thicker there than others. Or did you leave some room to screw the die down tighter against the face of the shell holder with your first pass? Might be as simple as that, screw the FL die in another eighth or quarter turn? | |||
|
| One of Us |
Tomorrow or Wednesday I am going to go run what I have loaded through her to get a good batch of brass. My front and rear sight inserts are being machined (I ordered 2 sets) so probably a week or so before I see them. I will install them but not file them until I get the scope installed and have a load worked up that I want to regulate the fixed sights to. | |||
|
| One of Us |
Oh well, I guess it was good while it lasted... The machinist that made my scope base and front sight ramp must have decided that he's graduated to Wall Street - the price he gave me for making my front and rear sight inserts was as much as for the scope base. He went ahead and made them on an EDM (which is ridiculous money to run), scrapped about 3-sets, and then sent me an email with a price that made me spit my coffee out -- without even the courtesy of giving me a price before he started the parts (I would NEVER have agreed to EDM because I know the price is stupid for what I need). I told him to keep them. I really have to get myself a small milling machine so I can do this stuff myself. | |||
|
| One of Us |
Leupold 2.5x28 Scout Scope delivered -- QRW rings will be here Saturday. I cannot fricken wait!!!! I might order me one of them Bell&Carlson stocks -- they look pretty nice with that aluminum block in them... | |||
|
| One of Us |
Ready to shoot this coming week!  Pretty sure I am going to order a Bell&Carlson stock for it - I just don't want to mess with finishing the wood. I can always finish the wood stock some other time if I ever get the bug to do it... | |||
|
| One of Us |
Can you believe that the Tasco bore-sighter I've had for some time, does NOT include a .40-caliber barrel insert... Anyways, got my chronograph out of storage - like to see how close my loads are to QuickLoad predictions. | |||
|
| One of Us |
I’m not sure I’m going to be able to handle this rifle…  Rifle weighs 9-lbs exactly – it kicks like a mule and this isn’t even close to max loads with the 300g bullet; I can’t even imagine what a 400g bullet is going to feel like! I’m going to need one of them slip on sissy pads before I can do any more load work - or maybe a lead sled! Any suggestions??? Nevertheless, pretty good guess on the scope base, huh? | |||
|
| one of us |
Hi QK, That is a great start for a test load. Very promising. I see the QuickLOAD velocity, equivalent to .375 H&H, 300-grainer at +2500 fps, but did you chronograph it? My suggestion is to back it off to about 2200 fps for the 300-grainer, make it equivalent to a .405 Winchester, for some fun until you get toughened up, or better padded. Use a slip-on pad, or a PAST pad, or a bag of lead shot between the rifle and your shoulder for long strings at the bench, sighting in and chronographing. Shooting standing, offhand or with sticks, at paper targets makes it a lot softer, and you won't even notice recoil if hunting. Of course the sport of big bore benchrest is a great challenge, competing with yourself for personal best, until you can get three shots into less than 0.200" at 100 yards. That is sufficient. Be sure to hang onto the rifle properly, with both hands, not like the small bores. To paraphrase my post on another thread: I am always amused when I see the small bore and rimfire bench shooters with no grip on the forearm at all, maybe with the offhand curled around the rear bag at the buttstock, and contacting the rifle only with trigger hand, cheek and shoulder. Maybe I need to try the one-handed technique on small bores, and I think I must, to try for sub 0.1" groups at 100 yards. So far it has been hard to break my habit of holding on tightly to the forearm with the offhand, something I did instinctively, or learned from reading Elmer Keith in my youth. Tips for sub 0.2" 3-shot groups at 100 yards with your 404 Express FNB: 1. Set the front rest and rear bags as tall as they will go and still allow easy sight alignment with rifle at rest before you grip it. A taller bench or standing rest is not always available. A shooting posture should be upright as possible whether sitting or standing. Do not lean forward into the rifle or crawl the stock or crane the neck, keep head upright and maintain eye relief enough to see the bullseye, don't worry about getting the full field of view. 2. Rest the forend of the rifle on the front rest as far forward as possible, short of placing bare barrel on rest. This gives more room for gripping the forearm as far forward as possible. 3. Grip the forearm firmly and as far forward as comfortable for you. This gives mechanical advantage to the grip on the forearm for control in recoil. Really powerful rifles have to be gripped with a thumb over the top of the barrel, offhand fully wrapping the forearm and barrel together in hand, to prevent torque from making the rifle jump off the front rest and lay over on its side. The one-handed benchrest shooter might be surprised by a first encounter with a 577 T-rex shooting a heavy bullet and a full load of proper powder. I was! 4. Get a small sandbag, folded towel, or foam rubber pad under your elbow of trigger hand, and also similar padding under your offhand forearm/elbow and rest both arms comfortably on the shooting bench. 5. Use a PAST pad or folded towel or extra slip-on recoil pad at the bench, or sandbag or bag of lead shot between rifle and shoulder. The extra LOP created is not a bad thing here. The shoulder bruise prevention and Weatherby eyebrow prevention are good things. 6. Pull the rifle firmly into shoulder and down onto the bags, gripping with both hands in simultaneous coordination, and bunch up the pectoral and shoulder muscles behind the butt of the rifle. Cheek on the stock lightly, head upright, not a "weld," acquire the sight picture. 7. Concentrate on consistency in everything, same as last shot. Trigger finger is the only relaxed part of body just before the shot. Start the breathing-and-heart-rate-control meditation thing before willing the trigger to break. Ommmmm ... Riflecrank Internationale Permanente NRA Life Benefactor and Beneficiary https://home.nra.org/ | |||
|
| One of Us |
As always, RIP, thank you for your incredible generosity. This rifle would not be what it is today without your help. Big bore benchrest? Hmmmmm... My lead sled will be here today, I am going to start off with 10-lb weight to see if that is bearable. I've heard talk of folks splitting stocks using lead sleds so I am hoping that is because they used far too much weight. I also ordered a PAST pad - the heaviest one they make Did not chronograph yet, just wanted to scout out the new shooting range so didn't know what to expect but next outing will do! If I were to start loading down to lower velocities how would I determine a minimum safe load? | |||
|
| one of us |
It is great to see an obscure wildcat brought back to life, especially one that is so efficient at equaling or surpassing many of the old standard DGR cartridges. If you are using Varget at about 99.4% fill (76.0) grains and getting about 2500 fps with the 300 grainer, I estimate an 85.0% fill (65.0 grains) will give you about 2200 fps. Perfectly safe to use 85% loads with Varget, commonly done. No filler needed, but might not be as accurate. You can use a filler for more uniform ignition and better accuracy. 4 or 5 grains of Dacron fluff balled up and pressed over the powder with a pencil eraser or dowel, then seat the bullet over that. You can use a filler with Varget and it will be like a common loading for the Nitro Express doubles. Less recoil than using a slower powder with a heavier charge weight for same velocity. Better filler, what I use now, is the foam backer rod used in caulking. A 1/2" long cylinder of 1/2" foam rod ought to do. Might weigh one grain, if that. Get a little package of that from Menard's, Lowe's, Home Depot, or local hardware store for a couple of bucks. Cut plugs from that with a sharp blade. It vanishes on firing. The Dacron fluff produces a little blizzard with each shot. Or if you want to get really low velocities, try AA 5744. No filler needed even with a half-full case. It is a powder standard for reduced loads using no fillers. Try a 1/2 to 2/3 fill of case with current bullet and primer. Might be about 1500 fps for some really light plinking practice. Chronograph anything you do, including that first load. And BTW, aren't you supposed to start low and work up, not the other way around? Maybe you will be publishing all this in a gunrag, need chrono data for that. | |||
|
| Powered by Social Strata | Page 1 2 3 4 5 6 7 8 |
| Please Wait. Your request is being processed... |

Visit our on-line store for AR Memorabilia